Introduction
Hello! This is a guide about how to survive in the tour Mecha Engine. Both of us have played hundreds of tours in Mecha, and both spent a lot of time recycling/repeating (in which we play missions and don’t use up our ticket). Furthermore, we have both spent most of our time solo, so we’ve got a decent amount of experience under our belts when it comes to clearing waves without the help of other experienced players.
We will try our best to run over advice for each wave of each mission for each class archetype. It is heavily advised that you have some grasp on how MvM works as we will not cover base mechanics such as the bomb and loot.
Any feedback and positive criticism is greatly appreciated!
A word we would like to give before any MvM advice is that yes, there will be problems and chaos when playing with other people you don’t know. People will disagree, people will get toxic, people will call each other names. It is simply the nature of the internet and the nature of animosity. Even on the comments of this guide there will most likely be some sort of heated toxic disagreement. It is important to maintain your composure and you know, the mute button is always available.
Sniper in Mecha
Sniper is incredibly strong on MvM in general but on Bigrock maps he is by far the best performer, allowing your whole team to not have to play the game (being that there is no tank to deal). By abusing nav_mesh and robot aggro, the Sniper could stand in a place where he is untouchable and won’t be target, being supplied by ammo by a Engineer who knows where to put his Dispenser.
With that in mind, this guide will NOT be covering how to play Sniper on Bigrock maps due to him being so powerful it might make the game boring for your teammates. If you’re still interested in how to be as good as those Snipers you see on Bigrock that even tell their teammates to go idle, you should check this guide. It was made by two of my mentors, so I give it a lot of credibility.
https://steamcommunity.com/sharedfiles/filedetails/?id=2458607661 Even with how powerful he is, it’s not that simple as a newcomer to hop in and play as him, so if you’re up to playing Sniper, know your team is relying on you to hit those precise shots when it matters.
Team Formation pt.1
On Mecha and specially on Bigrock, team formations can work out in many different ways due to it being the missions where you start with the most amount of money (1200 on Bone Shaker, 1500 on Broken Parts), a lot of classes become viable compared to tours where money is scarce such as Gear Grinder. A good team formation revolves around having Power Classes, Medic Pickers, Money Collectors, Tank Busters (when there is a tank), and a Support. A good team formation to follow is to have 3 Power Classes, a Medic Picker, a Money Collector and a Support (being the Engineer).
Power Classes
Power Classes fall in the category of team members who are able to dish out not only single target damage but also crowd control with some added bonuses, be it tanking or giving allies buffs. In general, good classes that always help the team out.
Soldier is an incredibly powerful class on all missions of Mecha Engine. The only wave he doesn’t perform as well is wave 1 of Disintegration, due to the low starting cash, but afterwards he is a staple. On the Bigrock maps, when paired up with the Beggar’s Bazooka and proper banner usage he becomes unstoppable. The choice of which banner to use comes to personal preference, but for newcomer I’d heavily advise using the Concheror, since it will help minimize deaths and maximize aggression.
As far as Beggar’s Bazooka upgrades go, you want to prioritize getting a single point of Rocket Specialist for the whole mission, since additional points only give you splash radius and rocket speed, and a singular dot will give you the damage bonus for direct hits and the stun which is incredibly important. Afterwards, get a balance of damage and reload and with proper tap firing technique, the only upgrades of importance left to buy will be Ammo Capacity and Health on Kill. With those upgrades, feel free to invest in Resistances, Crit Canteens for Tanks, and Banner Upgrades. With his damage output, he can even deal with Uber Medics on some of the latter waves.
One of the greatest abilities that the Soldier has is being able to deal incredible damage not only at robots, but also at Tanks. This proves to be very valuable in waves such as Broken Parts wave 2 and 6, Bone Shaker wave 4 and 7 and Disintegration wave 5, so you can usually stack up on Soldiers and have 2-3 and still perform just fine on all waves. Just be careful on Bone Shaker wave 5 and 6; Broken Parts wave 3 since those have Pyros with reflecting capabilities.
Heavy, similarly to Gear Grinder is still a potent option to go with but is not as favored as Soldier due to various reasons, mostly being the good amount of money that you can start with in the Bigrock maps. Don’t take this as saying he’s not as viable, but on Tank waves having at least one Soldier is favored. Heavy is equipped with powerful close-range damage and being able to tank a lot of damage, so if that’s the way you prefer to play, he’s still an incredible option. With resistance upgrades and a good Scout to keep the enemies milked, he’s able to sustain any type of damage, even Sentry Busters!
He’s incredibly important for knocking out Giants with more ease due to his consistent damage output and tanking capabilities, but when we’re talking about overall versatility, the Soldier will usually do a better job due to splash damage and being able to deal with tanks.
Medic Pickers
Medic Pickers consist of classes that can in their own way deal with Uber Medics or Giant Medic before they use Uber, helping your team not have to tank ubered robots. Very important in Bigrock missions.
The Demoman is one of the more privileged classes on Bigrock due to a position popularly referred to as “Demo Rock”. It’s an area where he won’t usually get aggro’d on and has an ammo pack nearby with a good sightline and able to shoot the stickies down without a worry in the world, specially if your Engineer sets you up with a Two-Way Teleporter nearby, you can spam Crit Canteens and one shot many giants on your own.
When upgrading Demoman, you should only focus on your Scottish Resistance starting off with Damage and Reload Speed, focusing on Firing Speed, Clip Size and Ammo Capacity later. A well placed cluster of stickies can deal with a lot of problems on it’s own when you have enough Damage upgrades. On Decoy, he doesn’t perform as well as he does in Bigrock but is still usable with proper wave knowledge.
The Spy provides a lot of value for many different types of players. Unsure of how the wave is layed out? The Spy doesn’t need much preparation time to do his job. Do you enjoy high risk/high reward? With good positioning and awareness, the Spy can not only be unkillable but also will make quick work of giants and clusters of robots (provided you have Sapper Power upgraded). There’s a Giant Medic on the wave? He’ll deal with it just fine. The Spy has a high skill floor and a unreachable skill ceiling. With powerful strategies that take practice to get used to, the Spy is always a great choice with incredible damage output and the ability to take aggro off your teammates.
As far as upgrades go, you usually want Sapper Power on waves without many giants, Armor Penetration and Attack Speed to deal with the Giants and Resistances overall to keep yourself alive. Any knife is usable with the exception of the Your Eternal Reward, and the watch of choice is the Dead Ringer.
Like we said in a previous section, we will not be going too in-depth about Sniper and his gameplay style, it is best recommended you check the guide previously linked if you’re interested. On Decoy, he is a good option but not the most easily accessible.
Team Formation pt.2
Tank Busters
Unlike in Gear Grinder, the Pyro sits alone on this section. Why? Because the Soldier has more strength in Mecha Engine due to the amount of money available. Even with overtuned weapons such as the Gas Passer the Pyro just doesn’t perform as well as the rest of cast and is reserved to just being a good Tank Buster. And even then, he’s easily replaced because Soldier is just a straight upgrade, but there’s some niche waves (Bone Shaker wave 2, Broken Parts wave 2, Disintegration wave 1) where Pyro is very much usable due to the Phlogistinator being an incredible weapon with low amounts of cash being needed. Once again, we ask that you don’t use this guide as a discussion forum about the Gas Passer, this is not about that.
Money Collector
When comparing simply how effective all the classes are at collecting money, the Scout is far and beyond the best. Having naturally a magnet to get money, getting overhealed for green AND red cash, and being able to dodge projectiles with ease due to double jump. But that doesn’t scratch the surface of how good Scout is in Mecha Engine. With a Mad Milk equipped, he’s able to keep multiple heavies alive due to it’s insane healing specially if you upgrade the recharge time. With resistance upgrades, he’s able to soak damage and take aggro off of your teammates. With Fan’O War, he can amplify the damage of your teammates by 1.35x and it’s better than having a Kritzkrieg since it applies to all teammates instead of just one. And that’s without mentioning the Soda Popper… by using https://steamcommunity.com/sharedfiles/filedetails/?id=2114727049 you’re able to amplify Scout’s damage by a lot, provided you also upgrade his Clip Size and Damage. This turns him into not only unkillable but also able to destroy tanks with Crit Canteens and destroy any other type of robot. Any team with a Scout that knows how to abuse Mad Milk and deal great amounts of damage will have every situation covered.
Support
The Engineer is once again, the most powerful class due to his huge toolkit. Going over all of his powerful tools:
Dispenser
Invaluable building when you have a lot of classes that need to be sustained such as the Soldier and the Heavy. Always make your priority to have it up since having a team with ammo will always do more than having a team without ammo but with a Sentry up and running.
Teleporter
Not many beginner Engineers understand how important it is to have a Two Way Teleporter, specially on Bigrock (which is the biggest MvM map!). Being able to go back and forth and keep some tools like Soldier’s Banner, Sniper’s Focus, Demo’s Stickies is invaluable and also being able to instantly setup at spawn when a Super Scouts gets by can mean the difference between a win and a loss. Make sure you keep it near your team and please, make it Two Way, it’s only 250 credits.
Sentry Gun
Unlike in Gear Grinder where you usually have 3-4 Heavies on one team and the bodyblocking is just natural, in a tour where a lot of players prefer other classes, the value on the Sentry goes way up. Being able to deal with Giant Scouts by just bodyblocking aliviates the stress on your team and even then, just being a sponge of damage by using the wrangler and getting HP upgrades on your Sentry is still a good option. Just be careful where you’re blowing up your Sentry Busters.
Widowmaker
Our preferred weapon of choice in Bigrock. With full firing speed and crit canteens, the Engineer can solo tanks with the exception of Broken Parts wave 6 and Bone Shaker wave 7. Leave that Rescue Ranger at home and enjoy the power of the Widowmaker.
Frontier Justice
Our preferred weapon of choice in Decoy. Doesn’t get a lot of talk but a Engineer that can handle the Justice can easily take care of the biggest problems of Disintegration, such as Ubered Engineers. More info on how this should be used will be on the Disintegration Section.
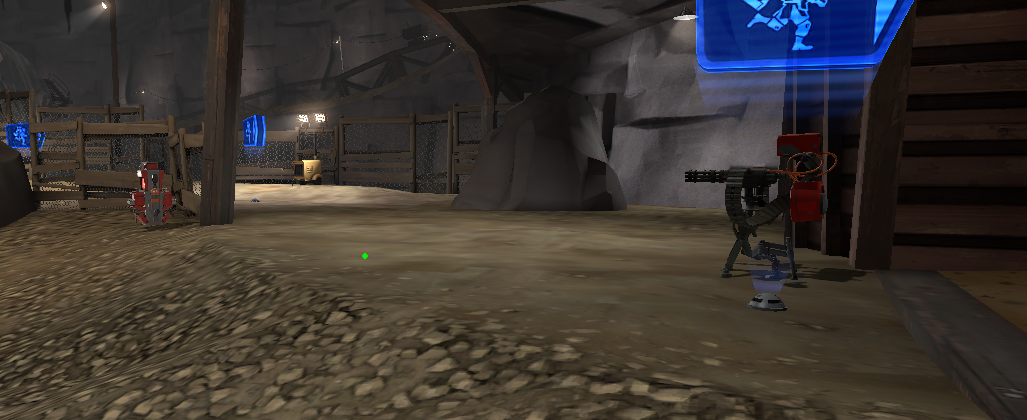
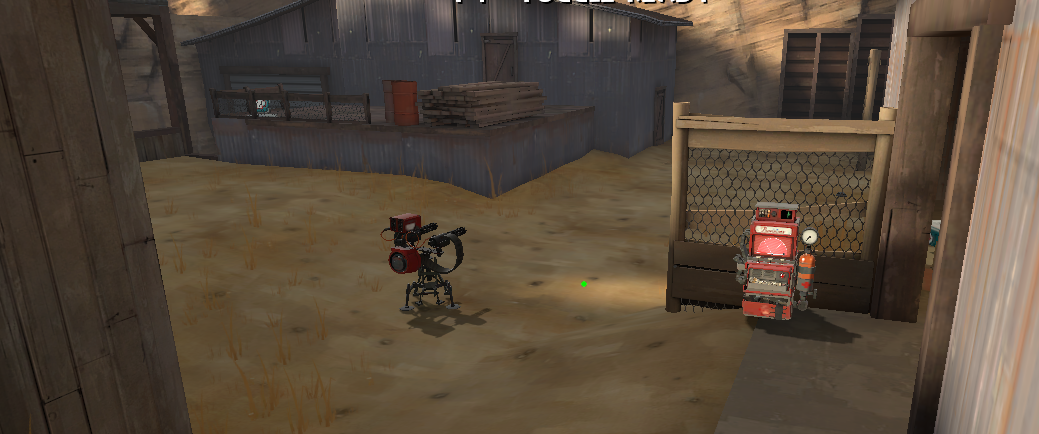
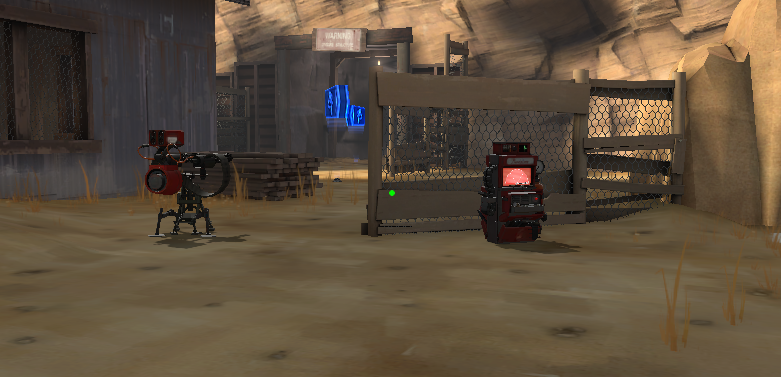
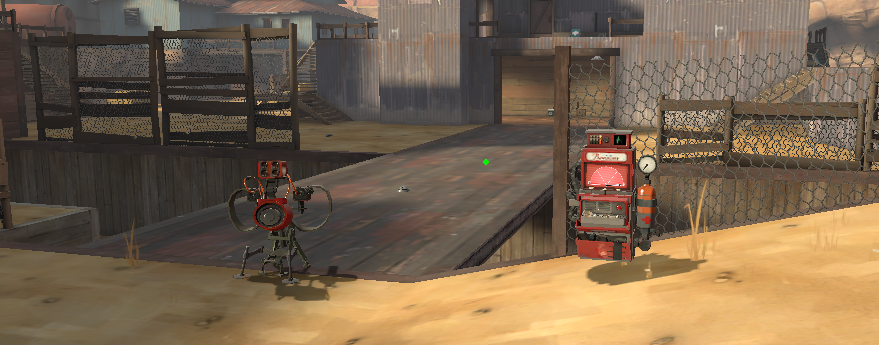
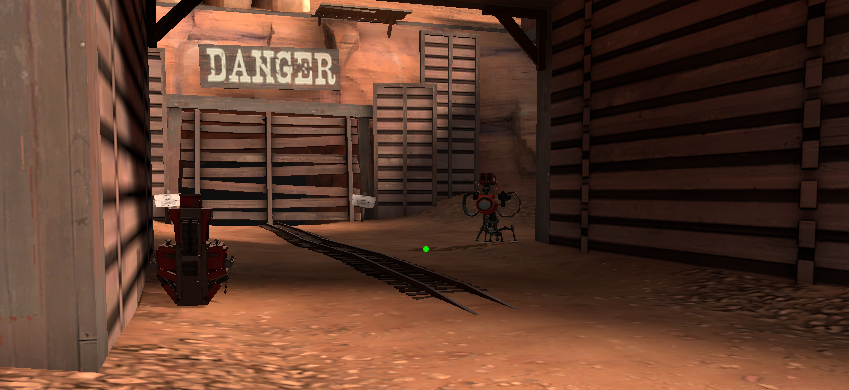
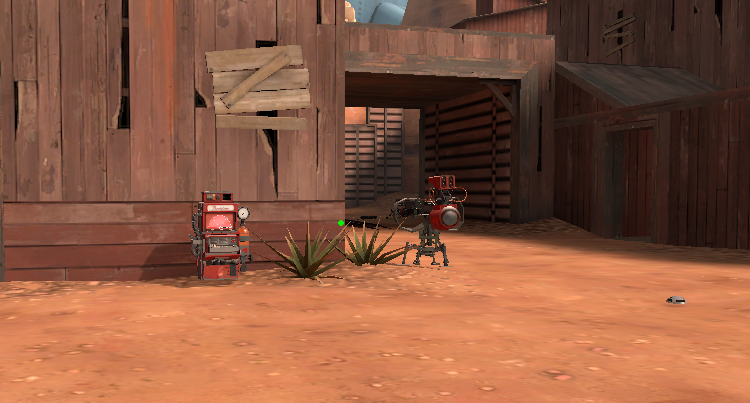
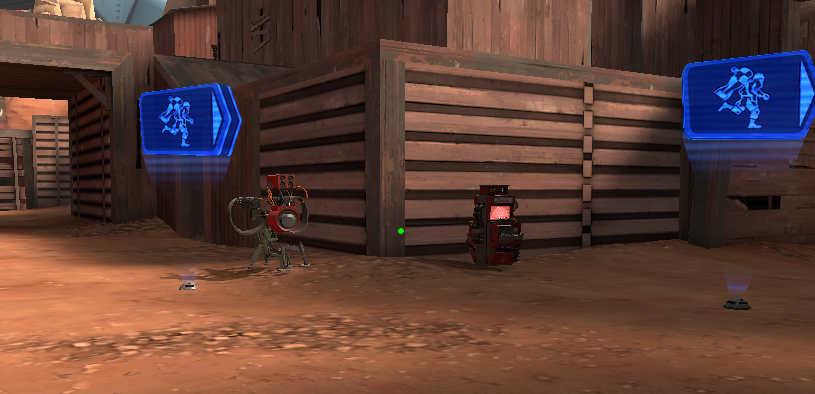
Below are some placement suggestions for Engineer on both Mecha Engine maps. Don’t take these as the meta, but more as a guideline on how you should position your buildings.
Defense options on Bigrock’s cave, depends on how far back you are and how aggresive you want to be.
Suggestions for when you’re out of the tunnel, can also utilize the high ground.
Use this when the bots aren’t going for the Left/Right Shacks. When not using this, make sure to abuse bodyblocking.
Primary options for Engineer on Decoy, if you lose these you’ll probably have to go back to defending the Bridges or the Hatch.
Medic is not the most optimal choice just due to how unnecessary he is, much like Gear Grinder. Having another class (specially a Soldier with Concheror) will usually output more damage and healing than a Medic. However, on latter waves with a lot of spam, you could use Medic to aid your teammates if they’re dying too much, such as Broken Parts wave 6. But most of the times, just having resistances you’ll do just fine.
Broken Parts (Bigrock) pt.1
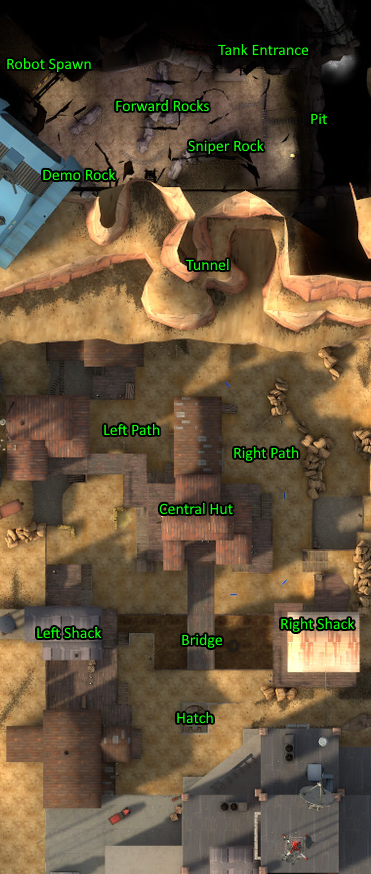
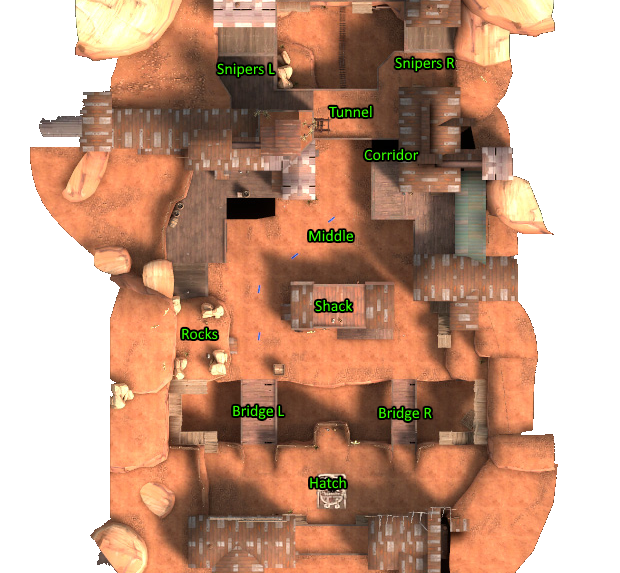
Here is a view of Bigrock from a birds eye view. This was made for this guide so that we can easily explain positioning using this map. The cave area at the top of the map is where the robots come out and where you will want to defend (hopefully for the whole match). The tunnel separates the cave from the rest of the map and is a pretty rough choke point since it’s long and the only way in and out of the cave. If you’ve lost it, it’s usually best to defend what you have unless you have cleared out the robot mess.
The left and right paths are where the robots go next, with the side you defend being the path the robots take (as an engie, it’s best you check this). Once down those paths, the robots will then either go up through one of the shacks or just go across the main bridge. Defend whichever one they take if possible, as keeping the bomb on the shacks allows your team to get out of spawn without being harassed. The hatch, as always, should be the last stand of your defence (no turtling dummy).
Something else to know is how the robots move around and leave the spawn. Non support robots will go for the bomb when it isn’t being carried, and if it is they will target players. Most of the time the robots will walk out on your right side of the spawn (sometimes they won’t, don’t ask me why). This will change as well depending on the bomb’s position; if the bomb is out on the left area by the spawn, then the robots will walk there to get it.
If the bomb is on the right they will always go there. Once the bomb moves past that first rock, the small robots will take either side of the spawn to advance (this is useful to know as demo so you can separate your traps with SR). Unless the bomb is on the left, giant robots will always go right (once again, good to know for demo players).
Wave 1
The first wave of Broken Parts (BP) can be slow. Robots crawl out of spawn in intervals, however, if you’re unprepared then you can be destroyed by crits. You’ll start with 1500 credits on this mission. As an Engineer it’s heavily recommended to always get Dispenser Range and Two Way Teleporters on Bigrock missions due to how big the map is and the amount of money you start off with.
The waves starts with small groups that comprise of a mix of scattergun scouts, bonk scout, and crit soldiers. The crit soldiers are what can push you back immediately if you aren’t careful (although crit resistance isn’t recommended yet). It’s best for you to try and kill them quickly using a high damage hit (sticky trap/rocket do nicely) and use cover to avoid being hit with the crit rockets. Once they have all finished spawning, the first of four giant soldiers will spawn.
He isn’t tough if you can dodge the rockets/resist the damage and deal damage yourself. After that, more groups will crawl out of spawn with gaps of dead time in between. They comprise of 3 pyros, 1 crit heavy and 1 uber med. These groups are easily dealt with if you are quick; you can pop a 2 damage rocket/scattergun into the med and deal with the rest, set up a sticky trap, etc. As these groups are dragging themselves out of spawn, 2 more giant soldiers will spawn along with them. Once all heavy/med/pyro groups are down, crit bat scouts will pile out of spawn along with the last giant soldier. Simple crowd control can deal with all of that easily.
Wave 2
Wave 2 is pretty simple so long as you kill the giant combo and have someone to deal with front when tank dies. Make sure to have a dedicated player on tank, as since the map is so long, the tanks usually have a bit more health.
Huntsman snipers will start this wave. They are weak and easy to deal with. Once you have destroyed most of them, a giant deflector heavy with a quick fix medic (that will pop uber when low on health) spawns with a tank. The tank can be soloed easily by a tank buster, however this will become difficult if the heavy is left to move up.
There are quite a few ways of dealing with the giant combo, but you will always have to start with the med. In order to deal with the med safely, you will need the final hit deal a high amount of damage (this means that classes like heavy and pyro are likely to pop the med since the damage they deal is in small bites, which allows the med to pop). Quick ways to get the med down are with a stack of crit stickies with the SR or a spy with a few backstabs and a swift escape. Other methods include sniper and soldier since they hit hard, high damage shots. By the way, as you are fighting the giants, 3 super scouts are going to pop out of spawn one after another, so be prepared to deal with them (14 stickies will 1 hit KO them).
Once the tank is down, the rest of the wave will come out (even if the previous robots are not dead). This will start with 4 batches of 10 soldiers and 5 charged soldiers, each with an uber medic. The small soldiers will spawn after the previous group is down. Charged soldiers are easy to dodge and small soldiers easy to kill, so this shouldn’t be too difficult with the right damage classes. As the last charged soldier spawns, 3 super scouts will spawn along side it in a little bunch, also easy to deal with so long as you are ready for them.
Wave 3
This wave is one of the waves that can stump new players. It’s got a lot of spam and awkward robots to deal with. Crit resistance will really help you out with the huntsman snipers if you are having trouble.
This wave will start with 10 pyros, each with an uber medic. These pyros can push you backinstantlyif their meds are popped and not dealt with. Obviously, you will need a med picker that is prepared to deal with as many of them as they can (crits as a demo or soldier can help, however, the pyros do airblast so be careful as soldier). Once they have all arrived, a giant crit soldier will appear. This giant spams crit rockets, so make sure that you deal with it quickly and have the proper resistances for it. Once all the pyros and uber meds are down, the rest of the wave will spawn.
The other half of this wave will start with crit Huntsman snipers (they can melt you pretty easily so don’t faff about). Next, 4 clusters of 3 giant demomen will make there way out of spawn in short intervals. The best way to deal with them is with penetration or splash damage (spy will suffer this wave). A good crit spam med can be really good this wave; using a combination of crits and shield on a decent damage dealer will both protect them from damage and allow them to clear the danger much quicker.
Once the huntsman snipers are down, 8 crit heavies (each with a med) and support scouts will be up next, along with the tank. This should be pretty self explanatory, your Medic Picker won’t have much issue, a Engi can clean up the Scouts and the rest of the team can deal with the Tank.
Broken Parts (Bigrock) pt.2
Wave 4
This is the infamous spy wave of mecha because its wacky and silly or something. Anyway, it’s easy to get pushed back if you aren’t smart. Crit and bullet resistances is a must have.
This wave is split into two parts, both of which will have groups of crit scattergun scouts as support – they will always spawn another group when the previous set is all dead.
The first half of this wave is the spies. There are 100 of them and you gotta kill them all. These spies will go wherever there are players, but sometimes they can go for the bomb if it is far enough up (keep it in the cave preferably). These spies are easily dealt with in multiple ways:
- High damage crowd control is very effective; soldier is probably the best for this wave.
- Since spies will go where you go, 1 person can stay at spawn and draw the spies there and kill them there, taking pressure off the front. Just make sure you pick up the money.
- Standing in certain spots where you are just out of reach from spies so you (or your teammates) can pick them off.
If you are looking for some good spots to stand to draw spies into a specific area, here are a few (just note that using the same one as someone else is not the best of plans, nor having everyone stand on a spot like this – need someone to deal with scouts):
Moving on to the other half of wave 4, 8 giant heavies, each with an uber medic, will spawn one after another once there are only 8-10 spies left. These heavies are not deflector, so once the uber med is down they aren’t too bad so long as you can kill them quick enough, as more will spawn out at pretty quick intervals so watch out. If the wave doesn’t end when the last heavy is killed, then that means there are a few spies still out and about, wandering about the map. Ditch front and find them. Doesn’t always happen, but just FYI.
Wave 5
There really isn’t much to say about this wave. It is by far the easiest in the whole mission, maybe even the whole tour. I will sum this wave up in three bullet points:
- The Steel heavies are useless and purely damage sponges.
- The crit soldiers deal more damage than the average soldier, they can kill you even with resistances easily, however if you are dealing lots of damage then it isn’t an issue because…
- This wave is easy if you are dealing lots of damage.
Wave 6
If you have played mecha before, this wave will probably be one of the reasons you are here. It seems impossible at times. I remember years ago when I was a low tour I spent hours just trying to beat this tour because of this wave, and to this day I still sometimes find wave 6 games (and sometimes even wave 7 on bone shaker) that have lasted anywhere between 1-3 hours. However, 1 decent soldier can be all it takes to take a stack of low tours that are struggling to the finish line.
This wave will start with a horrid flow of crit robots of every sort. They deal lot’s of damage. Some are faster than usual. They will knock you around. They will airblast. It’s best you use cover to your advantage, max out bullet, blast and crit resistance if you haven’t already (fire still meh), and don’t get too aggressive with buildings. They will come out at a constant rate until there are only 8 left, at which point the rest of the wave will begin.
A tank will now spawn at 8 crit bots left, the first of 3 extremely high health tanks. While one adept beggars soldier is able to solo all 3 tanks, this takes a surprising amount of effort and a lot of canteens, as well as not having to deal with robots, so don’t leave one person to these tanks, but also don’t forget about the frontline.
Once the last 8 crit robots are destroyed, a giant heavy med combo will spawn, this time with permanent crits. Deal with it as you did on wave 2, just be wary of the crits. Super scouts will also come out periodically in pairs so be mindful for this too. Once the last giant heavy is leaving spawn, he will be followed by many pairs of giant soldiers which will come out much quicker. This is a lot to deal with, and you will most likely get pushed back at a point if you are solo, however if you are maximising your damage output and doing your best to stay alive, you can whittle down these giants with ease and then finish off the final tank. Good ways of dealing damage to these robots is with a demo (since there are big gaps between the spawning of the heavy-meds), soldiers, heavies, a sniper with good aim (pretty much anything that helps/does lots of damage).
Once you start to learn and understand this wave, as well as grasp some skill on dealing damage, this wave won’t look so hard anymore, and you should be able to beat it with relative ease even if your team is subpar.
Wave 7
Every mecha mission finishes with a nice fella for you to meet (usually melted with a bunch of heavies).
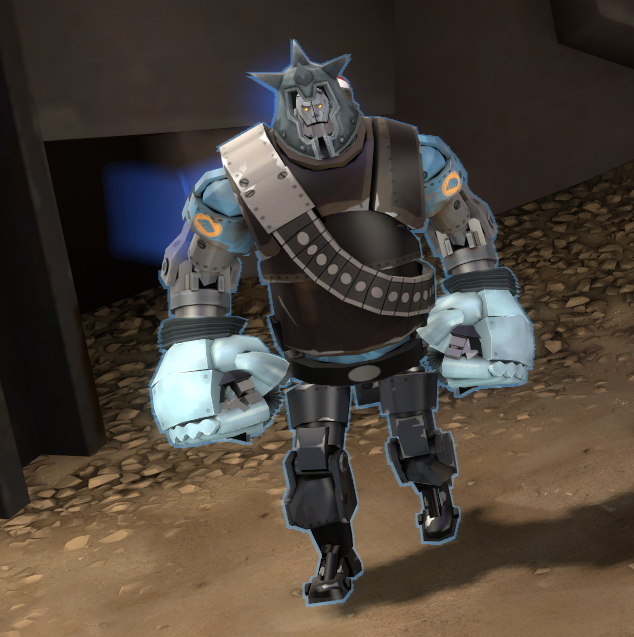
This is Sergent Crits. He spams lots of rockets. You can resist a few barrages from him usually before you perish. Every boss in Mecha is easily dealt with by just spamming heavies/soldiers, since its the only thing in the wave and all you need to do is deal a bunch of damage (there is another pretty good way of dealing with them all, but it’s most effective and easily done on bone shaker so it will be discussed there). A medic with a shield, kritzkrieg, uber canteens and uber saw can easily body block, keep teammates alive and pump out crits too. Just try not to get caught off guard by snipers and spies, too, otherwise this may become a slow process.
Bone Shaker (Bigrock) pt.1
Wave 1
Another Bigrock mission, so the map based tips found in the Broken Parts section apply here. This mission is generally easier than BP. You start this mission with 1200 credits, so follow the same upgrade advice for Engineer as noted on BP.
This wave isn’t too bad if you have crowd control (soldier/demo are good and easy choices). The robots will come out of spawn at a pretty constant rate, so it is important to keep up with the robots so you don’t get overwhelmed. An aggressive dispense at the very front rock with a decent soldier or demo will stump this wave without too much effort. Make sure you’re dealing with high damage robots (heavies/soldiers) first.
Wave 2
Kicking off with a tank, your only concern this wave is the giant heavies which can kill you easily due to a lack of resistances along side your damage, however, proper positioning will make your life easy.
Once the tank has passed the fence by the sniper rock (as shown) the giant heavies will spawn, each with a few small heavies. The first two will spawn with a gap in between the spawns, with the other two spawning in the same way but only when one of the existing heavies has been killed (note that this will cause the 2nd and 3rd heavies to spawn at the same time if the first one is killed quick enough).
Without resistances these heavies will destroy you, but with something like mad milk or a conch the damage can be resisted better. Furthermore, robots take a moment to aggro towards you and heavies take time to rev up, so ducking behind cover and waiting a moment for the heavies to rev down and lose aggro on you means that you can peak back out and have about a second to deal some damage without being shot. Using this with a combination of the nearby health packs (or any other self healing methods) means you can carve into these giants and take them out (hopefully) without dying. And since the Tank has a lower HP pool, usually a single player can take it down.
Wave 3
Another wave easily stomped by aggressive play. Your biggest concern is giant scouts in reality.
A crowd of little demos will spawn now and then, easily blown to bits. The small heavies this wave come out two by two. They are honestly a joke. The first few super scouts come out solo until the giant demos start to spawn, at which point they will start to spawn in pairs. The giant demos can be melted by any high damage class, same with the super scouts so long as you don’t let them slip through your hands, and having Rocket Specialist specially trivializes killing them. Two way teleporters are your best backup against super scouts, since when one slips you can just go back to spawn and wait for it (they can also be used to get more upgrades or canteens during dead time of the wave).
Wave 4
A wave of mostly melee/short ranged robots. Easy pickings.
The wave starts with bonk scouts and pyros (which don’t airblast), both of which are easily destroyed. The only real threat they should pose to you is the fact that they can overwhelm you if you get too close and they are particularly good at destroying aggressively placed dispensers. After a short while, the tank will come out. Later on as the wave has been cleared, 2 giant scouts will spawn one after another, along with 15 crit soldiers. These soldiers are easily dealt with, however they can easily deal with you so do be a little bit careful, as dying in this part will make you lose the cave generally.
Wave 5
This wave is where the difficulty starts increasing. You’ll have to pay more attention than you have been for the past few waves.
This wave kicks off with 10 airblast pyros, each with 2 uber meds following them. This is similar too the start of wave 3 BP, which also makes it similarly dealt with. Well placed stickies or a well aimed sniper will deal with it easily. An acute soldier could also put rockets into the uber meds with a bit of caution and a disregard for his own life (directing rockets at your teammates is obviously not advised; stay on the forward most rock). Soldiers will then follow these pyros, and then 4 giant deflector heavies will spawn one after another. These heavies can be painful, especially with all the rocket spam from the soldiers. Blast/bullet resistances and conch/mad milk are heavily advised. When the 4 giant heavies are down, a short break will follow and then 4 more giant heavies, each with 2 uber medics as well. Make sure that the meds are safely dealt with and you can proceed as you have already. This is a prime example of a wave that being able to resist damage is a lot of times better than dealing damage.
Bone Shaker (Bigrock) pt.2
Wave 6
You can take this one of two ways; walk through this wave and have a bunch of free time to kill or struggle endlessly. The main (pretty much only) meat of this wave are the giant-medic combos (bring resistances, including crit). If you take them out quickly and don’t get pushed back, then you will have more breathing room than you will know what to do with. Note that the robots this wave will always keep spawning even if the previous bots have not been killed yet.
5. bonk scouts and a giant heavy-med will leave spawn at the start of this wave. Later on after all bonk scouts have spawned, the next giant heavy-med will spawn, then followed by 2 giant crit soldier-meds (each with a brief pause between them). After the 2 crit soldiers, 2 more will spawn after a very long break. After those, 12 heavies will exit spawn 1 by 1, each with an uber medic. Finally, the wave tips off with a burst of 11 airblast pyros, which also all have a personal uber med.
Dealing with these robots is very easy when you know how. Bonk scouts will run out of bonk on this sight-line shown on the left should they not aggro onto anything else. The giants are very simple so long as you use the rock at the front as cover and have something to help you either keep alive and/or kill fast (milk, banners, canteens, etc). You will obviously need to go for the med first; spy or a stack of 14 crit stickies are both good options since they will get rid of that med quickly and allow your team to get onto the main giant. Melting these giants like this makes the wave a walk in the park. You will have long pauses between each giant where there are no robots, that you can utilize to either buy Uber Canteens as a Spy or Crit Canteens as a Demoman provided your Engineer has Two-Way Teleporter (if he doesn’t, let him know you’ll need it). Finally, the heavy/pyro-meds are easily dealt with a med picker or by hitting some directs on the meds.
Wave 7
Although easier than wave 6 BP, if you don’t play your cards right you can have just as bad of a time.
This wave kicks off with 2 tanks. As the second tank arrives, 10 soldiers, each with an uber med, will come out of spawn in short increments. Once the second tank is destroyed, the rest of the wave will sprawl out. First some giant demos with a few little bots sprinkled in, then bundles of two giant soldiers, 2 uber meds and 2 heavies, finishing with 3 bunches of 10 heavies and another tank. Due to the rapid rate of robots, having damage resistances and a decent source of ammo is imperative. I’ve found soldier with beggars to be incredibly effective here, since I can fizzle out the tanks and spam rockets at the robots to control the flow, rocket jumping to ammo packs or the dispenser so I don’t stop shooting. Using health on kill here will also help you keep just barely alive if you are struggling a bit against the giants, and farming off of what little robots are there will also help you.
Wave 8
Oh no he has bullet resistance what ever will we do.
Meet Captain Punch. Total pushover. Heavies will melt him despite the damage resistances, however, be careful about getting close to him as he will instantly punch you down with 1 hit unless you have a bunch of overheal. He’s fairly easy with any class that can deal damage in bursts, be it Soldier, Heavy, Demo, provided you have crits, he will go down easily, and you can also use the Sentry Gun with the Wrangler to simply bodyblock him giving your team even more time to destroy him with Crit Canteens or buy time for your teammates to buy more canteens. But there’s a special strategy that lets him be taken down by two players only…
This boss is the easiest to spy med on. Spy med is a very quick way of killing giant boss robots, since the medic will take the aggro away from the spy as long as he keeps his healing beam on the spy giving him free backstabs. For most bosses this can be hard for the medic, since they will have to properly use their shield to not be knocked around by incoming damage, however this giant steel heavy has only a melee attack, so all you got to do is stand like this and uber, causing the giant to aggro to you and give its back to the spy who will then body block – the uber will protect you and your spy from sniper/spy bots and the boss.
Furthermore, this is a Steel Heavy, meaning that it has a 100% damage weakness to melee attacks which does apply to backstabs, granting you roughly 1800 damage per hit with max armour penetration. You can probably see where that goes.
Disintegration (Decoy) pt.1
Disintegration is quite difficult but for a different reason than missions like Broken Parts is difficult. The mission starts with you off with 400 credits and you won’t get much until wave 5. A lot of the difficulty on the waves are also the Engineers that will spawn from the Sniper L and R locations, so it’s advised to have a player dedicated to killing them. Strategies will be included starting from wave 3.
Wave 1
The first wave of Disintegration was made to show you what the difficulty of this map will be about. While the 100 boxing heavies are no trouble and can get melted by a multiple different classes, the bigger problem is the Engineer Robots who will spawn from either Sniper L or Sniper R and go in specific areas to set up not only a sentry but also a teleporter, along with having a lot more health than your usual Engineer. Reminder that the robots come from the teleporter closest to the bomb and they also come ubered. The common spots are the high ground near the Rocks, the high ground near Sniper R, the Shack and other spots near those previously mentioned.
Now, as far as how to deal with the engineers, usually just having one player dealing with them will be fine until wave 3. Tell your Soldier to rocket jump near the Engies and bombard them, equip yourself with the Thermal Thruster and melt them with a Phlogistinator, sap’n’stab them, chase them down with a Soda Popper, there’s many ways to go about it since they’re alone. As far the boxing heavies go, my favorite strategies are setting upstairs with max Dispenser Range since it’s very common the bomb will spawn on Sniper L or Sniper R instead of at the bottom, and having a class that can pierce opponents, be it a Phlog (whom with the Thermal Thruster can deal with pretty much everything on this wave due to the massive mobility), a Heavy with Proj. Penetration, a Soldier, a Sniper, and others.
Wave 2
This is the wave that will begin to test how well your team can coordinate and work together by doing separate things. It starts off simple with a few Demoknights and once they’re dead, Scouts and Super Scouts will begin spawning. Your Engineer and your Heavies/Soldier can deal with them just fine. The big problem is that the Engineers will start spawning together with them and if you don’t have someone dedicated to them (or even two players) they will lock down most of the map letting you only work at the Hatch, and having the Super Scouts rush you down from behind will usually lead to disaster. A lot of attention is required to not get overrun by the Engineers, but once again, they’re alone so pretty much every class can deal with them.
Afterwards, a Giant Demoknight with Medics/Bowmen will spawn followed by a Tank at the very end. Compared to the middle part of the wave, the end is not an issue at all as long as you have some damage (like a Heavy, since you don’t have much money for other classes). It should be noted that even though Widowmaker is great for dealing with tanks, I personally recommend that Engineers should run Frontier Justice and keep their crits for the strategy used on the next wave.
Unlike other tours, I really discourage buying Resistance upgrades on this map as usually the Mad Milk healing is enough. Focus on damage upgrades and as Engineer, make sure you have Two-Way Teleporters, Dispenser Range and Building Health. You can also utilize Disposable Sentry if you use the strategy detailed below.
Wave 3
On the surface, this seems like a very simple wave. It starts off with Pyros at the bottom and once those are dead, Steel Gauntles and Boxing Heavies begin spawning. The big problem are the Soldiers who spawn upstairs who will flank the defenders at the Tunnel, but they are only 8 and usually the Sentry can be placed up top to deal with them (the first 4 take the right side, then the other 4 will come from the left). The bigger issue is from now onwards, Engineers will have Uber Medics pocketing them spawning from both sides once the Soldiers have spawned, limiting the amount of classes who can deal with them. Notable examples of classes that can deal with them:
- A spy can sap the duo and kill them along with the bowman provided he has enough Sapper Power, and then use a ammo canteen or wait for the next Sapper to deal with the next duo.
- Soldier can direct hit the Medic for over 150 damage with some Damage upgrade and even kill them at a distance.
- Sniper can as always headshot both provided he doesn’t get overrun himself by the amount of Engies spawning. He has some trouble killing Sentries however.
Those classes are good but they usually dedicate themselves to dealing with the Engineers. That’s why I much prefer the strategy I call “The Carry Engineer” which revolves around having an Engineer of your own keep his Sentry, Dispenser and Teleporter for his team while dealing with the Robot Engineers on his own using a Frontier Justice (which with a crit can do 180 damage up close and one shot medics) and a Mini-Sentry. The Mini-Sentry will pop the Uber from the medics but since they can’t fight back, they’ll be blocked and die afterwards. This is not an easy strategy and can go wrong a lot of times but it’s worth learning. Note that you shouldn’t upgrade your Frontier Justice and keep upgrading your PDA getting Dispenser Range, Building Health, Two-Way Teleporters, and others. Below are the positions that I use as Engineer to carry this wave and the future waves with Engineers + Medics combo.
Make sure you take one of the Engineer killing strategies and perfect it, as the next wave will need the level of micro-management this wave has, but in a larger scale since the actual bomb-carrying robots will be more powerful.
Disintegration (Decoy) pt.2
Wave 4
By far the hardest wave of this mission, maybe even in the whole tour just due to the fact you need multiple people working on different things. The wave starts with Super Scouts alongside the Tank spawning a few seconds after, with the Uber Medics + Engineers spawning up top. So you’ll need usually 1-2 players dealing with the Tank, one player taking care of the Ubered Engineers and the rest of the team making sure the Super Scouts don’t get past. One Engineer getting through, spawning a Super Scout can make everything go wrong and force your team to hold at Hatch and let your Tank Busters not be able to do their jobs.
Afterwards, it’s just a bunch of Scouts with Snipers. The problem with this is that if you’re holding at the Hatch, you’ll get pelted by the Snipers if you don’t have long-range damage while having to deal with a plethora of Scouts. This wave is easy to fail and requires a lot of teamwork, so if you lose the first time, don’t go off throwing insults at your teammates and work together. Utilise the strategies previously stated for bodyblocking (keeping the bomb up front will allow you to ignore engineer bots so long as one doesn’t build too close and you keep on bodyblocking) and killing Engineers and it will be no trouble with good communication. Feel free to state your favourite strategies in the comments below, any way that you know to make this wave less of a hassle will most likely aid another player.
Wave 5
At this point in the mission you’ll have so much cash that this wave will be a joke. I do recommend having some Bullet Resistance at this point, as the beginning of the wave is 2 Tanks with various Scouts while having the Engineers spawning up top as usual. After the Scouts are dead, Soldiers will spawn, and at the very end, there will be a Tank. Having multiple Soldiers makes this wave incredibly easy due to the amount of tanks and splash damage that will deal with many Scouts at once. Oddly placed wave that I usually forget even exists. Just make sure you don’t get overrun by Engineers and you’ll do just fine.
Wave 6
It’s big boy time.
Meet Major Bomber, the 40.000 HP boss featured in Disintegration. He has a lot of health and a lot of damage thanks to his infinite crits burst fire Grenade Launcher and has rapid health regeneration. The best strategy to defeat him is to have a team of 5 Heavies with Blast/Crit Resistance with some Crit Canteens alongside Max Ammo capacity, and a Scout just to throw the Mad Milk, making the Heavies near unkillable. As soon as he drops down, if all the Heavies are near the Tunnel, he will die in seconds. But if you fail to do so, you’ll deal with a lot of Engineers. Don’t bother killing them as they spawn, there’s just so many you’ll get overrun and die. If you don’t kill Major Bomber quickly enough, you will be held back at the Hatch and have to kill him before he deploys.
This is all for Team Fortress 2 Mecha Engine Guide for New Player – Tips and Tricks hope you enjoy the post. If you believe we forget or we should update the post please let us know via comment, we will try our best to fix how fast is possible! Have a great day!
- Check All Team Fortress 2 Posts List



















I would not call a guide “friendly” for new players when it involves something takes a long time to master, and in this case, it’s the sniper. Sniper, while in the right hand of right people, can outshine any other class. There are 2 things to determine how well a sniper player can do.
1. Ping. This is a key factor as a high ping can heavily affect a player’s performance and it will affect the Sniper and the Spy to a much greater extent. Soldier and Demo deal blast damage so ping is less punishing. Heavy doesn’t need to have precise aiming so that’s okay too. Engineer relies more on his Sentry Gun than his shotgun so that’s also not a big deal. Medic only needs to heal people and deploy shield and ubercharge at the right time so that’s also doable even with high ping. Pyro generally relies more on M1 than M2 so again ping makes almost no differences for him. Scout focuses mostly on money and occasionally hitting the robots with milk and tagging giants with Fan O’ War. But for the Sniper and Spy? That’s a HUGE deal as for Sniper it means missed or low bodyshot damage, or full headshot damage, and for Spy it’s 40 or 1.8k damage. People are going to get mad or even leave if you ever try going sniper with 150+ ping, which is pretty common for mann up because you are more than likely to end up joining a server that is millions miles away from your location. Not mentioning that, leaving a lobby for no apparent reasons (or sometimes with apparent reasons) generally makes other people to leave as well. You queued 30 minutes for a game, and you’re going to queue for another 30 minutes for a new lobby that could be even worse than the current one?
2. Aiming. This is not something that can be mastered in a short while. You have to do a good amount of training to be qualified for playing as a sniper in mann up. For most other classes, you don’t need that much of experience to be decent in mann up.