
The arrays used in this guide are only meant as an example, as they’re purely for the maximum Qi gathering without any other considerations to the items used or their element.
This guide explains the most basic version of manual Qi bursting, using 4 nodes with identical range.
ACS Manual Qi Bursting
This guide explains the unintended feature of manual Qi bursting and how to use it.
The arrays used in this guide are only meant as an example, as they’re purely for the maximum Qi gathering without any other considerations to the items used or their element.
This guide explains the most basic version of manual Qi bursting, using 4 nodes with identical range. Other methods exist, like using 8 nodes or using mixed range items, but they are currently outside the scope for this guide.
Written by docs.google.com – https://steamcommunity.com/profiles/76561198022098315/. discord.gg – https://discord.gg/neNpDvge server for any doubts
Manual Qi Bursting
Manual Qi Bursting is the use of unintended mechanics to increase the amount of Qi on a tile. Mostly used for end-game cultivation arrays and Golden Core breakthroughs, but can also be used to clear up Qi “voids” (a situation where the tile contains minimal Qi but has a lot of Qi gathering).
Manual Qi Bursting resets the Qi gathering of surrounding tiles (but not the center tile) of an array to increase the amount of Qi on the center tile.
To understand why it works, the function of cultivation arrays needs to be explained.
Cultivation Arrays
Cultivation arrays are built to increase the Qi on a tile. The amount of Qi on a tile is related to the amount of Qi gathering on a tile. Qi gathering is increased by having items with Qi gathering nearby.
[TECHNICAL] The relationship between Qi and Qi gathering is touched on in XiaWorld.LingMapData.UpdateLingUnit(), read docs.google.com - https://docs.google.com/document/d/1OkBuPpkL6mNdQtQR_Vr4xY41U3R2xS2fx78ImgKQu0g/edit#heading=h.dbf9s6pak2pq by inari for more details or dig into the code yourself. For even more details, check out the guide on Qi tieba.baidu.com - https://tieba.baidu.com/p/6419752081?see_lz=1. [END OF TECHNICAL]
A cultivation array has a single center, where the amount of Qi gathering is increased by nearby Qi gathering items. While Qi gathering items have a lot of values to consider, this guide will only look at Range and Value.
An important thing to keep in mind, Qi is updated based on multiple factors, one of those being the difference in Qi Gathering for nearby tiles. Qi usually gathers to squares with higher Qi gathering. A bigger difference between the tiles Qi Gathering values, the more Qi will be transferred. Manual Qi Bursting resets the Qi gathering for tiles near the center, which makes the difference from tiny (2000 on the center, 1800 near it, a 200 difference) to huge (2000 on the center, 0 near it, a 2000 difference).
Range
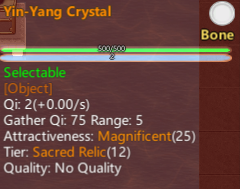
Qi gathering items increase the Qi gathering value in its range. Here’s an example with an item that has a Qi gathering range of 5:
To understand what the ranges are, here’s an image illustrating them:
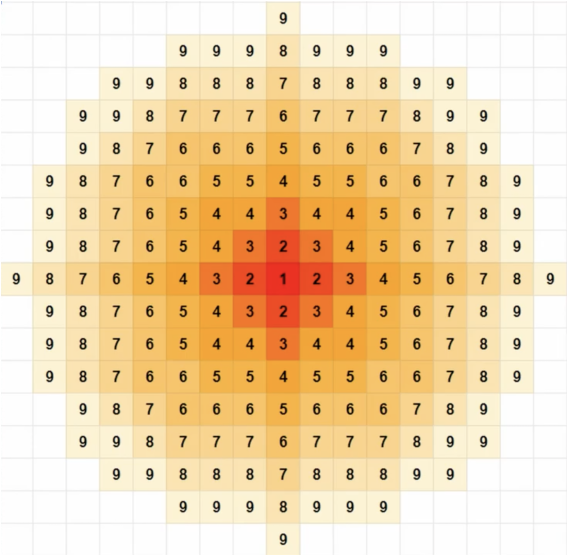
Range of 1 is the tile of the item. Currently, range 1 items are bugged. Fortunately, the only range 1 item ingame is the Qi Cushion. So the Range 5 Qi gathering item should be placed at the Range 5 tiles to get the most out of it.
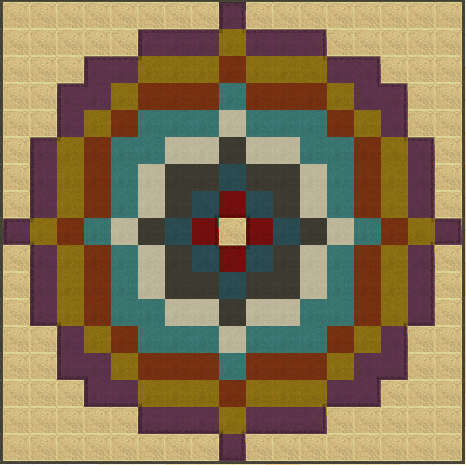
Another way of looking at the above image, the center tile with Holy Stone Flooring is Range 1.
Range 2 – Red Fabric Carpet
Range 3 – Blue Fabric Carpet etc.
Value
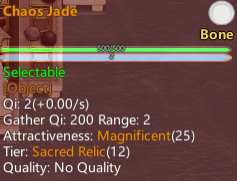
Qi Gathering Value is the amount of Qi gathering the item provides. While the effect is usually reduced over distances, the main concept is that higher is better. Here’s an example of a boss secret drop:
Example End-Game Array
For explaining the Qi Bursting, here’s an example of what an end-game cultivation array could look like (the items used).
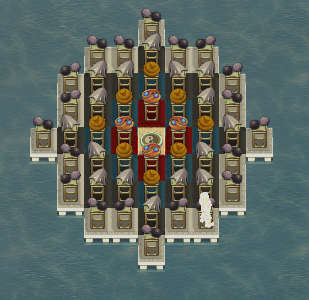
The array doesn’t use any ascended Xiandao statues or relics (Spirit Pagoda). Items used:
Range 1 (1 item): Chaos Jade under the cushion
Range 2 (4 items): Chaos Jade
Range 3 (8 items): Dragon Feces
Range 4 (16 items): White Scale
Range 5 (20 items): Yin-Yang Crystal
The end result will make the center tile have around 3.5K Qi gathering.
Resetting Qi Gathering
Placing or removing an item will reset the nearby tiles Qi gathering. The range of the tile affected is based on the Qi Gathering Range of the item.
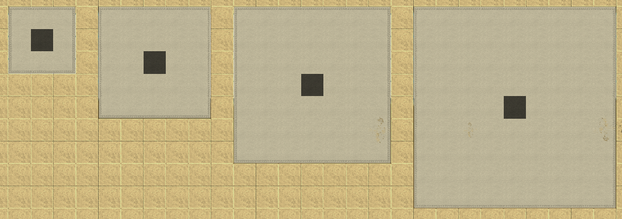
Range 2 items will affect a 3×3 square centered on the item (black square).
Range 3 items will affect a 5×5 square centered on the item (black square).
Range 4 items will affect a 7×7 square centered on the item (black square).
Range 5 items will affect a 9×9 square centered on the item (black square).
Based on calculations a Range 7 item would affect a 13×13 square.
Based on calculations a Range 9 item would affect a 19×19 square.
The formula for the range affected:
Square Diameter = (Qi Gathering Range * 2 – 1)
Triggering the reset
While there are multiple methods (dropping from inventory, dropping from stand, picking up unbanned) to trigger the reset, there is an easier way that requires the least micromanagement.
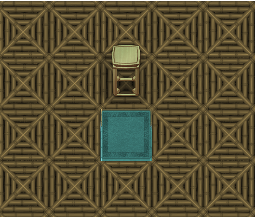
First, place the item on the ground and ban it. To place the item, either drop it from a disciple’s inventory, or from a stand. It will always be dropped one tile south, unless there’s something in the way. After it’s dropped, ban the item. Here’s an example of how you’d place the display. The carpeted tile is where the item will be banned on.
After the item has been banned, remove the display. To trigger the reset, build a Tic-tac-toe (found under Leisure) over the item. Since it costs no materials and will be built instantly, it can be done while paused.
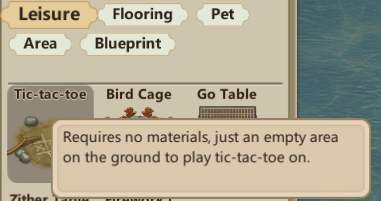
To trigger the reset again, rebuild the Tic-tac-toe. While the reset won’t happen when you remove the Tic-tac-toe, keeping the Tic-tac-toe will be a reminder which items have already been reset.Using the Tic-tac-toe will let you save space, since you don’t need to mess with walls near the array.
Resetting item placement
While it’s important to know how to reset the gathering, knowing where to place the item is important as well. Since we know the amount of tiles affected, we can take that into consideration when placing the item. The items are placed off-center, going clockwise. The exact position is dependent on your cultivation array. While the example array above is using Range 5 items, you can also use Qi bursting with smaller arrays, even with one using only range 2 items. The important thing to consider:
If your array is using range X, you’d need the resetting item to have a range of X-1 or greater. So if your array is up to Range 4 and filled with Spiritwood, then you’d need to use items with a Qi gathering range of 3 or greater. While you could go below it by removing some Displays, it’s not something you should be doing (explained further in the Cultivation Array guide [Link TBA]). Spiritwood is cheap and can be used even with the example end-game array.
To give a better visual example, here’s where you’d place the resetting item for a 4 Node Manual Qi Burst.
Range 2 items
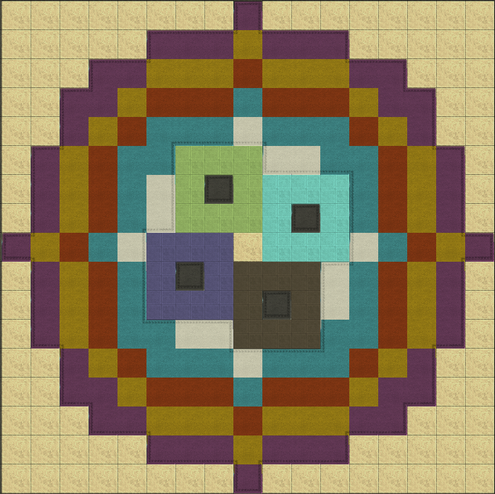
The black carpet tiles, at Range 4, is where the items should be placed when using Range 2 items for resetting. While it is an option, I wouldn’t suggest it due to there being no cheap Range 2 items.
Range 3 items
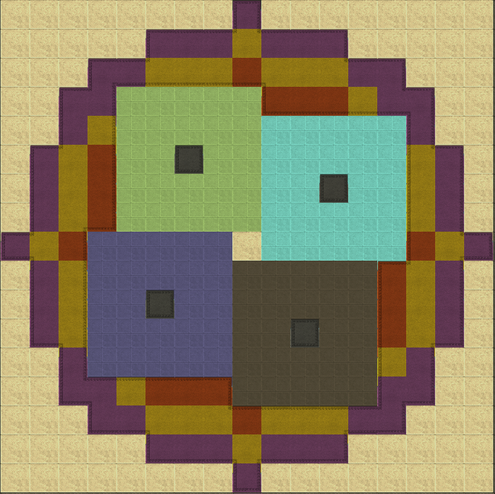
The black carpet tiles, at Range 5, is where the items should be placed when using Range 3 items for resetting. Useful if you’re not using Range 5 Qi gathering items in your array and you’re lacking space.
Range 4 items
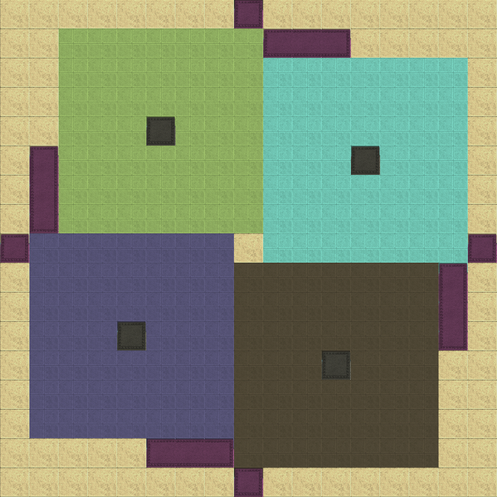
The black carpet tiles, at Range 6, is where the items should be placed when using Range 4 items for resetting. This is the most common method, due to the low cost of Spiritwood. Needed for the end-game arrays using Range 5 items.
Range 5 items
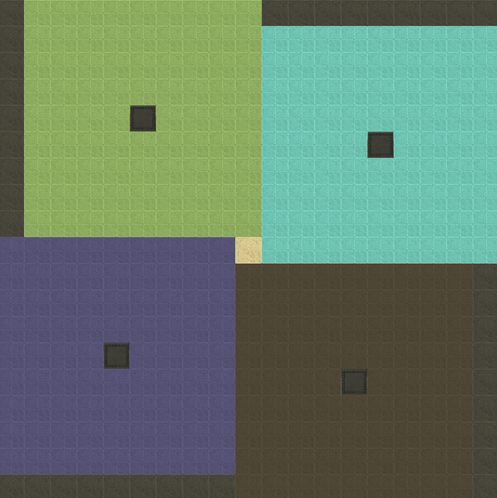
The black carpet tiles, at Range 8, is where the items should be placed when using Range 5 items for resetting. This should be used if you’re using end-game arrays with Xiandao statues at Range 9.
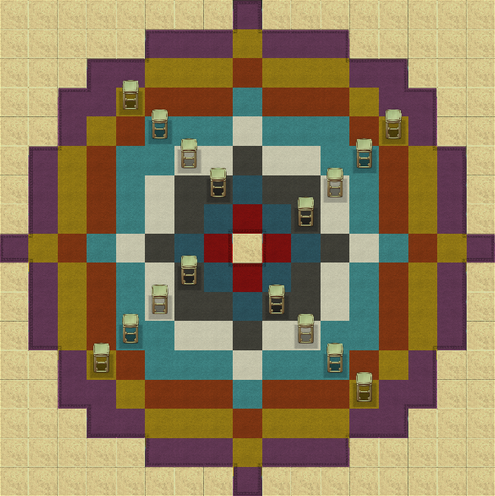
To clear things up, here’s another version of those images. The Displays mark the place where the items should be placed on the ground. The ones on Black carpet for Range 2, White Carpet for Range 3, etc.
Preparing for Manual Qi Bursting
Taking the knowledge of making arrays, and resetting the tiles of it, we can now look at the bursting process. Taking another end-game array as a base, the first step is adding the resetting items. Since the array is using Range 5 (Yin Yang Crystals) items, you’d need at least Range 4 items for resetting. For this example, Spiritwood will do fine. Now to place the Spiritwood where it needs to be.
For that, I’m using the method of placing them on Displays, then dropping the item where it needs to be. The Spiritwood flooring is where the items will end up being.
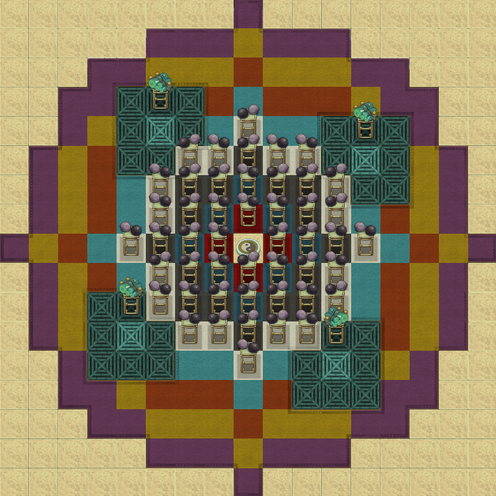
While the game is still paused, I’ll remove the Spiritwoods from Displays and then ban them.
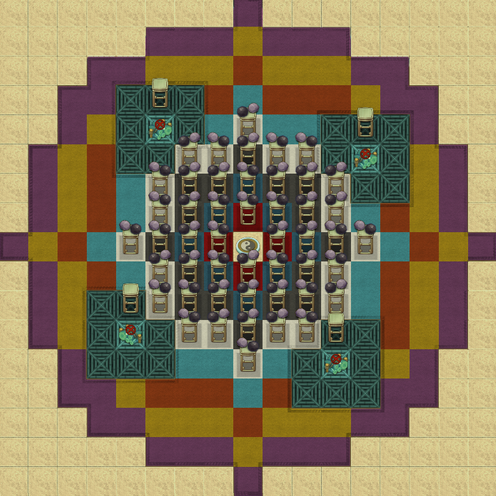
Since I have no need for the empty displays, I’ll remove them. Now it’s only a matter of waiting until the Qi gathering reaches the peak value. That’ll take 5 days, which you can always check with MoreGridInfo or a similar mod.
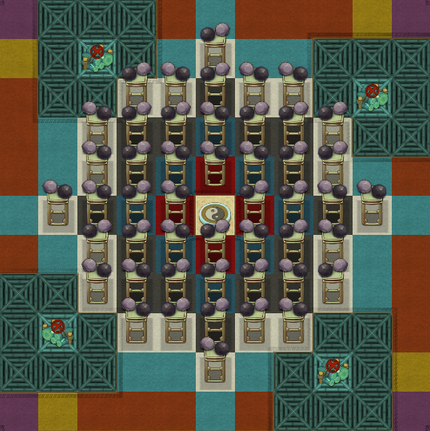
This is the end result, and it’s now ready for Manual Qi Bursting.
Manual Qi Bursting
At this point, we have our array ready and the cultivator is using it. Whether you plan to use manual Qi bursting for cultivation or breakthroughs, the method is the same. The Qi on the center tile is around 1.9K (Qi and not Qi gathering).
First, build a Tic-tac-toe over the bottom right item. Now the area surrounding the Spiritwood will have its Qi gathering reset. You might also notice the Qi on the center tile jumping up.
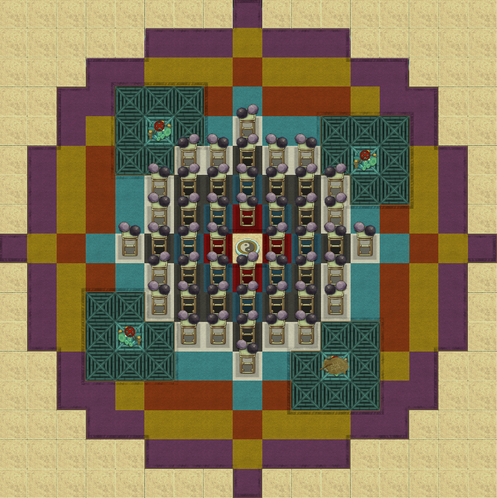
Now wait an ingame hour. The previous image was done at 12:00, the next will be at 13:00. Build a Tic-tac-toe over the bottom left item (since we’re going clockwise). Now the area surrounding that Spiritwood will have its Qi gathering reset.
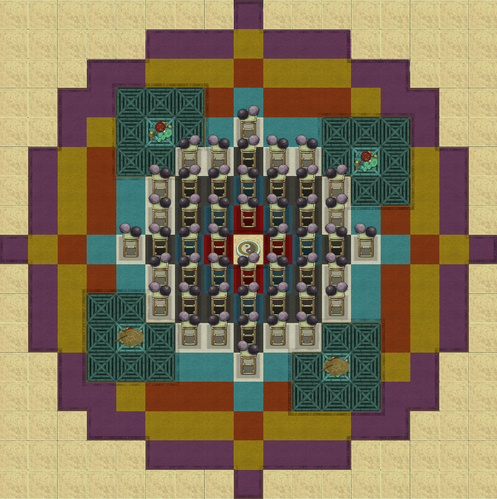
Now wait another ingame hour. At 14:00, build a Tic-tac-toe over the top left item. The area surrounding that Spiritwood will have its Qi gathering reset.
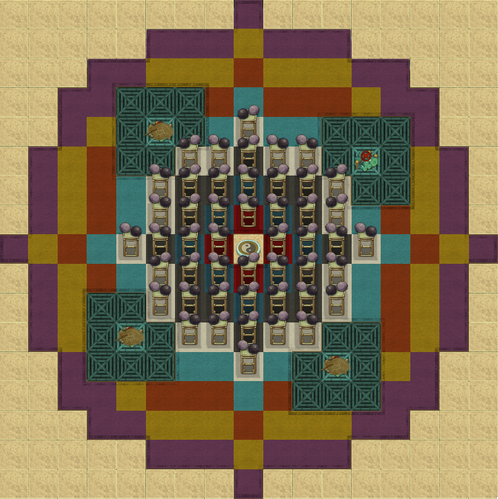
Now wait another ingame hour. At 15:00, build a Tic-tac-toe over the top left item. The area surrounding that Spiritwood will have its Qi gathering reset.
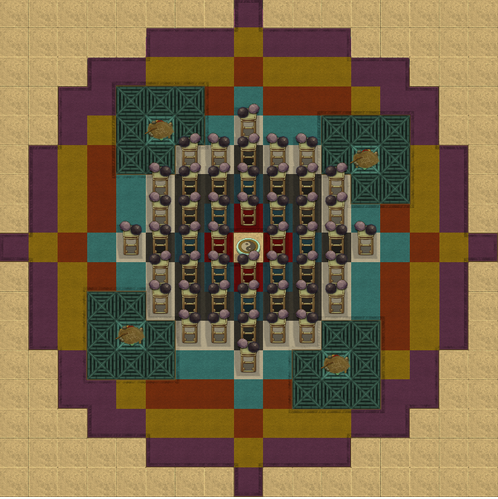
At this point a full circle has been done, and the original 1.9K Qi on the center tile has turned into 4.7 Qi. If the breakthrough continues, you can also keep going with manual Qi bursting. While you can continue right after building the last Tic-tac-toe, I suggest you wait until the Qi gathering increases a bit. That way the results will be greater. This would be a good point to remove the placed Tic-tac-toes in preparation for the next manual Qi burst.
For that purpose, I’ll wait 24 ingame hours, from the moment the first Tic-tac-toe was added. It’s 12:00, and the center tile has 5.4K Qi. Now build a Tic-tac-toe over the bottom right item. Then wait another hour and build a Tic-tac-toe over the bottom left item. And so on and so on.
Qi Void and other anomalies
While the technical part was touched upon by the Code diving guide, the most common anomaly you could face is when the highest amount of Qi on a tile is not on the center tile. The so-called Qi void will have similar symptoms, so I’ll be treating it as the same thing.
It will happen when the Qi gathering in the array is unbalanced, two ways in particular:
- The highest Qi gathering value occurs on multiple tiles away from the center
- The center and 3×3 square surrounding it have identical Qi gathering values
The main reason for the anomaly is messing up the ranges. To illustrate the example here’s what an “array” with incorrect ranges looks like:
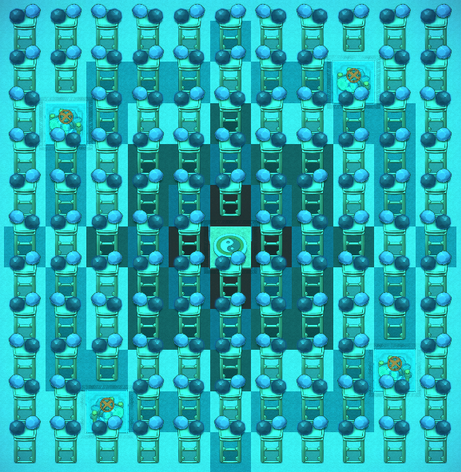
That mess of an array has the highest Qi Gathering on multiple tiles, with the highest Qi on the edges. The middle has over 3K Qi gathering, but due to the Qi void, there’s a 5×5 square with 0 Qi. The four corners of Bamboo flooring get 2.5K Qi every once in a while, but it isn’t spread any further.
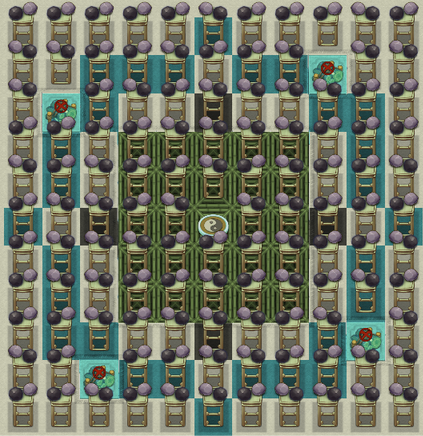
To avoid the anomaly happening, don’t mix up the ranges. Have the Range 5 items at Range 5 from the cushion, have the Range 2 items at Range 2, and so on. Another way of solving that is building asymmetrical arrays and|or having Qi Corridors.
While there are reasons you might want to go against that, like when you lack the more appropriate materials or when you’re using a full 48 Mortal Bodies, you will have a higher chance of experiencing the Qi anomalies.
To fix the anomaly, trigger a manual Qi Burst. That will make the above “array” usable for cultivation.
Other concepts
While the previous should be enough to explain Manual Qi Bursting, there are other factors to consider as well.
8 Node Bursting
A tile has 8 surrounding tiles. The order that Qi is transferred goes from incrementally on the horizontal axis, then on the vertical axis. To put it in simpler terms, here’s an image illustrating it:
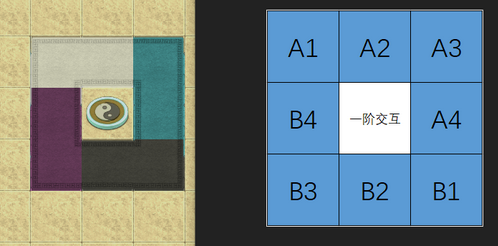
So the order goes B3>B2>B1>B4>Center>A4>A1>A2>A3. The A|B separation is related to the Flow and Return Directions (complex topic, out of scope for this guide). The order is also why the resetting starts from the bottom right and goes clockwise. The image on the left displays the affected tiles surrounding the cushion if you’re using a 4 Node Manual Qi Bursting design.
While it’s not a big issue, there are slight inefficiencies, since you’re resetting two tiles near the cushion at once. To fix that, you need to use an 8 Node Manual Qi Bursting Design, which will make the affected tiles more like this:
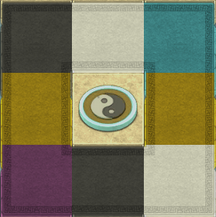
To illustrate, here’s what an AR 5 BR 4 would look like if it’s using 8 Node Manual Qi Bursting Design:
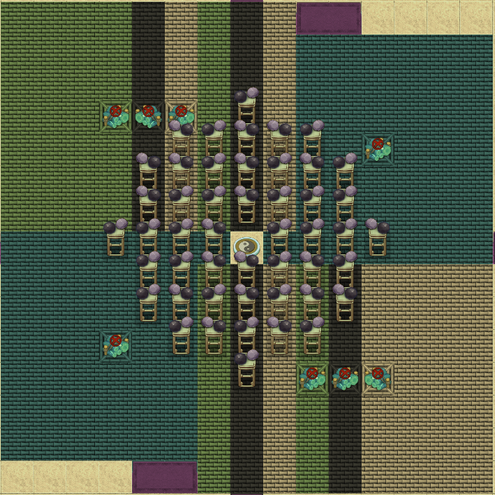
To utilize it, the same logic applies as a 4 Node Design. Start at bottom right and go clockwise.
In this example, the Spiritwood on Holy Stone(light flooring) would be triggered first, as it resets the B1 tile.
Then trigger the Spiritwood on Graystone (dark flooring), as that resets B2. Waiting an hour before you trigger the next one still applies.
Then trigger Spiritwood on Bamboo (green flooring), as that resets B3.
Then trigger the Spiritwood on the bottom left corner, as that resets B4.
Then trigger the Spiritwood on Bamboo (green flooring) in the top left, as that resets A1.
Then trigger the Spiritwood on Graystone (dark flooring), as that resets A2.
Then trigger the Spiritwood on Holy Stone (light flooring), as that resets A3.
Finally, trigger the Spiritwood in the top right corner, as that resets A4.
Examples
The example arrays with manual Qi bursting capabilities are built with Yin Yang Crystals, assuming a symmetrical array. The colored squares are the tiles reset, while the Black carpeted tiles are where the resetting items should be placed.
This is using a simple 4 node design.
AR for Array Range, based on the highest range items used in the array.
BR for Burst Range, based on the range of the Qi resetting item. (Qi Gather Range of the item)
AR 5 BR 4
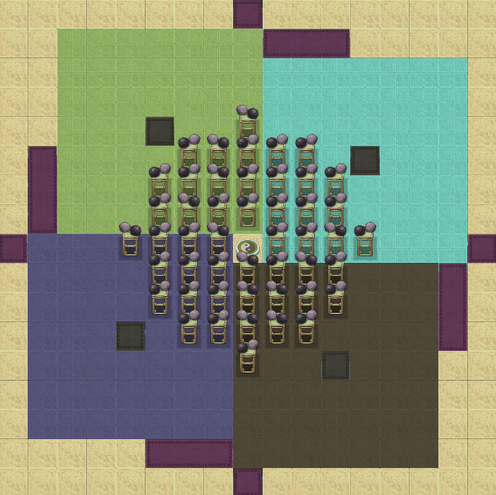
AR 5, BR 5
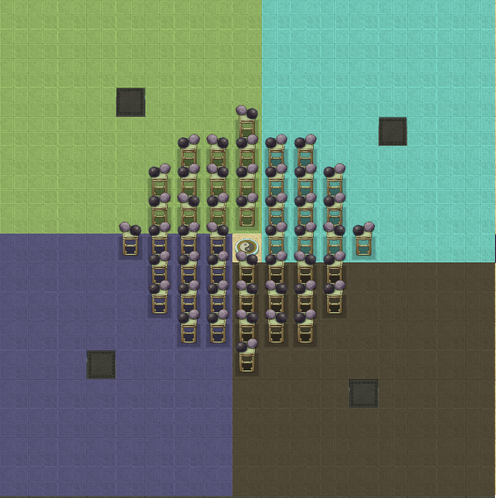
AR 4, BR 3
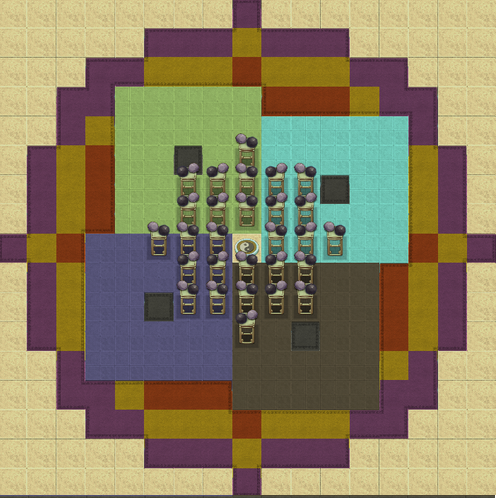
AR 4, BR 4
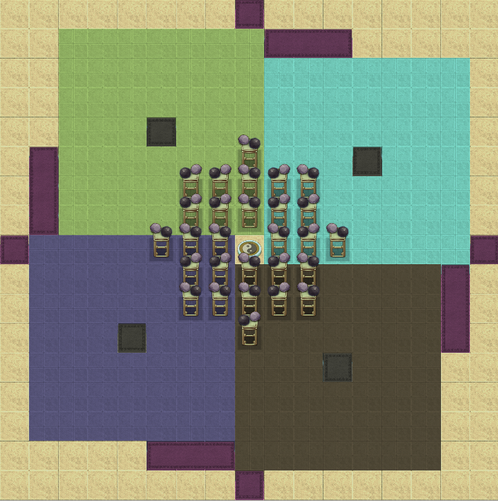
AR 4, BR 5
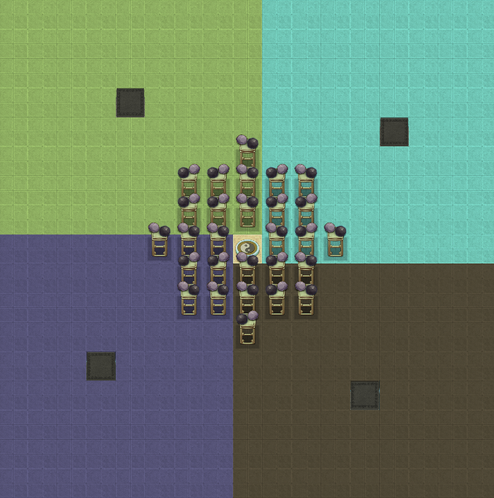
AR 3, BR 2
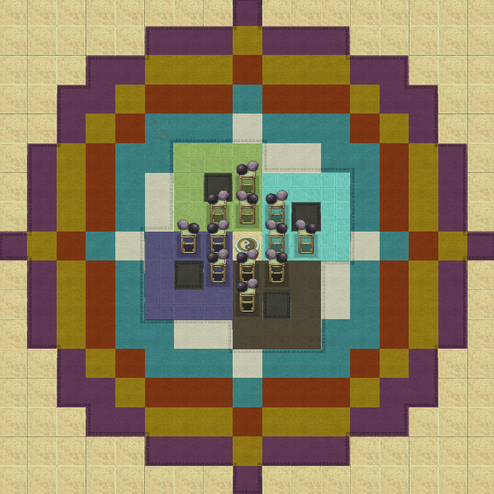
AR 3, BR 3
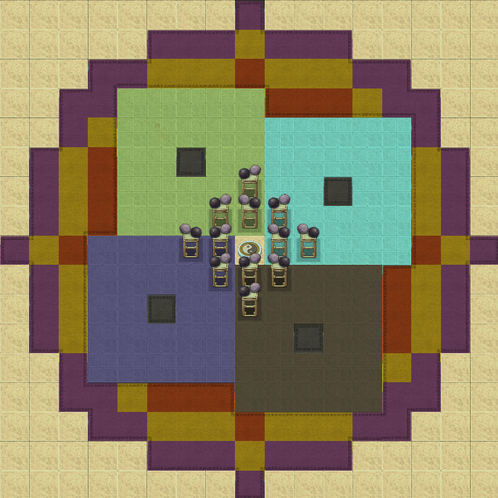
AR 3, BR 4
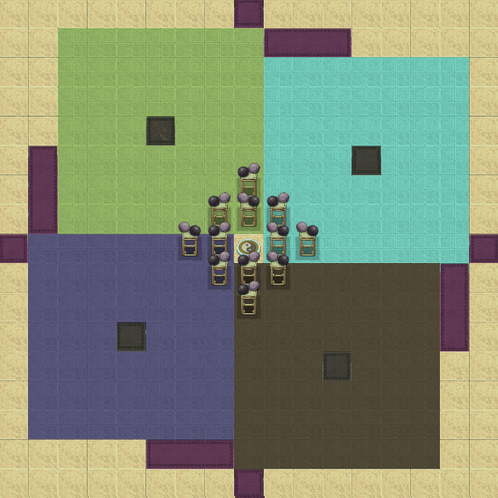
AR 3, BR 5
This is all for Amazing Cultivation Simulator Feature of Manual Qi Bursting Uses + Range + Value hope you enjoy the post. If you believe we forget or we should update the post please let us know via comment, we will try our best to fix how fast is possible! Have a great day!
- Check All Amazing Cultivation Simulator Posts List

Leave a Reply