The final addition to my series of Navy guides, which covers new features added in the No Step Back DLC and other information uncovered by the previous installments.
Changelog
Since I plan on this being the last of my naval guides, any additional information I want to share will be added to this guide instead of being put in a new one. This section is for user convenience in checking if anything has been added.
4/11/21: Added the Changelog and Risk/Repair
What’s Changed?
No Step Back hasn’t actually changed very much in the navy, and everything in the previous guides still stands with the exception of naval doctrines being purchased instead of researched. This is a good thing for large nations and a bad thing for small ones; for nations with large navies, a research slot is freed up, but nations with small navies will now find getting naval doctrine much more difficult.
Before addressing the new content, here is all you need to know about changes to what you should be doing to keep your navy in tip-top shape:
Training
The U.S. Secretary of the Navy generating Navy XP
Training your navy has become more important than ever before. Though the benefits of having your ships be trained (keep in mind all newly deployed ships start green, giving a malus to combat like land divisions) haven’t changed, the benefits of Naval XP, which may be generated in massive amounts by training, have drastically increased.
Pre-NSB, Naval XP was only vital for making new ship templates, and excess XP could be thrown at techs and doctrines as a research speed buff. Now, Naval XP is required to purchase Naval Doctrines, as well as additional buffs in the new Officer Corps tab.
With this new development, any serious naval nation (especially US, UK, Japan, and Italy) must train their fleets (if it is safe to do so) to get their doctrines and stay competitive.
Supply
One of the flagship changes in NSB was that of supply. Ports and Convoys are now more important than ever for keeping your divisions fighting at their best, but you already knew that. What you might not have known, however, was that your ships will also demand supply just like your divisions. Admittedly, this is unlikely to ever be much of a problem, so long as you avoid putting half your combined navy into a level one port in the middle of nowhere.
Command Power
Along with all the XP types, Command Power is now much more relevant than ever. Although there aren’t any ways to spend Command Power directly on your naval combat as you can on land or in the air (like Last Stand or Ground Crews), it is important to keep track of your Command Power.
Democratic nations especially (which tend to have low war support, and thus Command Power generation) will spend the early game with very little to spare, so watch what you spend it on carefully.
In terms of the Navy, Command Power can be used to give traits to your Admirals and are necessary for hiring advisors in the Officer Corps.
What’s New?
Mostly, this:
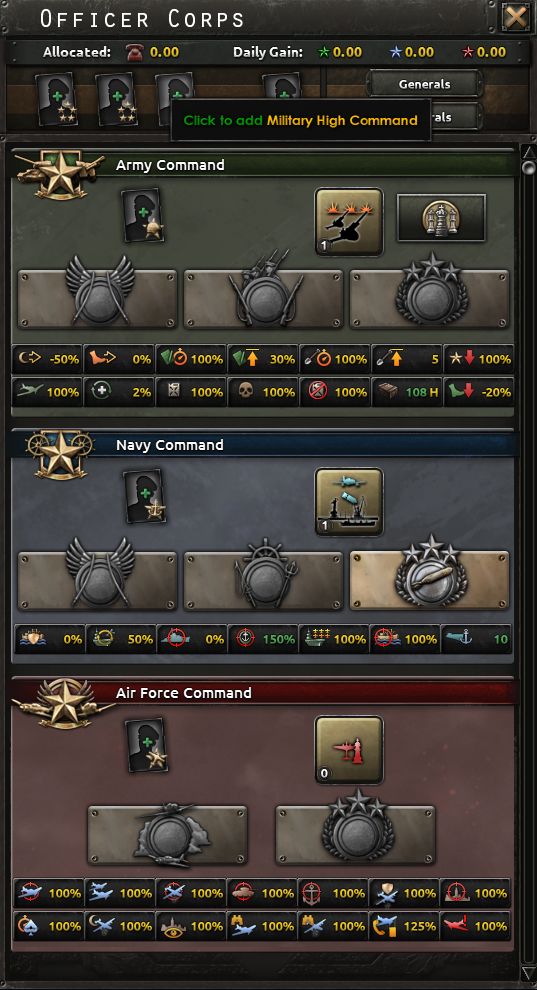
The Officer Corps menu offers various bonuses to your navy, and is also where you may view and purchase naval doctrines now.
Purchasing doctrines has a base cost of 100 XP, but this may be reduced by bonuses recieved from focuses, or hiring a Naval Theorist. As always, doctrines are very powerful and are definitely worthwhile investments.
Hiring a Chief of Navy or Naval High Command will generate additional Navy XP in addition to their stat buffs. If you are a large navy nation, do not prioritize hiring these guys ahead of Army or Air Force command, as your navy training already produces more XP than the advisors can, which is usually not the case for the other military branches.
Lastly are the new Spirits. There are three categories of them, and I’ll go into depth of each below. Keep in mind that some Spirits are doctrine-exclusive or nation exclusive.
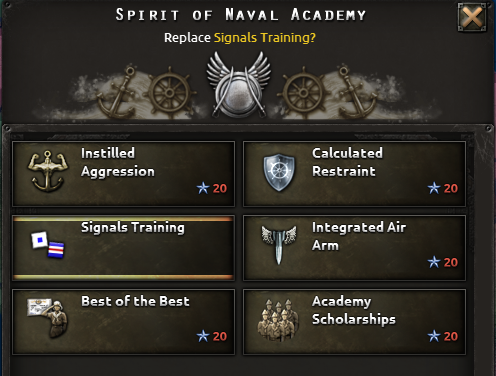
Spirits of the Academy
In my opinion, the least important of the Spirits, unless you’re doing a WC as an obscure nation where you need to make a navy and admiralty from scratch. Most navy-relevant nations already have more than enough admirals, and given how seldom Admirals can scrape together enough XP to level up, the choices related to leveling up are near worthless. Each costs 20 XP.
Instilled Aggression, Calculated Restraint, and Signals Training: these are very straightforward to understand, giving their respective chance bonuses to leveling up your Admirals. They are also a waste of XP.
Best of the Best: +2 starting levels to new admirals and -5% navy intel to others. This is very useful to nations with no (or bad) admirals, and arguably the most useful to nations who have good admirals already, as the -5% intel may come in handy if you have nothing else to spend your XP on.
Academy Scholarships: an alternative to Best of the Best, this decreased the cost of hiring admirals and gives them all +1 starting level. Not bad if you are starved of Political Power, although the situation in which this would be a relevant choice over Best of the Best is extremely specific.
Grand Fleet: this spirit is available if you have the Fleet in Being naval doctrine. It provides +20% experience gain towards the admiral traits Superior Tactician and Ironside, and makes it more likely for new admirals to be ‘Gunnery Experts.’
Convoy Warfare: this spirit is available if you have the Trade Interdiction naval doctrine. It provides +20% experience gain towards the admiral traits Seawolf and Blockade Runner, and makes it more likely for new admirals to start with those traits.
Integrated Air Arm: this spirit is available if you have the Base Strike naval doctrine. It provides +20% experience gain towards the admiral traits Fleet Protector and Air Controller, and makes it more likely for new admirals to be ‘Aviation Enthusiasts.’
Spirits of the Navy
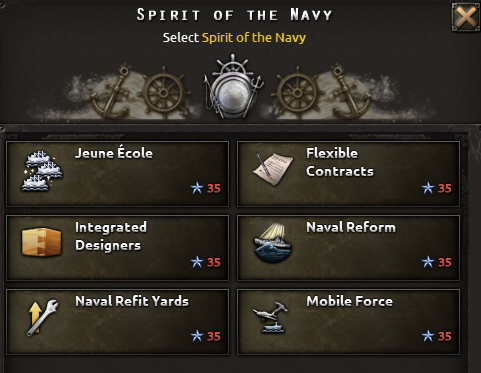
These spirits relate to naval research, module design, and XP. Each costs 35 XP.
Jeune École: provides a hefty buff to destroyer research and makes designing light ships much cheaper
Flexible Contracts: makes designing cruisers much cheaper, and also reduces the price of hiring a Naval Design Company to a mere 30 PP. For large navy nations, it may be prudent to select this Spirit, buy a Design Company, and then get a different spirit if you so desire.
Integrated Designers: +20% research bonus to ship modules and +20% naval research speed in general. Very useful if you are going to be researching stuff in the navy tab.
Naval Reform: +15% Naval XP generation. Very useful.
Naval Refit Yards: grants +25% Naval refit speed (how fast you can convert a ship into a newer model) and +15% repair speed. This will be a very useful spirit for players whose builds heavily involve refitting old ships. It is also arguably the most beneficial wartime spirit, as the repair speed bonus is an extremely valuable one if your opponent is actively engaging you or harassing your task forces with bombers.
Global Presence: this spirit is available if you have the Fleet in Being Doctrine. It provides a +10% research bonus to Battleships and Heavy Cruisers and makes designing them cheaper.
Submarine Primacy: this spirit is available if you have the Trade Interdiction Doctrine. It provides a +20% bonus to researching submarines and makes designing them cheaper. This is the best option, naturally, for those just using subs.
Mobile Force: this spirit is available if you have the Base Strike Doctrine. It provides a +20% research bonus to carriers and makes designing them cheaper.
Spirits of Command
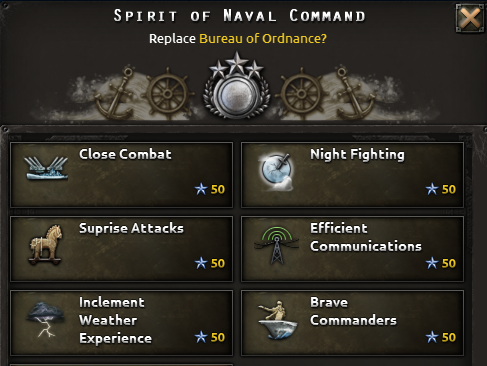
These spirits provide a range of bonuses to combat. Each costs 50 XP.
Close Combat: +5% Screen Attack and +5% Torpedo Screen Penetration. If you are using torpedo destroyers, or maybe just a whole lot of screens in general, this is a good choice.
Night Fighting: provides bonus attack and defense, plus reduced visibility, at night.
Efficient Communications: +15% positioning. This may prove to be invaluable for anyone using a deathstack.
Inclement Weather Experience: -40% bad weather penalty. Could potentially be very useful, but is of course situational.
Brave Commanders: -5% retreat decision chance (this is a “malus”) and +15% chance to score a critical hit. Although the retreat decision may prove mildly troublesome for combats where you are simply protecting convoys, if you are, well, brave, it may well be a bonus. If you remember the effects of Critical Hits from the first guide, you will be aware that this spirit can potentially be very, very evil. Excellent choice for any situation.
Decisive Battle: this spirit is available if you have the Fleet in Being doctrine. It provides +10% naval hit chance (including torpedoes) while making retreating less likely and slower. Good choice for fleets with lots of heavy ships and heavy attack, whose only real downside is their reduced hit chance.
Surface Raiders: this spirit is available if you have the Trade Interdiction doctrine: It provides +10% retreat decision chance and speed, which makes it easier to kill some convoys then run away before anyone can come stop you. It also provides a +20% screening bonus for using only capital ships, which basically means you can LARP as Germany and send a lone battlecruiser with no escorts out to sea and have a slightly better chance of it not getting immediately ganked by torpedoes. Despite being the Trade Interdiction unique spirit it is probably not the best choice for this playstyle.
Surprise Attacks: this spirit is available if you have the Base Strike doctrine. It provides +10% retreat chance after the initial stage of the battle, and +10% retreat speed after that initial stage. While potentially funny, I guess, this is completely worthless compared to your other choices.
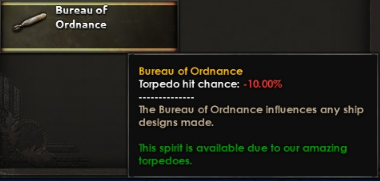
Bureau of Ordnance: you will begin the game with this spirit as the US. It provides -10% torpedo hit chance, which is a blessing since historically it was more like -90%. It may be removed either by taking the focus Bureau of Ships, under the War Department tree, or simply by selecting a different spirit, which isn’t hard considering your immense XP gain.
And I know I used this one already but here it is again:

The Other New Thing
Lastly, NSB has also blessed us with Mulberry Harbors!
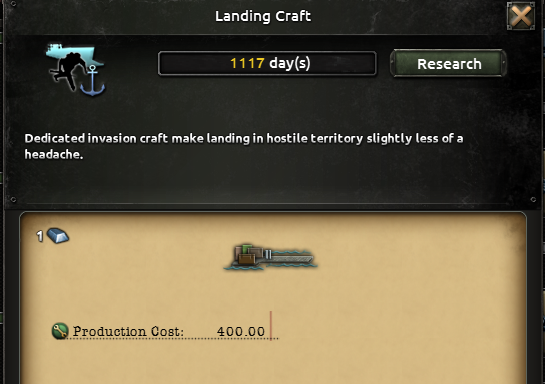
These are researched with the ‘Landing Craft’ tech inside the navy research tab. It is a 1940 tech. Mulberry Harbors are produced with dockyards in the production ledger like convoys and are stockpiled, not deployed. To use a mulberry harbor in a naval invasion, draw the plan using the alternative naval invasion order on the Battle Plans selector.
Suffice to say, being able to naval invade any province(s) you like, not just ports, with supply can be a massive threat and surprise to unprepared enemies, so long as you have naval supremacy. Not a mile of beach will be safe from your clutches!
Consequences of NSB on multiplayer
While the actual meta of fleet builds or designs are still the same, here are some things to keep in mind due to the changes of NSB:
1. Freeing up a research slot from doctrine may mean your opponent is more likely to research the other naval technologies that typically go ignored.
2. Coordination has made radar techs a more popular choice than before. Radar techs will unlock modules for your ships that increase spotting, and state radar will help detect ships.
3. Training, once again, is now more important than ever. This makes nations with the oil to afford such large training operations (the US, namely) more powerful, and makes nations without it have to make decisions on how to spend their fuel even before watime.
4. Floating Harbors
5. New supply changes means you will likely find more, and also higher level ports built around the map. The supply changes also mean that convoy raiding is even more potent than it was before if used in zones that cut off supply to divisions, like in the Mediterranean.
6. The Soviet navy has now gone from OK to pretty bad, which is good for Germany and the Axis.
Risk and Repair Revisited
In the very first guide I had made a point that four particular buttons, most notable of them the Engagement Risk and Repair Priority, were extremely important buttons. They are pretty straightforward but I wanted to return to them to give further insight onto how they work, how they should be used, and to reiterate that they are genuinely very, very important buttons.
Engagement Risk
Should you engage to your partner in a public space, they may be peer pressured into accepting. This presents a potential problem in which the two of you may enter an engagement in which one is not ready for, which will strain the relationship and foster a layer of distrust. Additionally, should they reject the proposal, you have now been publicly humiliated.
Naval Engagement Risk
Ranging from Do Not Engage to Always Engage, the selection you choose will drastically effect the performance of your fleet. Depending on what your goals are for each fleet, you must choose your Risk carefully in order for it to do what you want it to do.
The following are specific effects of Engagement settings to keep in mind:
> Submarines will not target Capital ships unless set on at least Medium Risk
> Submarines will not target Screens unless set on at least High Risk
> A Patrol fleet set to Do Not Engage, upon locating the enemy fleet, will follow it around so that the moment a fleet of yours that intends to engage it arrives, it will initiate a battle instantly. Upon the beginning of the battle, the patrol fleet will instantly begin leaving the combat.
> Setting a fleet performing Convoy Escort to Do Not Engage is stupid and defeats the entire purpose of the mission
> Setting a fleet to High Risk, for example, means that it will engage any fleet of High Risk and below, which may prove annoying when you want your battlefleet to focus only on important battles, and not waste time attacking a random group of submarines or something. If anyone at Paradox is reading this, please add a minimum risk option.
This can at least be partially dealt with by force-retreating that fleet.
Repair Priority and Split Off
Just like how divisions on land must wait and reorg before resuming an offensive or reentering a defensive battle, your fleets will need to sit in port to repair. The Repair Priority you set will determine at what limit your fleet will return to port and the minimum amount of repairs it will deem necessary before setting sail again; in other words, it determines how much time your fleet will spend not doing what you want it to do.
A battlefleet set on High Priority, for example, can easily be sent away to port by so much as breathing on it, giving your enemy time to set about their own machinations while your fleet is away twiddling its thumbs.
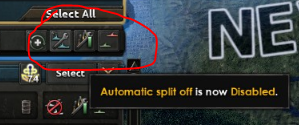
Of course the easy way out of this is to enable Automatic Split Off, which allows the damaged ships to go to port alone while the others continue their mission. Whether or not you turn on Split Off will depend on how important the composition of your fleet is, and what risk and repair it is set on.
A fleet set to Do Not Engage, for instance, can easily have Split Off turned on since it the missing ship won’t be absent for anything. A fleet set to High Risk, meanwhile, may be more dependent on having each and every ship prepared to engage, and Split Off may prove to be a potential cause of losing a battle.
Split Off is best used in tandem with a High Repair priority, so that any ship that does go and leave probably only has minor damage and won’t be gone for very long. It is an awful pairing for Low Repair priority, as that means the ships that split off will be gone for repairs for a while and the ships still operating are weak themselves before even considering the missing ships.
It should also be noted that even on Low Priority and High Risk, your fleet will refuse to leave port for anything until it has reached a certain amount of repair. No matter what your repair priority is, you may force a fleet to leave port and resume its mission by selecting the fleet and right clicking a sea tile. You will be asked if you are sure you want to do this.
Sometimes forcing your fleet to leave without full repair will be of vital importance to winning a contentious battle or saving some convoys, so remember you are capable of doing this. Just keep in mind that, as the above meme illustrates, forcing your fleet out of port will set it to Never Repair. Remember to set it back to whatever setting you want once the fleet has fulfilled its emergency purpose.
Advanced Carrier Warfare
So far my only words on Carriers and the Base Strike doctrine have summed up to “they are good.” This is, of course, true. But what if you could make them BETTER? Yes, it is finally time to talk about all the secondary stats that relate to carriers, and how to bring them from just good to positively terrifying.
Target Selection in Depth
I touched on this before, but here are the hard numbers on how target selection is calculated:
1. Base weight to be targeted is a ship’s HP. This means big ships will be more likely targets than small ones.
2. Base weight is multiplied by the following factors depending on ship type:
if a carrier: 200
if a capital ship: 50
if a submarine: 10
3. Ships with less than 5 AA have an increased weight based on the equation 5*(5-AA), meaning a ship with 0 AA receives a multiplier of 25, and a ship with 4.9 AA a multiplier of 5%.
4. Damaged ships can receive up to 500% targeting weight depending on how damaged they are.
The main takeaways from this information is that targeting generally ranks as follows:
1. Carriers (~50k weight)
2. Capitals (~20k weight)
3. Submarines (~2k weight)
4. Convoys (1440 weight)
5. Screens (~1k weight maximum)
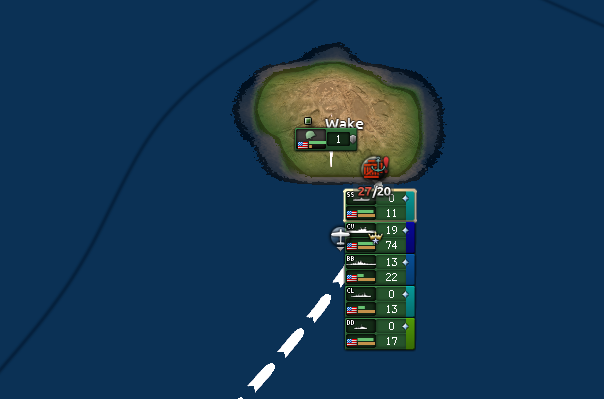
Note that the gaps between the first three priorities are so vast that there is no amount of gamey bs you could pull to keep naval bombers from shooting cheap ships instead of your capitals and carriers.
Carrier CAS vs. Carrier NAVs
You may have noticed while tending to your carriers that some have CAS on board and some have Naval Bombers on board ( or both ). This, of course, begs the difference of which one is better.
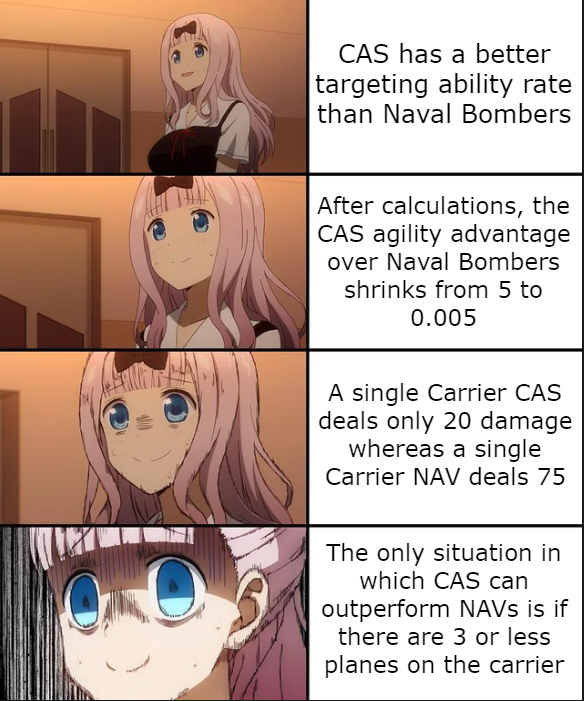
Now, there are a lot of complex calculations involving naval targeting, agility, and damage to take into account here, and rest assured I have done all of them for you. I was considering typing them out, or maybe adding a picture of the math, so that you all could also look at the numbers and determine which one better suited your playstyle and preference, until I realized the following:
Yes, I’m being serious. The breaking point at which naval bombers outclass CAS is when you have more than 3 naval bombers on your carrier. Despite the targeting ability bonus (the related calculation determines what % of the airwing will be able to attack a ship, with a maximum of 30%), CAS deal such abysmal damage compared to NAVs (the above figures have the 500% boost included) that they are undeniably and objectively worse. And if you are thinking about that 30% threshold, yes, that is correct, the situation in which CAS outperforms NAVs is the situation where 1 CAS and 0 NAVs are allowed to perform an attack.
And those calculations were done using 1936 carrier models! Once you get to the 1940 level the discrepancy is even worse, as NAVs pack on even more naval damage and an equal targeting ability to CAS.
So please do yourself a favor and disband all the CAS that might be deployed on your carriers and replace them with NAVs. And speaking of altering what planes are stationed on your carriers…
Overcrowding
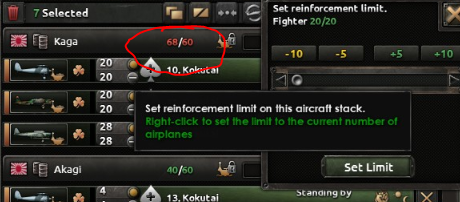
Something you probably haven’t considered doing is putting more planes on your carrier than it is able to hold. It is indeed possible, but just like putting too many planes into an airport on land, this creates a mission efficiency debuff called Overcrowding.
Overcrowding is calculated as double the percentage by which the planes exceed the deck size (limit). For example, if your carrier has a deck size maximum of 60 planes, every additional plane beyond the deck size will incur a 3.3% efficiency penalty. If you put, say, 72 planes on this carrier, there would be a penalty of 40%.
But what exactly is the efficiency debuff? Simply put, it is the percentage of your planes actually operating the mission. Now of course, putting 12 extra planes on your carrier won’t do you much good if it means 28 of them are now not going to do anything. Fortunately, the fourth Base Strike doctrine on the rightmost tree grants -20% overcrowding.
Unfortunately, that is a -20% to overcrowding, not efficiency, meaning each plane now incurs a penalty of 2.64 instead of 3.3, and the total penalty is only reduced to 32%. So if that’s the case, what’s the point? How do you overstack safely?
Sortie Efficiency and You
To directly combat the efficiency penalty of overstacking, we must turn instead to Sortie Efficiency.
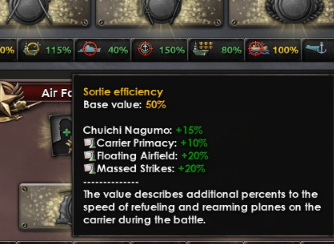
First, the bad news. Base aircraft carrier sortie efficiency is 50%, meaning that even if you don’t overcrowd, only half of your planes can go fight at a time. If you get every Base Strike doctrine on the right branch (the ones actually about carriers), you can increase this to 100%, allowing full use of your carrier aircraft.
But what if you get admiral traits or naval advisors that give even more Sortie Efficiency? How do you get more than 100% of planes to fly somewhere?
Oh yes, that’s right. Every % over 100% sortie efficiency you have can be put to good work nullifying the overcrowding penalty.
As Japan, for example, I can hire Chuichi Nagumo and promote Yamamoto to get 135% sortie efficiency on Yamamoto’s fleet (even more, actually, depending on the promotions you choose). This means we can afford up to a 35% penalty from overcrowding. On a carrier of 60 deck size, this means we can shove 13 additional planes onto it! That may not sound like a lot, but remember that you can have 4 carriers (before suffering a penalty) in a battle, so that would mean you have 52 extra planes, which is nearly as much as an entire additional carrier!
To readily calculate the number of planes you can safely overstack, follow these simple steps:
1. Take your sortie efficiency over 100%, displayed as a decimal (135% SE -> 0.35)
2. Multiply this value by your deck size (0.35 x 60 = 21)
3. Divide this value by 1.6 and round down (21/1.6 = 13.125 -> 13)
Other stats in Base Strike, explained
Two stats I have mentioned or you may have read while playing are Naval Targeting and Naval Air Agility. I will explain what exactly it is they influence in brief:
Targeting: This influences the calculations for the % of planes that are actually able to attack a ship at a time, as brought up during the CAS vs NAV section. I’m not sure if this increases the 30% targeting cap (probably not) or just increases the targeting stat on your planes (probably that) but in any case, the more the merrier. If you get the +40% from all Base Strike doctrines, your 1936 carrier NAVs’ targeting calculation will increase up to the 30% cap. 1940 and after this stat is kinda pointless I guess.
Agility: The more agility you have, the less likely it is for ship AA to shoot down your planes when they attack.
Using your Carriers as an Airfield
If you set a task force with a carrier in it to hold a position at sea (NOT WHILE IN PORT), you may assign the planes on the carrier to perform missions in the air tab. This is admittedly a pretty niche thing to do, as there aren’t very many places on the map where you couldn’t just use a normal airport, and carriers can only hold so many planes.
If you do do this, though, keep in mind that Sortie Efficiency only fixes Overstacking penalties during naval combat, and not regular air missions while holding. And I guess if you do do this for some reason you can finally put those carrier CAS to use, assuming you’re trying to provide ground support somewhere.
Superheavies (no, really)
I’ve talked of them briefly before, but I wanted to reiterate that they aren’t just a meme, and in fact cover one of the most important weaknesses of battleships and battlecruisers.
Now of course, when you research a new ship hull, it automatically researches the next level of engine along with it (and torpedoes for subs). However, ship armor and guns must be researched separately, and this is a daunting time-sink that makes producing high-tech battleships a painful sacrifice for researching literally anything else.
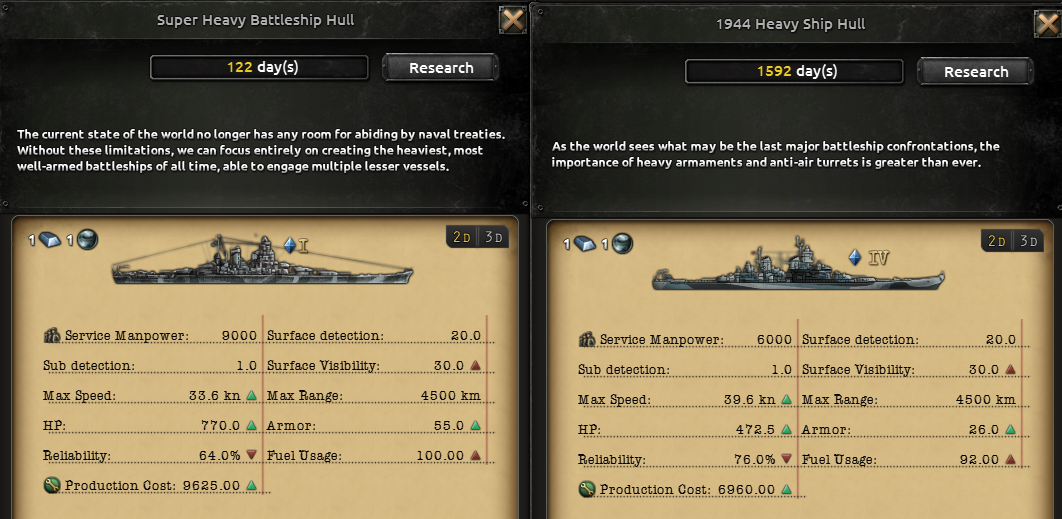
However, when you research the Superheavy hull (which is a 1936 tech), you will automatically unlock Superheavy Armor and the Superheavy battery along with it.
And as the numeral on the icon suggests, yes, the SH armor and battery are the strongest in the game, and are available in 1936 no less! The only caveat is that they may only be put on Superheavies.
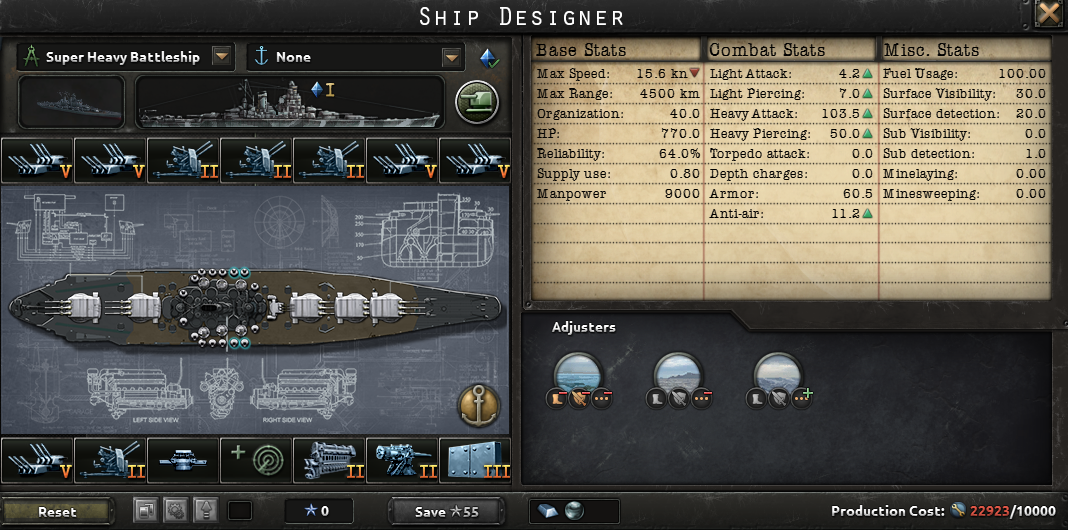
And when I say strongest in the game, I mean strongest in the game. Superheavy armor is literally impossible to be pierced with 1944 heavy batteries with both piercing bonuses, significantly decreasing the amount of damage taken (not that that’s a problem anyways, as the ship has a whopping 770 HP). Additionally, the SH battery deals more damage than the ’44 and can pierce that era’s armor as well.
Of course, it would be prudent to first get some better AA and a good fire control module (maybe even new secondary batteries if you’re up to it), but building a good Superheavy near the beginning of the game saves an incredible amount of time compared to researching 1940 or 44 battleships (or even heavy cruisers), 40/44 armor, and next-level batteries, and then still having to build them in the production queue.
And it certainly won’t be a ship to scoff at, either, provided that the fleet around it is well-equipped to keep it safe, as it is an easy target for planes with its massive HP, and threatened by torpedoes with its abysmal speed. Researching the techs that give bonuses for sustaining critical hits will be important for your Superheavies.
NOTE: Superheavies absolutely tear the London Naval Treaty’s production cost limit to shreds, so Democracies can’t indulge themselves here, unfortunately.
The 1944 Superheavy
Well, technically these are the strongest in the game, but good luck pumping one out ( let alone researching it) before the game ends.
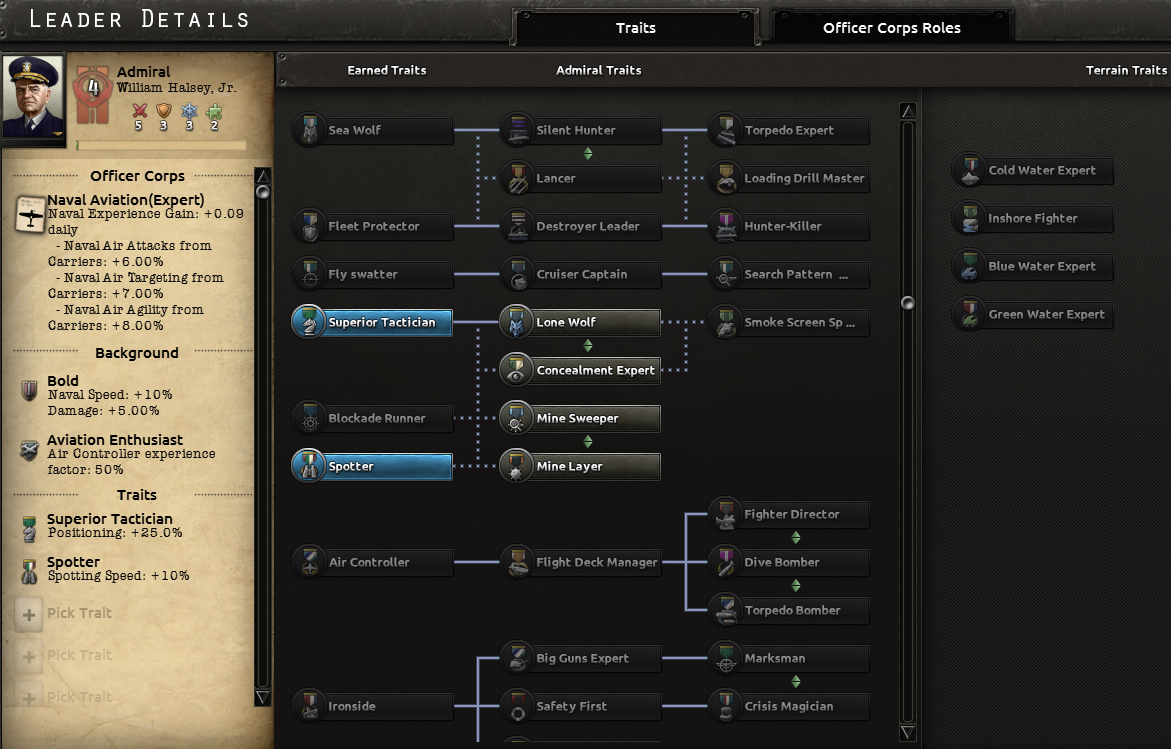
Admiral Traits
The following are my opinions on each of the Admiral Traits, or at least the ones that I think are worth explaining and aren’t straightforward (like Old Guard).
Media Personality: actually gives +10% Fleet Attack and Defense if the fleet includes the Pride of the Fleet, so be sure to see if you can take advantage of this.
Bold: One of the best traits in the game. It is a personality trait, so it cannot be unlocked, however. It provides +10% speed and +5% damage. Naval speed is invaluable, as it increases your evasion, so Bold Admirals will always be among your very best and should be trusted with your battlefleet(s).
Gentlemanly: aside from the org buff, this gives a +20% enemy retreat chance. Ideally, this guy isn’t in charge of any fleet whose job it is to destroy ships. However, it can be used as a positive buff depending on your goals. If your fleet is inferior and you want to avoid engagements, this could be beneficial. It may also be useful for convoy escort fleets lacking the detection or depth charges to kill subs, instead making the subs just go away before any more damage can be done.
Battleship Adherent: This is a dangerous trait, due to its Naval AA debuff, if you do not have the air war completely on lockdown, or if your enemy is using carriers.
Craven: like Gentlemanly
The Sub Traits: If you have Sea Wolf, you may either choose the Silent Hunter + Torpedo Expert or Lancer + Loading Drill Master. They grant -15% torpedo reveal chance, +10% torpedo hit chance and +25% torpedo screen penetration, -25% torpedo cooldown respectively. In general I would say that the Lancer path is better (and undeniably superior if you are making a torpedo-based battlefleet), but if you are only doing convoy raiding, Silent Hunter isn’t bad either. The reason why I consider the Lancer path to be so overpowered is because it allows your torpedoes to completely ignore sufficient enemy screening, and also fire torpedoes once every 3 hours instead of once every 4.
Fleet Protector: aside from its innate bonuses, giving a bunch of torpedo destroyers to an admiral with Fleet Protector (which unlocks the Lancer path, but is not mutually exclusive to its own, unlike Sea Wolf) is absolutely evil. If you lack a Sea Wolf, ironically, the Fleet Protector is your next best choice.
Fly Swatter: aside from the obvious bonuses and applications of this trait, if you aren’t concerned about enemy planes, this admiral is great for your patrols, as he can unlock Search-Pattern Expert, which provides a better spotting bonus than Spotter.
Superior Tactician: a good trait, and a common one too. Along with it comes the mutually exclusive decision of Lone Wolf vs Concealment Expert. Both are very good and come with powerful side effects, though the decision is made for you, really. Lone Wolf increases the enemy fleet size penalty, so if you are deathstacking and know your fleet is larger this won’t do you much good. On the other hand, if it is your enemy that is deathstacking, this will further punish them for it. Concealment Expert decreases your visibility, which is very powerful as it will reduce the likelihood of your ships being hit.
Smoke Screen Specialist: just because it is there doesn’t mean you have to click it.
Ground Pounder: is worthless, since the max cap for shore bombardment is already 25% and your ships probably generate that much bombardment already anyways.
Safety First: is very, very good
Marksman vs Crisis Magician: Up to personal preference and what your fleet is intended to do, though I prefer Marksman as, chances are, a ship struck with a critical hit will probably have simply died.
Air Controller mutual exclusives: Fighter Director is good if you are fighting other carriers. The other two are good if you are confident that your fighters will win. Concerning the other two, they provide the same bonus, but one is for carrier CAS and the other carrier naval bombers, so just make sure what planes are actually on your carriers before you click one.
The terrain bonuses: are great (except cold water), and should be used to maximum effect.
This is all for Hearts of Iron IV Advanced Guide to the Navy in Multiplayer hope you enjoy the post. If you believe we forget or we should update the post please let us know via comment, we will try our best to fix how fast is possible! Have a great day!
- Check All Hearts of Iron IV Posts List







Leave a Reply