A definitive guide for modifying sounds for War on the Sea
Introduction
Hello there! If you do not know me already, I am the creator of Berserk’s War on the Sea Sound Mod (BWSSM), which as of now is the community’s only sound mod for the game and something I wish to change with the creation of this guide. Sound modding for the game was something that took me a good few hours of smashing my head against the keyboard and many, many broken asset files to figure out, so hopefully with this guide I can save many of you the same frustration as I had.
Disclaimer
This guide will only let you replace existing sounds, not add new ones.
Required Software
Before you get started you’ll need the following software:
- Unity Assets Bundle Extractor (UABE) to extract and change file dumps: https://community.7daystodie.com/topic/1871-unity-assets-bundle-extractor/ – [7daystodie.com]
- Unity version 2018.4.31f1 on a free personal license and Unity Hub. Do not use any newer version of Unity as UABE cannot seem to read assets from newer versions. You’ll use it to put in new sounds and pack them into a .resource file that the game will read: https://unity3d.com/get-unity/download – [unity3d.com]
The following software are not necessary for modding sound, but ones that I personally use to make BWSSM and would highly recommend:
- Audacity, which I use to mix sound, adjust volumes, and convert them into .wav files: https://www.audacityteam.org/ – [audacityteam.org]
- Assets Studio, which lets you preview assets without opening the game. While not strictly necessary to make a mod, I highly recommend getting it especially for figuring out what files are connected to which sounds as there are many unused sounds in the game you can save time on by skipping. I personally use it to listen to sound files I’m thinking of replacing and to check to see if my modified sound files have successfully transferred over without having to trigger them in the game: https://github.com/Perfare/AssetStudio/releases – [github.com]
Getting Started
Context
To simplify how War on the Sea and just about any Unity game gets its sound, an .asset file will contain information that tells the game to look at a .resource file that contains the sound files for the game. What we will be doing is changing where the game looks for certain sound files so it instead will look at our own, custom .resource file containing the sounds we want it to have instead of the default one.
Figuring out what to change
So you’ve decided you want to make a sound mod, now what?
First thing’s first, you need to figure out the file names of what you want replaced. This is easiest to do with Assets Studio as UABE has no way to let you preview assets.
From Assets Studio, select “File” and in the pop-up window go to WarOnTheSea_Data, which can be found with on the filepath Steam\steamapps\common\War on the Sea\WarOnTheSea_Data
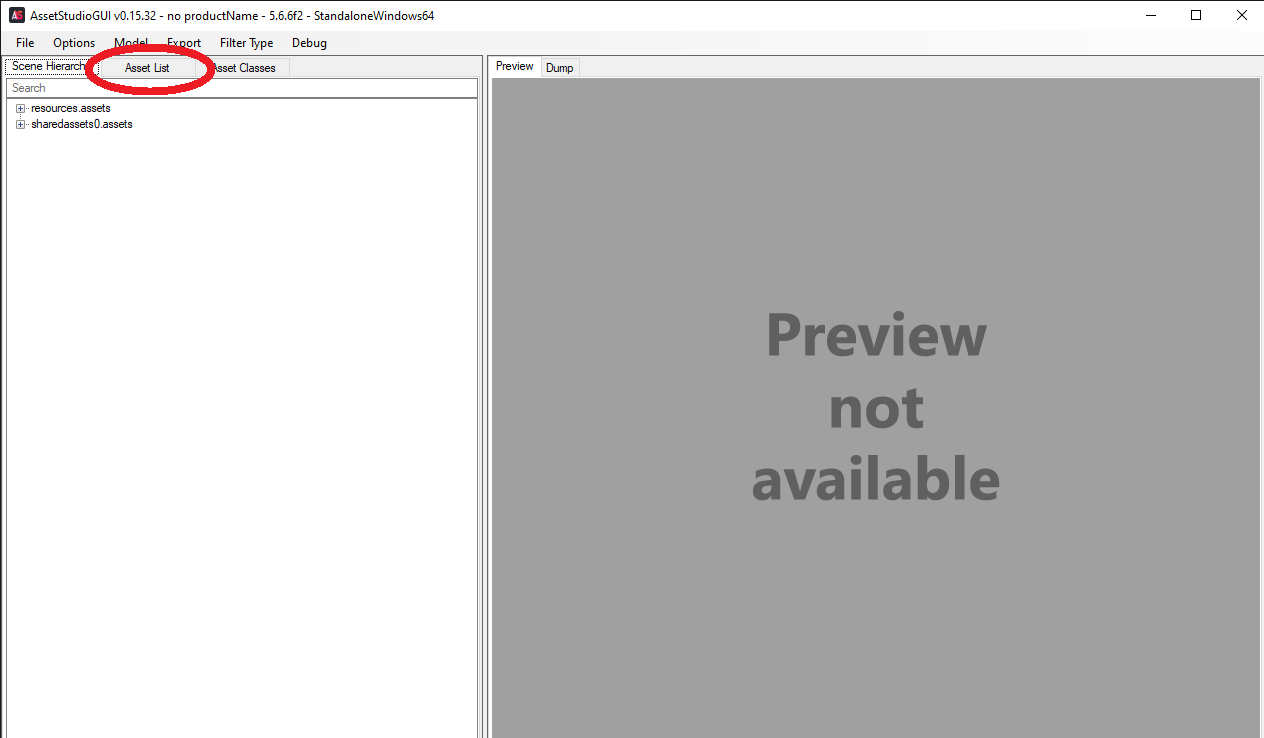
Once there, open the file resources.assets and click on “Asset List”
From there, you can access a list of the game’s assets.
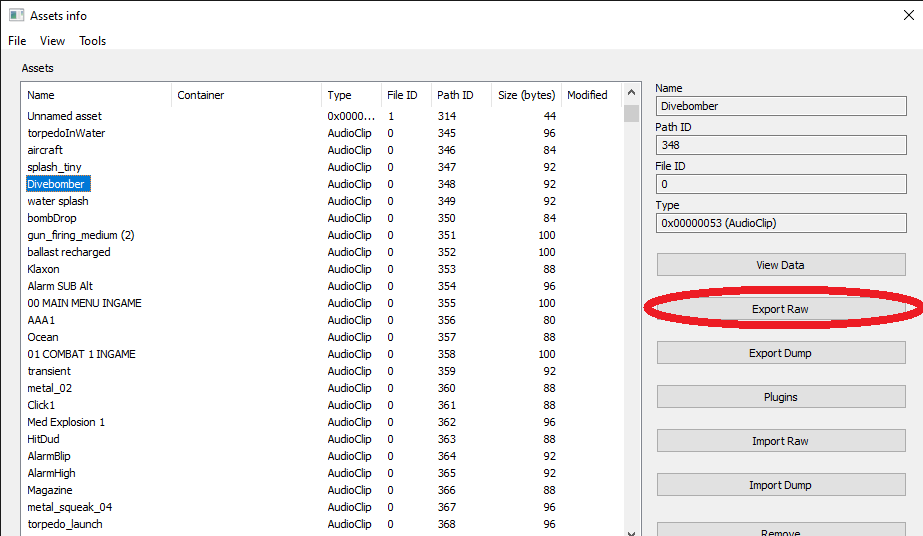
Because we are looking for sound files, click on “Type” on the list to sort by file type alphabetically. At the very top you should see a long list of AudioClip files. Assets Studio will allow you to click on each one and listen to each of them.
Keep track of the file names of each sound file you wish to replace for later. A few of them might even share the same sounds. If this is the case, you may as well replace all of them. An example of this that I came across when making BWSSM was the files aircraft, Single_Propeller_Engine, and PropellerEngine all use the same sound. I was unsure as to which sound the game actually uses, so I replaced all three to make sure. It is possible to figure out which of them actually works with trial and error, but this can be tedious as seen with the later steps.
If you want to do this step in UABE, open up resources.assets and sort by file type. From there, click on an AudioClip file you want to listen to and click “Export Raw”. It will prompt you with a window asking where to offload the file and upon selecting one, it will export a .wav file that you can then listen to.
Getting your sounds together
So now you know what files you want to replace and their names, fantastic. From there, collect whatever audio you want to replace them with. Whatever you decide to do, make sure that they are .wav files and that the audio is stereo, not mono.
Once you have everything together, rename the audio files to whatever their file name is in the game’s files based on what you found in the previous step. This is so that when you finally extract the dump files later, they are all named correctly and ready to be ported into the game.
I personally have two folders for my sounds, one that has files marked under my own naming conventions and with sounds that are in progress or have been adjusted, and another one for only the sounds that I am putting into the game with the correct names.
If you are replacing a sound where there are multiple files in the game that use the same audio but are under different names (i.e aircraft engine sounds), make a copy to replace each of the files and name them appropriately.
Now that that’s done, we now move on to Unity to start making a .resource file.
Working With Unity
Initial Steps
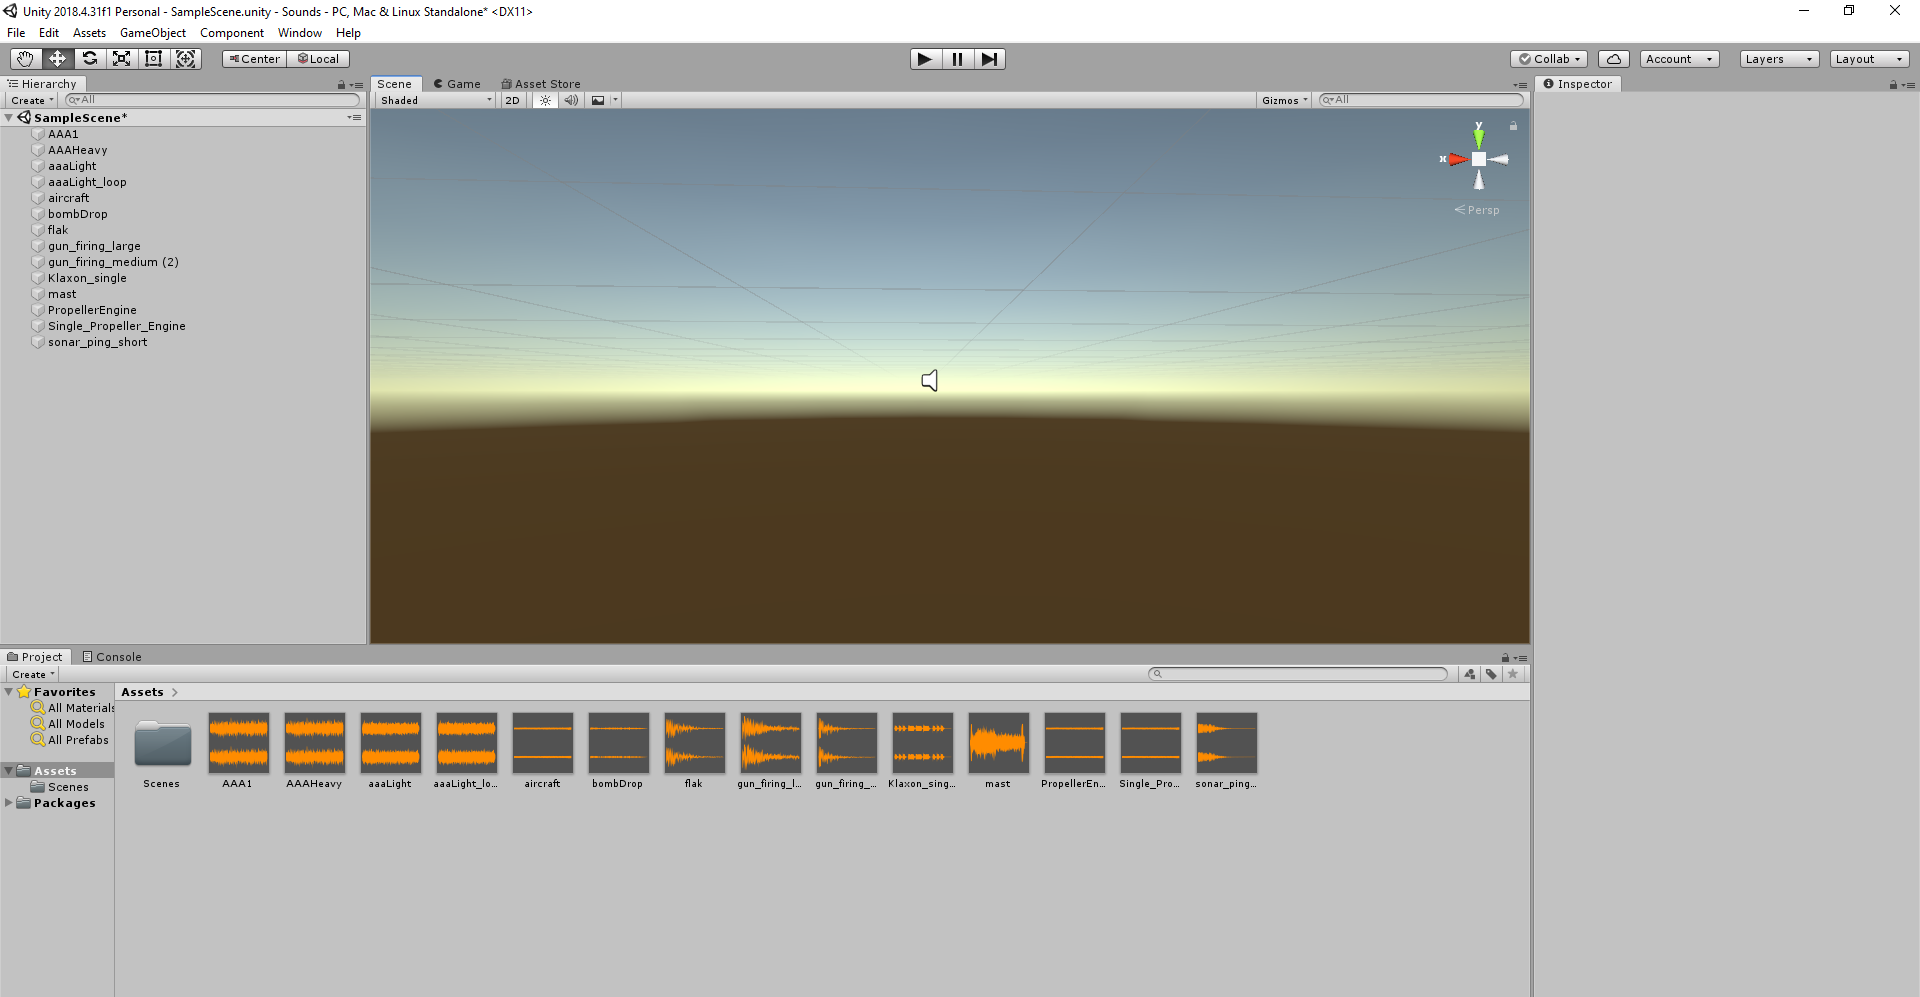
Launch Unity Hub and create a new 3D project with version 2018.4.31f1 and name it whatever you like. You won’t be doing anything particularly fancy, simply drag and drop your sound files into the assets folder at the bottom. Once they have finished importing, select them all again and then drag them into the sidebar on the left under SampleScene.
When you’re done, it should all look like this
Once that is finished, create a new build by clicking File and then Build Settings. From there, click Build and wait for it to finish.
Dump Files and the .resource File
Now we get to making the components that will actually make it to the game folder. Once the build has finished, go to the folder where your Unity Project is saved and open the folder (project name)_Data
There are two files of interest here, namely sharedassets0.resource and sharedassets0.assets
First, rename sharedassets0.resource to whatever you like. The reason being is that War on the Sea contains a file with exactly the same name. Just make sure that it still ends with .resource. For me, I chose BWSSM.
Next, launch UABE, click File, then Open, and go back to your Unity project and open sharedassets0.assets
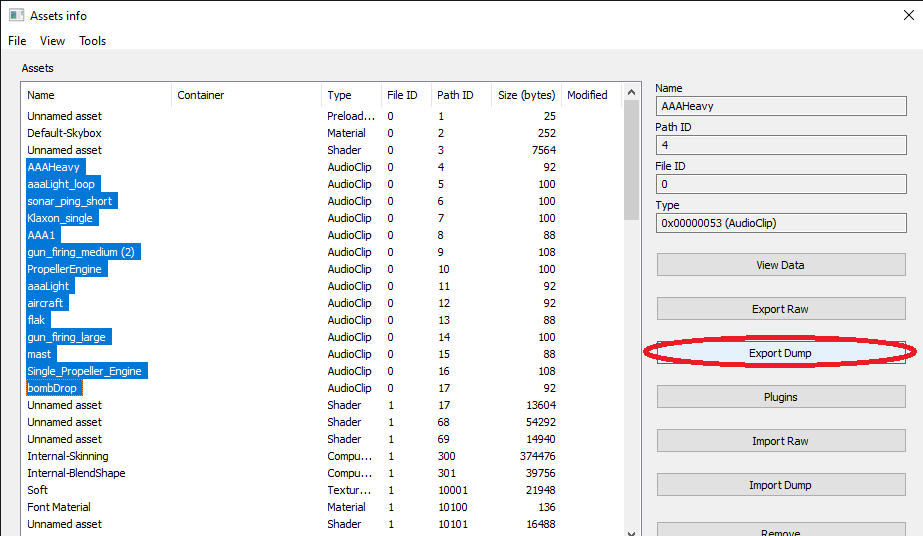
You’ll be given a new window with every asset in the folder. Towards the top, you should see all your audio files marked as AudioClips. Select all of them and on the right hand side click Export Dump.
From there, make sure that they are being exported as UABE text dumps and find/make a folder to put them in. Go to that folder afterwards and you should see a few text files with the names of the sound files. These are your dump files that will be used to redirect the game to look to your modified resource folder when it wants to get audio from a modified file rather than the game’s own resource folder with the vanilla audio.
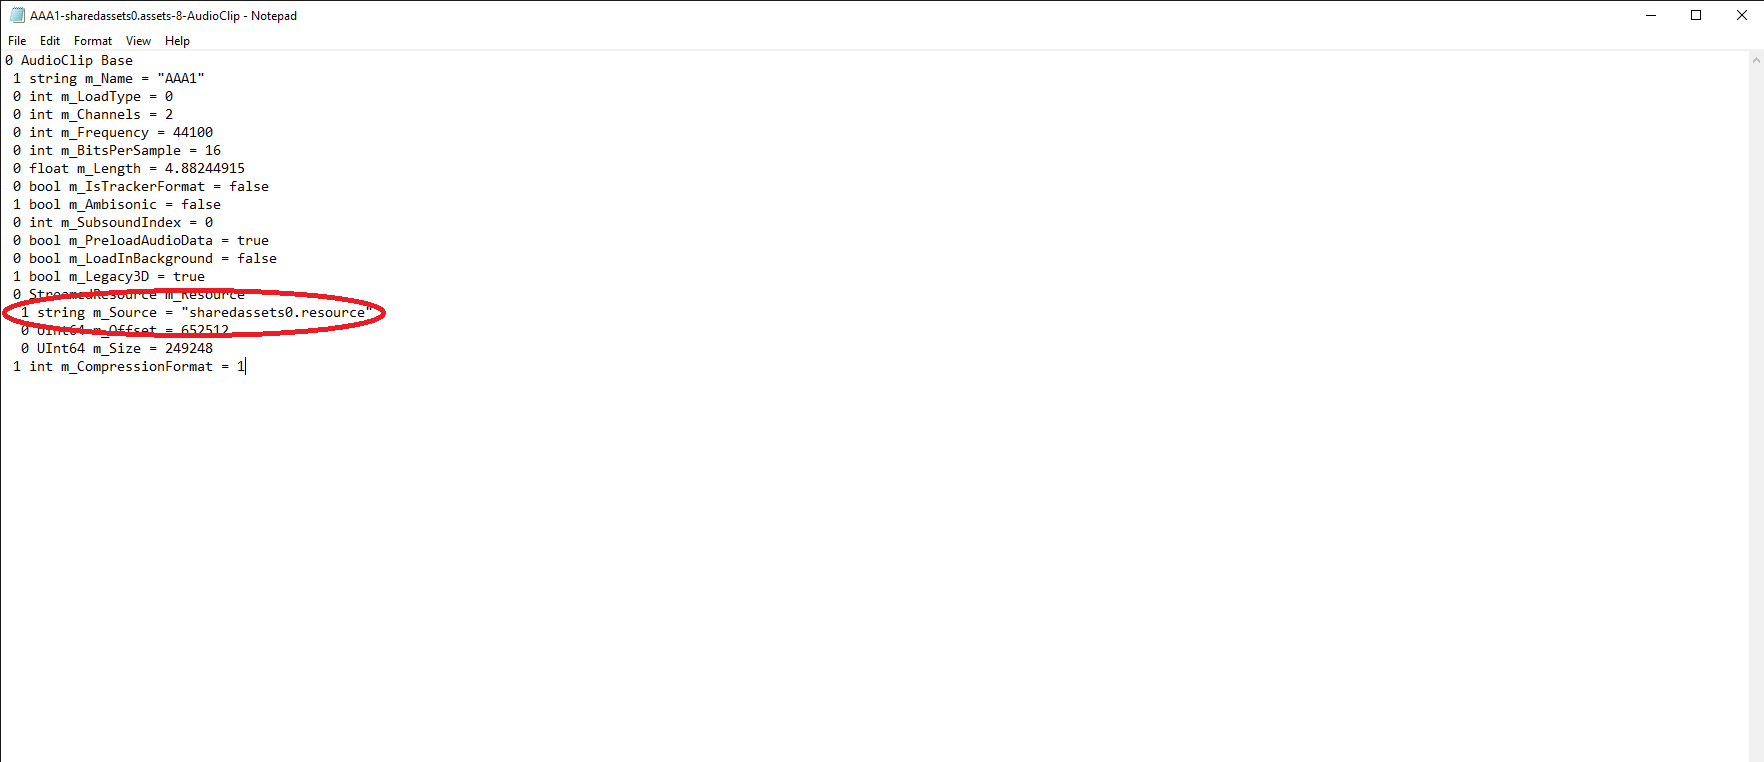
However, there is still one hitch, all of these dump files have been set to look for sharedassets0.resource, a file that you have renamed. You will have to manually open each dump file and look for the following line
Once you’ve found it, rename sharedassets0 to whatever you renamed your resource file to and save the file. Do this for every dump file.
This is the most tedious part of creating sound mods for the game. If you’ve made it thus far without being confused, congrats!
Modifying The Game’s Sounds
At this point we’re now ready to actually make changes to the game’s files so that it has our modified sounds and using our dump files to know where to find them.
The Resource File
This is the easiest part, simply copy and paste your modified resource file into WarOnTheSea_Data
The Asset File(s)
Now you’ll put your brand new dump files to work by changing the way the game reads its asset files.
Bring up UABE and use it to open up resources.assets in WarOnTheSea_Data
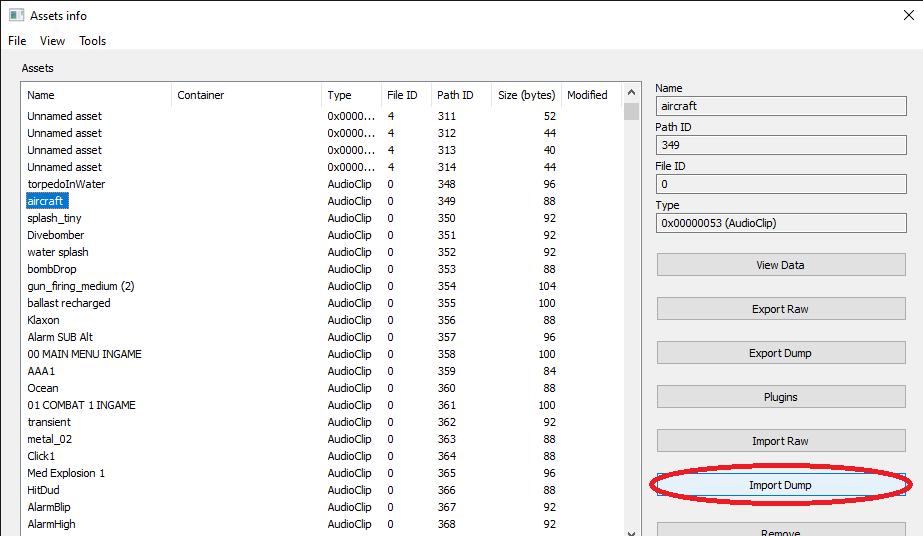
Once you’re in, you’ll probably want to sort by file type so AudioFiles appear towards the top. From there, find and click on a file you want to replace and click Import Dump.
From there, navigate to the folder containing your dump files and click on the dump file corresponding to the file you want to replace. Do this for every file you want to replace, and check twice to make sure that the number of modified files equals the number of dump files you have.
DO NOT GET RID OF YOUR DUMP FILES, THEY WILL BE USEFUL WHEN UPDATING YOUR MOD
Once you’re done, click OK on the bottom of the UABE window. It’ll create two new asset files under the same names as the ones present in the game files. Put them in a separate folder for the time being. Back up the original asset files first before replacing them with the new ones you’ve just created with UABE.
If all goes well and your modded resource file is in the game files, you should have successfully modded the game’s sound files!
Updates and Betas
Your Mod Will Not Work After an Update
This is an inevitability and something you’ll have to deal with due to the constant updates the game receives. This is quite good for the sake of the game moving forward, not so good when you mod the asset files.
With every update comes changes to the asset files, meaning that all your work importing the dump files will be undone with each update. This means that the game will revert to the vanilla audio files as your dump files are no longer redirecting the game to your modified resource file. The same thing will happen if you download a beta version of the game.
Updating Your Sound Mod
So how do you go about updating your mod with each game update or if you just downloaded a beta version of the game?
All you really need to do is re-import the dump files to the game’s new asset folders. Effectively, you will be repeating the steps listed under “The Asset Files” in the previous section. Boot up UABE, find each audio file you wish to change, import the dump files again, and replace the game’s asset files with the new ones made by UABE. No changes need to be made to the resource file, it can be reused after each update.
Updating Audio in Your Mod
If you ever decide to make changes to the audio contained in your mod, open the Unity project you made earlier and add/replace/delete sounds as needed. If you’re replacing or deleting sounds from your mod, make sure the previous version of the file has been deleted in both the lower assets bar and in the SampleScene bar on the left hand side. Once you’re done, save the build and repeat every step from the section “Dump Files and the .resource File” and onward. Your old dump files will no longer work, so it’s safe to get rid of them once you’ve created new ones.
Conclusion
If everything has gone well and you managed to put together a sound mod without breaking your game the first time, congratulations! I had over 20 gb in broken asset files the first time I tried putting a sound mod together, so hopefully you were able to avoid such a situation with this guide.
I very much hope that this guide will help others in modifying the sound in the game to their own liking in ways that my own mod could not and possibly help to inspire the creation of new sound mods in the future.
Thanks for reading, and happy sailing.
Berserk
Here we come to an end for War on the Sea How to Modify Sounds Tutorial hope you enjoy it. If you think we forget something to include or we should make an update to the post let us know via comment, and we will fix it asap! Thanks and have a great day!

Leave a Reply