Necessary infos on setting up your own custom server, be it PvE or PvP or just designed for a comfortable solo experience with your own game rules. Can be used as reference for a short look-up.
Intro
This guide will teach you how to make a custom server for free and without registration and sms. It also explains some settings in more detail so you can understand them better.
NOTE for Solo-Players and small private groups:
If you are looking for a solo play or if you and your friends know that you are going to play at the same time, it might be more optimal for you to create a Listen Server aka "Private Game" from the game menu itself. In this guide I will describe only Dedicated Server-related things
Use Dedicated server if:
– You have a spare PC to run a Server on
– Someone from your friends has the most powerful PC
– it’s important for you that the server runs separately from the game (you don’t have to launch the game like with Listen Server via “Private game” option)
– You need to minimize the ping difference within your group (for example, if you have a spare VDS/VPS located more or less equally close to everybody within your group)
elsewise, creating a “Private Game” (= Listen Server) and customizing it should be enough for your needs.
Installing a Server
Why
– You want your server to be running without having to launch the game itself
– You want to have full control over the game’s world
– You want to fully customize your game
– You want to test something out
– .. whatever other reason
How
There are three ways of setting up a server for VRising:
1. via Steam CMD
2. via Steam App
3. via paid game server like GPortal (no actual installation)
If you just want a little private server for you and your friends, I recommend, going for the 2nd option. If you want to build a community, probably the 3rd option will be a better start.
The first two can be hosted on your machine as well as on a bought server (I don’t mean a game server provided by GPortal or NITRADO here). I will describe how to install a server on your home PC you usually use to play games. Same will apply to a rented dedicated server.
You can host AND play at the same time on the same machine.
The third option won’t be covered as in that case the Server is pre-installed, but you might find this guide useful when it comes to the Server’s settings and modifiers.
The guide is aimed at Windowsusers, for Linux, please refer to:
– here – [github.com] or
– here – [github.com] or
– here – [github.com] or
These are Docker solutions, shall there be any better options / cleaner projects, please let me know.
– here – [riotbits.com] is a great guide taking your hand and explaining step-by-step how to install it. It’s CentOS-specific but I’m sure you will find it relevant to your distribution.
Now Let’s see how to set up a server using Steam CMD and Steam App:
— Steam CMD [free]
Fetch the server files with Steam CMD as described below:
^ SteamCMD download link. Once on the website, scroll down to see a download link for the Steam CMD
- Download SteamCMD from here – [valvesoftware.com] .
- Extract the contents into a new folder.
- Run “steamcmd.exe” in the folder and wait for the process to complete.
- Type into the window
login anonymous
- Hit Enter and wait for SteamCMD to log you in.
- Type into the window
App_update 1829350
- Hit Enter and wait for the server files to be downloaded.
- Once the process is complete, type “exit” and hit Enter to exit the window.
- Now from your steamcmd folder, navigate to “..steamapps/common/VRisingDedicatedServer” to find your server files.
- You can now jump to the Server’s General Folder section and continue reading from there.
— Steam App [free]
Get the Server files using your Steam:
- Open Steam
- Navigate to your Library
- From drop-down menu on the left panel make sure “Tools” is checked.
- Now search for V Rising Dedicated in your Library
- Install it (you don´t have to install it on the same hdd as your game)
- Once installed, Right-Click on it and choose “Browse Local Files”
^ Screen 1.1 Jump to Server’s files from Steam
Continue reading from “Server’s General Folder” section.
— Game Server Provider [paid]
NITRADO, GPortal or any other game server providers normally already have a ready solution for certain games and have the server pre-installed. If you want to tweak it, you will have to find the folder with Settings somewhere through the web-interface.
Contact support of your provider if you feel completely lost.
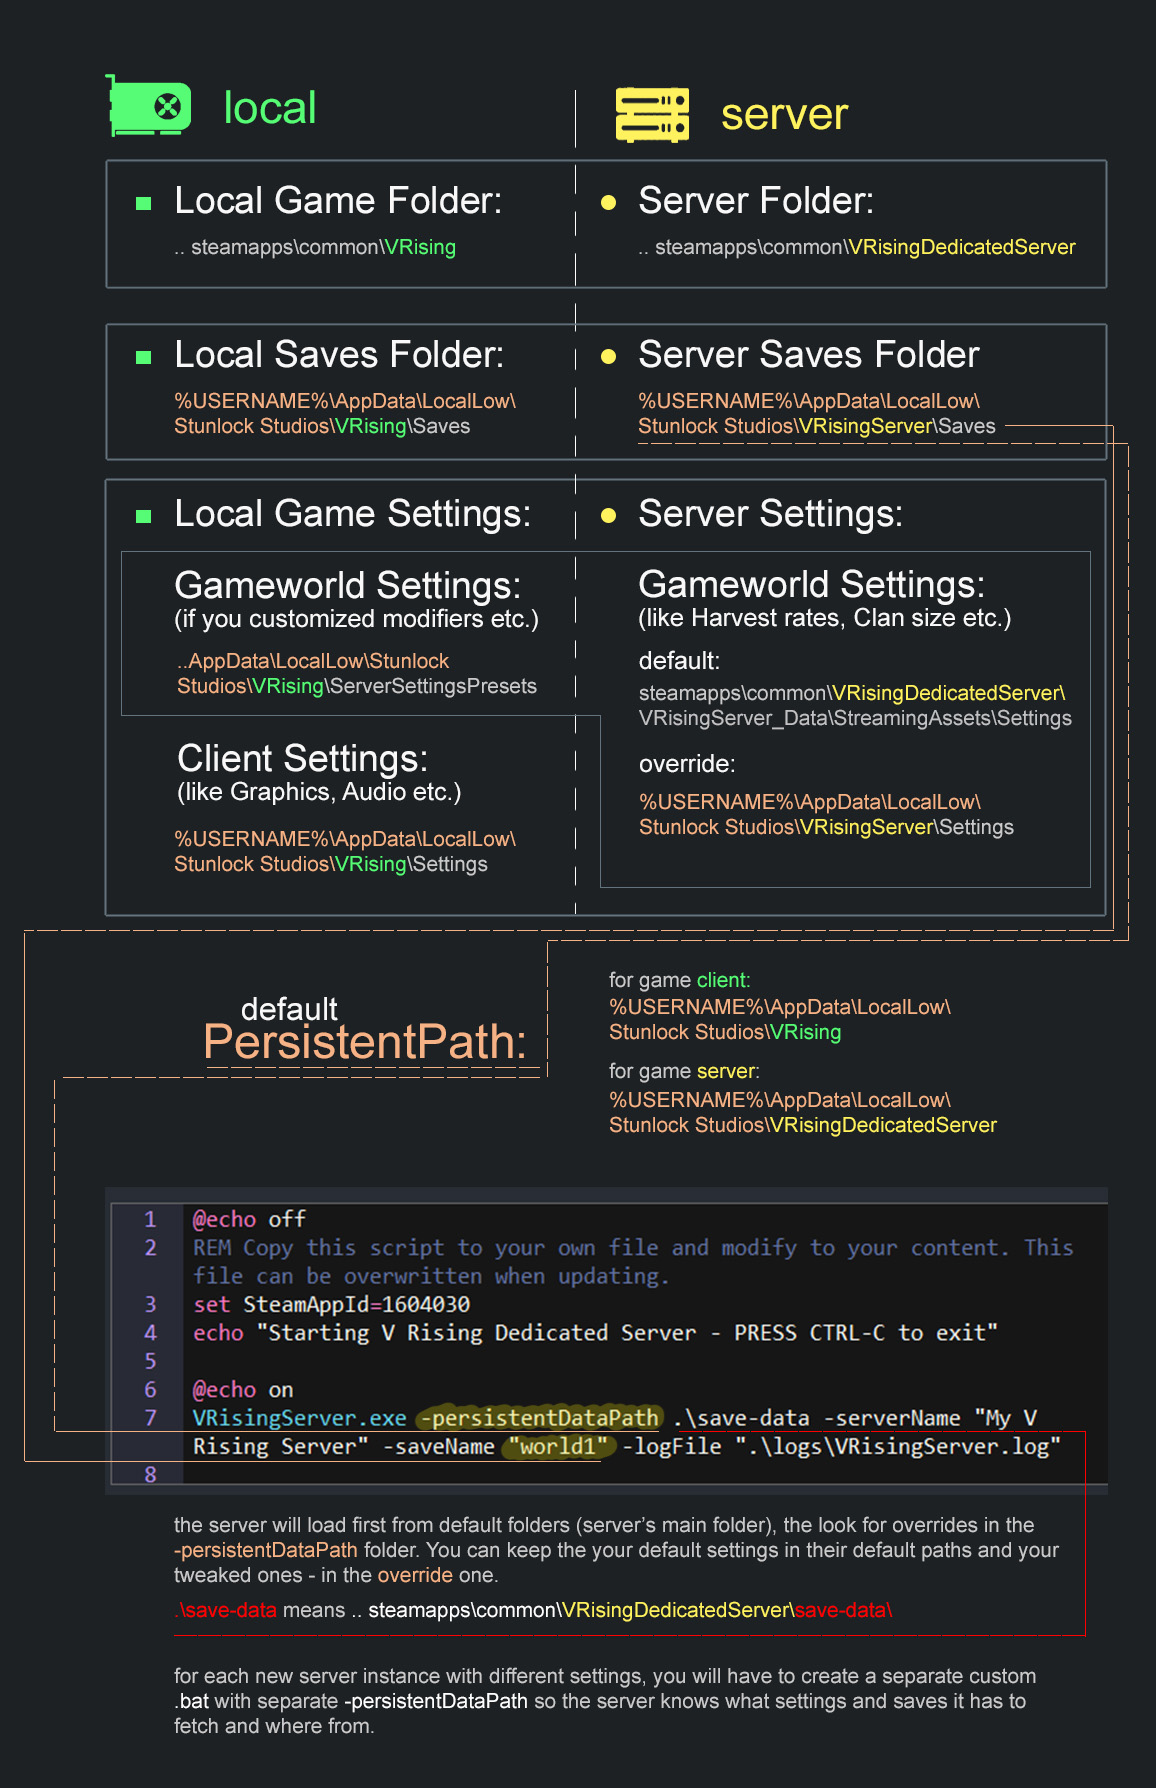
Server files VS. Local Game files
NOTE — Before you start reading this section:
1. make backups before changing sth
2. you can keep all the default paths, including persistent path, path’s names etc in order to make a custom server and make it work, you don’t have to change everything, the server will work “out of the box” already, all you’d have to do is to change it’s name, set a password and tweak some parameters. For that you need to edit:
- – start-server-example.bat
- – ServerHostSettings.json
- – ServerGameSettings.json
that’s it! you can skip this section and jump to corresponding ones which describe how to edit those.
If you want to know a bit more, continue reading here:
Since names of folders and some crucial files are mostly the same for the server and the local game, it’s important not to confuse those and understand the differences in paths:
– Server’s General Folder
Once you got your server files installed, navigate to the Server folder which will be located at:
..Steam\steamapps\common\VRisingDedicatedServer\
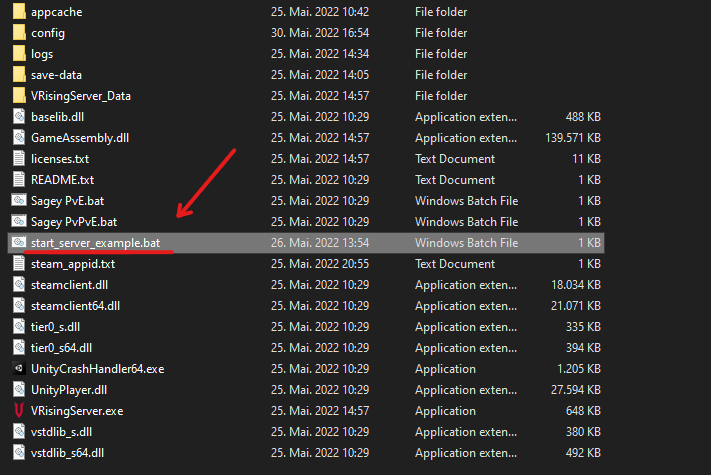
You will have less Folders than on the screenshot below but as soon as you launched a Server for once and let it run for some seconds, they will appear.
^My Server folder.
To remember:
– start the .bat — to start the server
– if you do any changes in paths, .txts, .jsons:
– stop the server first
– make your changes, save
– start the server
— start_server_example.bat
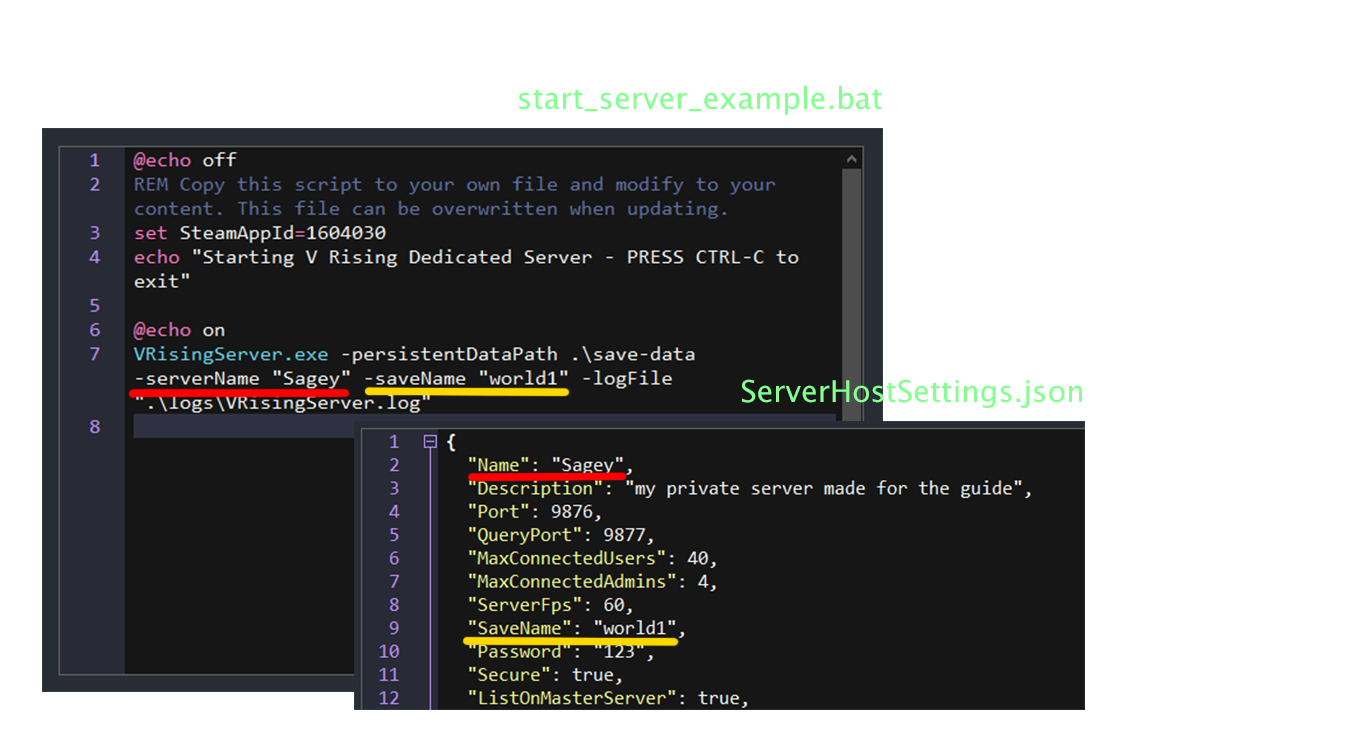
In order to launch a Server, we need to start a .bat file called “start_server_example.bat”
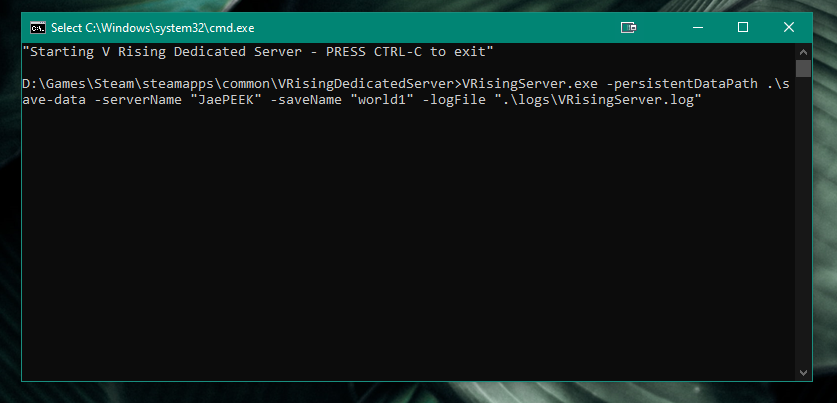
This is how the batch-file (.bat) looks like once executed:
^ Once launched, it will look sth like shown above: a black window with minimal Infos
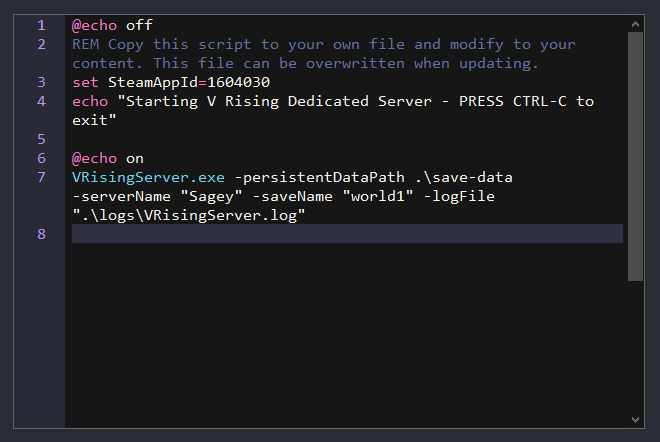
This is how the batch-file (.bat) looks like from “inside” :
^ A bat file in Edit mode (not the one executed above)
In order to open it, Right-Click —> Edit (or open with any source-code program)
As the commentary suggests, you can change this file to your content.
We can change:
The name of the .bat file – give it any name you’d like, like “myServer”. It’s recommended to do that as the file with the default name could be overwritten once the game recceives an update.
- persistentDataPath
^ a location where our worlds will be saved
- serverName
^ self-explanatory
- saveName
^ tells the .bat file which save it should peek from the “persistent DataPath” and load on the Server
- logFile
^ location where logfiles are saved
to avoid confusion, make sure that the Server name in the .bat you are going to use and in your ServerHostSettings.json are the same:
read on below to know more about .json files:
– Server’s Settings Folder (configuring .txt & .json)
I will describe how to edit standard files to avoid confusion. If you want to keep standard files, either make a backup or refer to the image comparing local vs server paths above to understand how overrides work.
To find your Setting files, navigate to the folder shown below. The fastest way to do that is to find the Dedicated Server in your Steam library –> Right-Click on it –> Browse Local Files.
then navigate to the Settings folder:
..Steam\steamapps\common\VRisingDedicatedServer\VRisingServer_Data\StreamingAssets\Settings
– – – – – – – – – – – – – – – – – – – – – – – – – – – – – – – – – – – – – – – – – – – –
Once Opened, you will see 4 files inside the folder:
^ Our Server. Default Server Settings Path
– – – – – – – – – – – – – – – – – – – – – – – – – – – – – – – – – – – – – – – – – – – –
I have the Server and the Game itself installed on different harddrives. Of course, you might have another Disk volume Letter and “Games” folder name for Steam downloads – use yours there to find.
Let’s see what each of them does:
Tip:
 if you prefer GUIs to text files when it comes to tweaking, you can do the following:
- Launch the Game
- Choose host own game
- Show advanced settings
- Tweak it the way you like
- Save this "Ruleset" (bottom right of your screen)
- Name and add description to it however you like
- Close the game
- Go to %USERNAME%\AppData\LocalLow\Stunlock Studios\VRising\ServerSettingsPresets
- Find a file named sth like gd344-fs334-434hy4-3434d-3242gh.json
- Open it and you will see all the settings you just set via the game itself
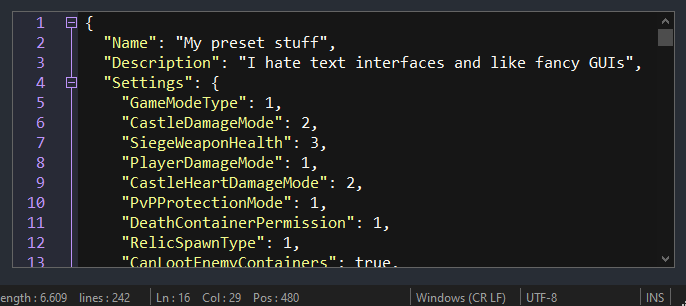 ^pre-set example I made and extracted from the game
You can now just copy these to your server's Settings.
Like this you wont have to manually adjust the .json files at all.
Note on numerical Values:
some of the settings in such generated preset will have number parameters instead of text parameters, the latter are used more ofter in this guide, for some parameters I mentioned it, for some - not. If you need to decypher them for whatever reason, reference to the in-game screen like shown below and read the bars from left to right. 0 will always be the most left one: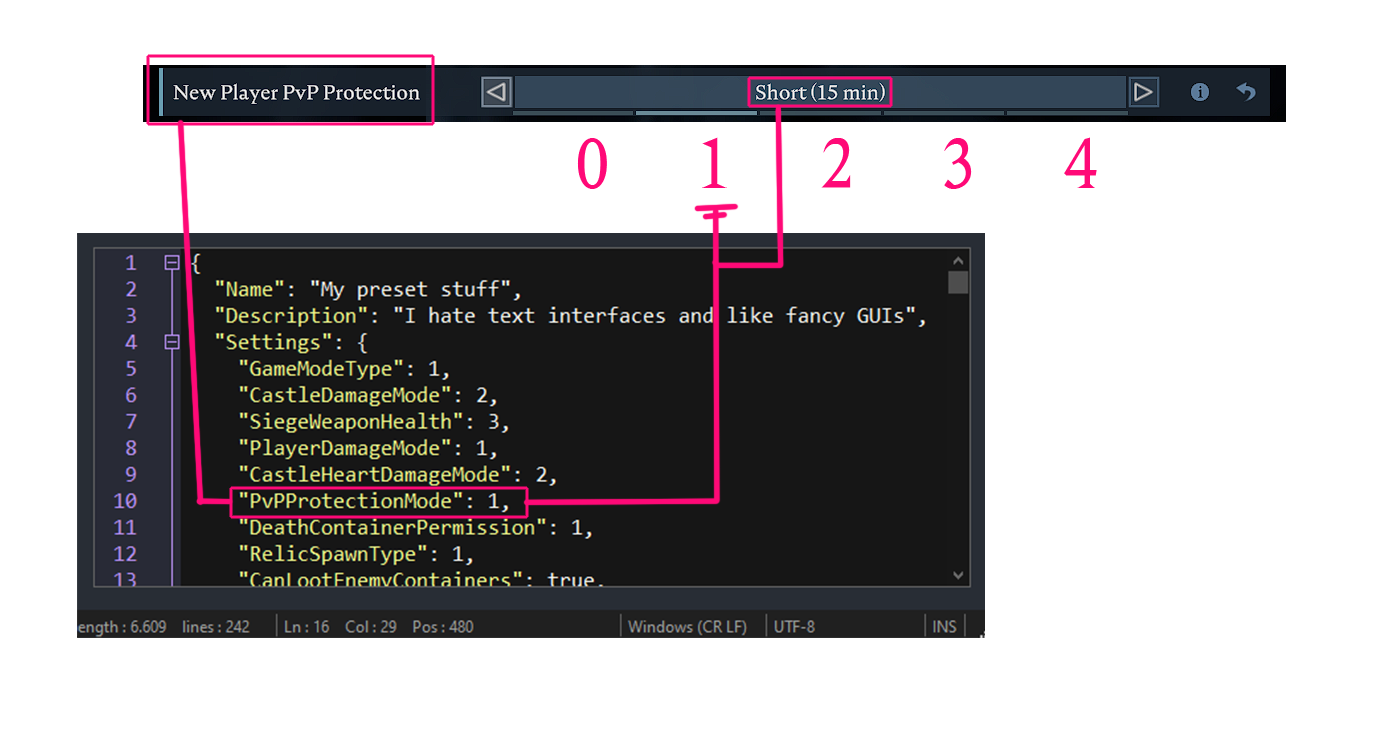
— Adminlist.txt & Banlist.txt
These two txts will contain the Steam IDs of Admins and Blacklisted players respectively. Find your SteamIDs here – [steamidfinder.com] .
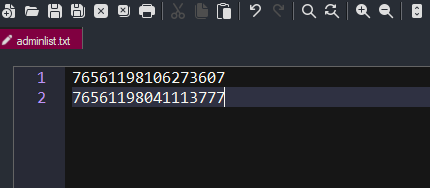
Just insert each SteamID in the document. 1 string should contain 1 ID like shown in examples below:
76561198106273607
76561198041113777
^ Adminlist.txt: Just insert the SteamID64 Decimal values. Use the same method for your banlist.txt
- Putting somebody on the Admin list will enable that person to log in as admin on the server.
- Putting somebody on the Banlist will prevent them from joining the server.
— ServerHostSettings.json
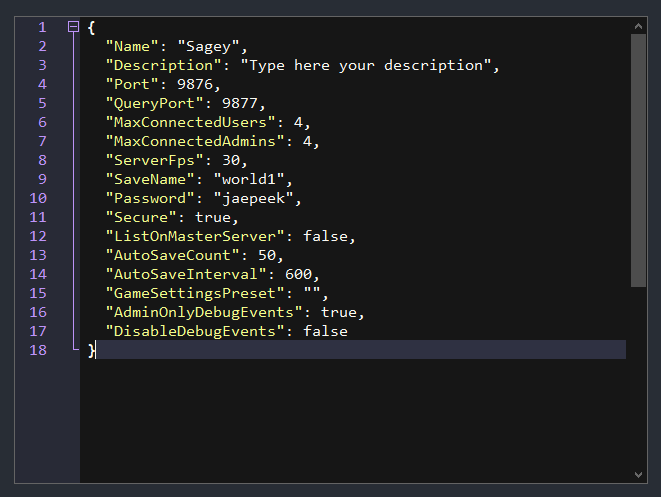
^ Screen 2.1 Example of Host File
– – – – – – – – – – – – – – – – – – – – – – – – – – – – – – – – – – – – – – – – – – – –
Let’s have a look at each parameter:
2.”Name”
"Name": "V Rising Dedicated Server"
Description: Write you server name here, for example. “[UK] Edward & Bella | Duo | PvE | x2 Harvest |”
3.”Description”
"Description": "Roleplay server, join pur discord at xxxxxxxx!",
Description: placeholder for a short description, you can leave a link to you discrod or purpose of the server, whatever you’d like.
4.”Port”
"Port": 9876,
Description: UDP port for game traffic
5.”QueryPort”
"QueryPort": 9877,
Description: UDP port for Steam server list features
6.”MaxConnectedUsers”
“MaxConnectedUsers”: 40
Description: Max number of concurrent players on server
7. “MaxConnectedAdmins”
"MaxConnectedAdmins": 4,
Description: Max number of admins to allow connect even when server is full
8. “ServerFps”
"ServerFps": 30
Description: Server FPS is your server’s tickrate, which affects the rate your server will process the game’s data per second. Game’s data contains animations, players’ positions and dozens, projectiles; processing and tons of other things. The more fps – the more accurate and fluid the client’s game will be, it will also mean more stress to the server machine. The value could be crucial for PvP games or actually any intense battle. Consider increasing it if you think that “you totally hit that enemy with your chaos ball but it didnt take any damage!” or if the animations don’t seem smooth enough.
9. SaveName”:
SaveName": "world1",
Description: Defines the name of the paths where saves will be stored. If you rename it, make sure the .bat file you are going to use will “know about” it by editing -saveName parameter there.
10.”Password”
Password": "123",
Description: Insert the password you want to set on the server in order to prevent people who don’t know what the password is to join the server.
11.Secure:
"Secure": true,
--TBD
12.”ListOnMasterServer”
"ListOnMasterServer": false,
Description: Defines whether the server will get visible on the Server list. If set to false, the server will still be accessible, however Players will have to know the exact IPAddress of the server and use Direct Connect function or a console command in order to join. Perfect if you don’t want to advertise or for privacy reasons.
About direct connect:
Like mentioned above, If you host on the same machine you host the server from: just use the console command:
connect 127.0.0.1 9876
for your friends / players to join, you can also use the same command but you will need a public IPv4 exact address:
connect xxx.xxx.xxx.xxx 9876
to know the public address of your server, visit a website like whatsmyip or use cmd command
ipconfig /all
– you will need an IPv4 address from there. If you rented a pre-installed server, you should look for it in the webinterface. the port remains the same in both cases unless you changed them manually.
13.”AutoSaveCount”
"AutoSaveCount": 50,
Description:Number of autosaves to keep
14.”AutoSaveInterval”
"AutoSaveInterval": 600,
Description:Interval in seconds between each auto save
15.”GameSettingsPreset”
"GameSettingsPreset": "",
Description: Defines which set of rules for your game has to be used. The devs made their own pre-sets – you can find them in
steamapps\common\VRisingDedicatedServer\VRisingServer_Data\StreamingAssets\GameSettingPresets
but you can also make up your own one, name it how you want and indicate it here
Name of a GameSettings preset found in the GameSettingPresets folder.
Debugcommands:
You can leave everything here as it is unless you want to develop a mod or you know what you are doing
16.”AdminOnlyDebugEvents”
"AdminOnlyDebugEvents": true,
Description:Admins are the only ones who can control debug events
17.”DisableDebugEvents”
"DisableDebugEvents": false
Description:self-explanatory
— ServerGameSettings.json
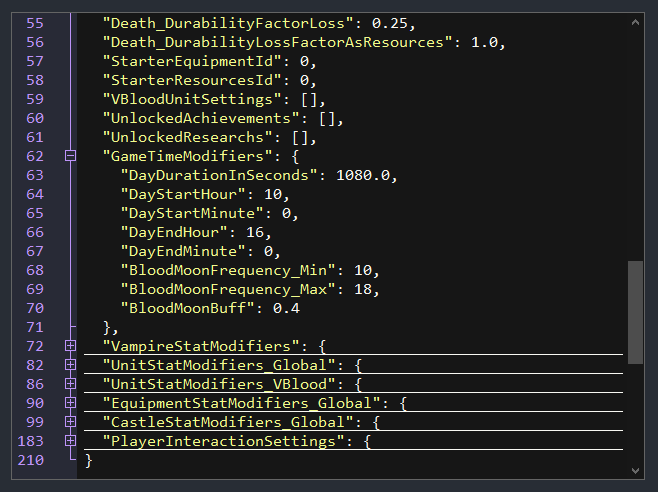
Here I will describe the parameters of .json files. The number next to each parameter means the number of a string in the document for a faster reference, you can see the strings when you open a file with a source code editor. On the screenshot below you see how it looks like.
You can also use standard Windows’ Notepad and Ctrl+F function to find a parameter, edit and save the file.
^ Screen 2.1 Example of Host File
– – – – – – – – – – – – – – – – – – – – – – – – – – – – – – – – – – – – – – – – – – – –
– 2-21. General Settings [Part 1]
2. “GameModeType”
"GameModeType": "PvE",
Description:Just a label to mark your game type, defines the basics to PvP or PvE gamemode.
3. “CastleDamageMode”
"CastleDamageMode": "Never",
Description: Defines whether Players’ Castles can be damaged and when. The possible values are written below and are self-explanatory:
- “Never”
- “Always”
- “TimeRestricted”
NOTE: If set to time restricted, refer to 183.”PlayerInteractionSettings” section for tweaking.
4. “SiegeWeaponHealth”
"SiegeWeaponHealth": "Normal",
Description: Siege weapon = Siege Golem. Will define the health pool of the Siege Golem – a Unit you summon and use to Raid someone’s base.
Possible Values:
- “Low” or “1” // (500 HP)
- “VeryLow” or “2” // (1000 HP)
- “Normal” or “3” // (1500 HP)
- “High” or “4” // (2000 HP)
- “VeryHigh” or “5” // (2500 HP)
5. “PlayerDamageMode”
"PlayerDamageMode": "Always",
Description: Defines whether Players can take damage from other Players. The possible values are written below and are self-explanatory:
- “Always”,
- “TimeRestricted”
NOTE: If set to time restricted, refer to 183.”PlayerInteractionSettings” section for tweaking.
“6. CastleHeartDamageMode”
CastleHeartDamageMode": "CanBeDestroyedByPlayers",
Description: Defines when Sastle Heart can be destroyed by players. The possible values are written below and are self-explanatory:
- “CanBeDestroyedOnlyWhenDecaying” // read: when it ran out of Blood Essence
- “CanBeSeizedOrDestroyedByPlayers” // = captured or destroyed
- “CanBeDestroyedByPlayers”
“7. PvPProtectionMode”
"PvPProtectionMode": "Medium",
Description: The amount of time a Player will be invulnerable to other Players’ attacks together wih not being able to do any Damage to other Players after joining the server for the first time. Use it to protect the players from spawn kill and give them time to settle before they can engage in battle.
Possible values and time amounts for them:
- “0” // disabled
- “1” // 15 min
- “2” // 30 min
- “3” // 1 hour
- “4” // 2 hours
8. “DeathContainerPermission”
"DeathContainerPermission": "Anyone",
- “0” // Anyone
- “1” // Clan Members
- “2” // Only Self
Description:Defines who can take the items dropped by a player who was slained.
9. “RelicSpawnType”
"RelicSpawnType": "Unique",
Possible values:
- “Unique” // only one of each type may exist at a time on the server
- “Plentiful” // a new one is dropped everytime a soul shard boss is slain
Description:Defines if the EndGame Soul shard items should be unique or plentiful. When set to unique, only one of which can exist at the same time.
10. “CanLootEnemyContainers”
"CanLootEnemyContainers": true,
Description:When set to True, Players are allowed to loot other Players´ containers (stashes, crafting stations etc). Set to Falseto prevent Players from doing so.
11. “BloodBoundEquipment”
"BloodBoundEquipment": true,
Description:When set to True, Players will not drop their Equipment (not to be confused with resources!) upon death. Set to Falset o disable.
12. “TeleportBoundItems”
"TeleportBoundItems": true,
Description: when enabled, some items will prevent you from using waygates. Set to “Fasle”to disable.
13. “AllowGlobalChat”
"AllowGlobalChat": true,
Description: Set to Trueto allow players to write messages that all players on the server can read, set to Falseto disable global chat.
14. “AllWaypointsUnlocked”
"AllWaypointsUnlocked": true
Description: This will not reveal the Entire map, it will only allow you to use all the waypoints without having to discover them manually. Affects all players on the server.
15. “FreeCastleClaim”
"FreeCastleClaim": false,
Description: Defines whether Players will need Keys to Seize Castles. When set to True: seizing an enemy player castle heart requires no keys, when set to False: – Players will need to craft a key first.
To destoy a Castle(Heart) you will need 1 key. To seize control over it – 3 keys. Here is a quick note on Keys needed to destoy a Castle of each Level and ingredients needed to craft 1 key:
| Key tier (ascending 🠗) | Destroys (x1) / Seizes (x3) | cost if “RecipeCostModifier” is 1.0: |
|---|---|---|
| Bone Key | Level 1 Castles | |
| Copper Key | Level 2 Castles | |
| Iron Key | Level 3 Castles | |
| Golden Key | Level 4 Castles |
These keys can only be used on servers that allow destruction and/or seizing of enemy castles.
16.”FreeCastleDestroy”
"FreeCastleDestroy": false,
Description:Defines whether Players will need Keys to DestroyCastles. When set to True: seizing an enemy player castle heart requires no keys, when set to False: – Players will need to craft a key first.
Please see a Note in 15. “FreeCastleClaim” to know more about keys.
17-21. “InactivityKill…”
 "InactivityKillEnabled": false,
 "InactivityKillTimeMin": 3600,
 "InactivityKillTimeMax": 604800,
 "InactivityKillSafeTimeAddition": 172800,
 "InactivityKillTimerMaxItemLevel": 84,
Description:
- “InactivityKillEnabled” – Inactive players are automatically killed after a set duration
- “InactivityKillTimeMin” – Minimum timer before inactive player is killed in seconds based on gear level
- “InactivityKillTimeMax” – Maximum timer before inactive player is killed in seconds based on gear level
- “InactivityKillSafeTimeAddition” – Additional time before an inactive player is killed in seconds when standing in a castle territory
- “InactivityKillTimerMaxItemLevel” – The maximum gear level that the inactivity min and max timers are based on from 1 – this value
– 22-42. General Settings [Part 2]
22-23. “DisableDisconnectedDead…”
"DisableDisconnectedDeadEnabled": true,
// If dead disconnected players are disabled
"DisableDisconnectedDeadTimer": 60,
// The time for a disconnected dead player to become disabled
24 .”InventoryStacksModifier”
"InventoryStacksModifier": 5.0,
min possible: 0,25
max possible: 5
the more = the less stacks of items will be required to carry more of the items, meaning 1 stack will contain more items.
Description:multiplies a standard stack of a certain item. Stacks vary for different items.
For example, default max stack (1.0 aka 100%) for Blood Essence would be 250.
set the value to 5.0 and you will be able to carry 250 x 5 = 2500 Units of Blood Essence in 1 stack.
NOTE: the stack will affect not only your inventory but those of any game container, be it a smelter, chest or castle. That means the default Level 1 Castle Heart (with 2 slots available for BE) will be able to contain 1250 + 1250 = 2500 Blood Essence (consider tweaking CastleBloodEssenceDrainRate in that case).
25. “DropTableModifier_General”:
"DropTableModifier_General": 1.0,
min possible: 0,25
max possible: 5
the more = the faster Players become rich on ressources and loot
Description: multiples the amount of loot dropped from general sources such as enemies, chests and other containers upon opening or destruction.
26. “DropTableModifier_Missions”
"DropTableModifier_Missions": 1.0,
min possible: 0,25
max possible: 5
- 1.0 would just mean a default value (100%)
- set to 0.75 to decrease teh amount of loot and get onlu 75% of teh defaul value.
- set to 2.o to double the loot
- etc.
Description: multiples the amount of loot brought by your servant after a successful hunt
27. “MaterialYieldModifier_Global”
"MaterialYieldModifier_Global": 5.0,
min possible: 0,25
max possible: 5
Description: Mulitiplies the amount of materials received from harvesting resource nodes.
28. “BloodEssenceYieldModifier”
"BloodEssenceYieldModifier": 5.0,
min possible: 0,25
max possible: 5
Description:Multiplies the amount of blood essence received from defeating enemies.
Example:
set to 2.0 to get 200% = 2 times more
set to 5 to get 500% = 5 times more
set to 0.5 to get half as much (50%)
“JournalVBloodSourceUnitMaxDistance”
"JournalVBloodSourceUnitMaxDistance": 25.0,
— TBD
30. “PvPVampireRespawnModifier”
"PvPVampireRespawnModifier": 1.0,
The more = The slower the player would spawn.
Description: Defines how slow a player can respawn after being slained in a PvP battle. Multiplies the additional respawn duration players suffer from being slain in PvP.
31. “CastleMinimumDistanceInFloors”
"CastleMinimumDistanceInFloors": 2,
Description: A minimal disctance allowed when placing floors next to an enemy castle measured in Floors. A Floor is what you normally claim your territory with once you’ve built a Castle Heart.
32. “ClanSize”
"ClanSize": 4,
max possible value: 10
Description: Sets the maximum amount of people who can group up in 1 clan. set this value to 1 if you want to create a pure solo server, set to 2 for duo, etc. etc. In the example given above clans can consist of 4 people.Players in a clan can rise together, share progress and build castles together.
33. “BloodDrainModifier”
"BloodDrainModifier": 1.0,
higher rate = higher blood consumption.
Description: This value will define how fast players will lose their Blood. Higher value will mean players would have to refresh their blood pool more frequently. Set the value to zero if you want to completely turn off this mechanic.
34. “DurabilityDrainModifier”
"DurabilityDrainModifier": 0.01,
max value: 5
the more = the faster items will break
Set to 0 to completely disable this mechanic.
Description: Multiplies the amount of durability suffered from dealing or receiving damage.
35. “GarlicAreaStrengthModifier”
"GarlicAreaStrengthModifier": 1.0,
min value: 0 (completely disabled)
max value: 5
the more = the more stacks of debuff will players gain per second.
Description:Defines how fast the players will gain stacks of Garlic debuff. Garlic Debuff causes players to be more susceptible to damage.
36. “HolyAreaStrengthModifier”
"HolyAreaStrengthModifier": 1.0,
min value: 0 (completely disabled)
max value: 5
Description:Multiplies the effect of the Holy element.
37. “SilverStrengthModifier”
"SilverStrengthModifier": 1.0,
min value: 0 (completely disabled)
max value: 5
the more = the less silver needs to be in Player´s inventory to cause damage.
If 1.0 will mean default value, then:
0.75 – only 75% of the default value = lesser damager taken by players.
2.0 – 200% from the default value = higher damage taken by players.
Description:Silver carried in Inventory causes player take damage over time. The more silver the player has on them – the more hp will they lose per second. Increase the value to make players suffer from a greater penalty of carrying silver.
38. “SunDamageModifier”
"SunDamageModifier": 0.05,
min value: 0 (completely disabled)
max value: 5
Description: Affects the duration a player may stand in the sun before starting to take damage.
39. “CastleDecayRateModifier”
"CastleDecayRateModifier": 1.0,
the more = the faster the castle will dissappear
Description: Rate for how quickly a castle deteriorate when the castle heart run out of blodd essence. For players it means how much time they have left to farm for blood essence and bring it to their castle if they don’t want it to disappear.
40. “CastleBloodEssenceDrainModifier”
"CastleBloodEssenceDrainModifier": 1.0
higher rate = higher blood essence consumption
Description: Rate for how quickly a castle consumes blood essence.
41. “CastleSiegeTimer”
"CastleSiegeTimer": 420.0,
min value: 1
max value: 1800
default value: 420
Description:The amount of time a castle is deemed as breached when enemy players breaks through the outer defenses. Players may not construct new structures or walls while a castle is breached and all structures are susceptible to damage while in this state. Time is defined in seconds.
42. “CastleUnderAttackTimer”
"CastleUnderAttackTimer": 60.0,
min value: 1
max value: 180
default value: 60
Description:The amount of time where players are blocked from building structures or walls while being under attack. A castle is deemed under attack whenever enemy players manages to deal damage to any wall or door using explosives or siege golems.
– 43-61. General settings [Part 3]
43. “AnnounceSiegeWeaponSpawn”
"AnnounceSiegeWeaponSpawn": true,
Description: Will leave a message in a global chat warning about a Siege Golem being spawned.Set to Falseto disable and prevent players from getting notified on this one.
Looks like this:
44.”ShowSiegeWeaponMapIcon”
"ShowSiegeWeaponMapIcon": true,
Description:Will mark the Golem on the map for everybody on the server.
45.”BuildCostModifier”
"BuildCostModifier": 0.5,
min value: 0
max value: 10
Description:Multiplies the amount of materials required to build structures.
46. “RecipeCostModifier”
"RecipeCostModifier": 0.5,
min value: 0
max value: 10
Default = 1.0 (100% of default values)
the more = the more expensive
set to 0.5 to make items two times cheaper
set to 2.0 to make everything twice as expensive.
etc.
Description:Defines how expensive (= how many ingredients) crafting is.
47. “CraftRateModifier”
"CraftRateModifier": 1.0,
- set to 0.75 to slow the standard crafting time on 25%
- set to 125% to grant 25% speedup with crafting times
- set to 2.0 to double the crafting speed
- etc. etc.
Description:defines how fast items will be crafted (not to be confused with refinement!)
48. “ResearchCostModifier”
"ResearchCostModifier": 0.5,
-- TBD or
-- doesn't seem to be working but sounds like it should define amount of paper, scrolls etc to unlock a random research item drom Research Desk, Study and the other thig I forgot the name of.
Description:affects how many scrolls,
49. “RefinementCostModifier”
"RefinementCostModifier": 0.5,
-- doesn't seem to be working properly?
Default = 1.0
for example
the more = the more expensive
the more = the more units of iron ore you will need to produce 1 iron ingot
Description:Defines how many units of an ingredient of a lower tier will be needed in order to produce an ingredient of a higher tier / a new ingredient. Multiplies the cost of refining items.
50. “RefinementRateModifier”
"RefinementRateModifier": 0.5,
higher value = faster speed
min value: 0.1
max value: 10
Description:
A multiplier for how fast the refinement process will be finished. Affects the speed of all refinment-type building = buildings which produce a new type of materials: Sawmill, Grinder, Smelter, Loom, Alchemy table etc.
51. “ResearchTimeModifier”
"ResearchTimeModifier": 0.5,
--- TBD or does not work correclty atm
52. “DismantleResourceModifier”
"DismantleResourceModifier": 0.75,
set to 1.0 to get the whole price back in terms of ressources
set to 0 to receive nothing
default: 0.17
the value should not exceed “1”
Description:The material reimbursement players receive from dismantling a structure. In other words, how much of the spent ressources you will get once destroying sth you’ve built.
^ value set to 0.8
53. “ServantConvertRateModifier”
"ServantConvertRateModifier": 1.0,
the more = the faster servants will convert
Description:Defines the rate at which your servants will join your side after being put into Servant Coffin.
"RepairCostModifier": 1.0,
higher value = more expensive repairs
Description:Defines how expensive it will be for the Players to repair items which lost some of their Durability.
54-55. “Death_Durability”
"Death_DurabilityFactorLoss": 0.25,
min value: 0
max value: 1.0
the higher the value = the more broken the items will be
Description: A multiplier for how damaged the equipment will become upon death in PvP. Players are deemed as in PvP for a duration after dealing damage to another player or receiving damage from another player.
Default value – 0.25, which makes 25% of the Items´ durability value.
Example:
use 1.0 for 100% (fully destroyed)
use 0.50 for 50% damage
use 0 .0 to set a 0% damage = no durability penalty.
etc.
"Death_DurabilityLossFactorAsResources": 1.0,
Description: Durability loss suffered upon death is dropped as materials. This value defines the amount of materials that are either lost or dropped. A value of 0 results in all materials being lost while a value of 1 results in all materials being dropped.
Example:
1.0 = 100% which means you will drop all the ressources upon death
set to 0.5 – lose only 50% of ressources
set to 0 – not to lose anything = respawn with the ressources you had.
etc.
56.”StarterEquipmentId”
"StarterEquipmentId": 0,
Default – 0, means everybody would start with nothing on the server.
"StarterEquipmentId": 0,
Possible values:
- -376135143 // for Copper Equipment (Lvl 30)
- -1613823352 // for Iron Equipment (Lvl 50)
- -258598606 // for Darkslver Equipment (Lvl 70)
- 1177675846 // for Sanguine Equipment (Lvl 80)
Description: Sets what kind of equipment players will start with.
57. “StarterResourcesId”
"StarterResourcesId": 0,
Default – 0, means everybody would start with 0 resources on the server.
Possible values:
- -696202180 // for Copper Material (Lvl 30)
- 481718792 // for Iron Material (Lvl 50)
- -766909665 // for Darksilver Material (Lvl 70)
Description: Sets what kind of recources players will start with in their inventory.
59. “VBloodUnitSettings”
"VBloodUnitSettings": [], // by default it is empty
 "VBloodUnitSettings": [
 {
 "UnitId": -1905691330,
 "UnitLevel": 11,
 "DefaultUnlocked": false
 },
 {
 "UnitId": -1659822956,
 "UnitLevel": 38,
 "DefaultUnlocked": true
 },
 {
 "UnitId": -740796338,
 "UnitLevel": 83,
 "DefaultUnlocked": true
 }
 ],
- “UnitId” // Tells what Boss you are tweaking. Please, refer to Appendix: “VBloodUnitSettings” to see the full list of Bosses, their IDs and stuff they unlock.
- “UnitLevel” // Defines the Level of that Boss
- “DefaultUnlocked” // Defines whether the Boss will be unlocked for Players.
Description: Everything written in […] will define the level of the VBlood Creatures and it’s status in your Journal VBlood creatures are the in-game Bosses listed in the Blood Altar They are also killable and discoverable without one, the Altar will give new players an Idea where to go and whether they are close to be strong enough to beat the bosses.
60. “UnlockedAchievements”
"UnlockedAchievements": [],
Default is empty [], meaning the players start with 0% Progression. Progression is a current “mission” players see on the top left of their screen. “Achievement” here means a mission.
"UnlockedAchievements": [
 -2071097880,
 1695239324
 ],
Possible values:
Please, refer to Appendix
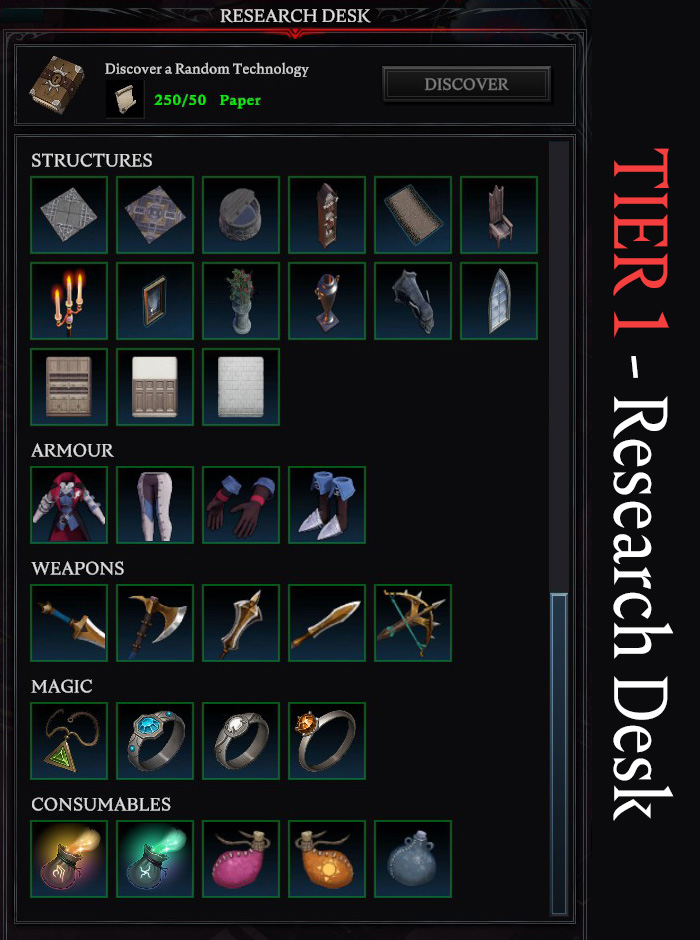
61. “UnlockedResearchs”
"UnlockedResearchs": [],
 "UnlockedResearchs": [
 -1292809886,
 -495424062
 ],
The Arguments […] will define Reasearches available for the player
– 62-71. Game Time Modifiers {}
63.”DayDurationInSeconds”:
"DayDurationInSeconds": 1080.0,
min value: 60
max value: 86400
def: 1080
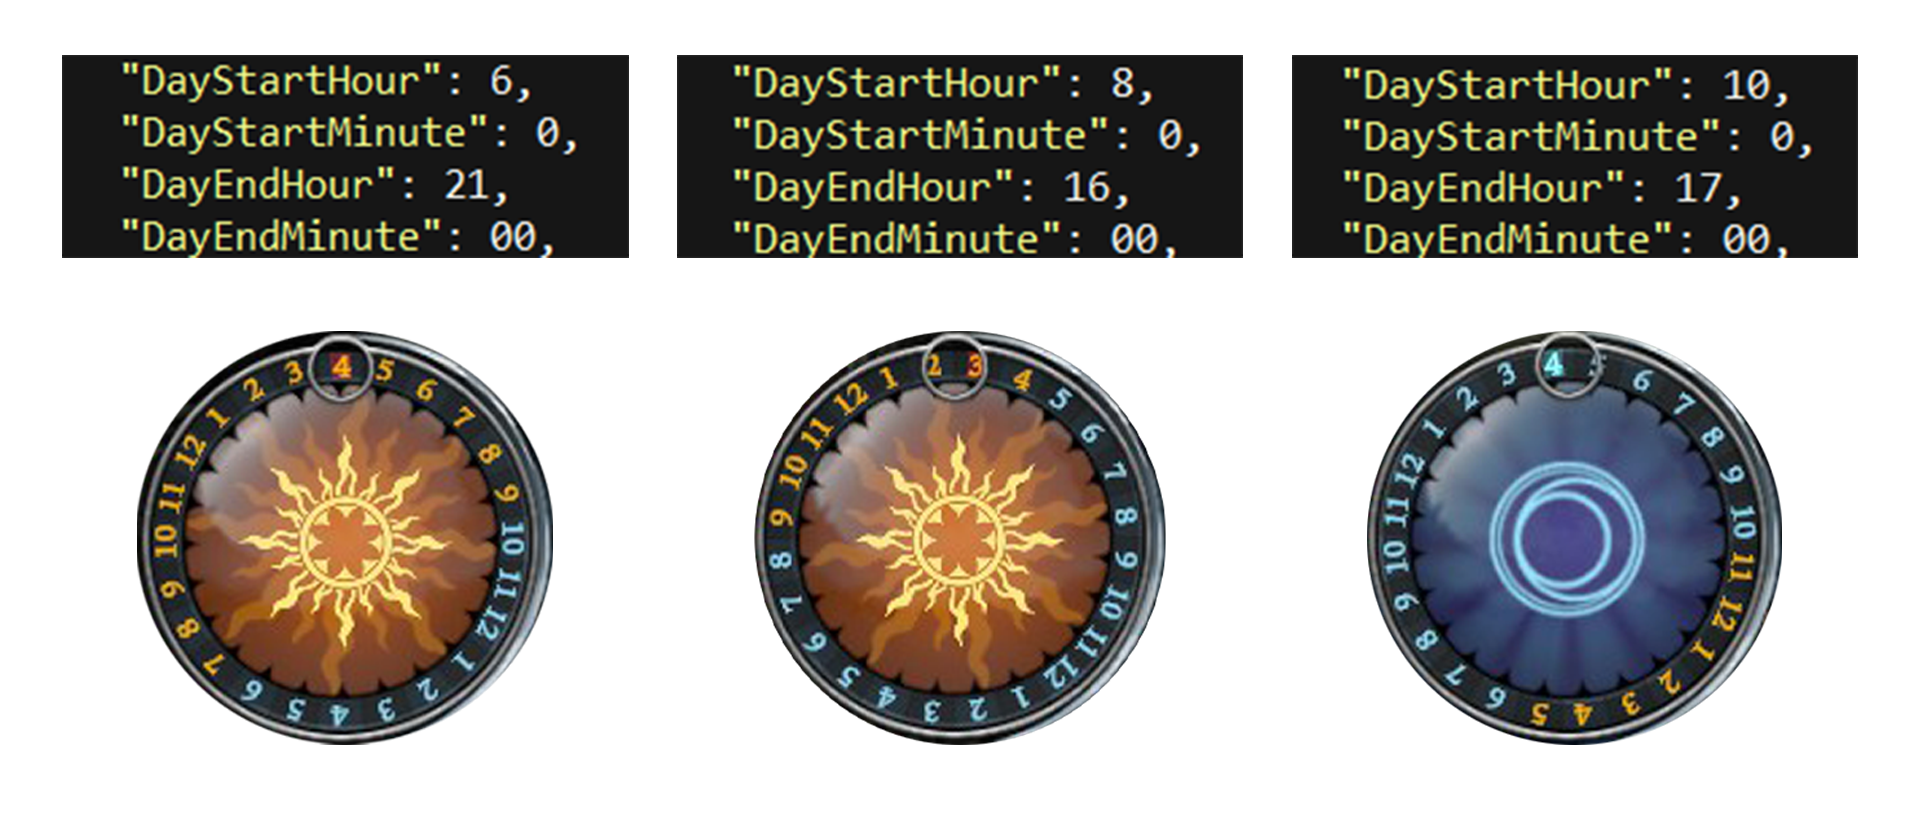
Description: Sets the total duration of the in-game day-night cycle in terms of real-life seconds. Basically affects the speed at which the clockface on top right will rotate. In real life we have 86400 seconds in 1 Day (24 hours), in vanilla VRising experience – 1080 seconds which is 18 minutes. Use this option to set the desired length of the day. The parameters 64-67 will let you define at what in-game hour and minute daylight phase and night shall start.
Examples:
"DayDurationInSeconds": 3600.0, // to set the day to 1 Hour
"DayDurationInSeconds": 86400.0, // to set the day to 24 Hours like IRL
64-65.”DayStartHour” & “DayStartMinute”:
 "DayStartHour": 9,
 "DayStartMinute": 15,
Description: Sets the exact time for the last nighttime hour and minute thus triggerting the beginning of the daylight phase. Sun mechanic is only present during this phase. Note that the parameters affect the in-game hours and minutes – those you see on the clock face next to minimap, not the ones from real time nor those from the server’s local timezone or whatsoever.
Examples:
"DayStartHour": 9,
"DayStartMinute": 15, //
in the example above the night will end at quarter past 9. (9:15am in-game clock time)
66-67.”DayEndHour” & “DayEndMinute”:
 "DayEndHour": 10,
 "DayEndMinute": 0,
Description: Sets the exact time for the last daylight hour/minute, thus triggerting the beginning of the night phase. Sun in non-present during a night phase.
Examples:
"DayEndHour": 10,
"DayEndMinute": 0,
in the example above the Sun will start to go down at 10pm sharp. (22:00)
More visual examples:
68-69. “BloodMoonFrequency_ … “
"BloodMoonFrequency_Min": 10,
"BloodMoonFrequency_Max": 18,
^ default values
// The minimum frequence for how often a blood mon may occur
// The maximum frequence for how often a blood moon may occur
min possible value for both: 1
max possible value for both: 255
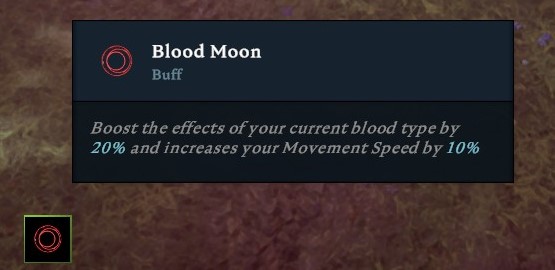
70. “BloodMoonBuff”
"BloodMoonBuff": 0.2
min value: 0.1 // 10%
max value: 1.0 // 100%
default is 0.2 meaning 20% of a max possible value
Description:The amount of additional movement speed in % that a player gain during blood moon
^ value set to 0.1
– 72-81. “VampireStatModifiers”
73. “MaxHealthModifier”
"MaxHealthModifier": 2.0,
the more = the more default HP players will have.
Description:Multiples the max amount of health. Basically the number your HP bar has.
default is.
74. “MaxEnergyModifier”
"MaxEnergyModifier": 2.0,
-- TBD
75. “PhysicalPowerModifier”:
"PhysicalPowerModifier": 2.0,
min value: 0.1
max value: 5
the more = the more damage dealth with weapons
Description: multiples Players’ physical power, affects the amount of DMG dealt using weapons attacks and weapon skills.
76. “SpellPowerModifier”
"SpellPowerModifier": 2.0,
min value: 0.1
max value: 5
the more = the more damage / more efficient healing dealth with spells,
Description: multiples Players’ spell power, affects the amount of DMG and healing dealt using with spell skills
77. “ResourcePowerModifier”
"ResourcePowerModifier": 2.0,
min value: 0.1
max value: 5
Description: Multiplies the amount of damage players deal to resource objects.
78. “SiegePowerModifier”
"SiegePowerModifier": 1.0,
-- TBD
79. “DamageReceivedModifier”
"DamageReceivedModifier": 1.0,
the more = the more vulnerable Players are.
Description: multiples amount of damager Players will receive upon getting attacked.
80. “ReviveCancelDelay”
"ReviveCancelDelay": 5.0
should be left as it is.
– 82-85. “UnitStatModifiers_Global” {}
83. “MaxHealthModifier”
"MaxHealthModifier": 1.0,
min value: 0,1
max value: 5
the more = the more HP hostile AI non-VBlood units will have.
Default is 1.0 = which makes 100% of normal value
set to 2.0 to double the amount of HP AIs will have
set to 0.75 to mae AIs health pool 25% less.
etc. etc..
Description:Defines how big the health pool of AIs will be. Affects ordinary units, not VBlood Bosses. For VBlood Bosses check out “UnitStatModifiers_VBlood” setting below.
84. “PowerModifier”
"PowerModifier": 1.0
min value: 0,1
max value: 5
the more = the more damage hostile AI non-VBlood units will deal.
Description:Defines how much AI will hurt. Affects ordinary units, not VBlood Bosses. For VBlood Bosses check out “UnitStatModifiers_VBlood” setting below.
– 86-89. Unit Stats [vblood] {}
“UnitStatModifiers_VBlood”: {
These stats will affect the Boss creature who have VBLOOD indicator on them
87. “MaxHealthModifier”:
"MaxHealthModifier": 1.0,
Description: Multiplies the maximum amount of health of V Blood units
89. “PowerModifier”
"PowerModifier": 1.0
Description:Multiples the dmg output of V Blood Units
– 90-98. Equipment Stats {}
“EquipmentStatModifiers_Global”: {
– Defines buffs received from items. Different Items will give differnet Buffs, for example, most of armor will give you +maxhealth, rings +spellpower etc. The values written below will be applied to such buffs:
min for all values: o.1
max for all values: 5
default far all: 1.0
91. “MaxEnergyModifier”
"MaxEnergyModifier": 1.0,
TBD or not used or not working
92. “MaxHealthModifier”
"MaxHealthModifier": 1.0,
Description:Multiplies the amount of health received from equipment
93. “ResourceYieldModifier”
"ResourceYieldModifier": 1.0,
Description:Multiplies the resource yield modifiers from equipment
94. “PhysicalPowerModifier”
"PhysicalPowerModifier": 1.0,
Description:Multiplies the physical power gained from equipment , this value affects the amount of damage players deal using weapon attacks and weapon skills.
95. “SpellPowerModifier”
"SpellPowerModifier": 1.0,
Description:Multiplies the amount of spell power gained from equipment, this value affects the amount of damage and healing players deal using spells.
96. “SiegePowerModifier”
"SiegePowerModifier": 1.0,
TBD or not used or not working
97. “MovementSpeedModifier”
"MovementSpeedModifier": 1.0
Description:Multiplies the amount of movement speed players gain from equipment that affects movement speed
– 99-182. Castle Stats {}
“CastleStatModifiers_Global”: {
Some castle-related things.
100. “TickPeriod”
"TickPeriod": 5.0,
Description: How often the castle decay damage should tick. Leave the value unchanged.
101. “DamageResistance”
"DamageResistance": 0.0,
not used or nor working correctly
102. “SafetyBoxLimit”
"SafetyBoxLimit": X
min value: 0
max value: 20
Description: The number of vampire lockboxes players may build in a single castle.
103. “TombLimit”
"TombLimit": 12,
min value: 1
max value: 20
Description: The number of tombs players may build in a single castle.
104 “VerminNestLimit”
"VerminNestLimit": 4,
min value: 1
max value: 20
The max amount of Vermin Nests which can be built within a single castle.
A vermin Nest will lure rats into your castle. Also used to summon the Rat boss.
105. “PylonPenalties”
 "PylonPenalties": {
 "Range1": {
 "Percentage": 0.0,
 "Lower": 0,
 "Higher": 2
 },
 "Range2": {
 "Percentage": 0.0,
 "Lower": 3,
 "Higher": 3
 },
 "Range3": {
 "Percentage": 0.0,
 "Lower": 4,
 "Higher": 4
 },
 "Range4": {
 "Percentage": 0.0,
 "Lower": 5,
 "Higher": 5
 },
 "Range5": {
 "Percentage": 0.0,
 "Lower": 6,
 "Higher": 254
 }
 },
TBD
132. “FloorPenalties”
 "FloorPenalties": {
 "Range1": {
 "Percentage": 0.0,
 "Lower": 0,
 "Higher": 20
 },
 "Range2": {
 "Percentage": 0.0,
 "Lower": 21,
 "Higher": 50
 },
 "Range3": {
 "Percentage": 0.0,
 "Lower": 51,
 "Higher": 80
 },
 "Range4": {
 "Percentage": 0.0,
 "Lower": 81,
 "Higher": 160
 },
 "Range5": {
 "Percentage": 0.0,
 "Lower": 161,
 "Higher": 254
 }
 },
TBD
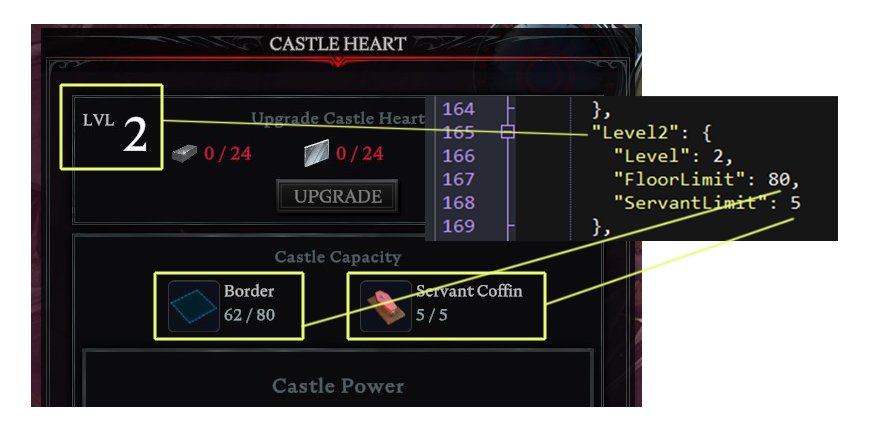
159. “HeartLimits”
 "HeartLimits": {
 "Level1": {
 "Level": 1,
 "FloorLimit": 30,
 "ServantLimit": 3
 },
 "Level2": {
 "Level": 2,
 "FloorLimit": 80,
 "ServantLimit": 5
 },
 "Level3": {
 "Level": 3,
 "FloorLimit": 150,
 "ServantLimit": 7
 },
 "Level4": {
 "Level": 4,
 "FloorLimit": 250,
 "ServantLimit": 9
 }
 },
!!! -- Do NOT exceed 250 Floor limit - it'll crash your server -- !!!
Description: these values describe how many Floors you can build within a Castle of a certain level. See a picture below how the values affect the in-game mechanic:
^ In this screenshot I’ve already upgraded my castle to Level 2 thus expanding my territory as building even more Floors become available. I’ve also built 5 Servant coffins – the max amount possible for lvl 2 Castle according to my server settings.
My subjective thoughts on this value:
I personally find the default floor limit too high, especially for public servers.

The 250 tiles are just much more than enough for the level 4 castle, same goes for the values of previous levels.

If your server is public, consider decreasing the amount of floors for both PvP and PvE, as the Floors placement , regardless of the "CastleDisctanceSetting" value, can be abused to blocking off the crucial paths to/out of your base. It would also somewhat decrease honeycombing bases when players use claimed space to make rows of empty rooms separated by reinforced walls. Up to you whether you like it or now.

The lesser amount of available space will stimulate its' more effective use in terms of placement of necessary buildings: make the amount which you will think will be just enough for crucial constructions: smelters, sawmills, devourer, prison, servants' tombs, research tables and others,

Of course if you want to make an epic wild server with big 10-men clans, scale the amount. Again, it all comes what server / community you want to build.

So, make a bare necessary minimum if you want to force control on your server and minimize the risks of getting path blocks blocked. Make that floors amount becomes super precious to the Players. Pair it up with the "Minimum castle distance" - and you will close the blocking path problem.

However, consider keeping or even increasing the floor limits if you want a building / creative server - only or if you know that people are going to stick to coop PvE behaviour.

Of course, descreasing the Floor Limit will cause the bases be significantly smaller and more susceptible to a siege, it will also force players to build as closer to cliffs/edges as possible, keep that in mind.

Don't set the limits if you aim at lawless PvP though, there are people who enjoy abusing game mechanics for their goals. Just make sure to mention what your server's environments and mechanics are so people know and everybody is having fun.
181. “CastleLimit”
"CastleLimit": 2,
min value: 1
max value: 5
Description: Sets the max number of castles a player can build. In the example above a Player will be able to place 6 castles on the map.
– 183-210. Player Interactions {}
The parameters described below control at what time Versus mode will be active. In other words, you set the time limit for PvP-Events. The events should be set within 1 day.
183. “PlayerInteractionSettings”
 "PlayerInteractionSettings": {
 "TimeZone": "Local",
... }
Description: In the example above the time will be set to that of the server machine.
Possible values:
- “Local” // Local server time
- “UTC” // Coordinated Universal Time
- “PST” // (UTC -8) = Pacific Standard Time
- “EST” // (UTC -5) = Eastern Standard Time
- “CET” // (UTC +1) = Central European Time
- “CST” // (UTC +8) = China Standard Time
The events listed below will be triggered accordingly to the current Hour:Minute of the chosen timezone. Note that hours and minutes are real time hours and minutes and are defined by the timezone you set.
185. “VSPlayerWeekendTime”
 "VSPlayerWeekdayTime": {
 "StartHour": 17,
 "StartMinute": 0,
 "EndHour": 23,
 "EndMinute": 0
 },
Description: will define when Players will be disposed to DMG on Weekdays (Mon-Fri).
Leave empty to disable. In the code piece given above all Players on the Server can take Damage from 5pm sharp till 11pm sharp.
191. “VSPlayerWeekendTime”
 "VSPlayerWeekendTime": {
 "StartHour": 17,
 "StartMinute": 0,
 "EndHour": 23,
 "EndMinute": 0
 },
Description: will define when Players will be disposed to DMG on Weekends (Sat-Sun).
Leave empty to disable. In the code piece given above all Players on the Server can take Damage from 5pm sharp till 11pm sharp.
197. “VSCastleWeekdayTime”
 "VSCastleWeekdayTime": {
 "StartHour": 17,
 "StartMinute": 0,
 "EndHour": 23,
 "EndMinute": 0
 },
Description: will define when castle heart will be disposed to DMG on Weekends (Mon-Fri). Leave empty to disable. In the code piece given above all Castles on the Server can take Damage from 5pm sharp till 11pm sharp.
203. “VSCastleWeekendTime”
 "VSCastleWeekendTime": {
 "StartHour": 18,
 "StartMinute": 30,
 "EndHour": 22,
 "EndMinute": 0
 }
Description: will define when castle heart will be disposed to DMG on Weekends (Sat-Sun). Leave empty to disable. In the code piece given above all Castles on the Server can take Damage from half past 6pm till 10pm sharp.
– – – – – – – – – – – – – – – – – – – – – – – – – – – – – – – – – – – – – – –
check out the castleheartexposure setting to tweak this event even more
Admin console commands
Enable your console:
- In game, go to Menu, select “Options” in Main Menu / Pause Menu.
- Under General, check “Console Enabled“.
- Return to your game and hit “~” on your keyboard.
- To close the console, hit same key.
Using commands without looking up for a reference:
Try starting to type in console, you will see that it will give you suggestions of commands and the arguments when applicable. Use arrow keys on your keyboard to “scroll” down the list, TAB to chose and option and Enter to call the command.
In this guide I just grouped some commands I believe to be important.
– General
| Command | Descriptor |
|---|---|
| Adminauth | give admin status |
| Admindeauth | give up admin status |
| Kill | kills your character. |
| Command | Argument | Descriptor |
|---|---|---|
| Connect | address/steamid port pass | connect to server |
| Disconnect | disconnect from server | |
| MultiCommand | commands separated by semicolon (;) | execute multiple commands |
| give | check in console | use to grant items |
| toggleobserve | toggle being observer |
| adminonlydebugevents | Admins are the only ones who can control debug events |
– Manage players
| Command | Argument | Descriptor |
|---|---|---|
| Bancharacter | type Character Name here | ban a player with that character name from the server |
| Banuser | type Steam ID here | ban a player with that Steam ID from the server |
| Banned | lists all players who have been banned | |
| Changehealthofclosesttomouse | type desired value b/w –2,147,483,648 and 2,147,483,647 | modifies the health of the target unit/object closest to the admin’s cursor, allowing admins to deal damage or heal targets. Can also be applied to the AI units. Has to be a whole number (Integer) |
| Kick | type Character Name here | kick a player from the server (they can still enter it again) |
| Listusers | lists all players on the server | |
| Unban | type User Index here | unban a player to allow them back into the server |
– Teleportation
| Command | Descriptor |
|---|---|
| GatherAllAllies | teleports allies to mouse cursor position. |
| GatherAllAlliesExceptMe | teleports all allies but you to mouse cursor position. |
| GatherAllNonAllies | teleports all players who are not allies to mouse cursor position. |
| GatherAllPlayers | teleports all players to mouse cursor position. |
| GatherAllPlayersExceptMe | teleports all players but you to mouse cursor position. |
| Command | Argument | Descriptor |
|---|---|---|
| TeleportPlayerToMe | check in console | Teleports a Player to your location |
| TeleportPlayerToMousePosition | check in console | Teleports Player to your mouse position |
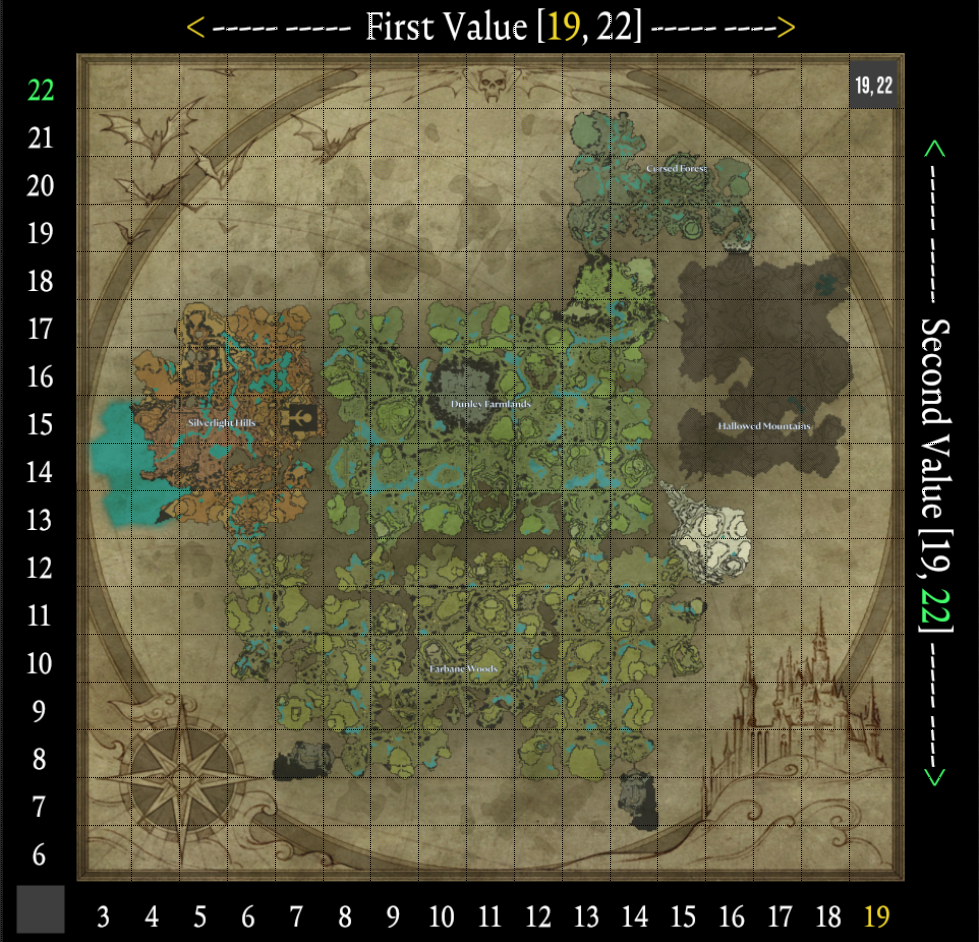
| TeleportToChunk * | refer to a map grid below | teleports you to a certain chunk* |
^ WorldMap Grid for TeleporttoChunk command. I made this image by eye with the help of PS Grid and a bit of guessing, so it’s by no means 100% accurate. The Waypoints coordinates fit perfectly though, so I think it’s pretty close to the actual chunk scaling map.
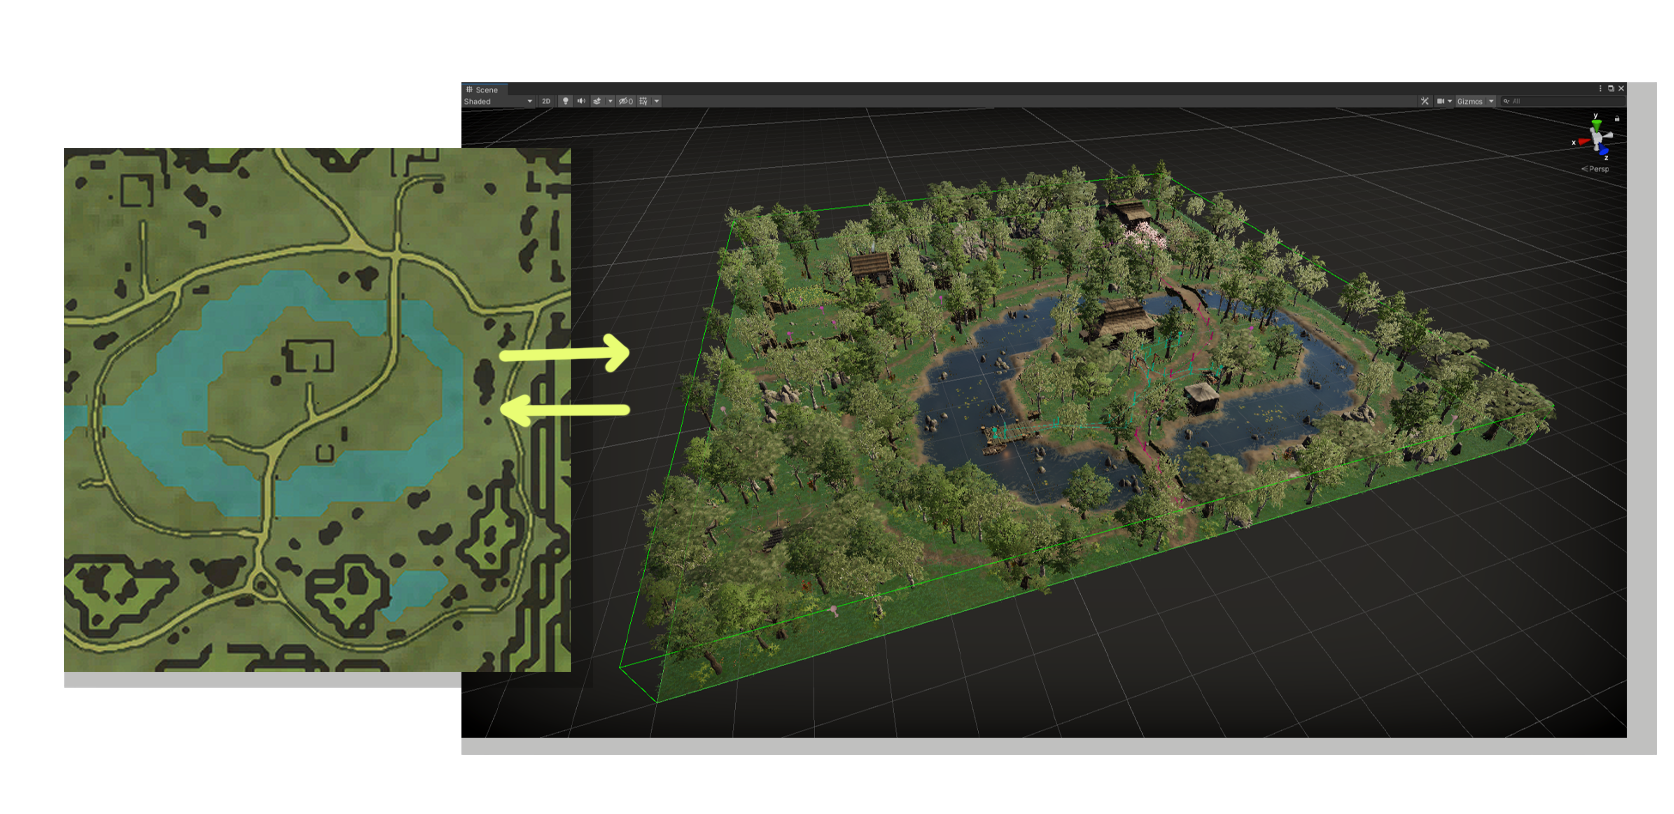
* A word about Chunks. A chunk is a piece of the World, an area. The gameworld of V Rising consists of Numerous Chunks which are being streamed to the Player upon their movement and "disappear" for the player when they are located farer away from a chunk. This is why V Rising doesn't have loading screens, while it has a huge gameworld.


^ Here is how a Chunk look like + it's position on the map.

The map above was made so you have an idea what coordinates to put while using the corresponding console command. Should the worldmap of Vardoran get expanded, I will update this section of the guide. For now these infos are more or less relevant.
TeleportToChunkWaypoint
| Command | Arg | Descriptor |
|---|---|---|
| TeleportToChunkWaypoint | 14, 8 | Farbane Woods Waygate South-East |
| 8, 8 | Farbane Woods Waygate South-West | |
| 9, 10 | Farbane Woods Waygate West | |
| 14, 11 | Farbane Woods Waygate North-East | |
| 15, 13 | Hallowed Mountains Waygate | |
| 13, 13 | Dunley Farmlands Waygate South-East | |
| 9, 13 | Dunley Farmlands Waygate South-West | |
| 12, 15 | Dunley Farmlands Waygate East | |
| 13, 19 | Cursed Forest Waygate | |
| 6, 16 | Silverlight Hills Waygate |
| TeleportToNether | teleports you to the Cave you start in at the very beginning. |
| TeleportToPlayer | teleports you to Player upon your choice |
| PlayerTeleport | teleport player to .. |
– Clans
| Command | Descriptor |
|---|---|
| Clanaccept | accept clan invitation |
| Clandecline | decline clan invitation |
| Claninvite | (Unnamed Argument) //invite player to your clan |
| Clanleave | leave clan |
– RCON
RCON is a protocol used to communicate with and issue commands to your game server. In other words, it’s a console which allows server owners to control the game server without having access to the machine their server in running on.
in ServerHostSettings.json, which is located in %USERPROFILE%\AppData\LocalLow\Stunlock Studios\VRisingServer\ServerHostSettings.json, add the following:
"Rcon": {
"Enabled": true,
"Password": "somepassword",
"Port": 25575
},
! — Password field has to be filled.
! — Port can be changed to any valid TCP port.
In order to use the RCON console, you need to download a client, for example:
Available commands:
I will fill up this table once more commands will become available.
| Command | Type | Descriptor |
|---|---|---|
| announce | string | Sends a message to all players connected to the server. |
| announcerestart | number | Sends a pre-configured message that announces server restart in x minutes to all players connected to the server. Less flexible than announce but has the benefit of being localized to each users language. |
Managing Save Files
— Character & World Migration
Migrating from local Game to Server:
Let´s say, you´ve played for a while in single game mode, your friends would like to join you, and you decide to set up a server to play together but independently. You would like not to lose the progress you achieved with your character and want to start with the same character on a fresh server or even on a server with the same settings you had in your local game.
In order to do that, you need to place your character files into the Server´s folder.
The default location for save files are:
.. %USERPROFILE%\AppData\LocalLow\Stunlock Studios\VRising\Saves
Navigate to the folder as shown below:
In the “v1” folder you will find the actual save folders for the local saves/sessions. Your Folder should look something like this set of numbers and letters: db4b1c0e-2b7d-430a-87ef-4b6c09398dcf
in case you had multiple worlds there will also be multiple folders, you can identify the one you need by navigating to each of such folders and checking on the ServerHostSettings.json file where you can see the Name you gave to that Game (= that server you hosted).
"v1" will be probably replaced through other Name during the further game updates.
As soon as you found the correct one, copy the Autosaves from this Folder, then Navigate to your Dedicated Server path:
[Drive]:\...\Steam\steamapps\common\VRisingDedicatedServer\save-data\Saves\v1\world1
Delete all the Saves that exist there and paste the ones you copied.
and paste them there. “world1” is of course the default name for that folder, you can change it to yours.
you can copy that local Game’s settings from:
[Drive]:\Users\Sage\AppData\LocalLow\Stunlock Studios\VRising\Saves\v1\9512b294-cb52-48c2-b910-4a8ff3ce7f50
^your last folder will look different of course.
and paste them to those of your Server’s:
[Drive]:\...\Steam\steamapps\common\VRisingDedicatedServer\VRisingServer_Data\StreamingAssets\Settings
– – – – – – – – – – – – – – – – – – – – – – – – – – – – – – – – – – – – – – – –
Appendix for IDs {…}
┝– “VBloodUnitSettings”: []
Separated into 3 parts due to Steam Guide sections’ character limit. The Bosses below are listed in the same order as they appear in the Player’s Blood Altar, assuming the default values like level for those bosses stayed unchanged.
– Part I [LVL 16-37]
| ID value (use in .json) |
Name | Lvl | Power unlock | Blueprint or Recipe unlock |
|---|---|---|---|---|
| -1905691330 | Alpha Wolf | 16 | Wolf Form |
N/A |
| 2122229952 | Rufus the Foreman | 20 | Blood Rage |
Woodworking Bench; Hunter’s Crossbow; Fishing Pole; Sculptured Wood; Painting Frame |
| -2025101517 | Erol the Stomebreaker | 20 | Aftershock |
Big stash |
| 1124739990 | Keely the Frost Archer | 26 | Frost Bat |
Tannery, Traveller’s Wrap, Empty Canteen, Leather |
| 763273073 | Lidia the Chaos Archer | 26 | Chaos Volley |
The Devourer |
| 1106149033 | Grayson the Armourer | 27 | Crimson Aegis |
Five-Finger Workboards; Longboards; Whetstone |
| 577478542 | Goreswine the Ravager | 27 | Corpse Explosion, Veil of Bones |
Tomb; Skeleton; Ghoul |
| -2039908510 | Putrid Rat | 30 | N/A | |
| 1896428751 | Clive the Firestarter | 30 | Veil of Chaos |
Alchemy Table; Sulphur; Minor Explosive Box |
| -484556888 | Polora the Feywalker | 34 | Spectral Wolf, Veil of Illusion |
Vampire Waygate; Garden Floors; Minor Garlic Resistance Brew |
| -1391546313 | Ferocious Bear | 36 | Bear Form |
Fur Rugs |
| -1659822956 | Quincey the Bandit King | 37 | Chaos Barrier, Merciless Charge |
Smithy, Tailoring Bench, Iron Ingot, Iron Weapons, Hollowfang Battlegear |
– Part II [LVL 37-60]
| ID value (use in .json) |
Name | Lvl | Power unlock | Blueprint or Recipe unlock |
|---|---|---|---|---|
| 153390636 | Nicholaus the Fallen | 37 | Pestilence; Ward of the Damned |
Study |
| -1942352521 | Beatrice the Tailor | 38 | Human Form |
Loom, Hunter’s Cloak, Cloth, Cotton Yarn |
| -29797003 | Vincent the Frostbringer | 40 | Frost Barrier, Veil of Frost |
Prison Cell, Reinforced Plank |
| -99012450 | Christina the Sun Priestess | 44 | Purgatory |
Glass, Empty Glass Bottle, Blood Rose Potion, Holy Resistance Potion |
| 939467639 | Leandra the Shadow Priestess | 46 | Spectral Assassin |
Jewelcrafting Table, Scourge Pendant, Scourgestone, Skeleton Priest |
| -1449631170 | Tristan the Vampire Hunter | 46 | Blood Hunger |
Greater Blood Essence (*to be produced from lesser BE in a Blood Press) |
| -1065970933 | Terah the Geomancer | 48 | Spectral Guardian |
Gem Cutting Table, Siege Golem Stone, Regular Gems |
| 850622034 | Meredith The Bright Archer | 52 | Sanguine Coil |
Wool Thread |
| 24378719 | Frostmaw the Mountain Terror | 56 | Ice Nova |
Scroll |
| 1688478381 | Octavian the Militia Captain | 58 | Mirror Strike |
Anvil, Dark Silver Ingot, Dawnthorn Regalia, Dark Silver Weapons |
| -680831417 | Raziel the Shepherd | 60 | Crimson Beam |
Athenaeum, Silver Resistance Potion, Corrupted Artefact |
| -548489519 | Ungora the Spider Queen | 60 | Volatile Arachnid |
Ghost Yarn, Silk, Spiderling |
– Part III [LVL 62-80]
| ID value (use in .json) |
Name | Lvl | Power unlock | Blueprint or Recipe unlock |
|---|---|---|---|---|
| -203043163 | The Duke of Balaton | 62 | N/A | |
| -1968372384 | Jade the Vampire Hunter | 62 | Chaos Barrage |
Major Explosive Box, Primal Blood Essence |
| -1208888966 | Foulrot the Soultaker | 62 | Mist Trance |
Phantom’s Veil, Spectral Dust, Banshee |
| -1007062401 | Willfred the Werewolf Chief | 64 | Heart Strike |
Holy Resistance Strike |
| -2013903325 | Mairwyn the Elementalist | 64 | Crystal Lance |
Imperial Thread |
| 685266977 | Morian the Stormwing Matriarch | 68 | Void |
Flawless Gems |
| 114912615 | Azariel the Sunbringer | 68 | Power Surge |
Gold Ingot |
| -1347412392 | Terrorclaw the Ogre | 68 | Arctic Leap |
N/A |
| -910296704 | Matka the Curse Weaverr | 72 | Unstable Mosquito |
Schematic, Mosquito |
| 1112948824 | Nightmarshal Styx the Sunderer | 76 | Bat Form |
N/A |
| -1936575244 | Gorecrusher the Behemoth | 78 | Wisp Dance |
N/A |
| -393555055 | The Winged Horror | 78 | Frost Vortex |
N/A |
| -740796338 | Solarus the Immaculate | 80 | Summon Fallen Angel |
N/A |
┝– “UnlockedAchievements”: []
| ID value (use in .json) |
Name | No. ↓ | Objective Text | Reward |
|---|---|---|---|---|
| 1770927128 | Collecting the Remains | 1 |
|
Recipe: Bone Sword |
| 436375429 | Wielding the Sword | 2 |
|
Recipe: Bone Ring |
| -1400391027 | Mastering Magic | 3 |
|
Recipes: Boneguard Vestment; Vermin Salve |
| -2071097880 | Armour of Bones | 4 |
|
Recipe: Bone Axes |
| 1695239324 | Into the Woods | 5 |
|
Recipe: Bone Mace |
| 1502386974 | Stone Breaker | 6 |
|
Blueprints: Castle Heart; Borders |
| 1694767961 | Lord of Shadows | 7 |
|
Blueprint: Walls & Structures |
| -1899098914 | Fortify | 8 |
|
Blueprint: Basic Crafting & Refinement |
| 560247139 | Getting Ready for the Hunt | 9 |
|
Blueprint: Blood Altar |
| -1995132640 | Blood Hunt | 10 |
|
Blueprint: Research Desk |
| -1434604634 | The First Book in the Library | 11 |
|
Blueprint: Walls & Structures |
| 1668809517 | Expanding my Domain | 12 |
|
Blueprint: Mirrors |
| 334973636 | Building a Castle | 13 |
|
Blueprint: Stone Coffin |
| 606418711 | Lord of the Manor | 14 |
|
Blueprint: Servant Coffin |
| -892747762 | Servants | 15 |
|
Vampire Power: Dominating Presence |
| -437605270 | Army of Darkness | 16 |
|
Blueprint: Castle Throne |
| -2104585843 | Throne of Command | 17 |
|
Blueprint: The Eye of the Twilight |
| -327597689 | Soul Stones | 18 |
|
Blueprint: ‘Imperious’ Wall Panels |
| 1762480233 | Blood of Luminance | 19 |
|
Recipe: Blood Key |
┝– “UnlockedResearchs”: []
to unlock Tier 1:
-495424062
These include:
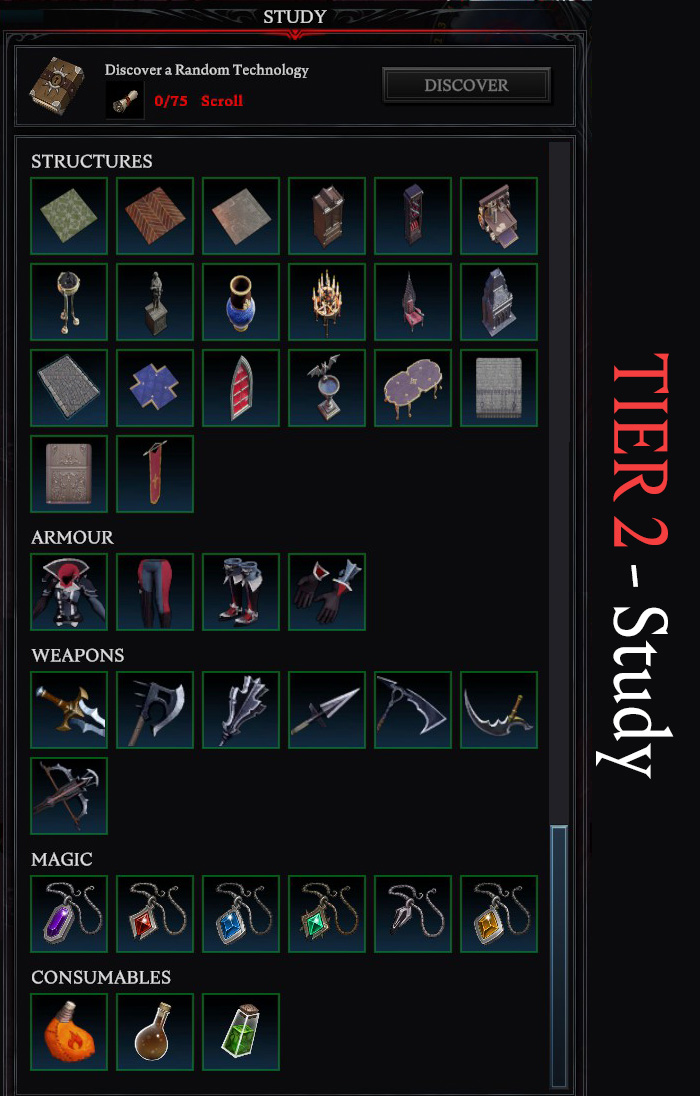
to unlock Tier 2:
-1292809886
These include:
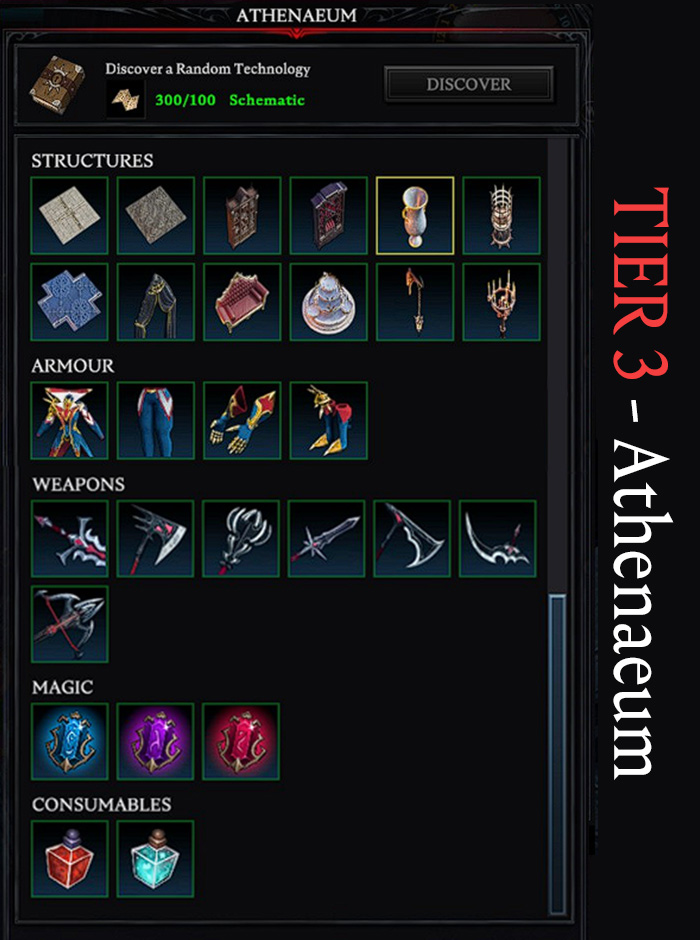
to unlock Tier 3:
-1262194203
These include:
References & Updates
– V Rising Dedicated Server Instructions from github – [github.com] (made by the dev)
– Devs’ website – [stunlock.com] for some images
– Devs’ reference – [stunlock.com]
– The in-game console mostly for commands’ descriptors
– The game files especially for finding out IDs
– The game itself for numerous screenshots and descriptions
– Screenshots taken and images edited by me
– Used some recipes infos from vrising-academy dot info(site contains trackers)
Hopefully the game won’t change a lot in terms of internal data, so the guide will stay relevant for a long time. If you too performed some test to find out the meaning of some values and would like to point out that my infos are bs, please do.
Guide Updates:
Upd. 4 June 2022

- Slightly changed the order in "Manage Players" commands table;
- Added Changehealthofclosesttomouse to "Manage Players" section with description and possible values (possible values based on assumptions that these are C# int32 values);

--------------------------------------------
Upd. 5 June 2022

- Added Tier 3 image in UnlockedResearches []
- Added a screenshot to SteamCMD method sectipon
- Credited VrisingAcademy for looking up and using infos on keys from there
- In 15. "FreeCastleClaim" under -- ServerGameSettings.json - added images and infos on Keys to destroy/seize castles to give an idea about keys' tiers and resources needed for that game mechanic

--------------------------------------------
Here we come to an end for V Rising How to Make Dedicated Server & Setup Guide hope you enjoy it. If you think we forget something to include or we should make an update to the post let us know via comment, and we will fix it asap! Thanks and have a great day!
- Check All V Rising Posts List

![V Rising How to Make Dedicated Server & Setup Guide - -- Steam CMD [free] - B33476D V Rising How to Make Dedicated Server & Setup Guide - -- Steam CMD [free] - B33476D](https://steamsplay.com/wp-content/uploads/2022/06/V-Rising-How-to-Make-Dedicated-Server-Setup-Guide-Steam-CMD-free-B33476D-steamsplay-com.png)
![V Rising How to Make Dedicated Server & Setup Guide - -- Steam CMD [free] - 9418147 V Rising How to Make Dedicated Server & Setup Guide - -- Steam CMD [free] - 9418147](https://steamsplay.com/wp-content/uploads/2022/06/V-Rising-How-to-Make-Dedicated-Server-Setup-Guide-Steam-CMD-free-9418147-steamsplay-com.jpg)
![V Rising How to Make Dedicated Server & Setup Guide - -- Steam App [free] - E51C6BC V Rising How to Make Dedicated Server & Setup Guide - -- Steam App [free] - E51C6BC](https://steamsplay.com/wp-content/uploads/2022/06/V-Rising-How-to-Make-Dedicated-Server-Setup-Guide-Steam-App-free-E51C6BC-steamsplay-com.png)

![V Rising How to Make Dedicated Server & Setup Guide - - 22-42. General Settings [Part 2] - B60889E V Rising How to Make Dedicated Server & Setup Guide - - 22-42. General Settings [Part 2] - B60889E](https://steamsplay.com/wp-content/uploads/2022/06/V-Rising-How-to-Make-Dedicated-Server-Setup-Guide-22-42.-General-Settings-Part-2-B60889E-steamsplay-com.png)
![V Rising How to Make Dedicated Server & Setup Guide - - 43-61. General settings [Part 3] - 1BF8F18 V Rising How to Make Dedicated Server & Setup Guide - - 43-61. General settings [Part 3] - 1BF8F18](https://steamsplay.com/wp-content/uploads/2022/06/V-Rising-How-to-Make-Dedicated-Server-Setup-Guide-43-61.-General-settings-Part-3-1BF8F18-steamsplay-com.png)
![V Rising How to Make Dedicated Server & Setup Guide - - 43-61. General settings [Part 3] - BB54B67 V Rising How to Make Dedicated Server & Setup Guide - - 43-61. General settings [Part 3] - BB54B67](https://steamsplay.com/wp-content/uploads/2022/06/V-Rising-How-to-Make-Dedicated-Server-Setup-Guide-43-61.-General-settings-Part-3-BB54B67-steamsplay-com.jpg)

 * A word about Chunks. A chunk is a piece of the World, an area. The gameworld of V Rising consists of Numerous Chunks which are being streamed to the Player upon their movement and "disappear" for the player when they are located farer away from a chunk. This is why V Rising doesn't have loading screens, while it has a huge gameworld.
 ^ Here is how a Chunk look like + it's position on the map.
Leave a Reply