Having trouble getting your SD40-2 or GP38-2 locomotive to move? Feels like it’s stuck? Or maybe you can get it to move, but there’s not enough power to make it up the hill? Whatever the reason, this guide will show you how to troubleshoot the issue and get your train moving.
Introduction
All the screenshots in this guide were taken in a SD40-2, but the controls between the SD40-2 and GP38-2 are virtually identical. So it should be easy enough to follow along in either.
1. Lead Locomotive
This section covers the basics of driving your lead locomotive. Maybe your train only has 1 locomotive, maybe it has a bunch—you have to pick one of them to drive from—that’s your lead locomotive. I don’t know if that’s the exact definition in real railroading, but that’s what I’m sticking with for this guide.
Brakes
By far and away the most common reason people can’t get their train to move is because of brake system problems.
To get moving you need to be aware of 2 different brake systems:
- Automatic Brake – controls the brakes for your entire train
- Independent Brake – controls the brakes just on the lead locomotive + any cable attached locomotives
Both sets of brakes need to be released before the train will move.
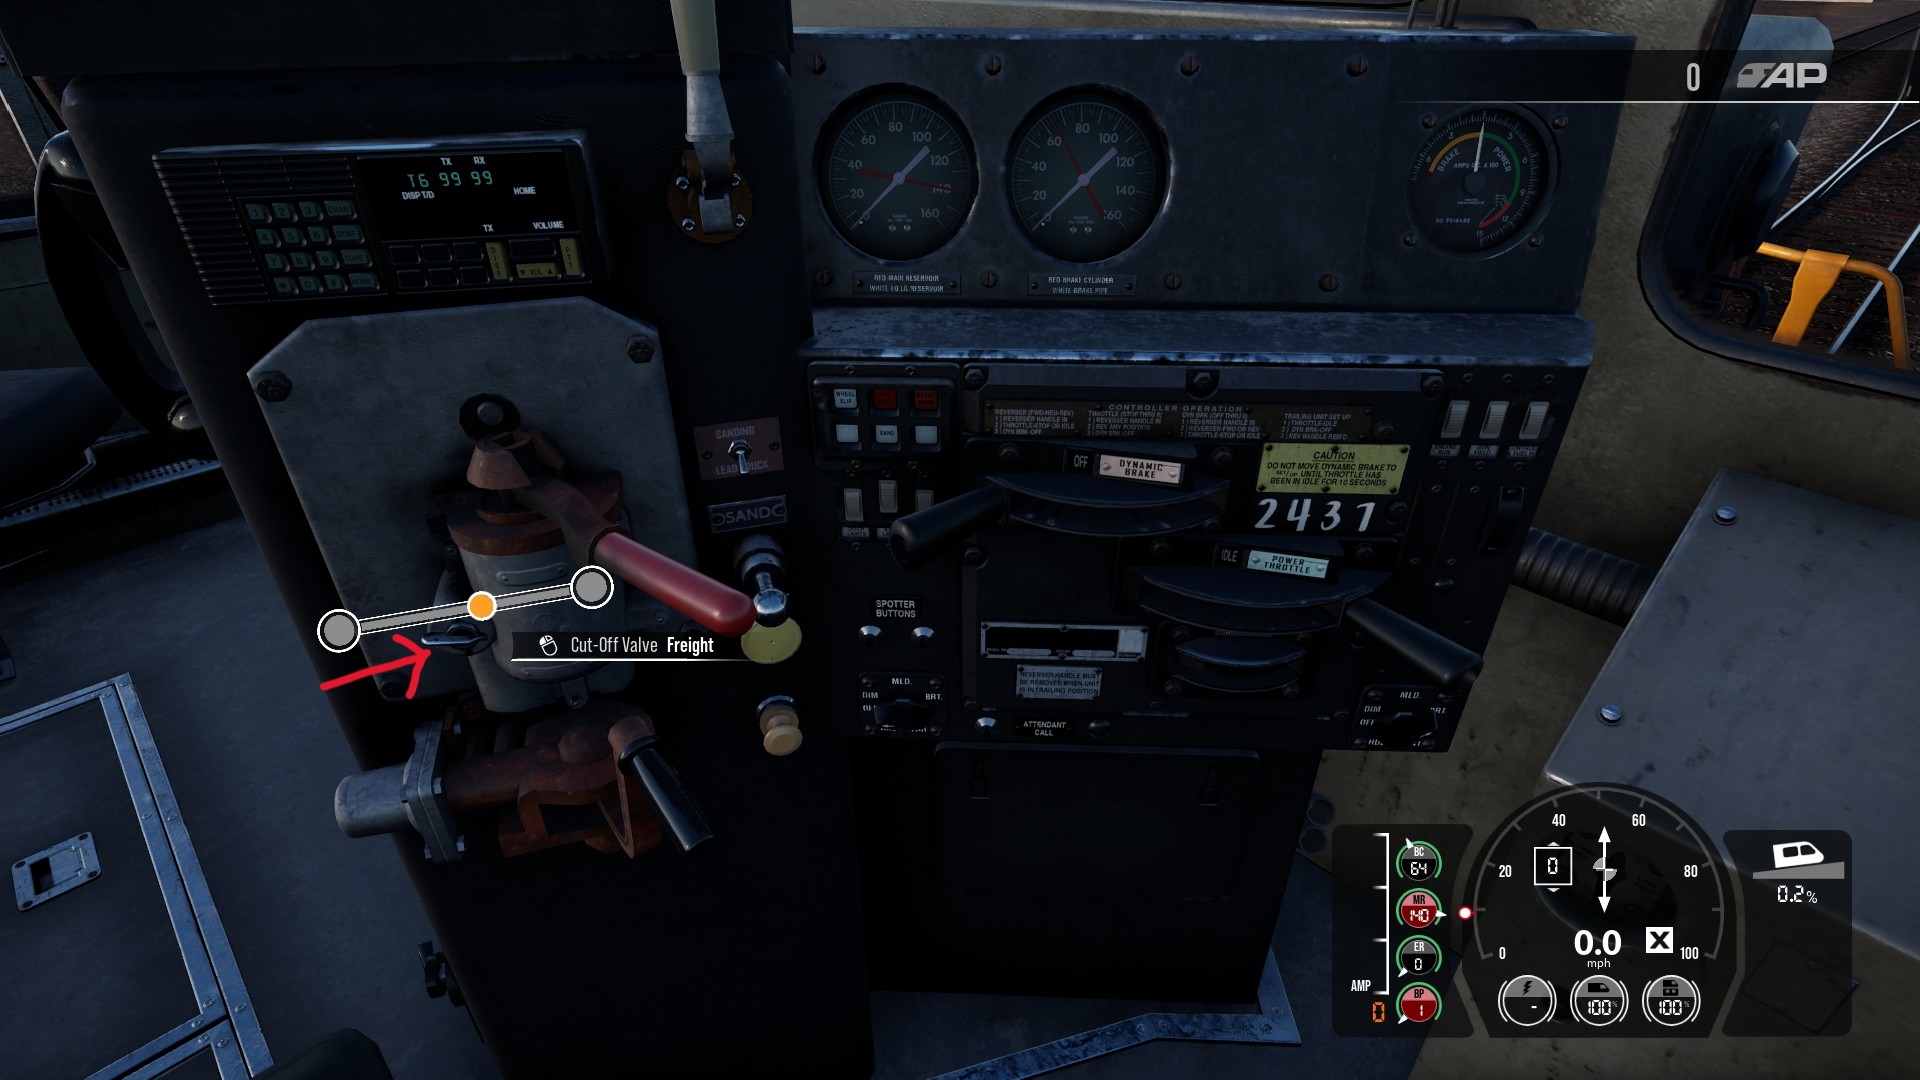
To release the automatic brake, you first need to activate the automatic brake handle by using the cut-off valve so that the equalizer tank is able to act on the brake pipe for the train. Do this by setting the Cut-Off Valve (or Cutout Valve) to Freight:
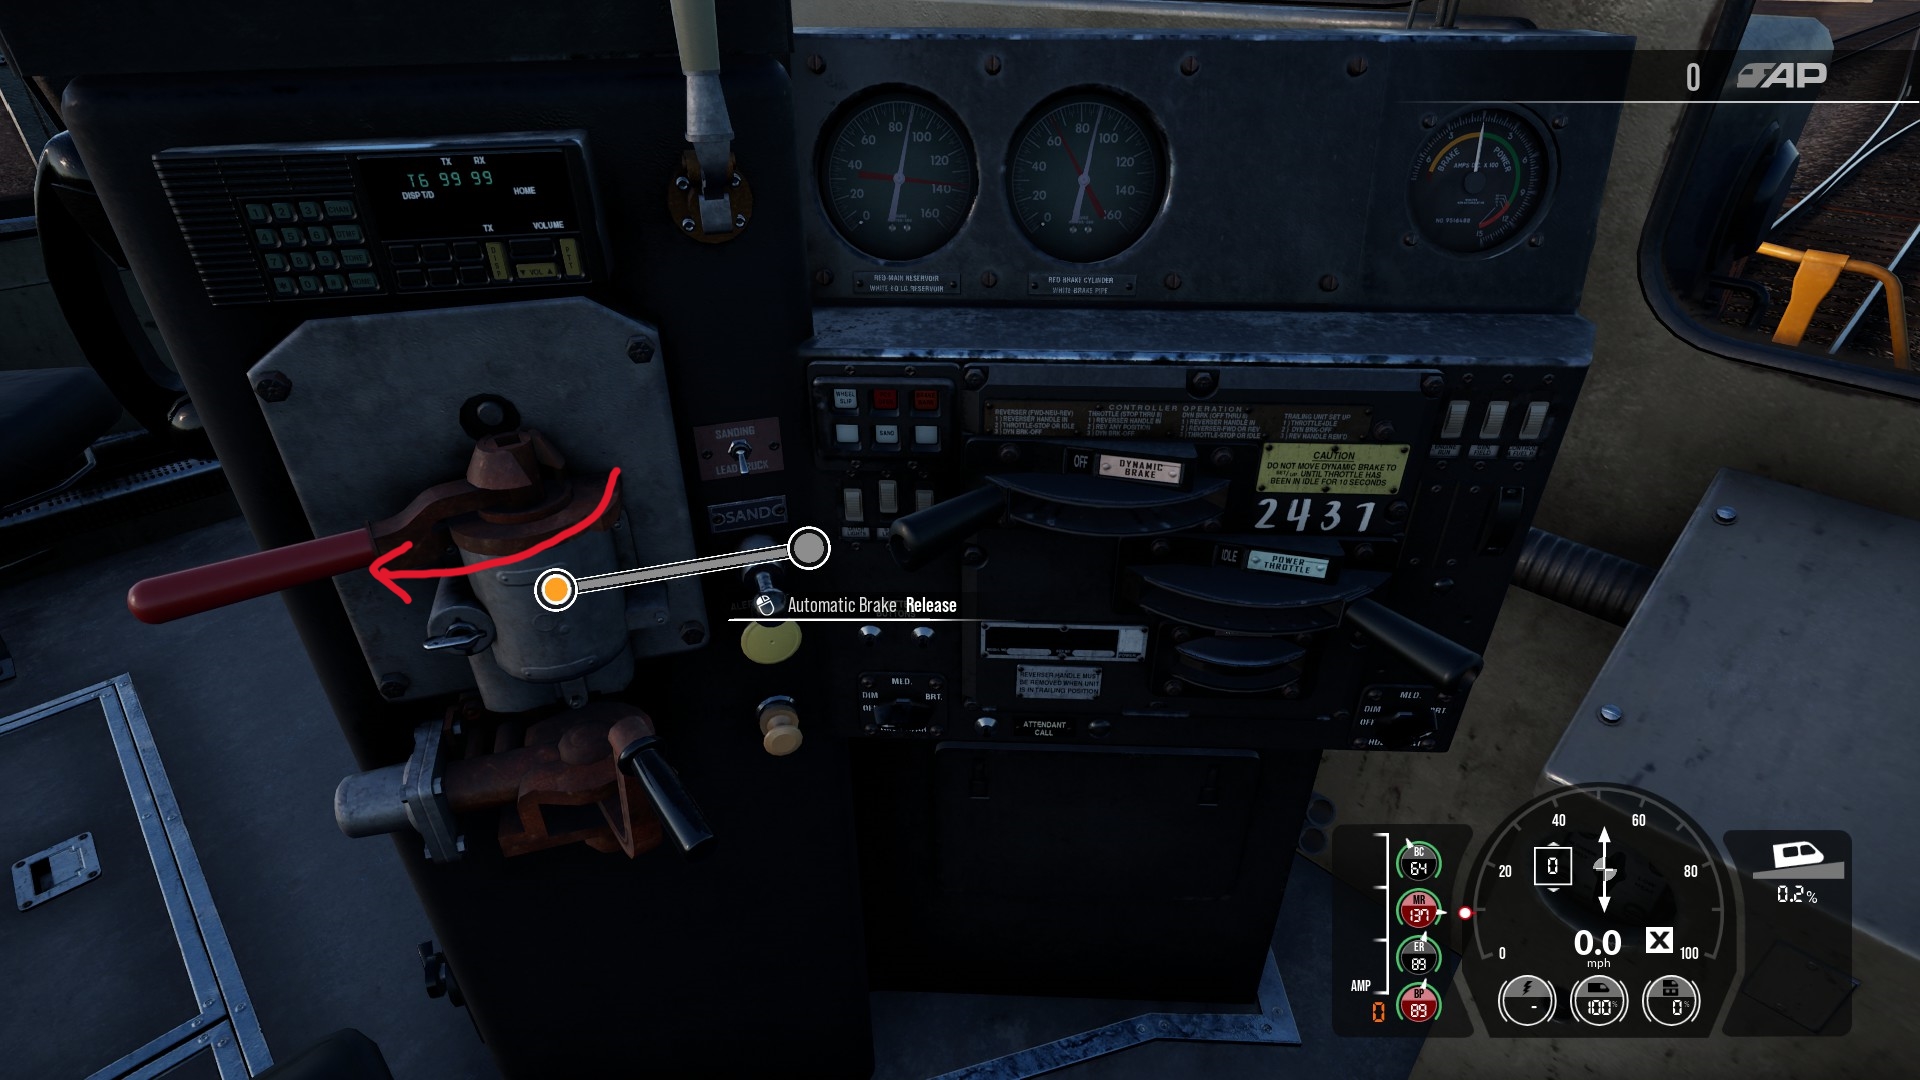
Then you can move the Automatic Brake lever all the way left into the Release position:
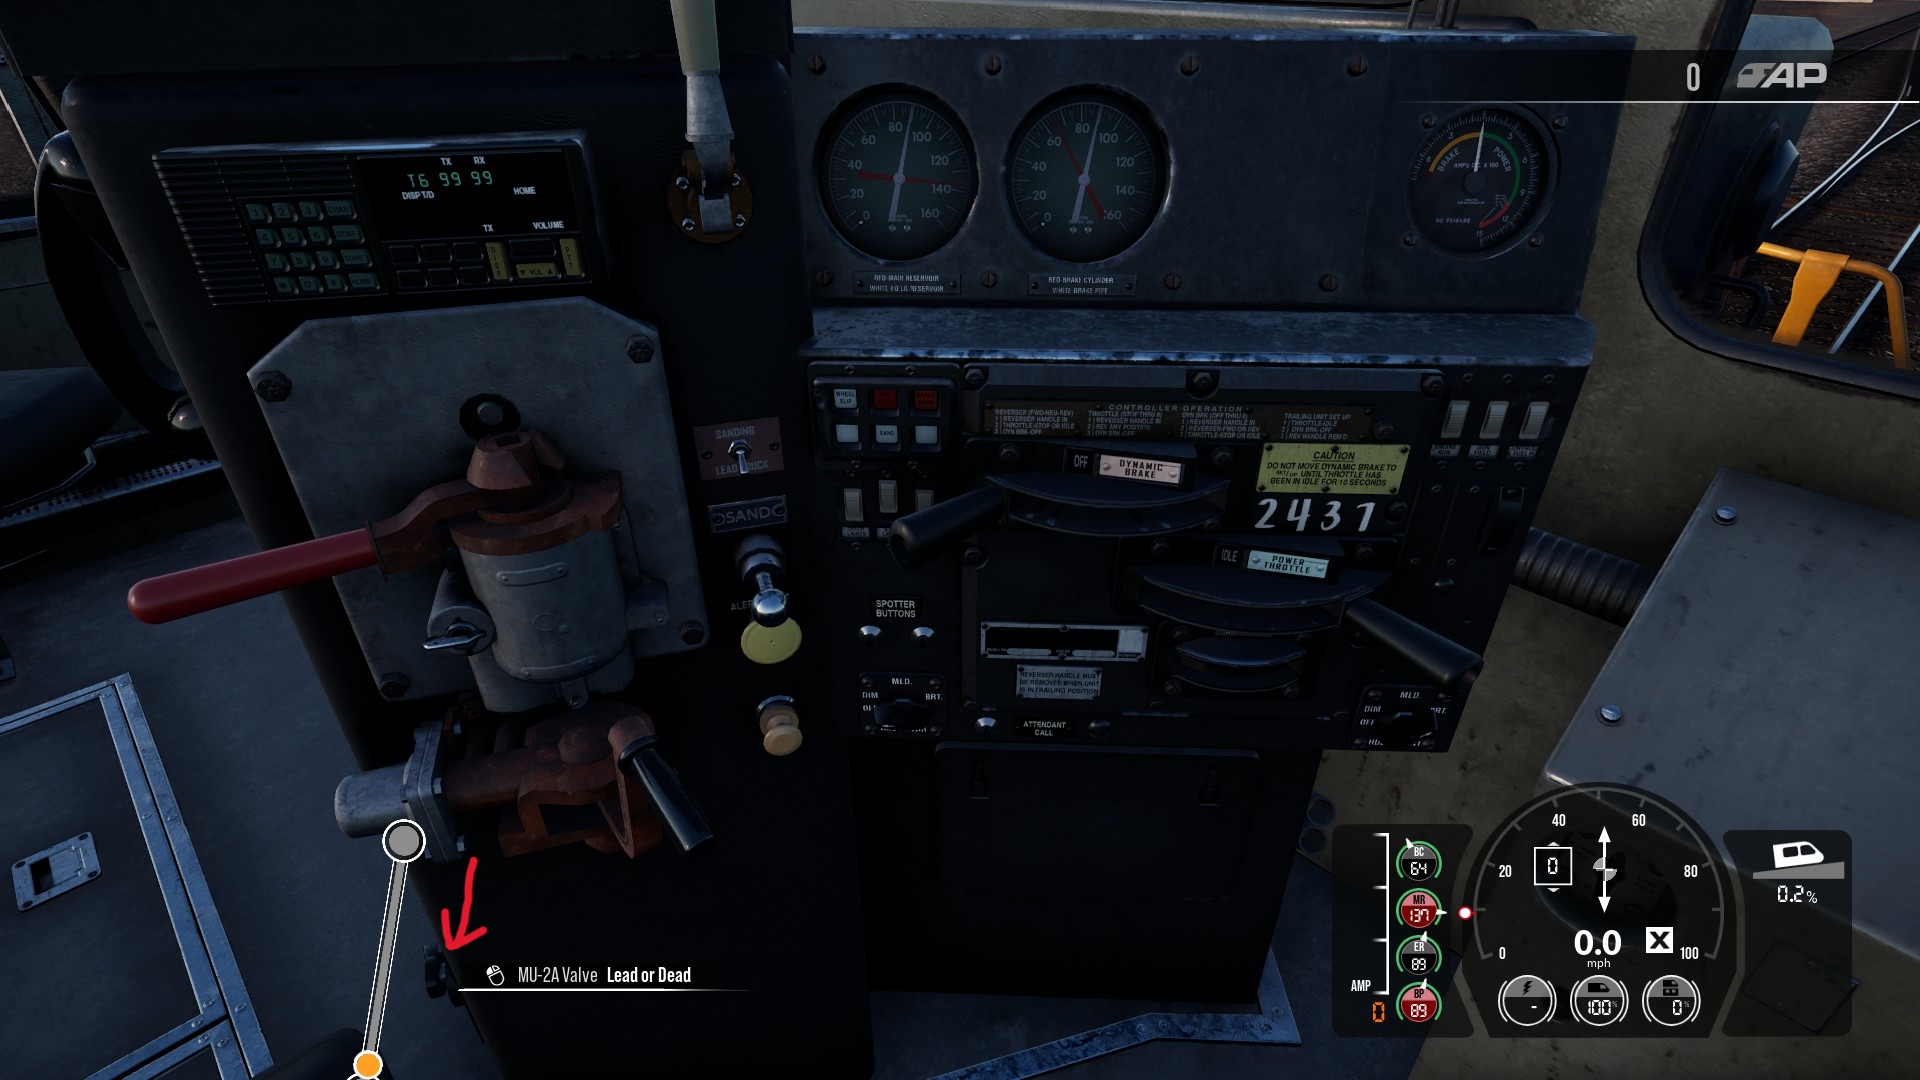
Now for the independent brake. Similarly to the automatic brake you first need to activate the independent brake handle, except in this case you need to set the MU-2A Valve to Lead or Dead:
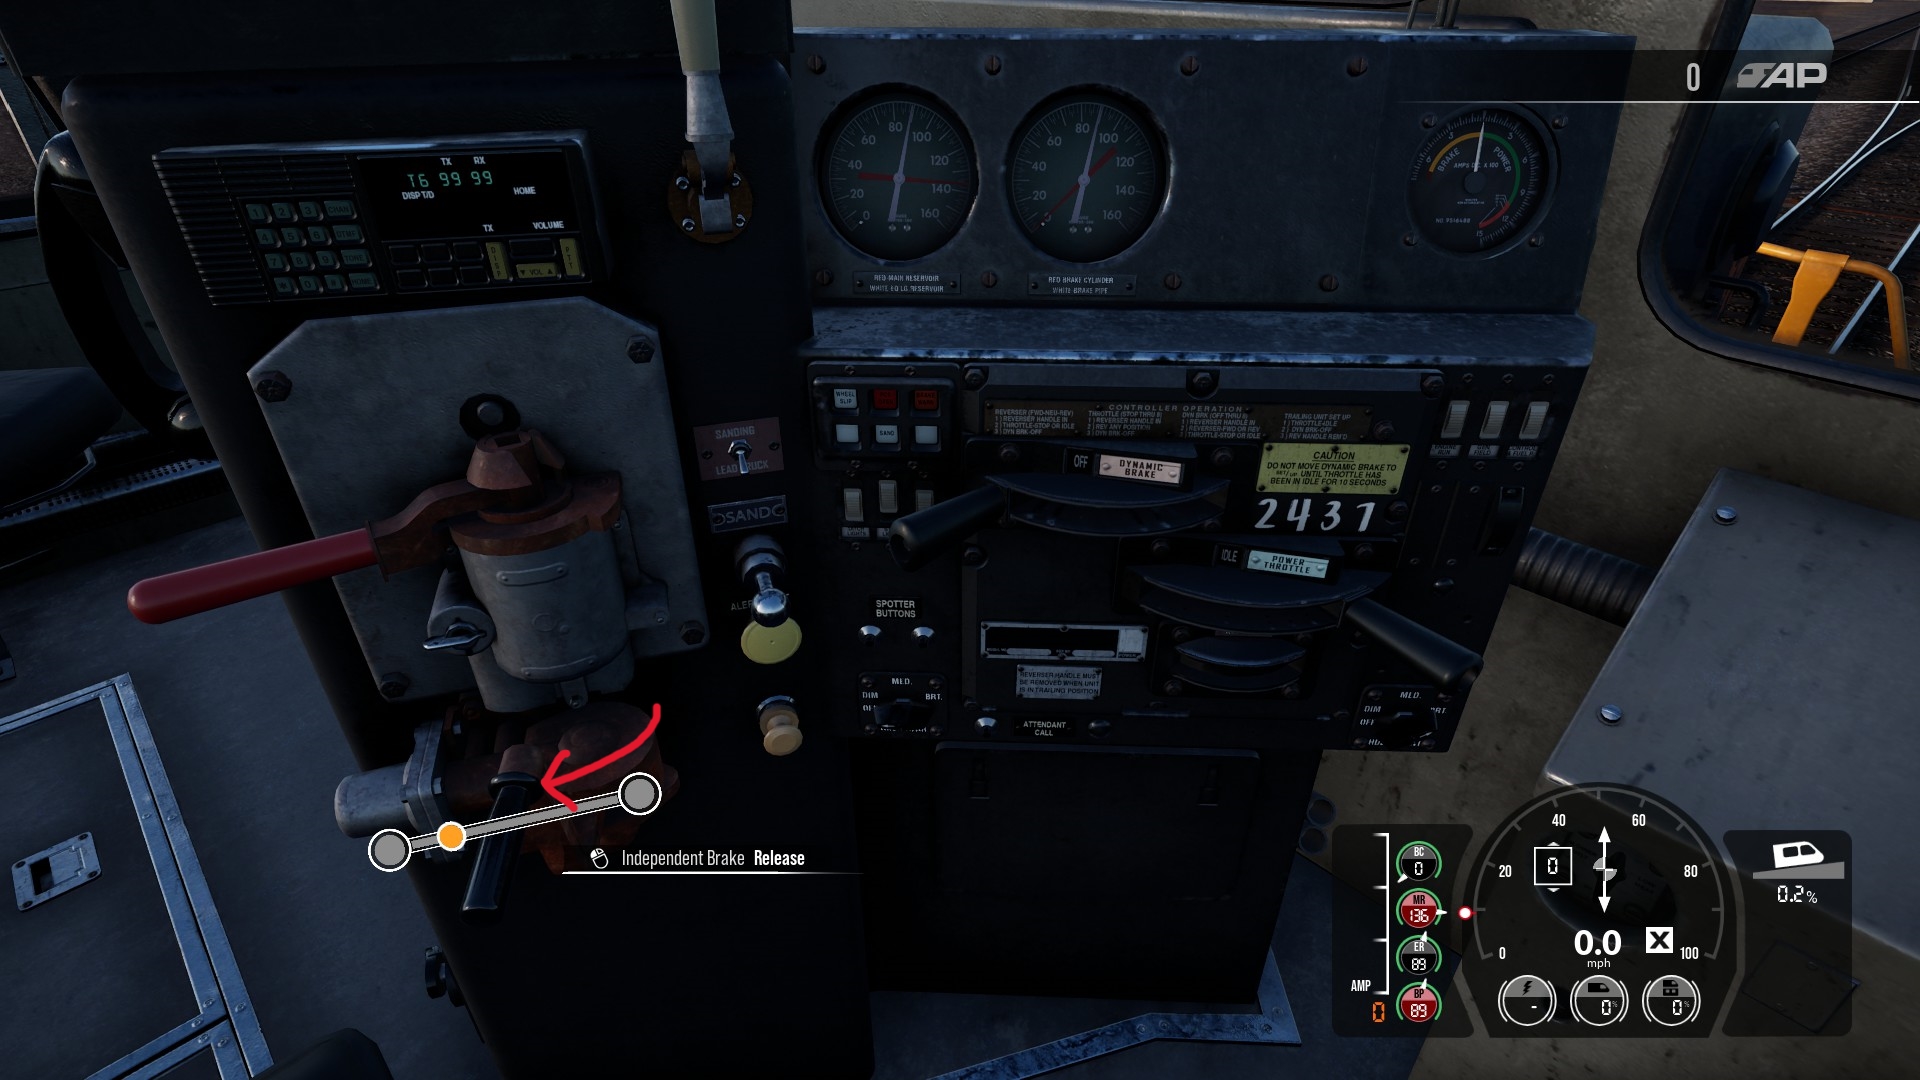
Then move the Independent Brake lever to the left into the Release position:
Note: If you go all the way to left you end up in Bail Off mode, which is fine—just let go of the handle and it will return to the Release position. Bailing Off is used during dynamic braking—an entirely different, third braking system that isn’t relevant when just getting the train started and so is out-of-scope for this guide.
Now here is the fun part: the automatic brakes–remember, the ones that operate on all the cars in the entire train–don’t work instantaneously. The longer the train, the longer it takes for the brakes on all the cars to release. On a warmed up train, it could take 20 seconds from moving the handle before the last car even starts to release its brakes. And on a cold train–one that hasn’t had a running locomotive attached to it in a while–it can take up to 10 minutes! That is because the brakes on a car don’t fully release until the brake pipe is at full pressure (89 PSI) and on a long train it takes a while for the locomotive to build up to that pressure across the entire brake pipe when starting out from 0 PSI.
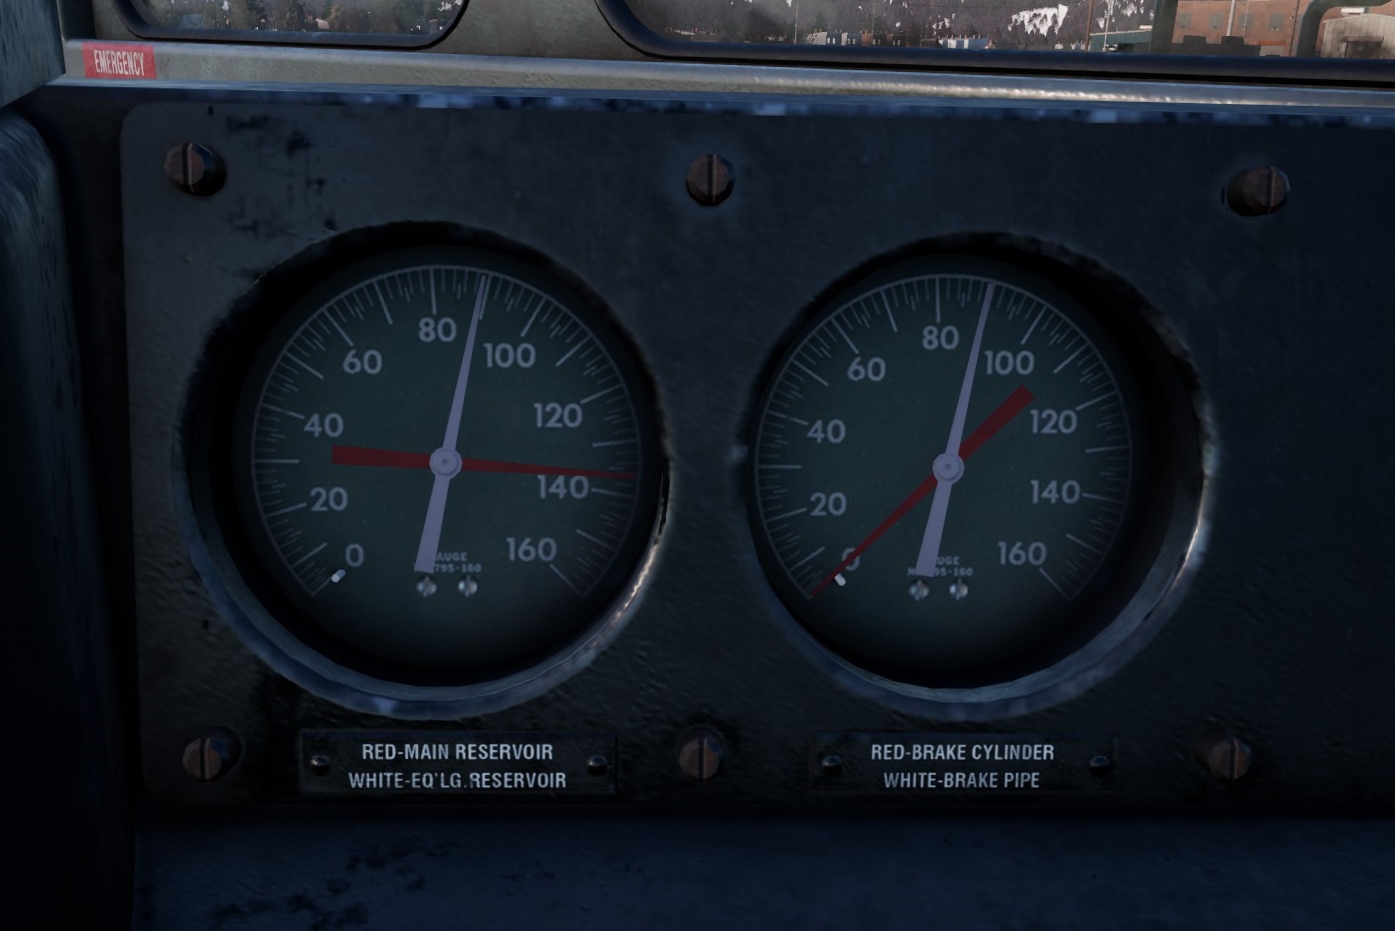
When everything is configured correctly your gauges should look like this:
| Gauge | Location | Expected | Notes |
|---|---|---|---|
| Main Reservoir | Red Needle on Left | ~135 PSI | Feeds rest of system. If it runs low your brakes stop working! |
| Equalizer Reservoir | White Needle On Left | 89 PSI | The set target pressure for the brake pipe |
| Brake Pipe | White Needle On Right | 89 PSI | What actually triggers automatic brakes on each car; lower PSI = more braking |
| Brake Cylinder | Red Needle On Right | 0 PSI | The actual brakes for just the current locomotive; higher PSI = more braking |
If your brake gauges don’t match up with the above table, you need to re-read the brake section from the beginning and think about what step isn’t working.
Traction
Traction is the part of the locomotive that gets the power from the engine to the wheels. Compared to braking, traction is far simpler to understand, although there are a number of a details that will mess you up if you overlook a step.
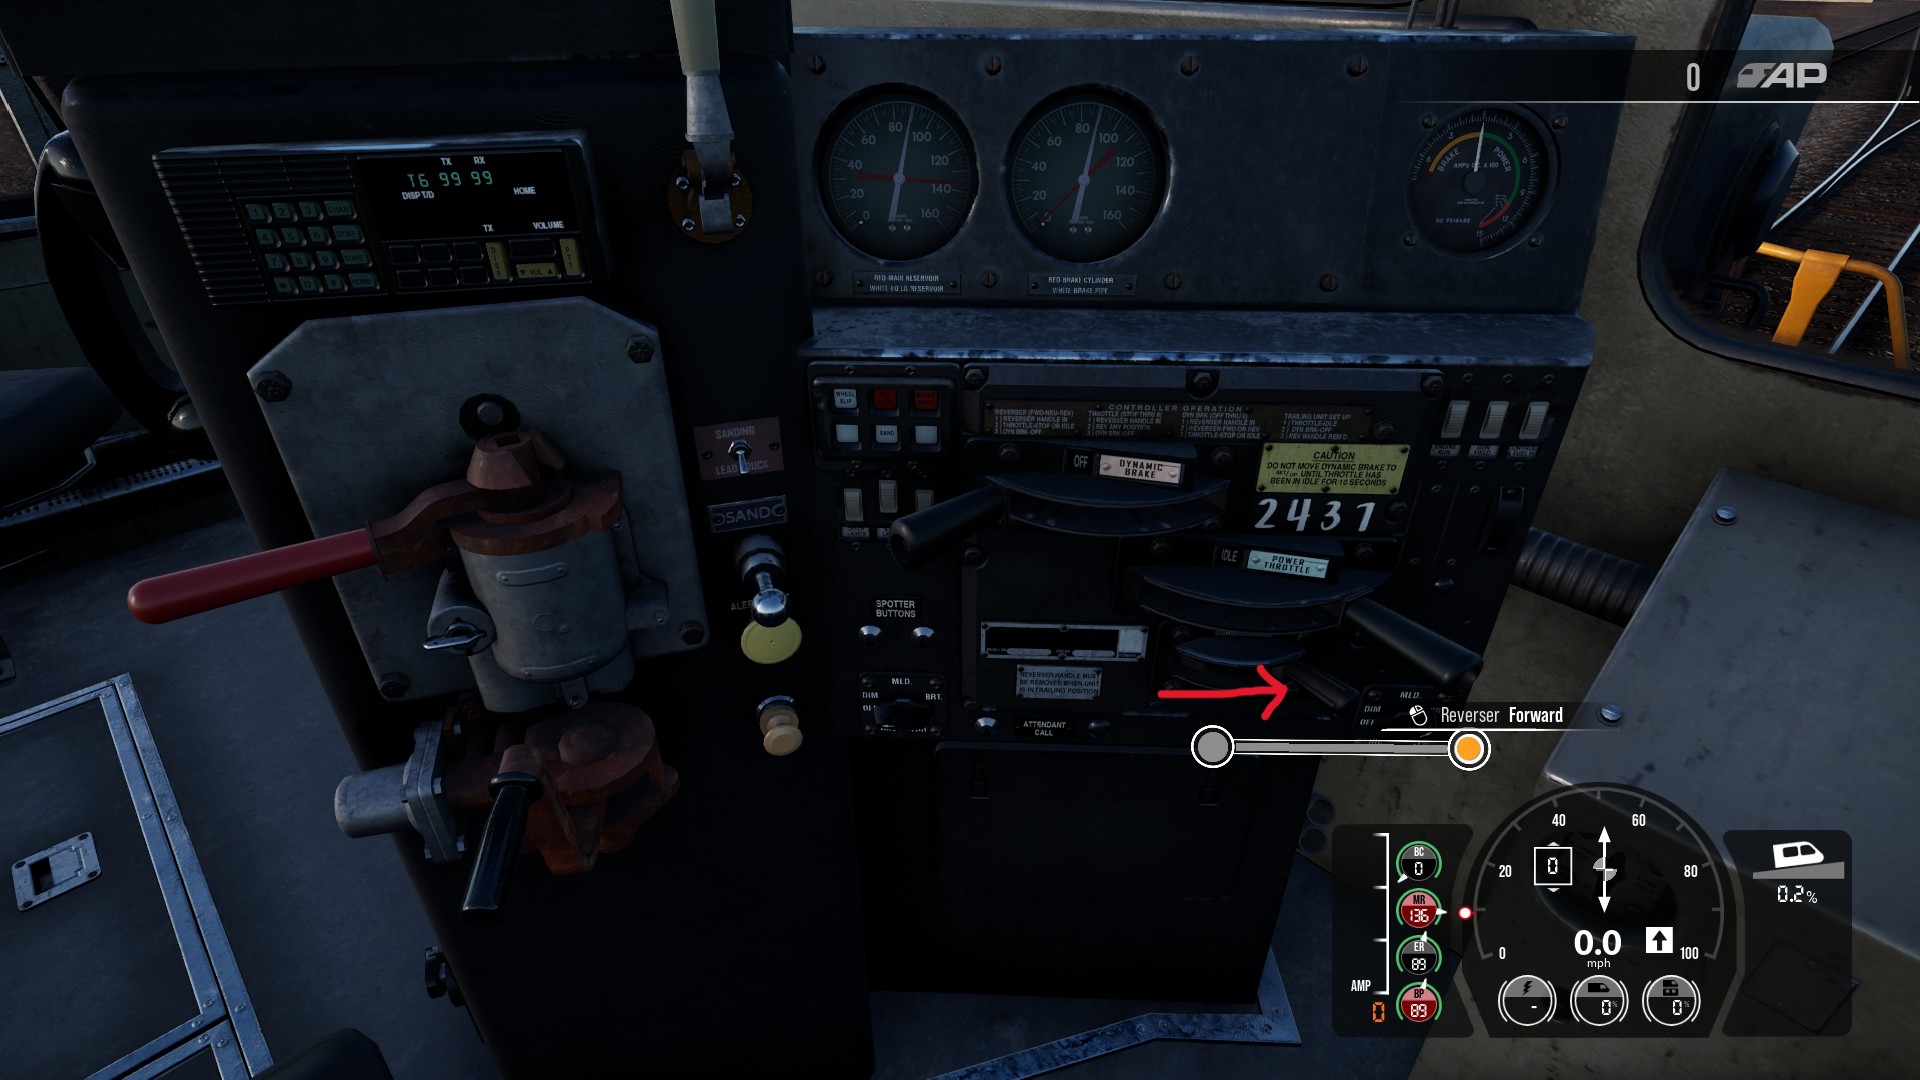
First insert the Reverser Handle if you haven’t already (click on the area to insert it) then move it rightwards to Forward:
Note: you won’t be able to move the Reverser handle if the Throttle handler is not in the Idle position or if the Dynamic Brake handle is not in the Off position, so adjust those first if necessary.
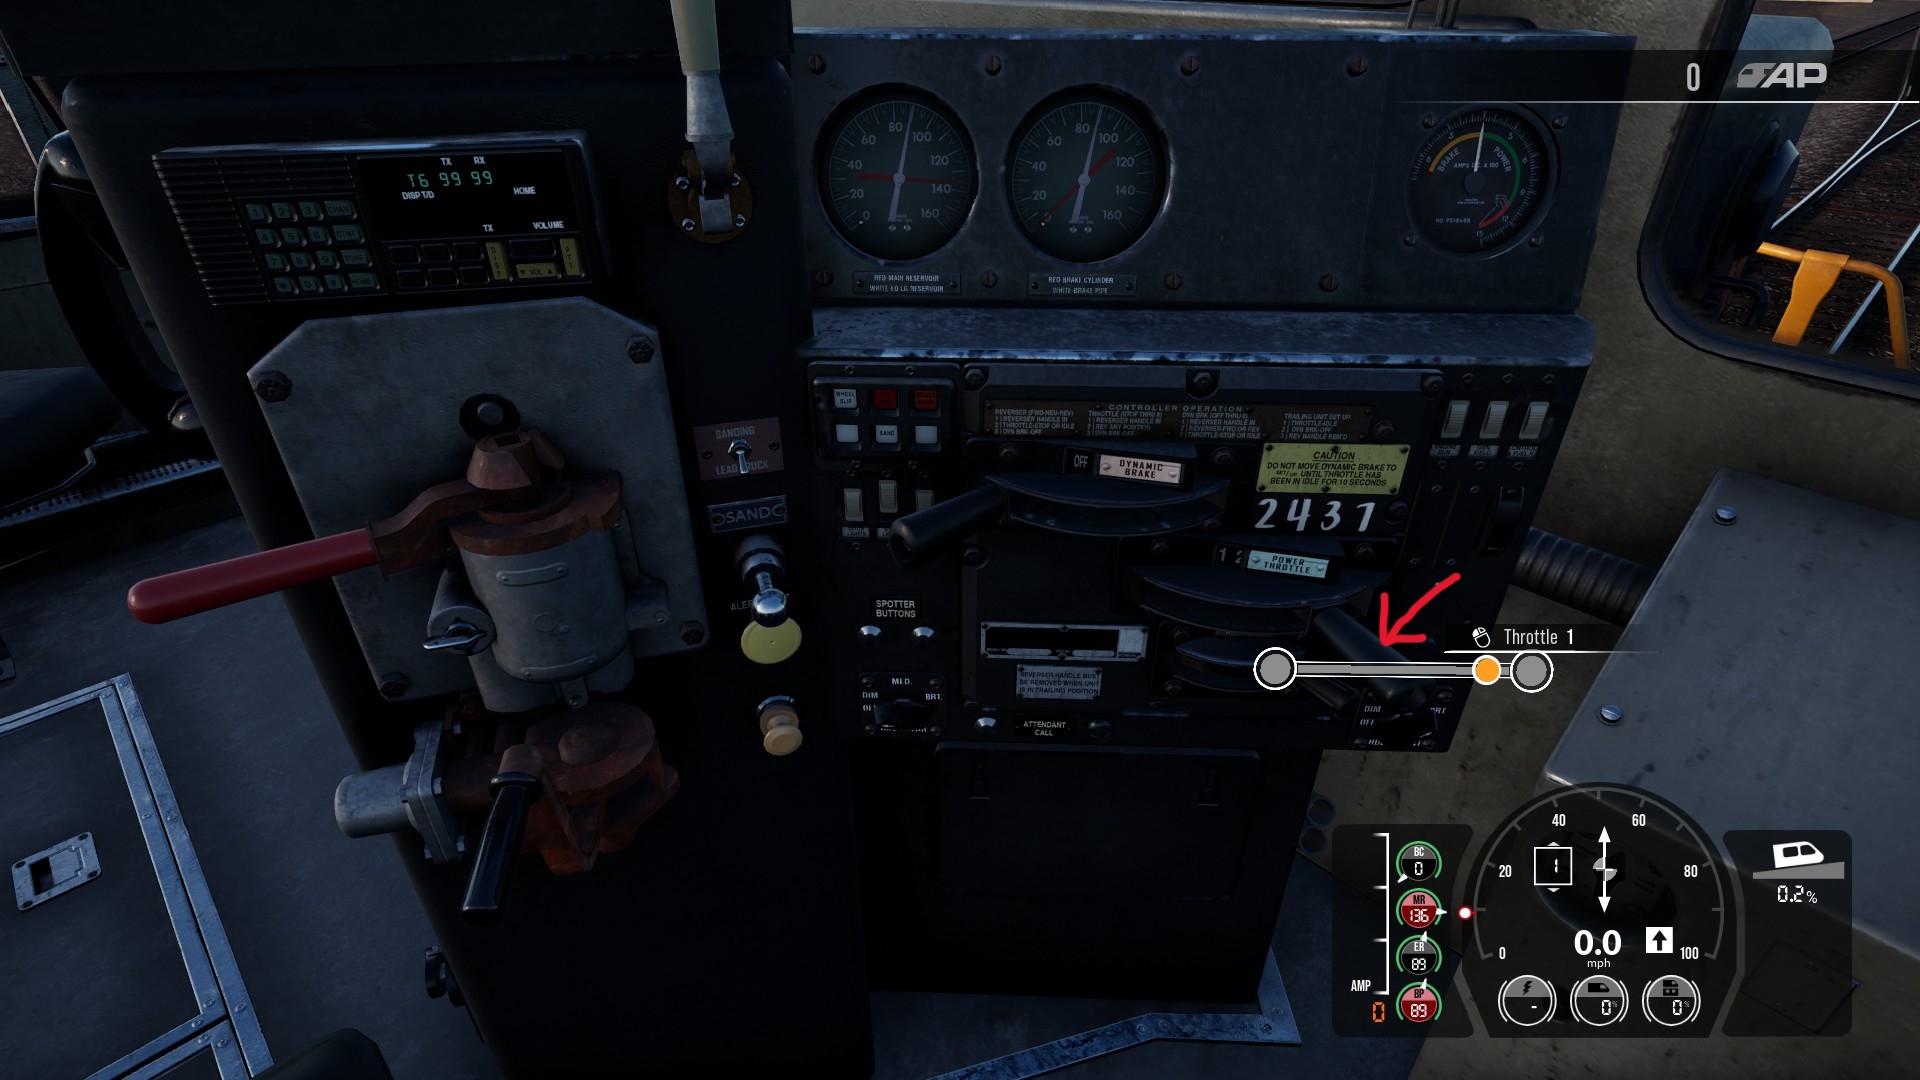
Next move the Throttle to the left 1 or more notches:
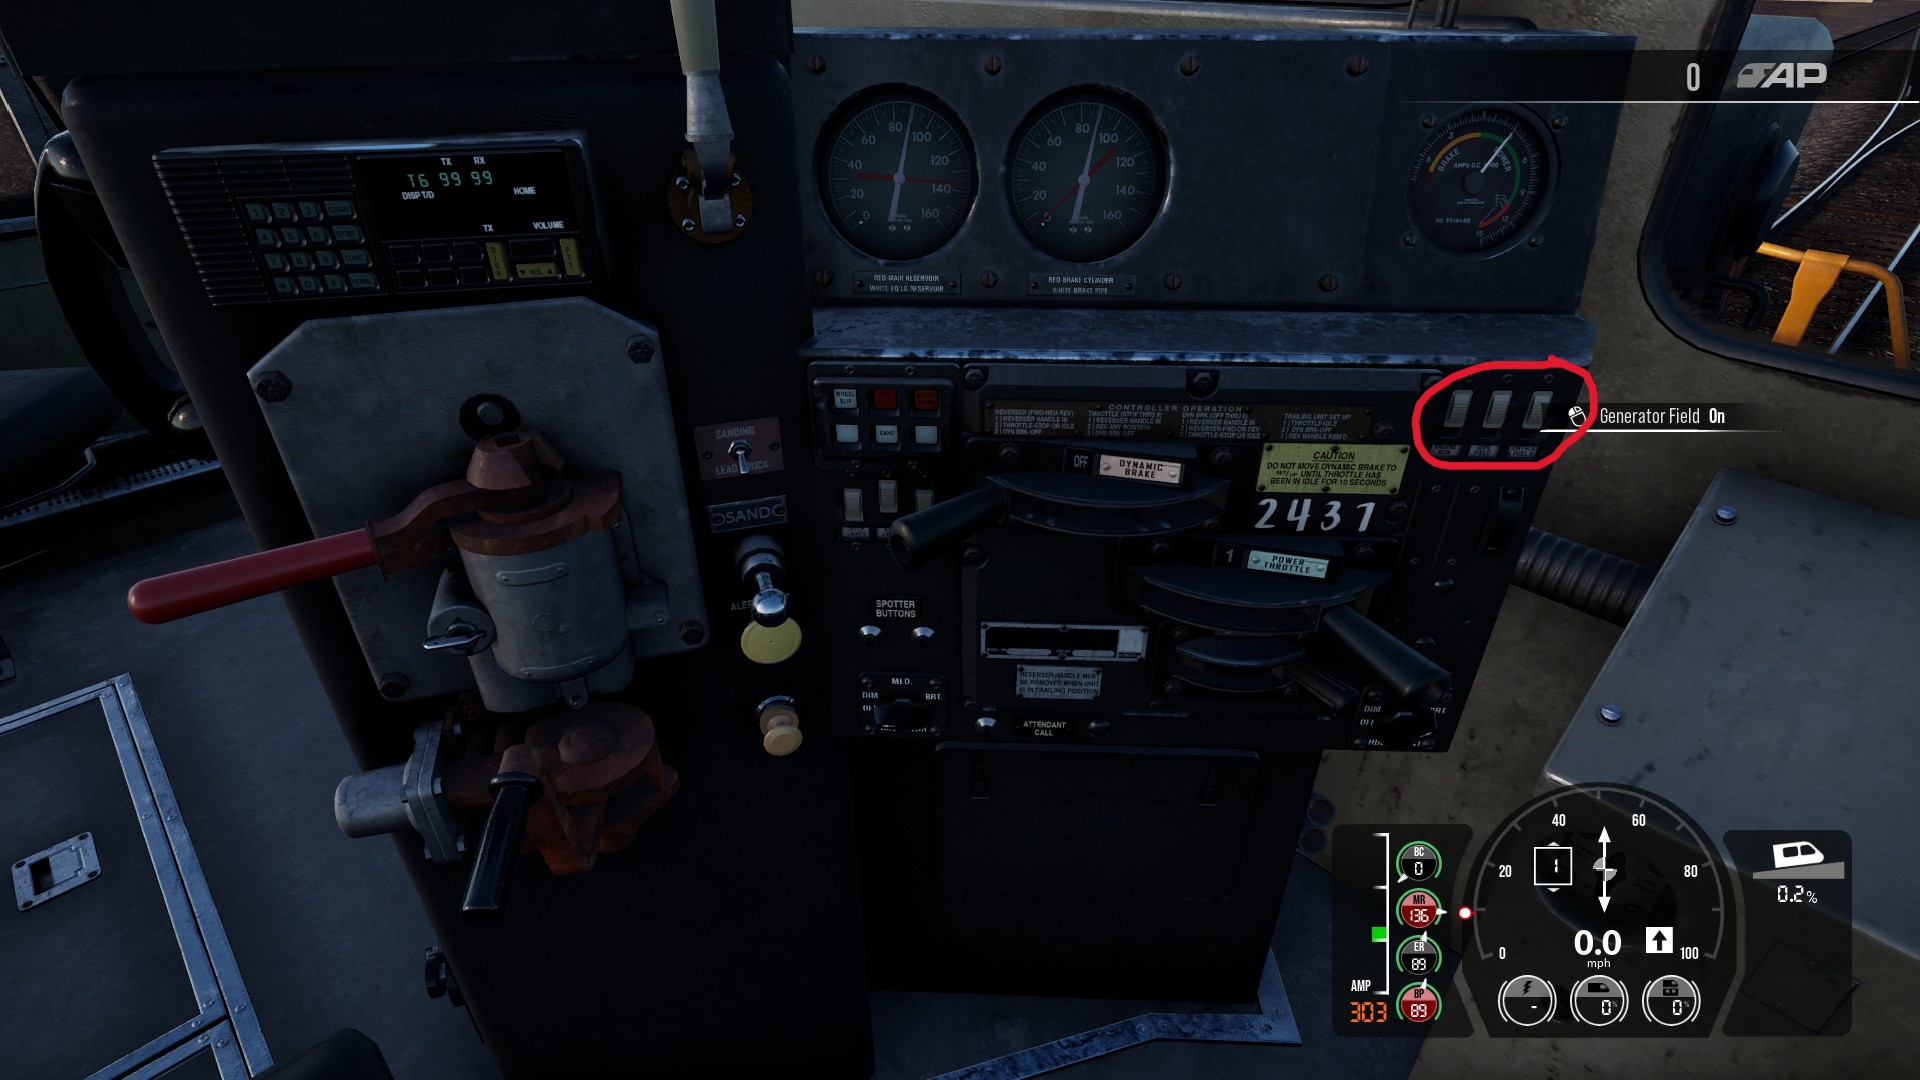
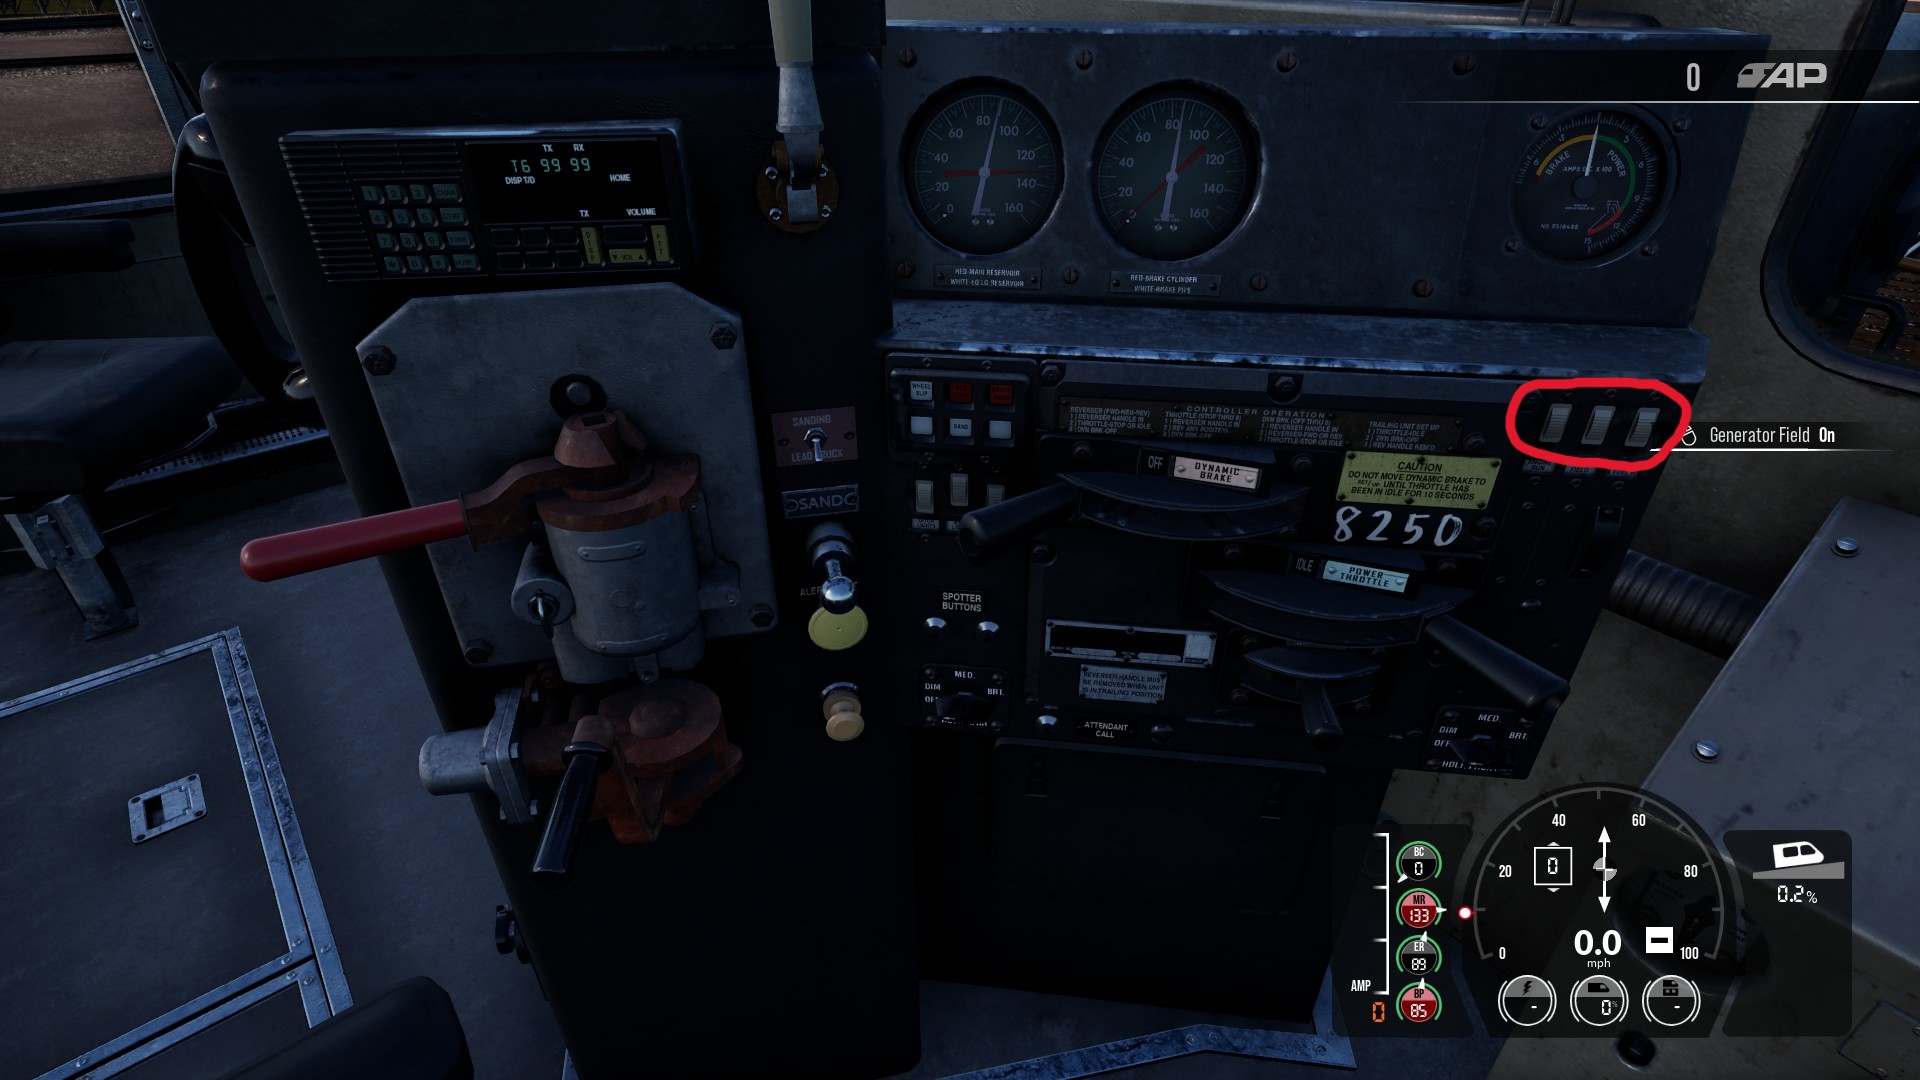
Finally, double check that Engine Run, Generator Field, and Control & Fuel Pump are all in the On position:
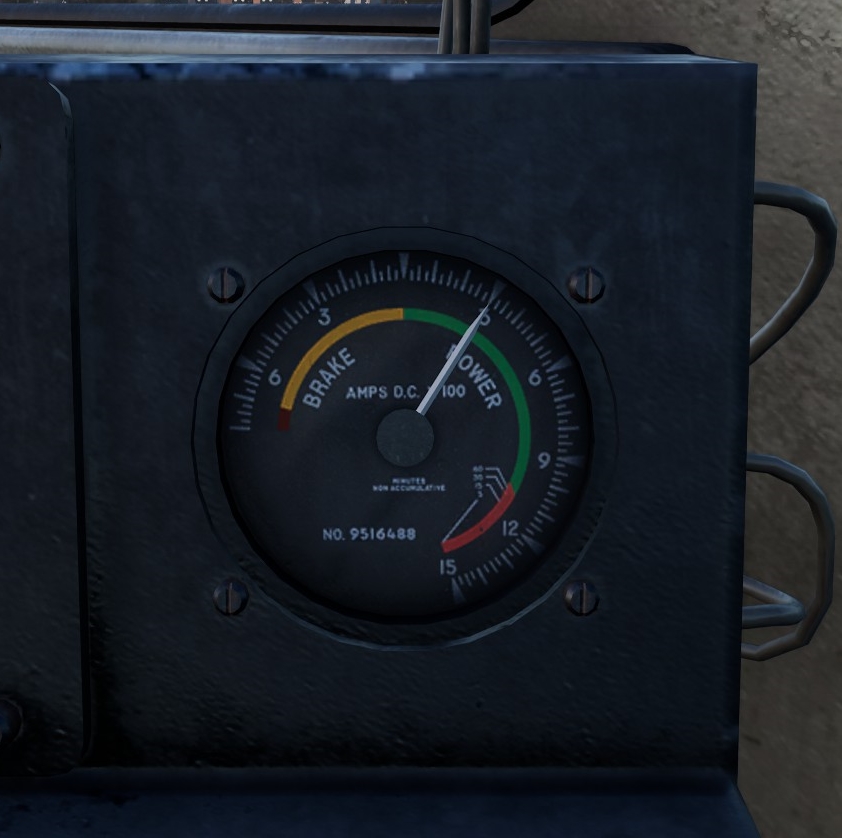
If you have done everything right, you should hear the engine rev up and the current meter start to move into the green area:
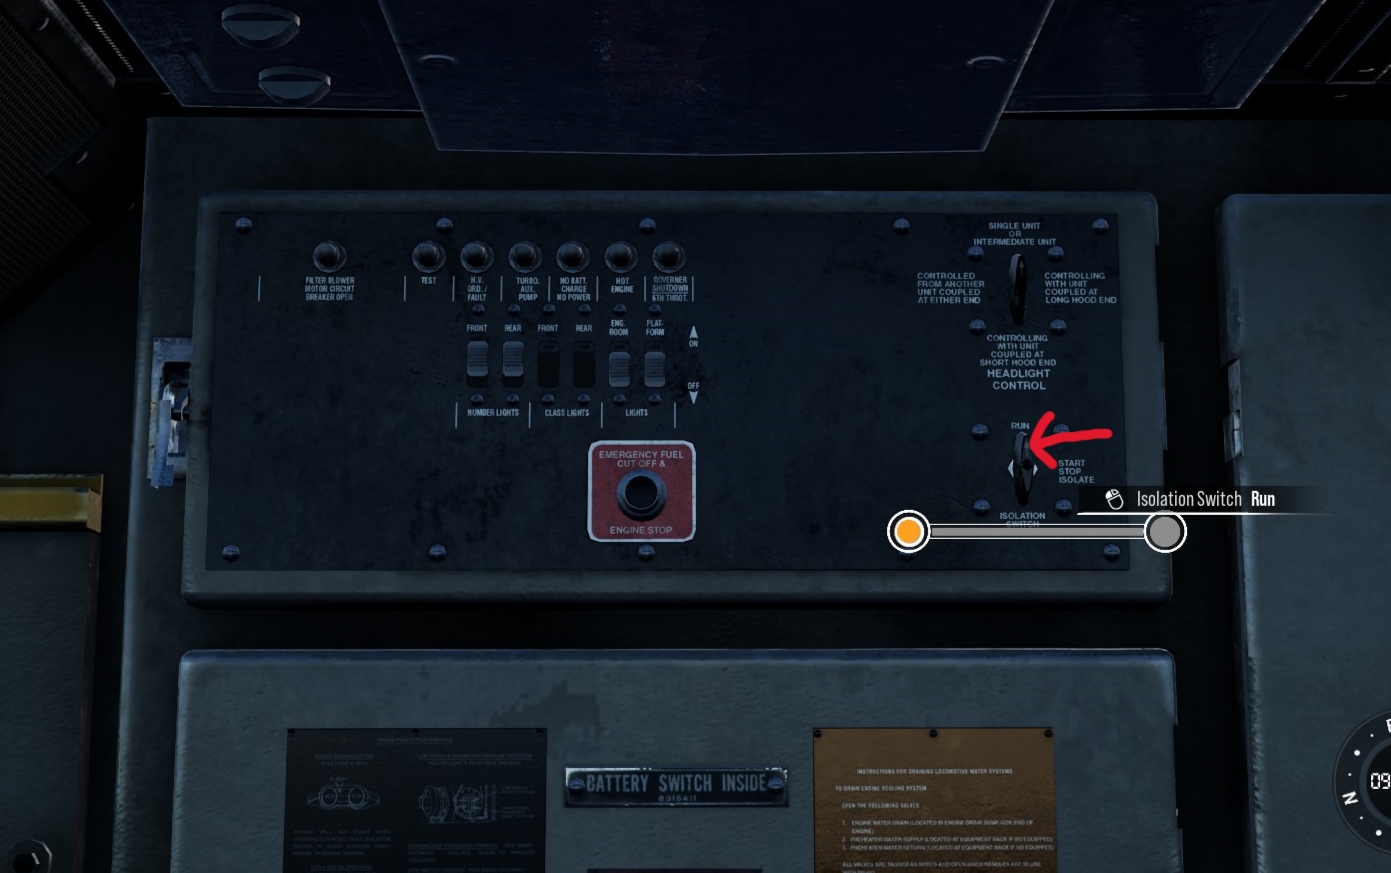
If you hear the engine rev up, but the current meter doesn’t move a nudge, double check the Generator Field toggle (see earlier screenshot). Also make sure the Reverser is in either the Forward or Reverse position. Finally check the Isolation Switch on the panel behind the engineer’s seat:
(It should be set to Run)
If you don’t hear the engine rev up at all, it’s probably a problem with the fuel pump or the engine isn’t started. Double check the steps above. You may also need to perform a Cold Start of the engine (see section towards the end of this guide).
PCS Open
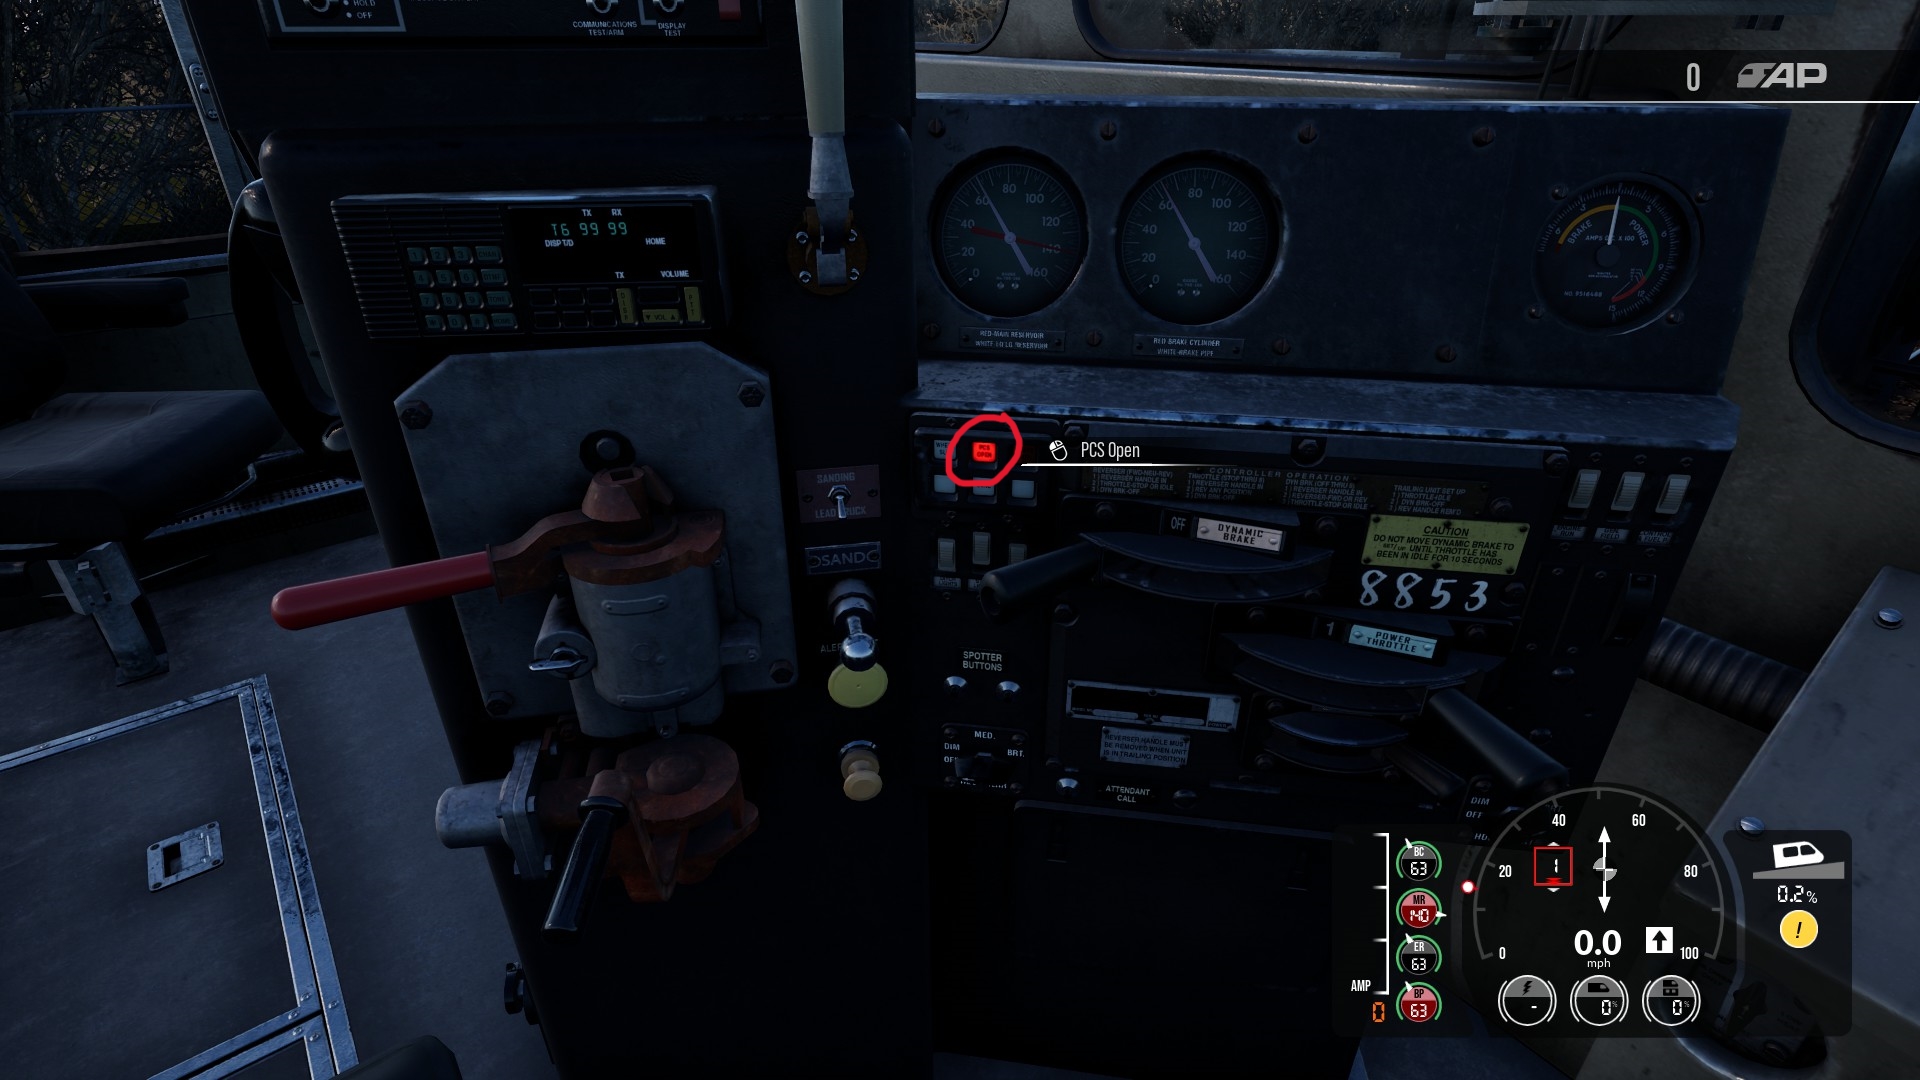
Your throttle and brake controls can get locked out if the PCS Open alarm trips. Your HUD throttle will be surrounded by a red outline when this happens. Typically this happens if you are using the Alerter and you forget to press it in time:
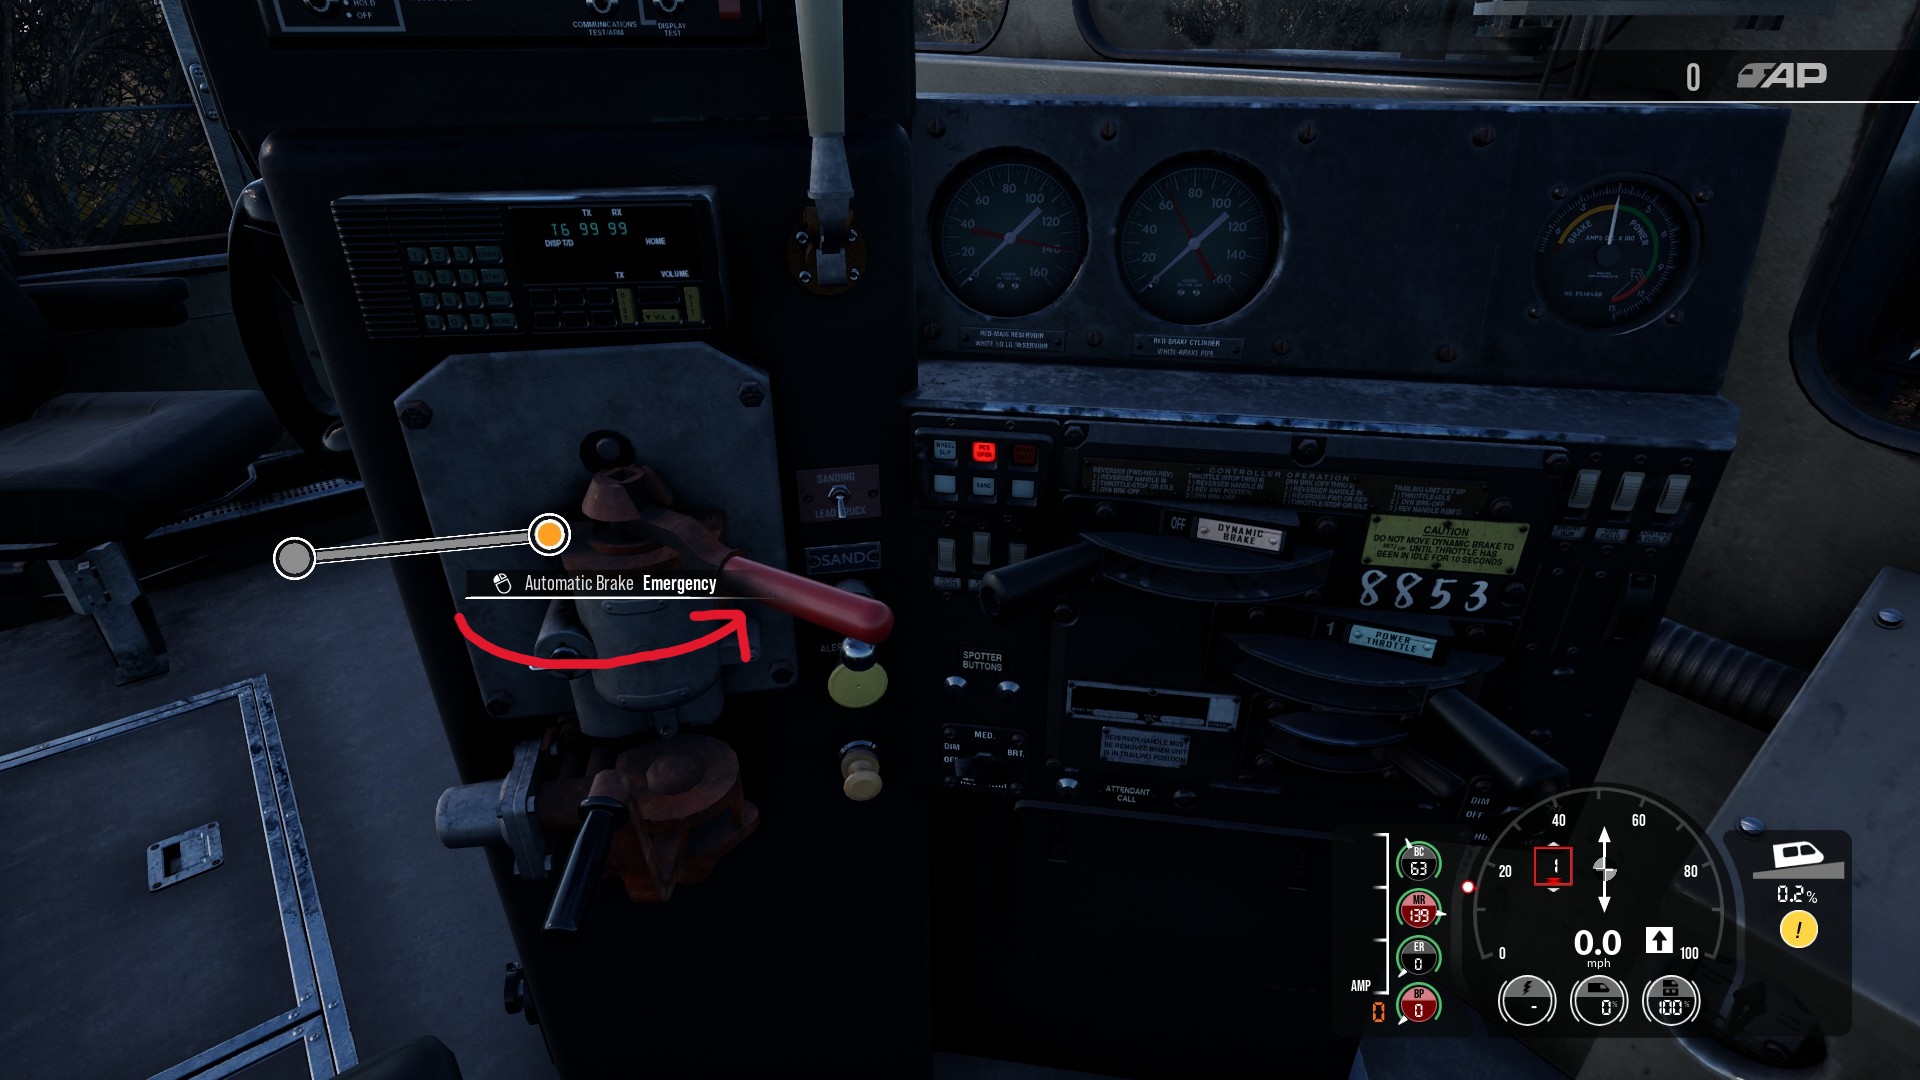
The proper way to clear the alert is to move the Automatic Brake all the way rightward to Emergency:
Then you must wait at least 60 seconds. After that, you should be able to release the Automatic Brake and the PCS Open alarm will clear automatically.
But who has time for all that?
If you set the Cut-Off Valve (or Cutout Valve) to Cut-Out, it usually clears the alarm immediately. Then you can set it back to Freight and be on your way. Alternatively, I find setting the Automatic Brake to Handle Off and waiting for the brake pipe pressure to fall also does the trick.
1.a Driving Tips
The actual driving part of driving a train in TSW2 doesn’t exactly require Forza level skills. But there are some basic skills that you can screw up if you’re not aware of them:
When starting on an uphill, apply enough brake to keep the train stationary, then throttle up the engine, then slowly release the brakes.
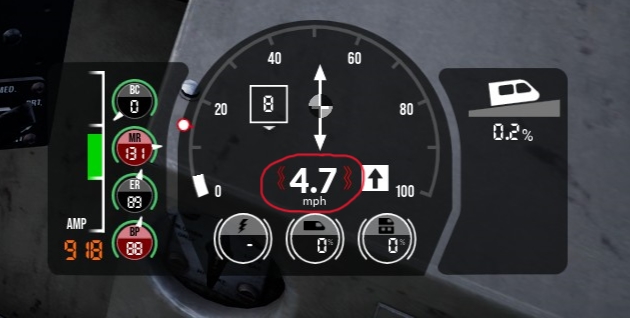
If you see these wavy lines around your speed:
It means your wheels are slipping. More power is being applied to the wheels than the friction between the wheels and the rails will allow. Reduce your throttle to keep wheel power in check, or hold down the Sand button to increase friction, or both!
Sometimes you need just a little more power to get enough speed to keep the wheels from slipping. But if you prematurely hold the throttle in the next higher notch, the wheels will slip before you can get to that speed. What you can do is move the throttle up to the next notch to get a small boost in power, then quickly move it back down a notch before the wheels slip. Repeat a few times and you can often build up enough speed that your wheels will no longer slip at the next higher notch setting.
Finally, maybe your train is just under-powered for the load? That is where a properly configured Multiple Unit setup comes in…
2. Multiple Unit w/ Control Cable
Anytime you have multiple locomotives working in a train—helping to push or pull the train—that’s a Multiple Unit (MU) setup. By far the most common MU configuration you’ll run into in TSW2 is two or more directly connected locomotives.
In the game there’s nothing special you have to do to connect the locomotives. If you have two locomotives directly coupled to each other, the game automatically takes care of hooking up the hoses and the control cable between the two.
What you do need to do is configure all the trailing locomotives so they can be controlled effectively from the lead locomotive.
Brakes
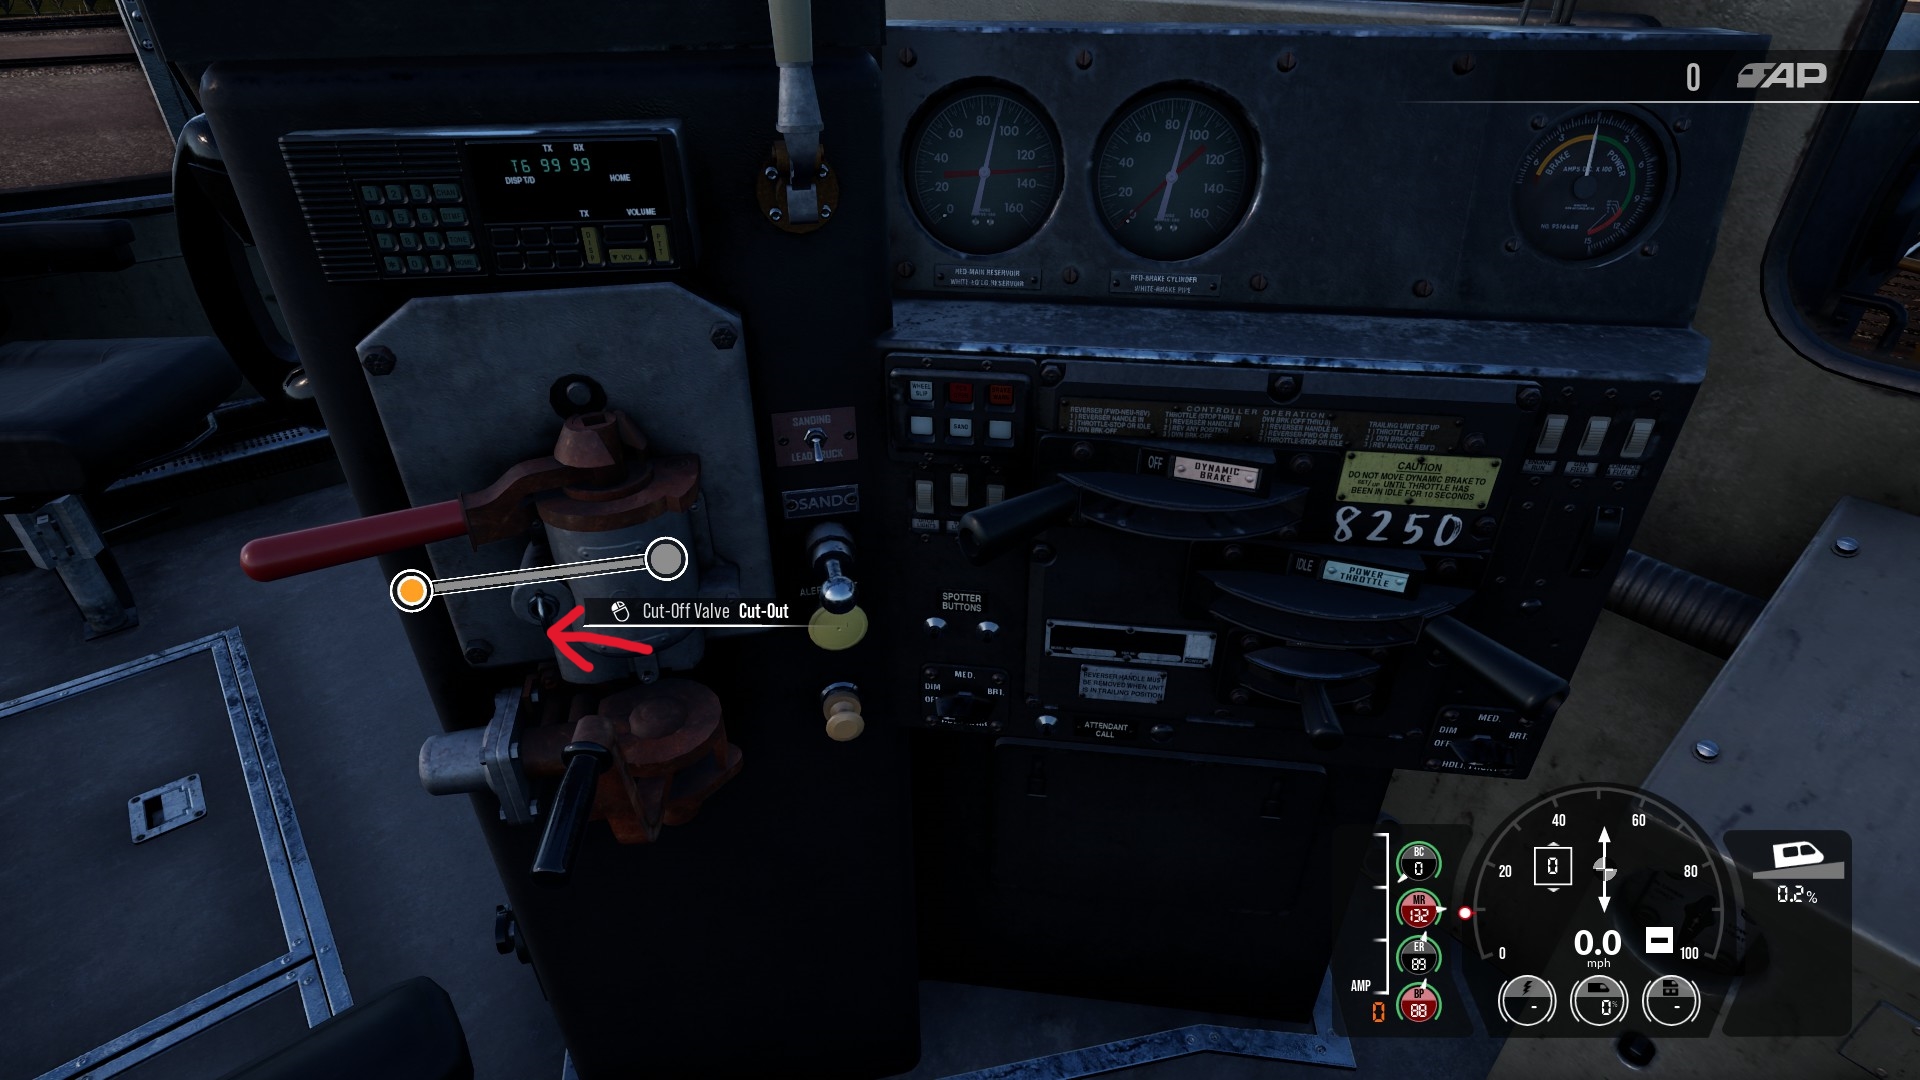
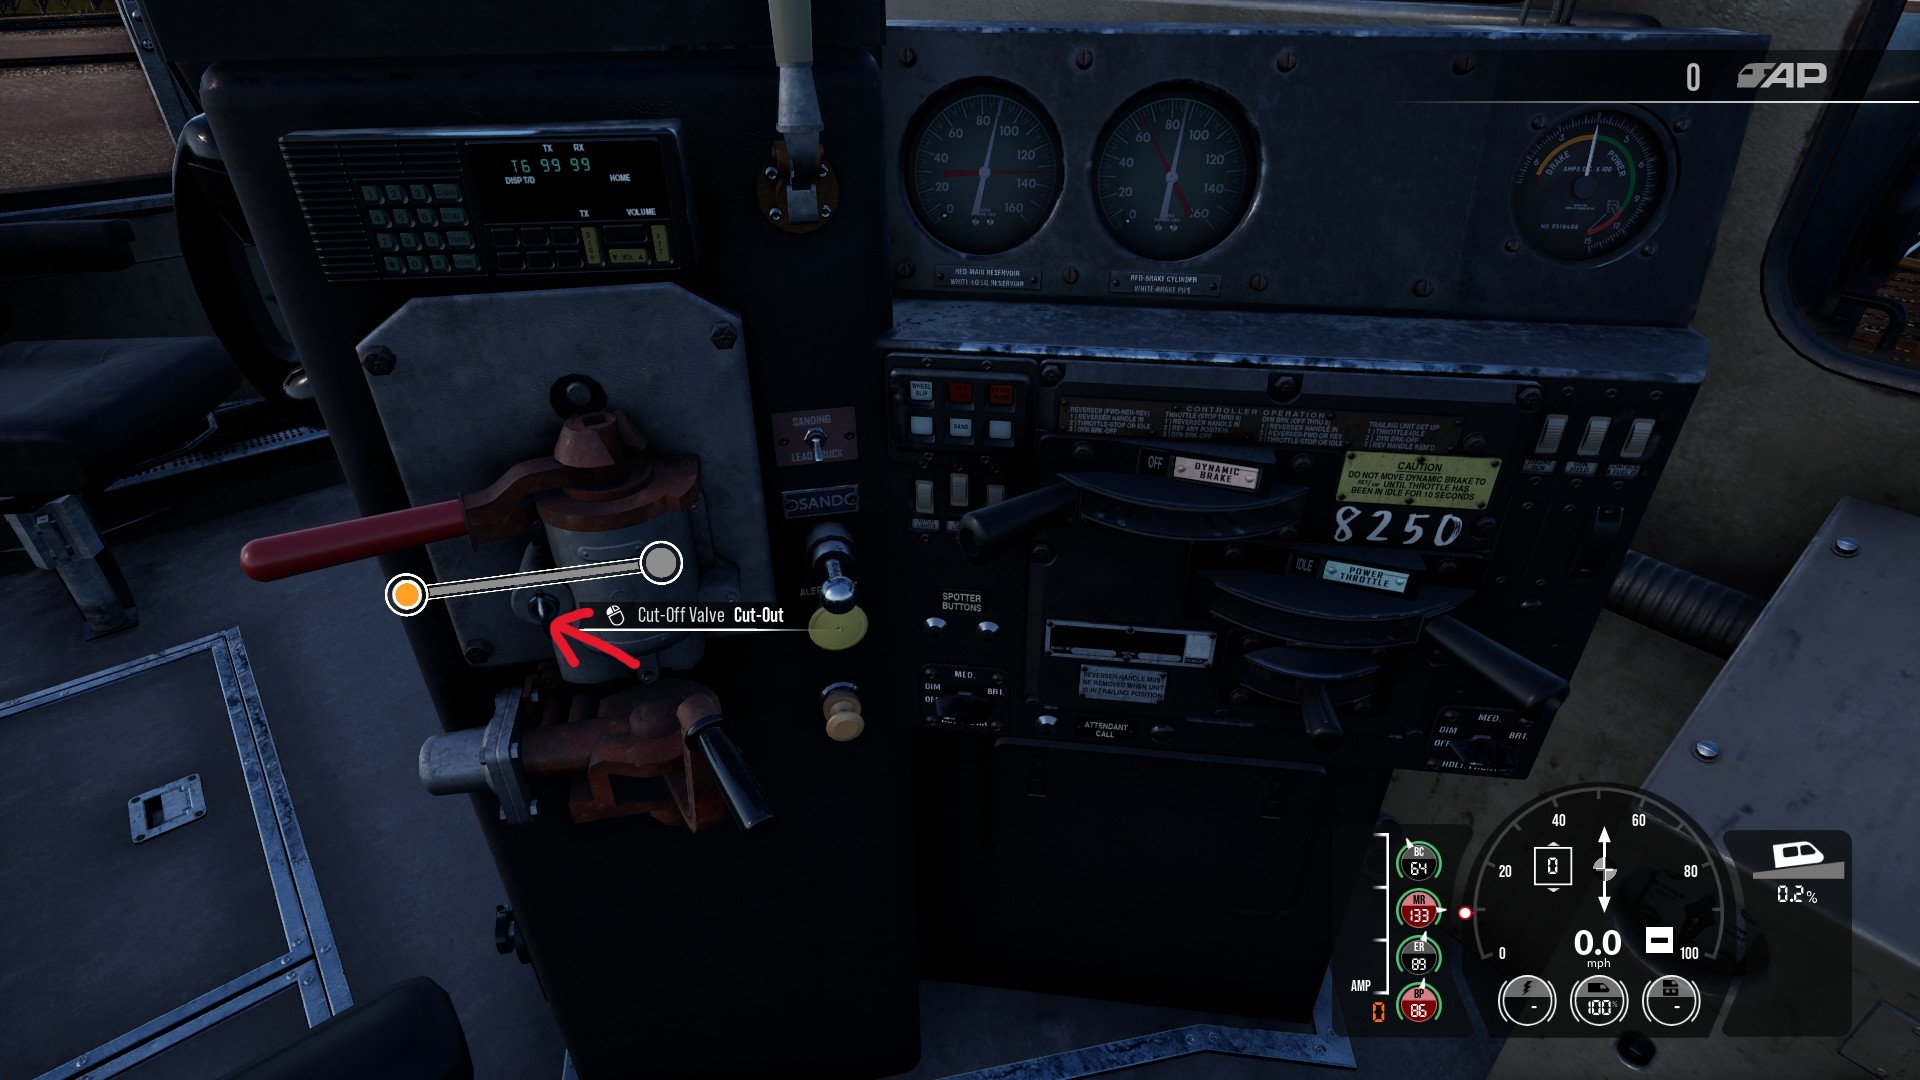
First set the Cut-Off Valve (or Cutout Valve) to Cut-Out:
This will prevent the trailing locomotive’s Automatic Brake control from fighting with your Automatic Brake control in the lead locomotive. Optionally, you can also set the Automatic Brake to the Handle Off position. This will drain the equalizer reservoir in the trailing locomotive. But it doesn’t really matter either way since the Cut-Off Valve has already disconnected the equalizer reservoir from the brake pipe in the trailing locomotive.
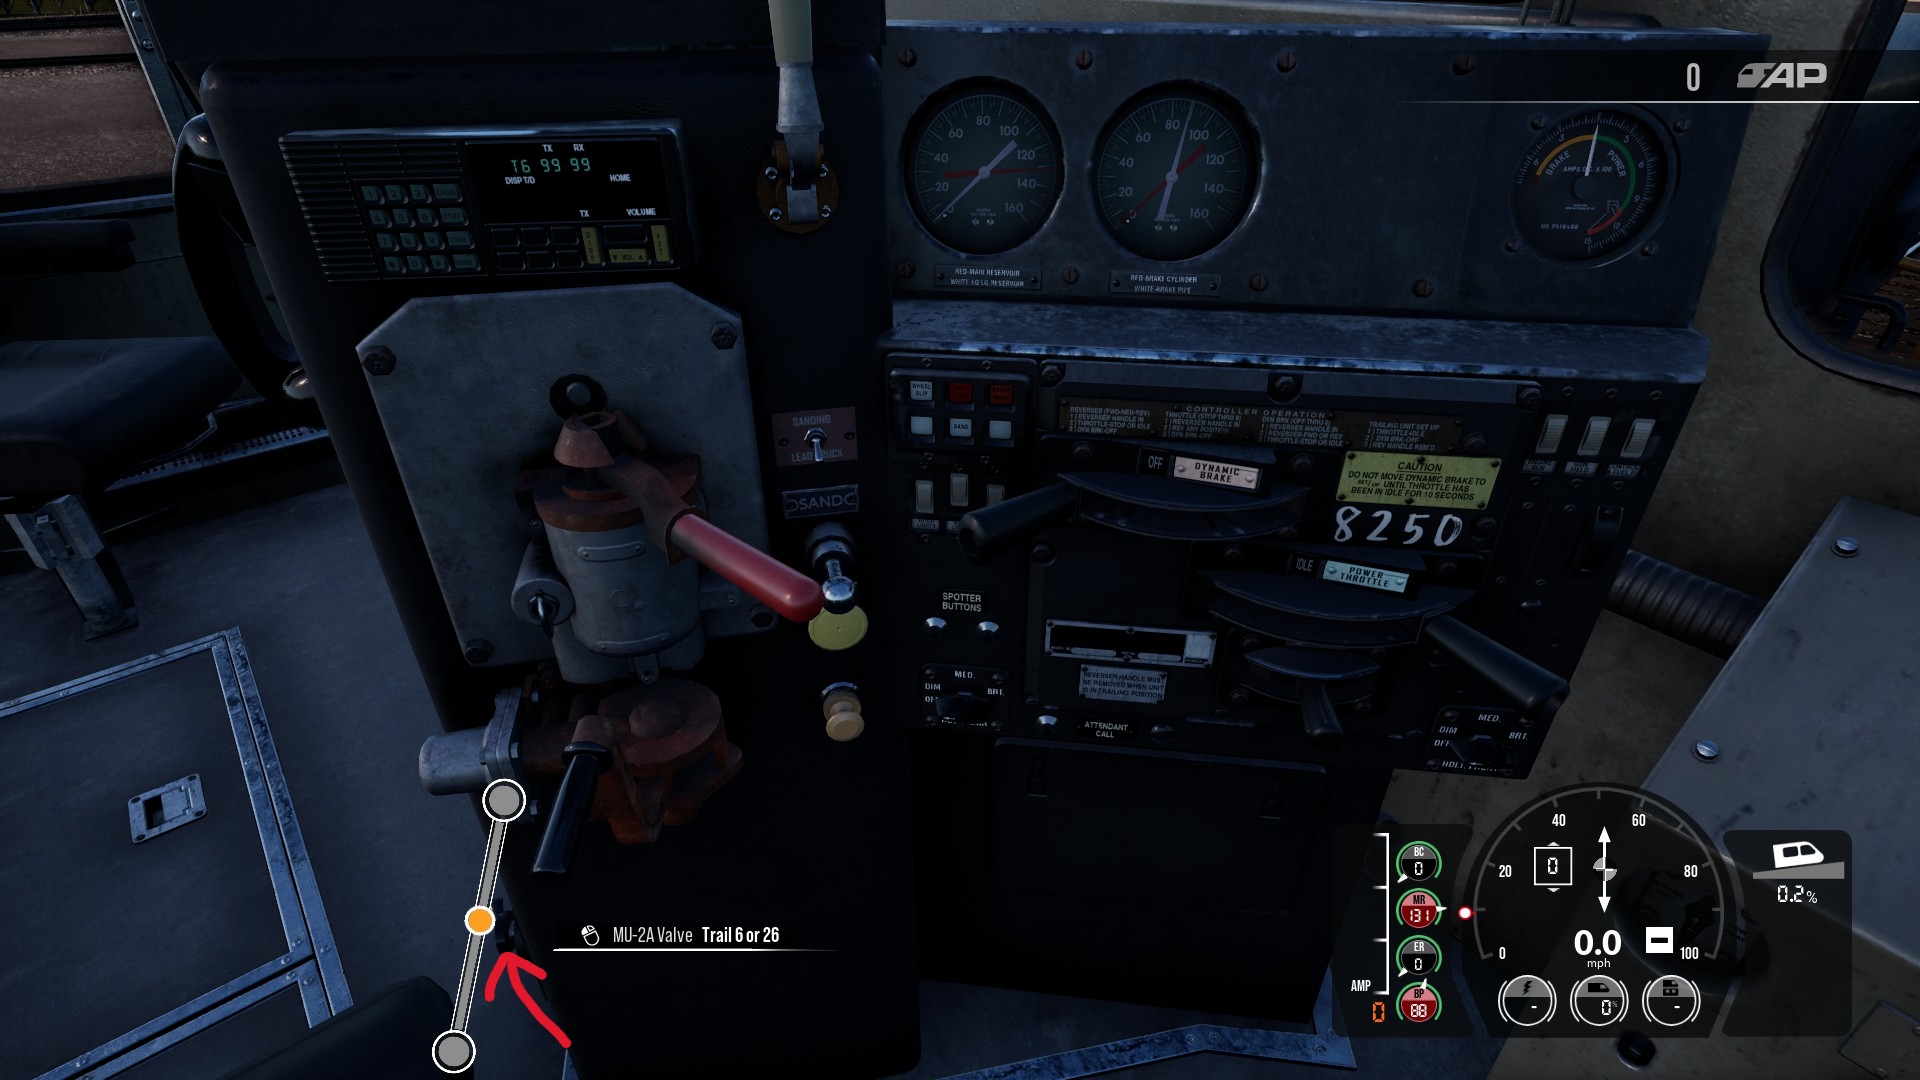
Next set the MU-2A Valve to Trail 6 or 26:
This will both ignore the Independent Brake handle in the trailing locomotive (in case you had it applied), while simultaneously telling the independent brakes on the trailing locomotive to follow whatever the Independent Brake handle does in the lead locomotive. That way your Independent Brakes in all the connected locomotives activate when you use them.
Traction
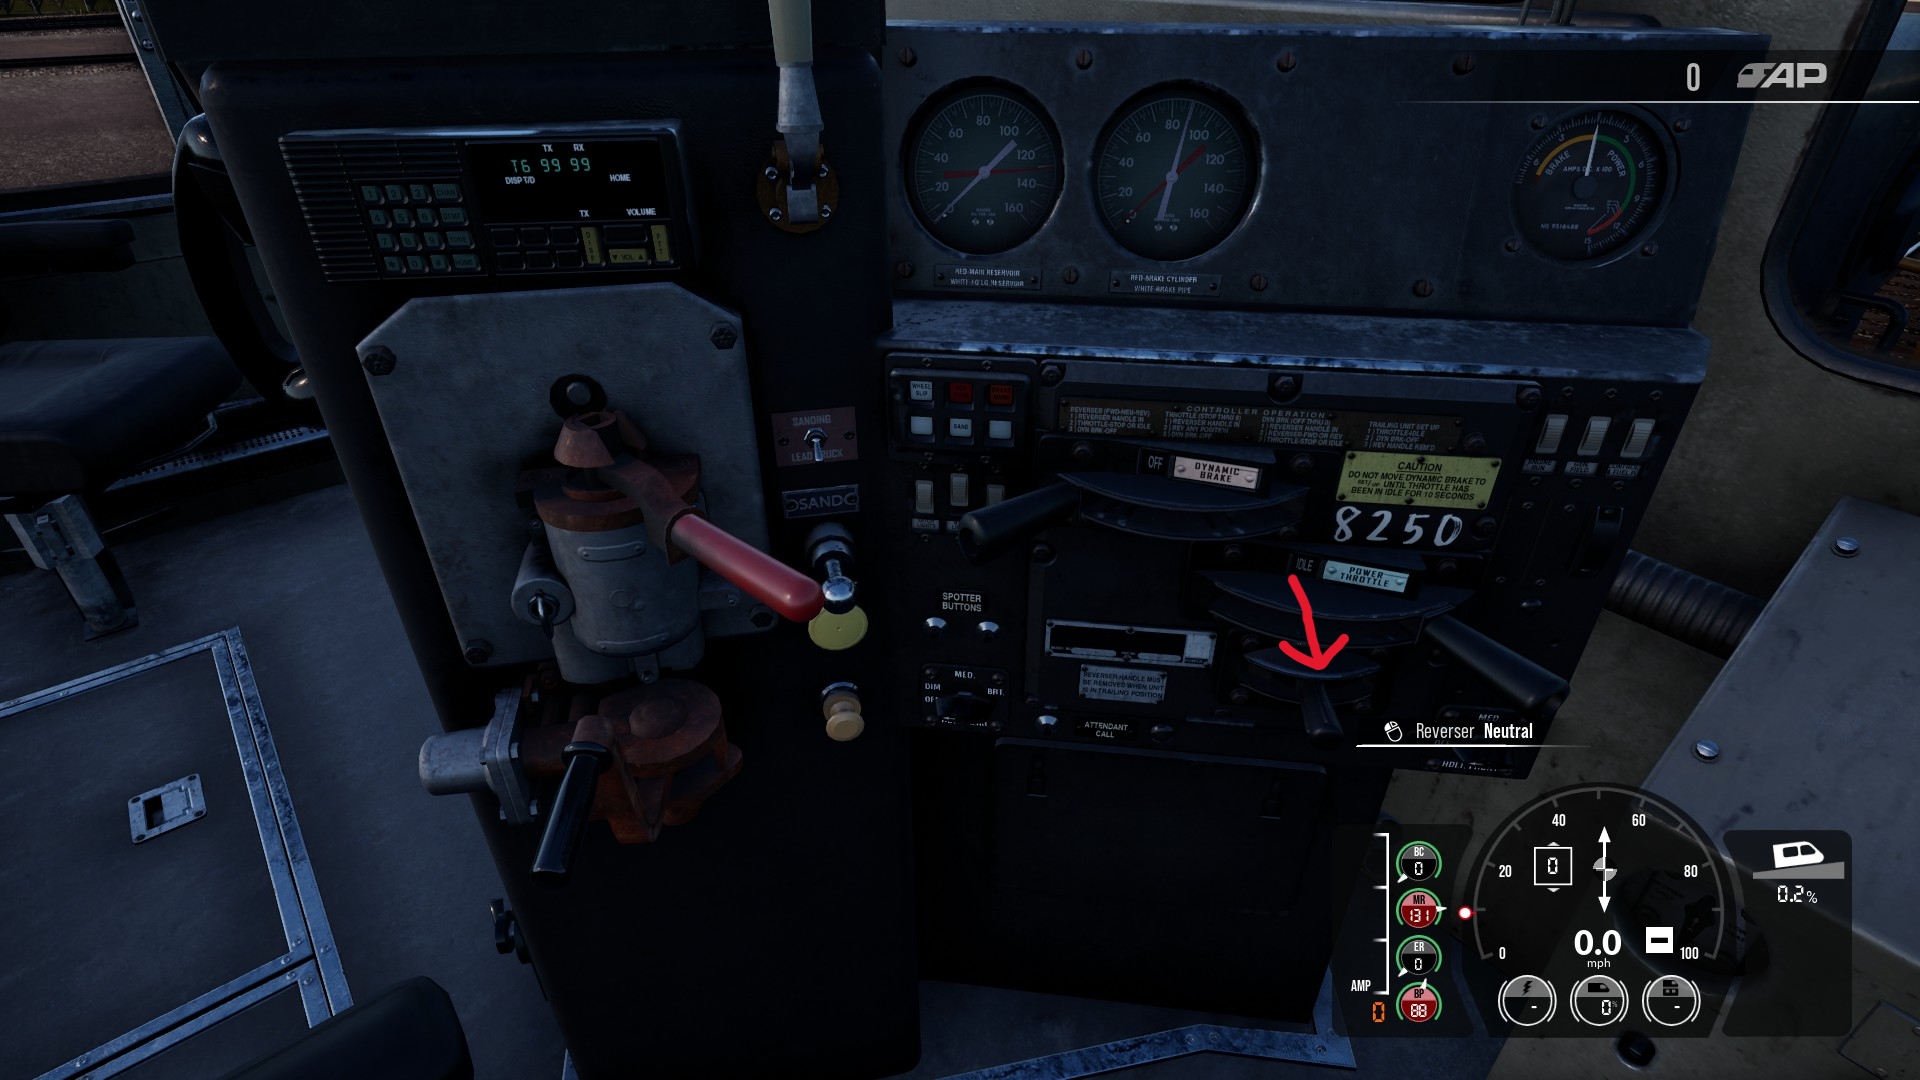
Setting up traction is really easy: set the Reverser to Neutral:
Or better yet, remove the Reverser handle entirely by moving it to Neutral then pressing Ctrl+W, that way the traction controls are safely locked out. If you don’t do this the Reverser could be accidentally pushed into a position that will essentially cause the trailing locomotive to fight the leading locomotive.
Technically you’re also supposed to set Engine Run, Generator Field, and Control & Fuel Pump all to Off, since these toggles are basically wired in parallel across all the locomotives. So if the toggle is set to On in any of the locomotives, it’s effectively set to On in all the locomotives. By turning the toggles Off in all the trailing locomotives it will allow you to control each toggle from the lead locomotive. But if all you’re trying to do is get your train to move, it doesn’t matter too much how they’re set in the trailing locomotives.
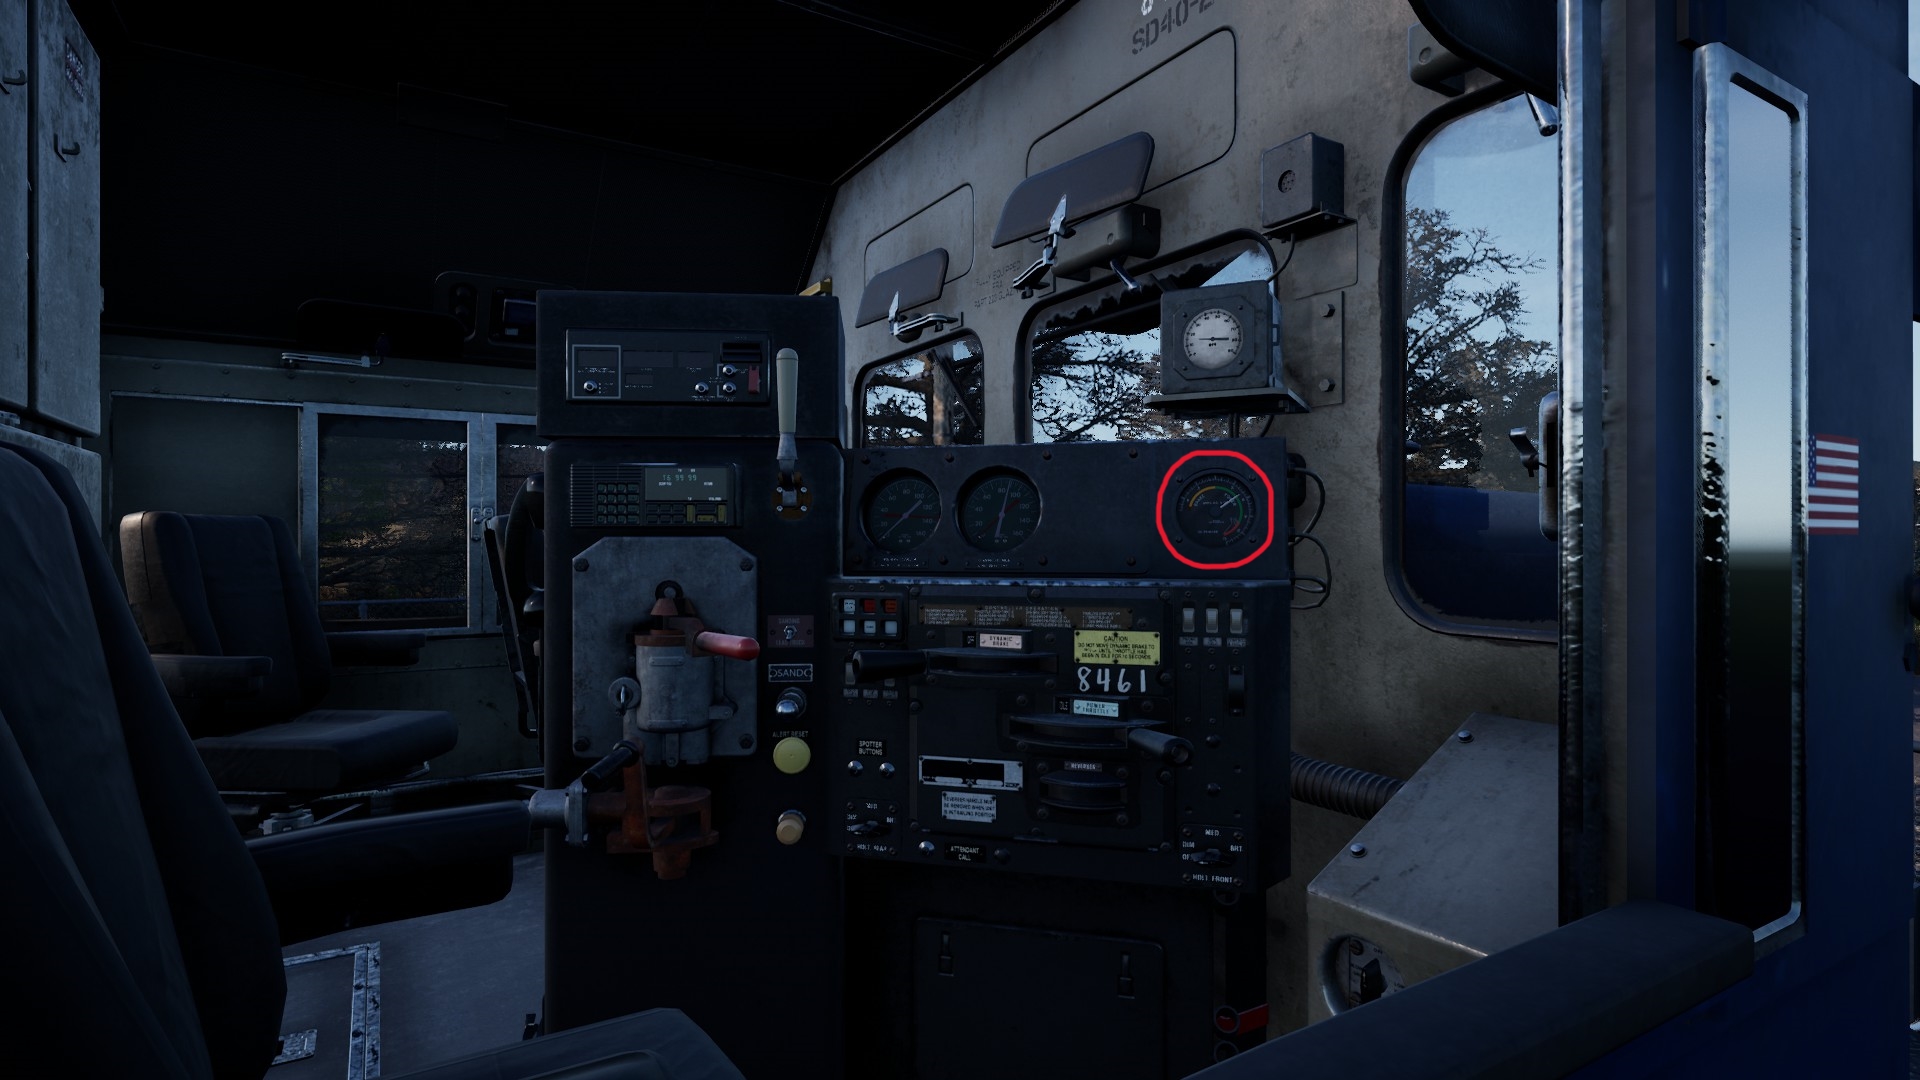
To verify that traction is set up correctly in a trailing locomotive, go to the lead locomotive and apply power. Then use the External Camera (press the 3 key) to go look through the window of the trailing locomotive. You should see the current meter in the green:
And as you throttle up and down you should see the power in the trailing locomotive follow.
3. Multiple Unit w/ Radio
Sometimes you want to have multiple locomotives in a train, but it doesn’t make sense to have the locomotives directly connected and all in the same part of the train.
In TSW2 it’s typically because the scenario starts that way, or because you’re too lazy to shuffle cars around. In real life it could also be because you want a Push-Pull configuration (locomotives in the back pushing, plus locomotives in the front pulling), which can greatly reduce the stress on couplers in a long train, especially when cresting a steep hill.
Note: the locomotives don’t actually have to be at the very beginning and end of the train. You can stick them somewhere in the middle, or any combination thereof. But for simplicity I’m just going to talk about the setup as if one locomotive is in the front and one is in the back.
Brakes
Neither the Automatic Brake nor the Independent Brake are radio controlled. The brakes on the trailing locomotive are controlled the same way as the the non-locomotive rolling stock in the rest of the train—via the brake pipe controlled from the Automatic Brake in the lead locomotive.
Set the Cut-Off Valve to Cut-Out:
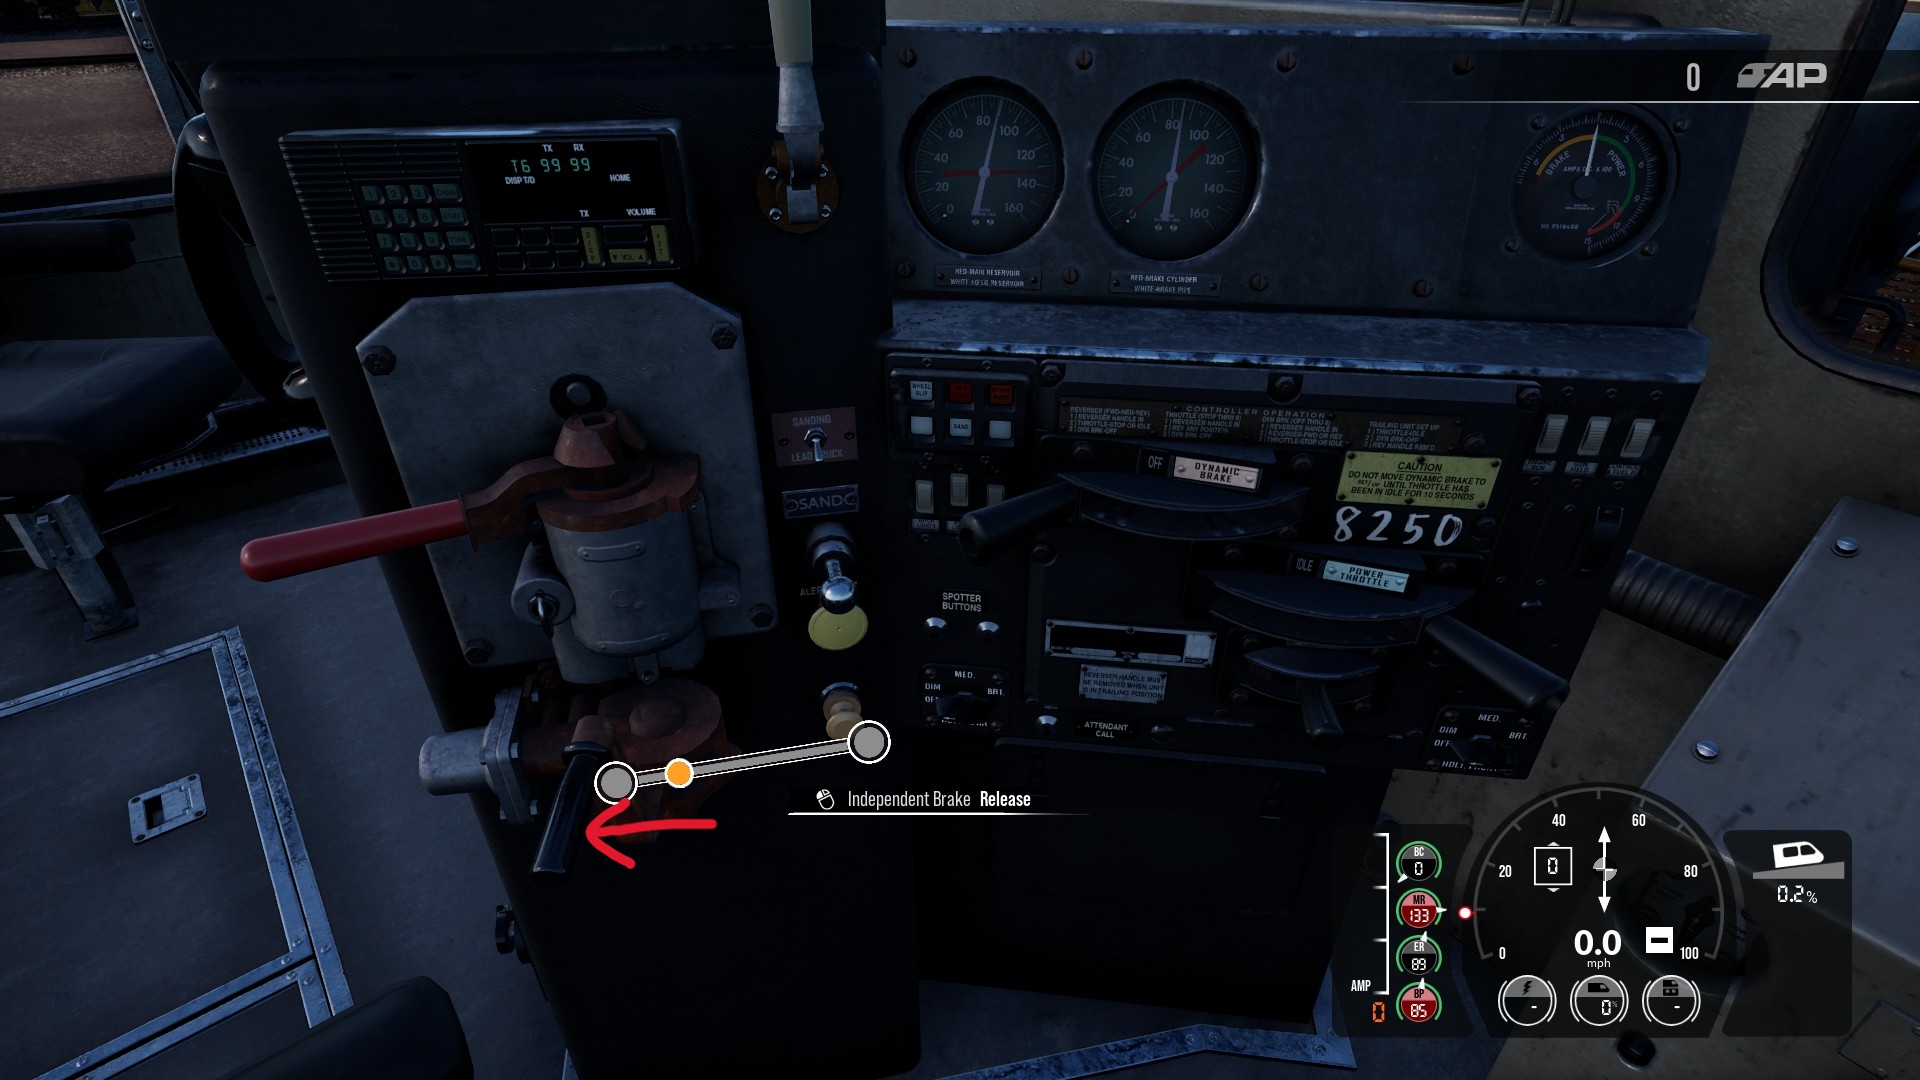
And set the Independent Brake handle to Release:
Since the Independent Brake won’t be used at all on the trailing locomotive, we don’t care what the MU-2A Valve is set to, as long as the brake is released one way or another.
Traction
Basically we’re going to set up the lead locomotive and the trailing locomotive as if we going to be driving both of them. Then we’re going to set up the radio in both to relay commands from your lead locomotive to the trailing locomotive. It works kind of like if you were sitting in both locomotives simultaneously and changing the same controls in each at the same time.
Trailing Locomotive
Strictly speaking, the only thing we need to do in the trailing locomotive is make sure Engine Run, Generator Field, and Control & Fuel Pump are all set to On:
As well as making sure the train is started and the Isolation switch is set to Run:
TSW2 kind of cheats with the rest of the controls. The trailing locomotive will be remote controllable even if we don’t set it up correctly like you would have to in real life. But on the assumption that DTG fixes the simulation in a future upgrade:
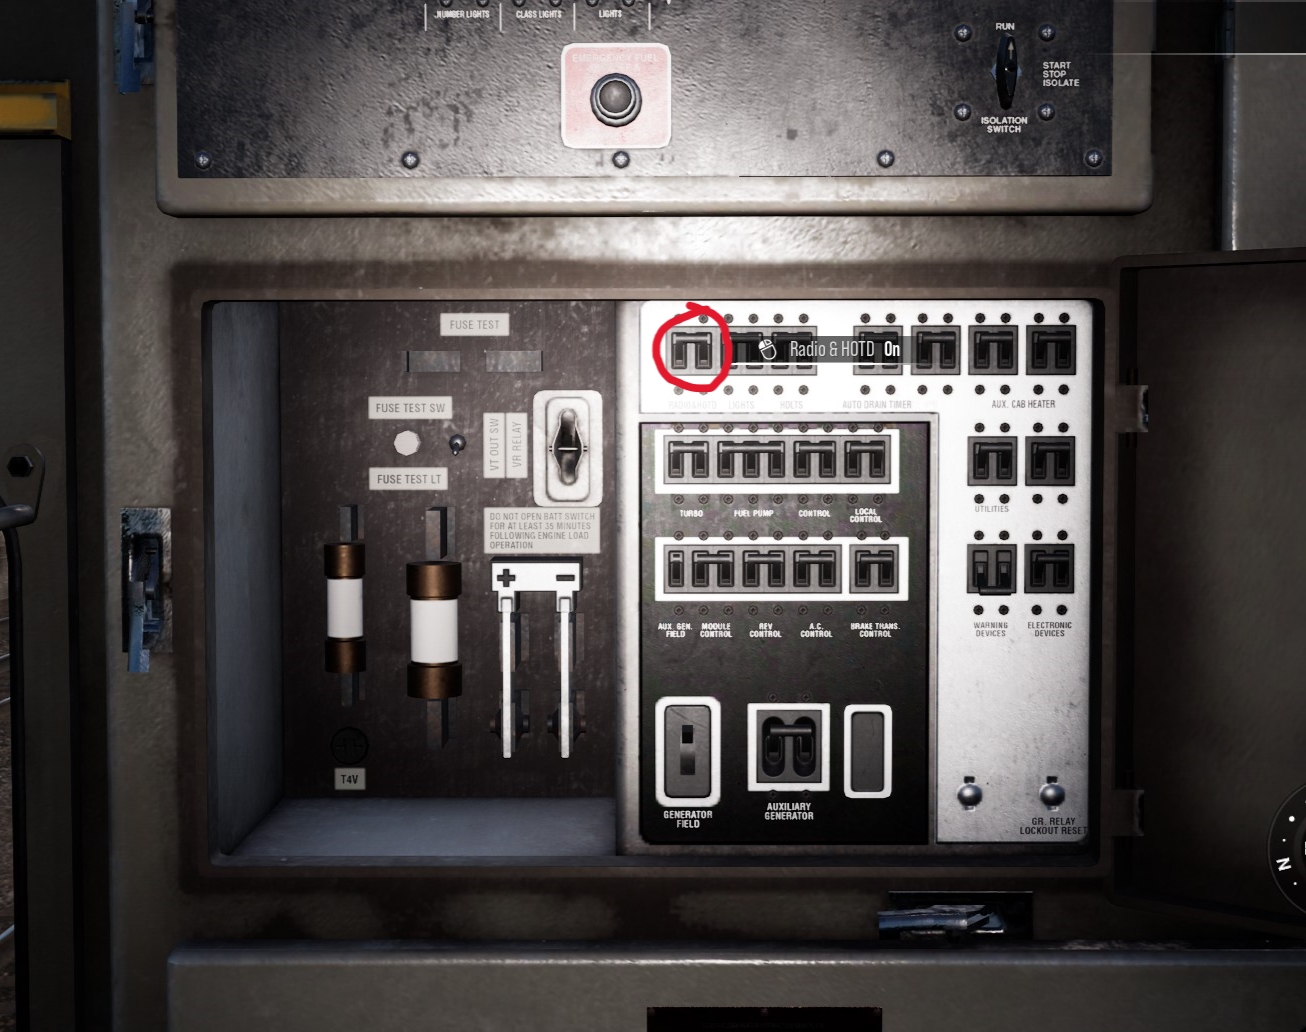
Next open the fuse box below the Isolation switch, and make sure the Radio & HOTD fuse is set to On:
Finally, insert the Reverser handle if it isn’t inserted already. Just leave it in Neutral.
Lead Locomotive
Now walk all the way to the other end of the train and hop in the lead locomotive. Open the fuse box and make sure the Radio & HOTD fuse is set to On, just like before.
Sit in the Engineer’s Seat, and move the Reverser back to Neutral (if it’s not already in Neutral).
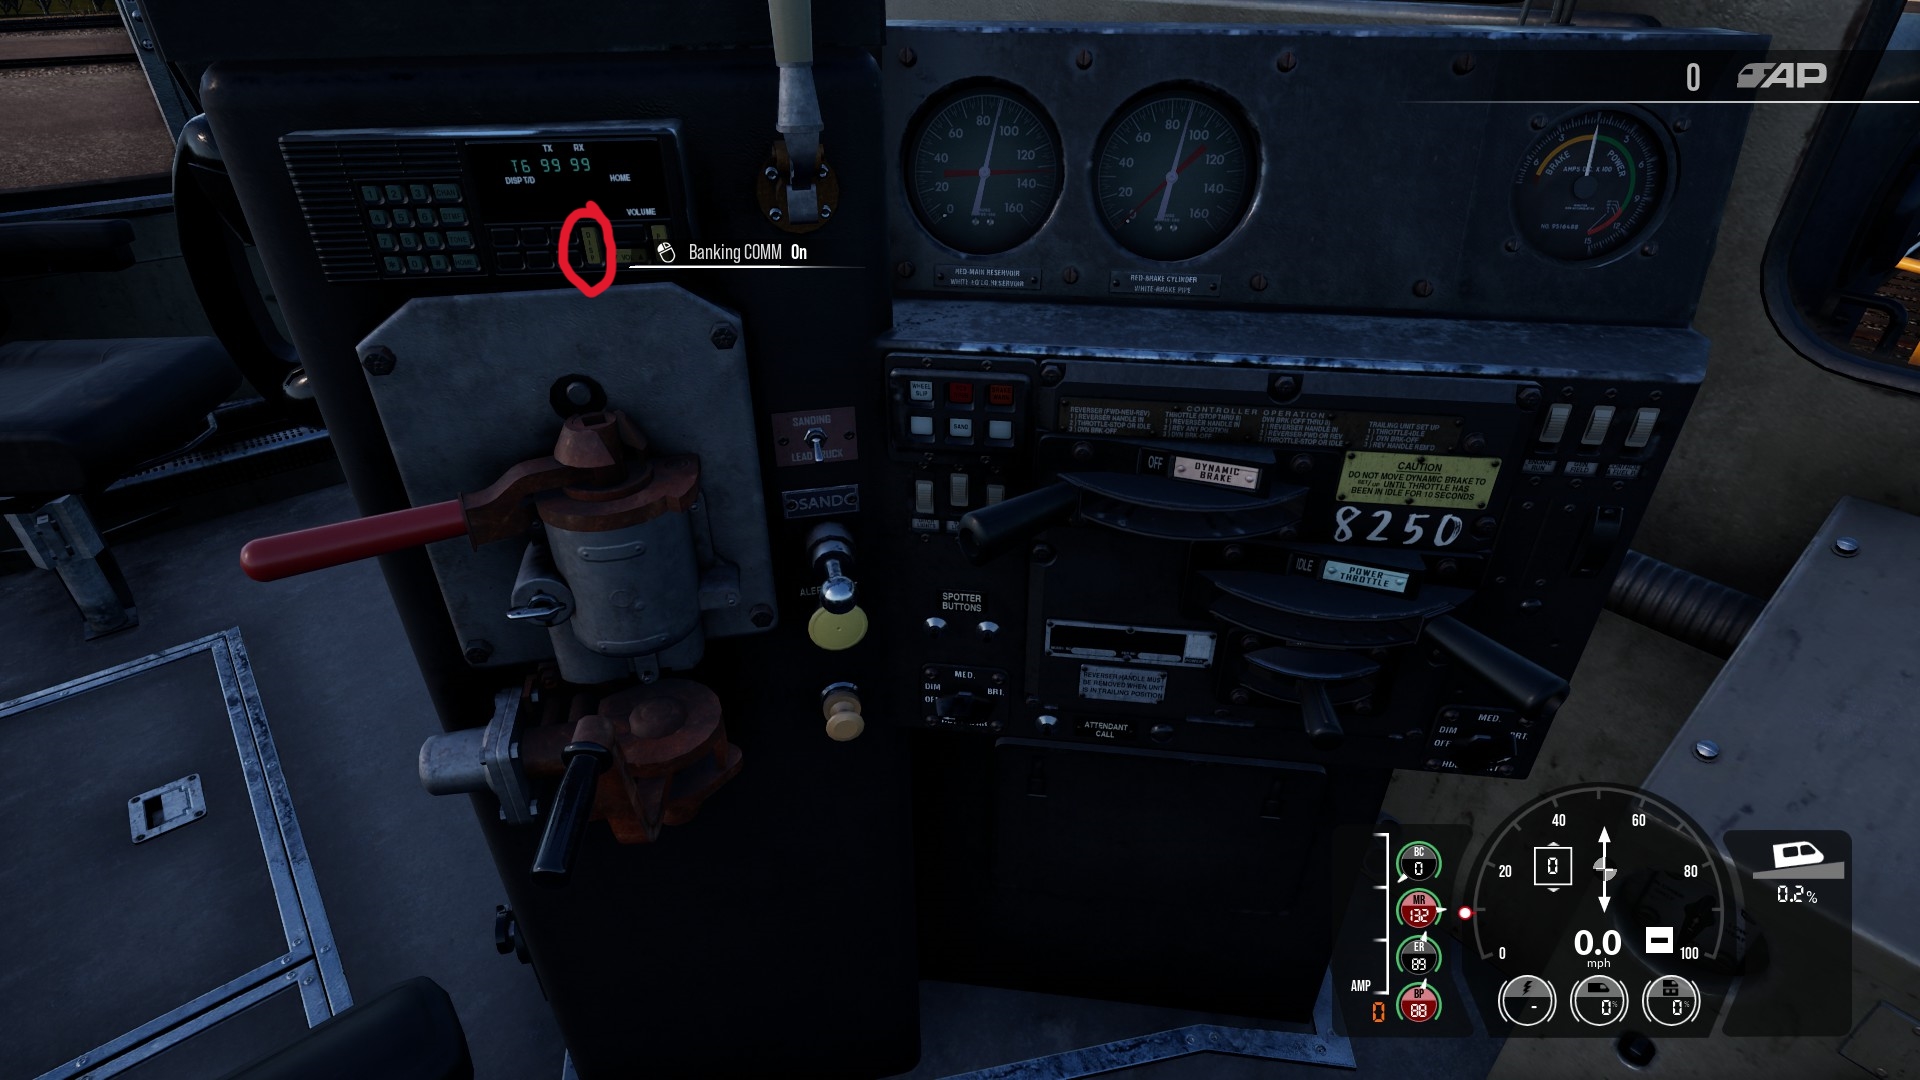
Then on the radio press the Banking COMM button to turn it On:
That’s it! When you put the Reverser in either Forward/Reverse and apply power, not only will you be controlling the lead locomotive, you’ll be controlling the trailing locomotive at the same time.
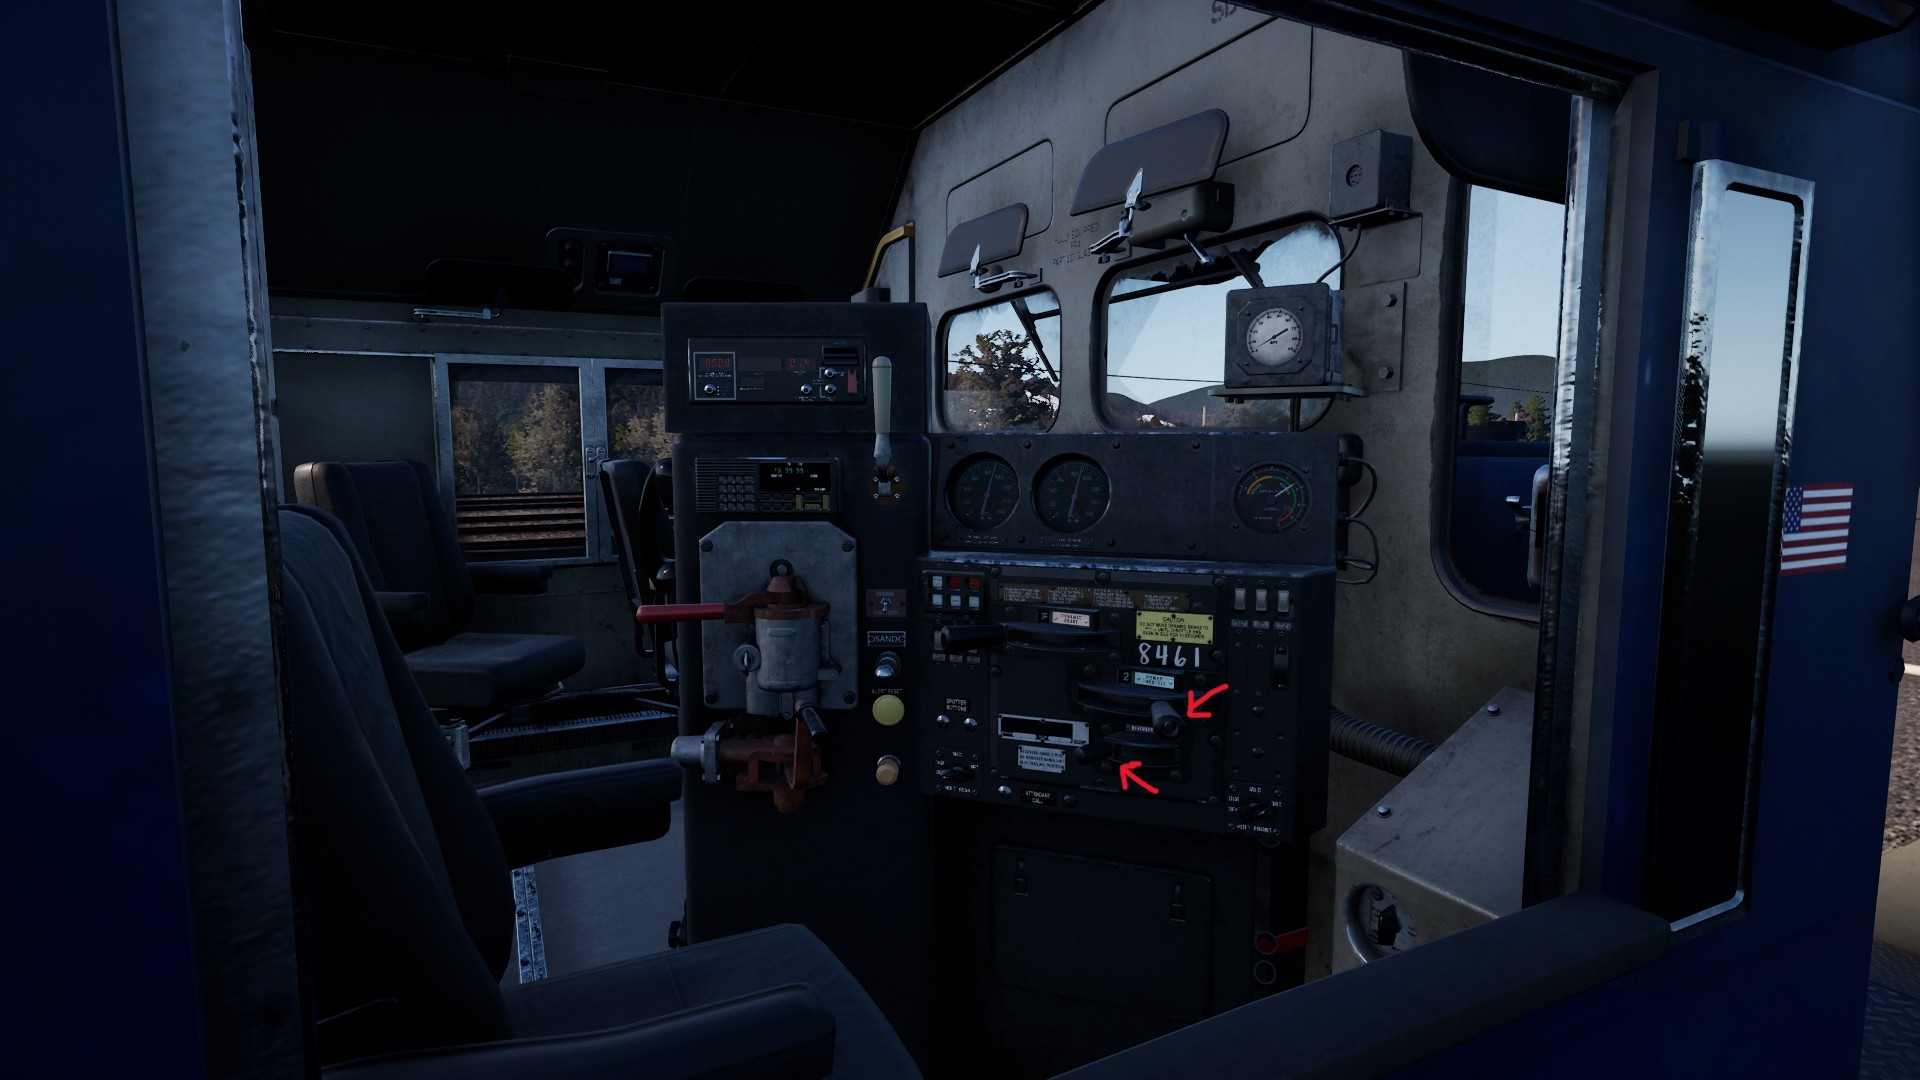
To verify that traction is set up correctly in a trailing locomotive, we’ll use the External Camera like before (press the 3 key) to go look through the window of the trailing locomotive:
Except this time, besides seeing the power meter move, you should see the Reverser and the Throttle controls in the trailing locomotive move around when you push the corresponding controls around in the lead locomotive! Pretty cool, right?
4. Multiple Unit: Control Cable + Radio
It is rare that you’d just have a single locomotive at each end of a train. Typically you’re using a Push-Pull configuration because you have a long, heavy train and you need multiple locomotives at each end. This is exactly the setup in the Fully Fueled scenario that gives people so much trouble.
If you’ve been paying close attention so far, you can probably already figure out how to use both Multiple Unit configurations in the same train. You basically set up two separate Multiple Unit w/ Control Cable configurations, then use the Radio to link them together. But it’s easy to mix up things the first time you do it, so I’ll spell it all out in a future update.
TODO
5. Other Things To Check
The above sections should cover you for 90+% of scenarios, but if you’ve been messing around with controls and forget what you changed, or if you’re trying to perform a cold start on a locomotive, there are a few more places you need to check.
Other Brake Controls
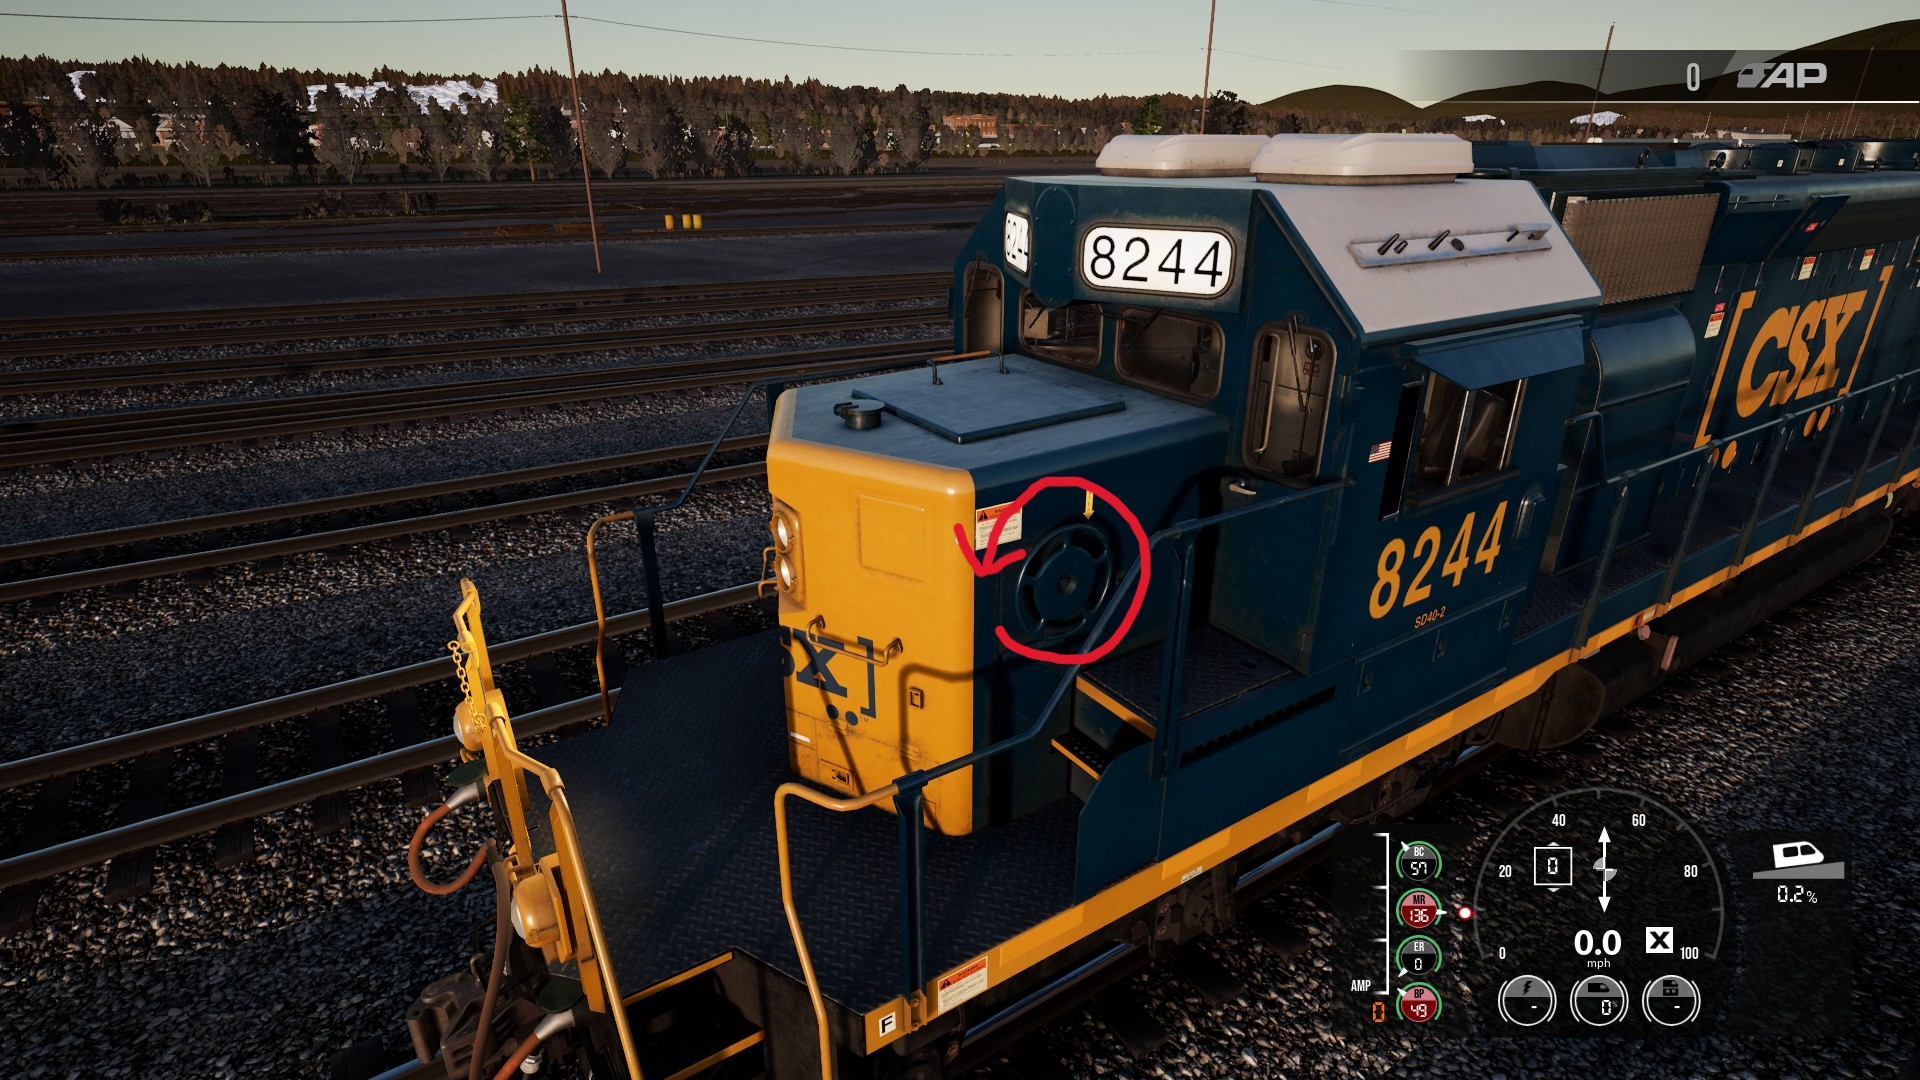
There is a Handbrake on the outside of the short hood end of the locomotive. Make sure it is fully Released:
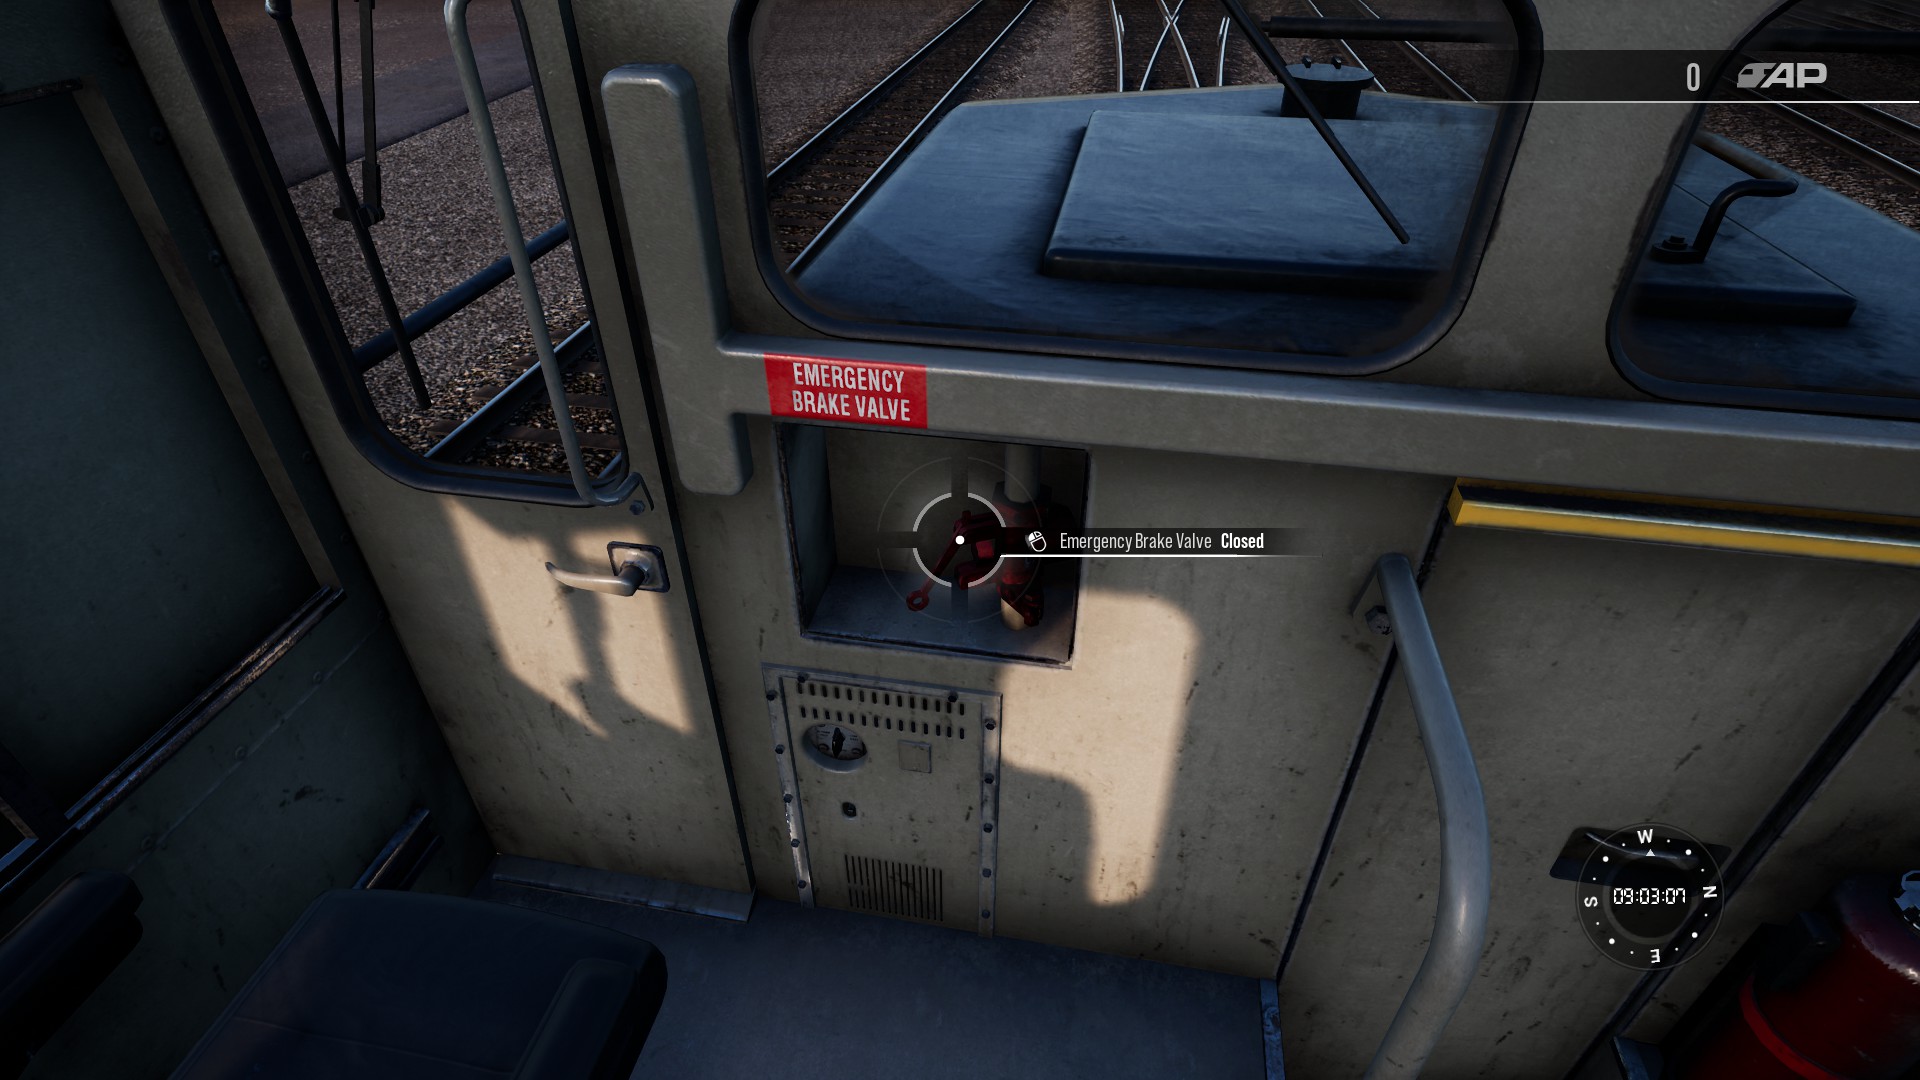
Double check that the Emergency Brake Valve is Closed:
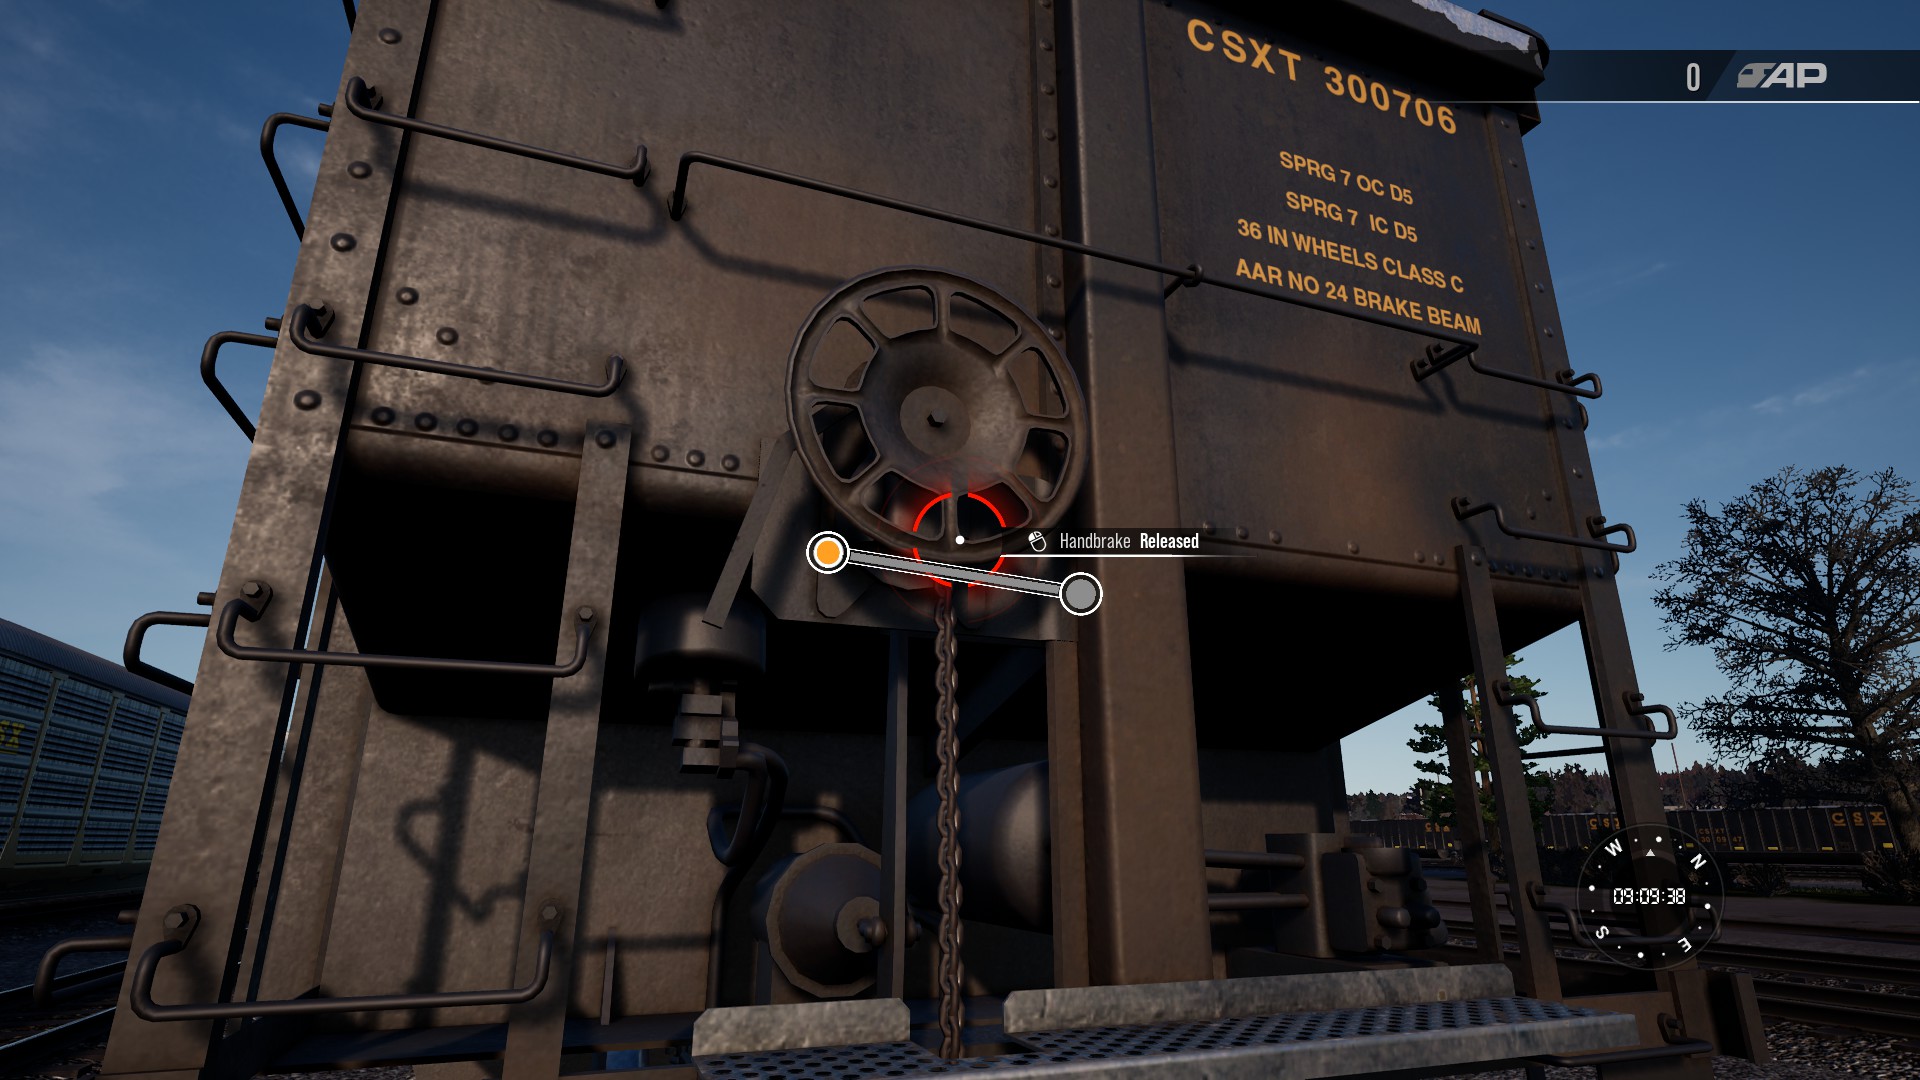
Finally—and this is the really tedious part—make sure the Handbrake is fully released on all the rolling stock in the train:
Pro-tip: you can check the brakes from the Exterior Camera view (press the 3 key), which is much faster than on foot.
Fuses
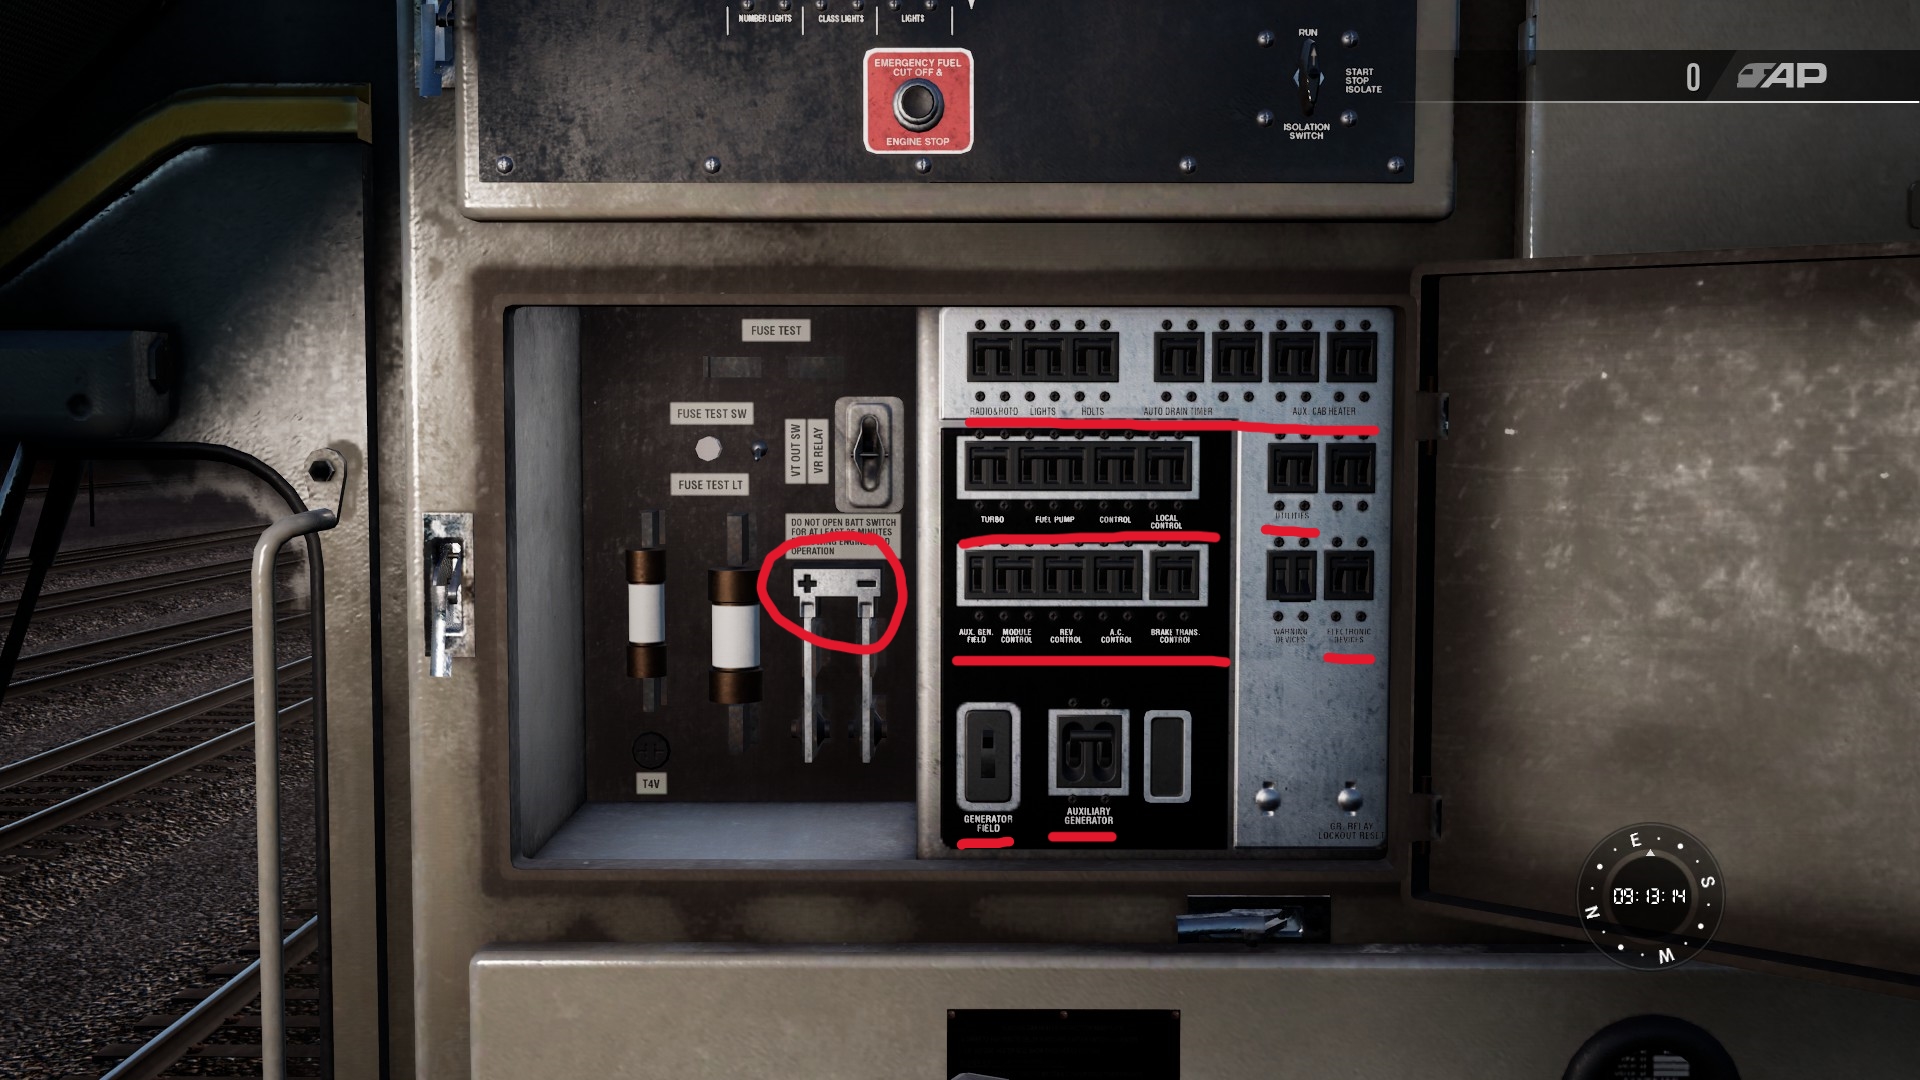
Open the Fuse Cabinet, which is on the wall behind the Engineer’s Seat. Make sure all the fuses plus the Main Breaker are set to On:
Note: one exception is you can leave Warning Devices set to Off, unless you enjoy pressing the Alerter.
In my experiments, the fuses seem to control the switch on the control stand more than they control the actual system itself. Which in practice means just toggling the fuse sometimes isn’t enough to turn some system back on, after setting the fuse to On you also have to go toggle the corresponding control on the control stand to have it take effect.
Cold Start
If you don’t hear the hum of the engine running, chances are the locomotive needs to be started up.
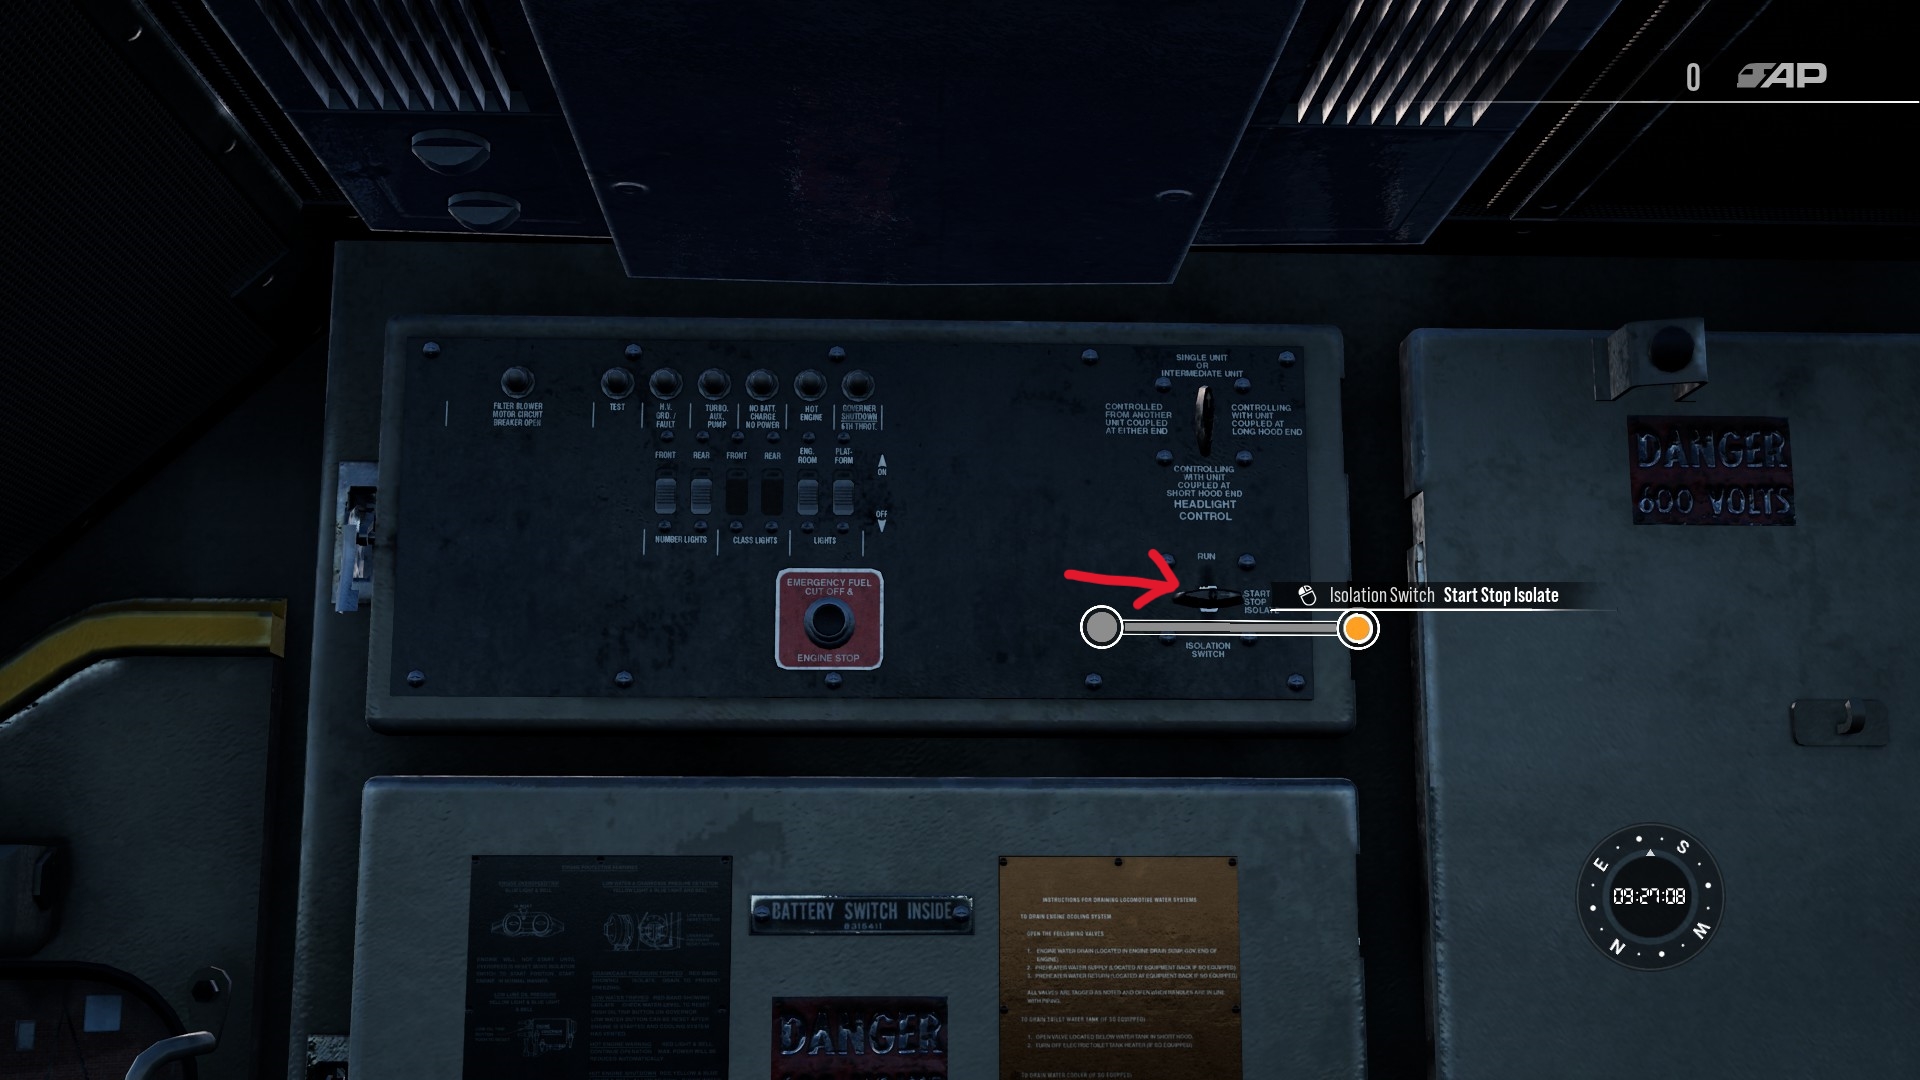
First set the Isolation Switch to Start Stop Isolate. It is right above the fuse panel:
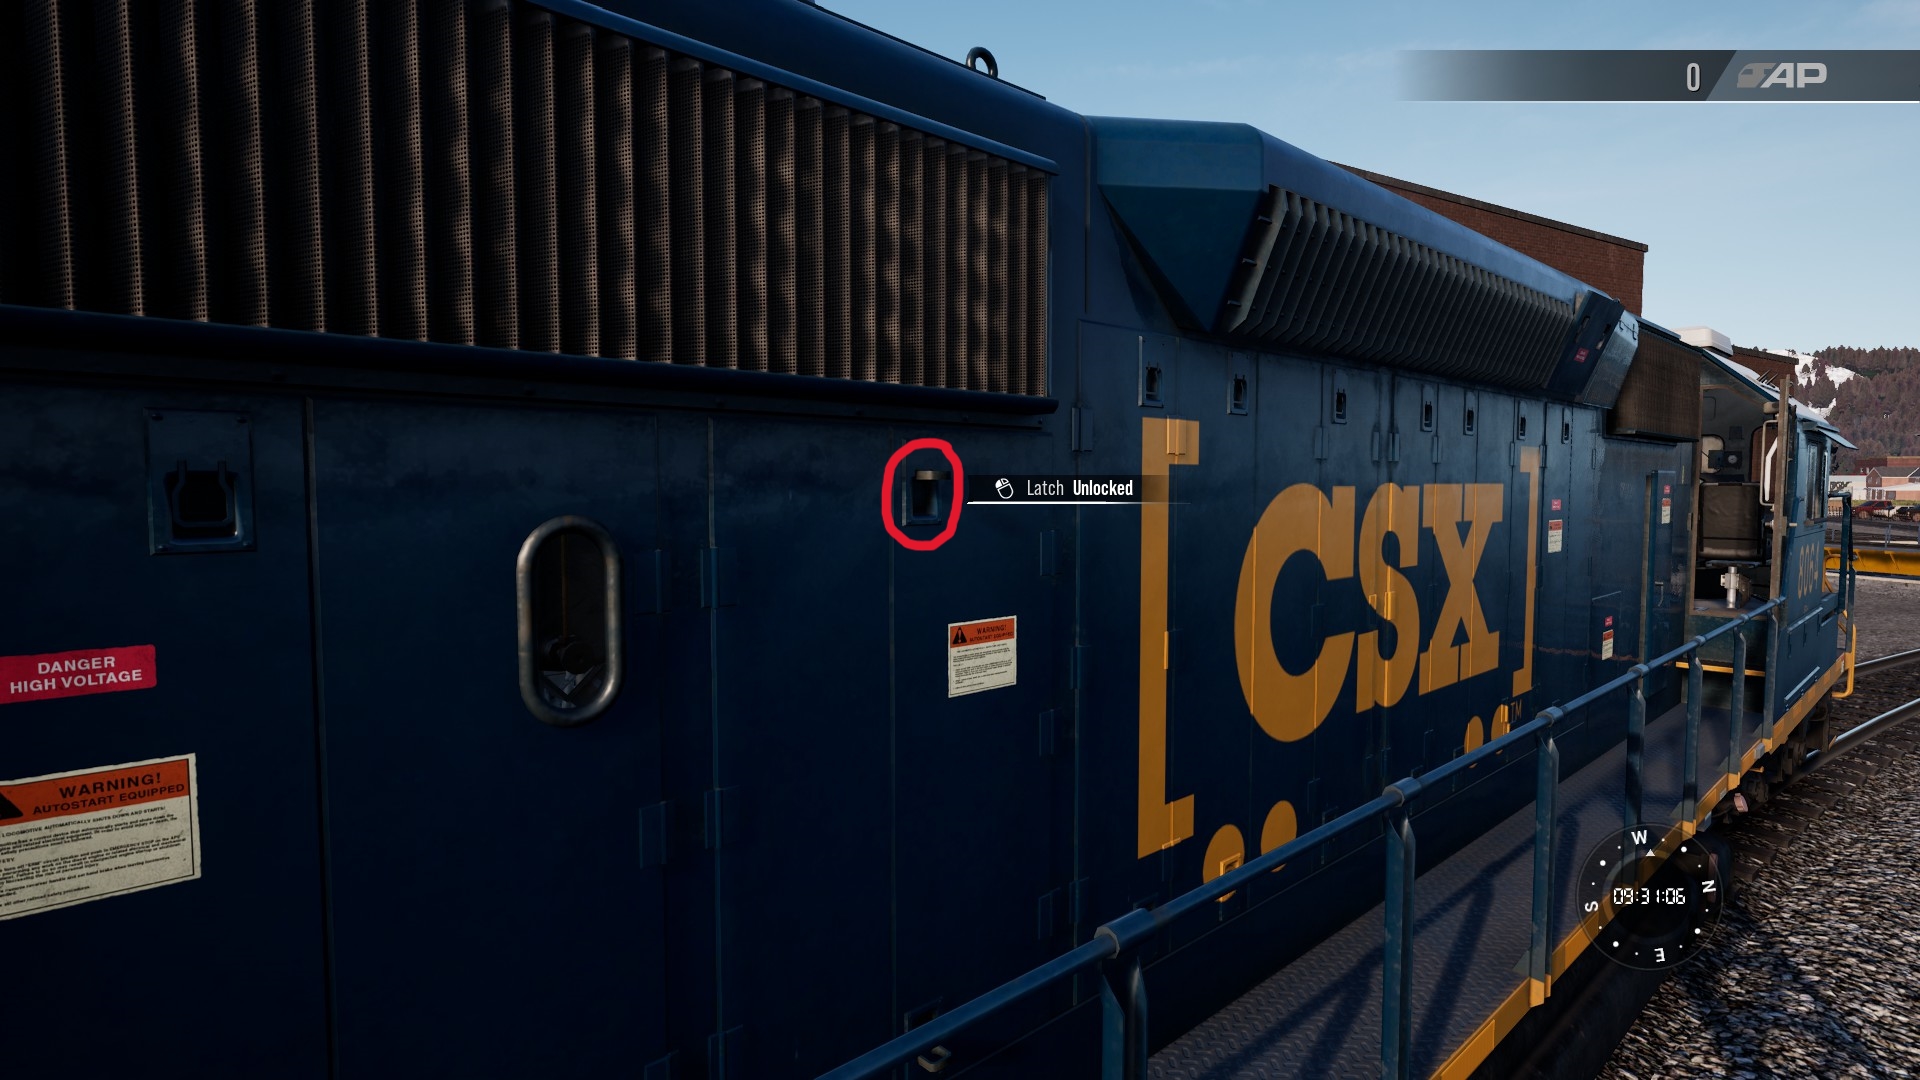
Next go out to the long hood end of the train and Unlock this latch:
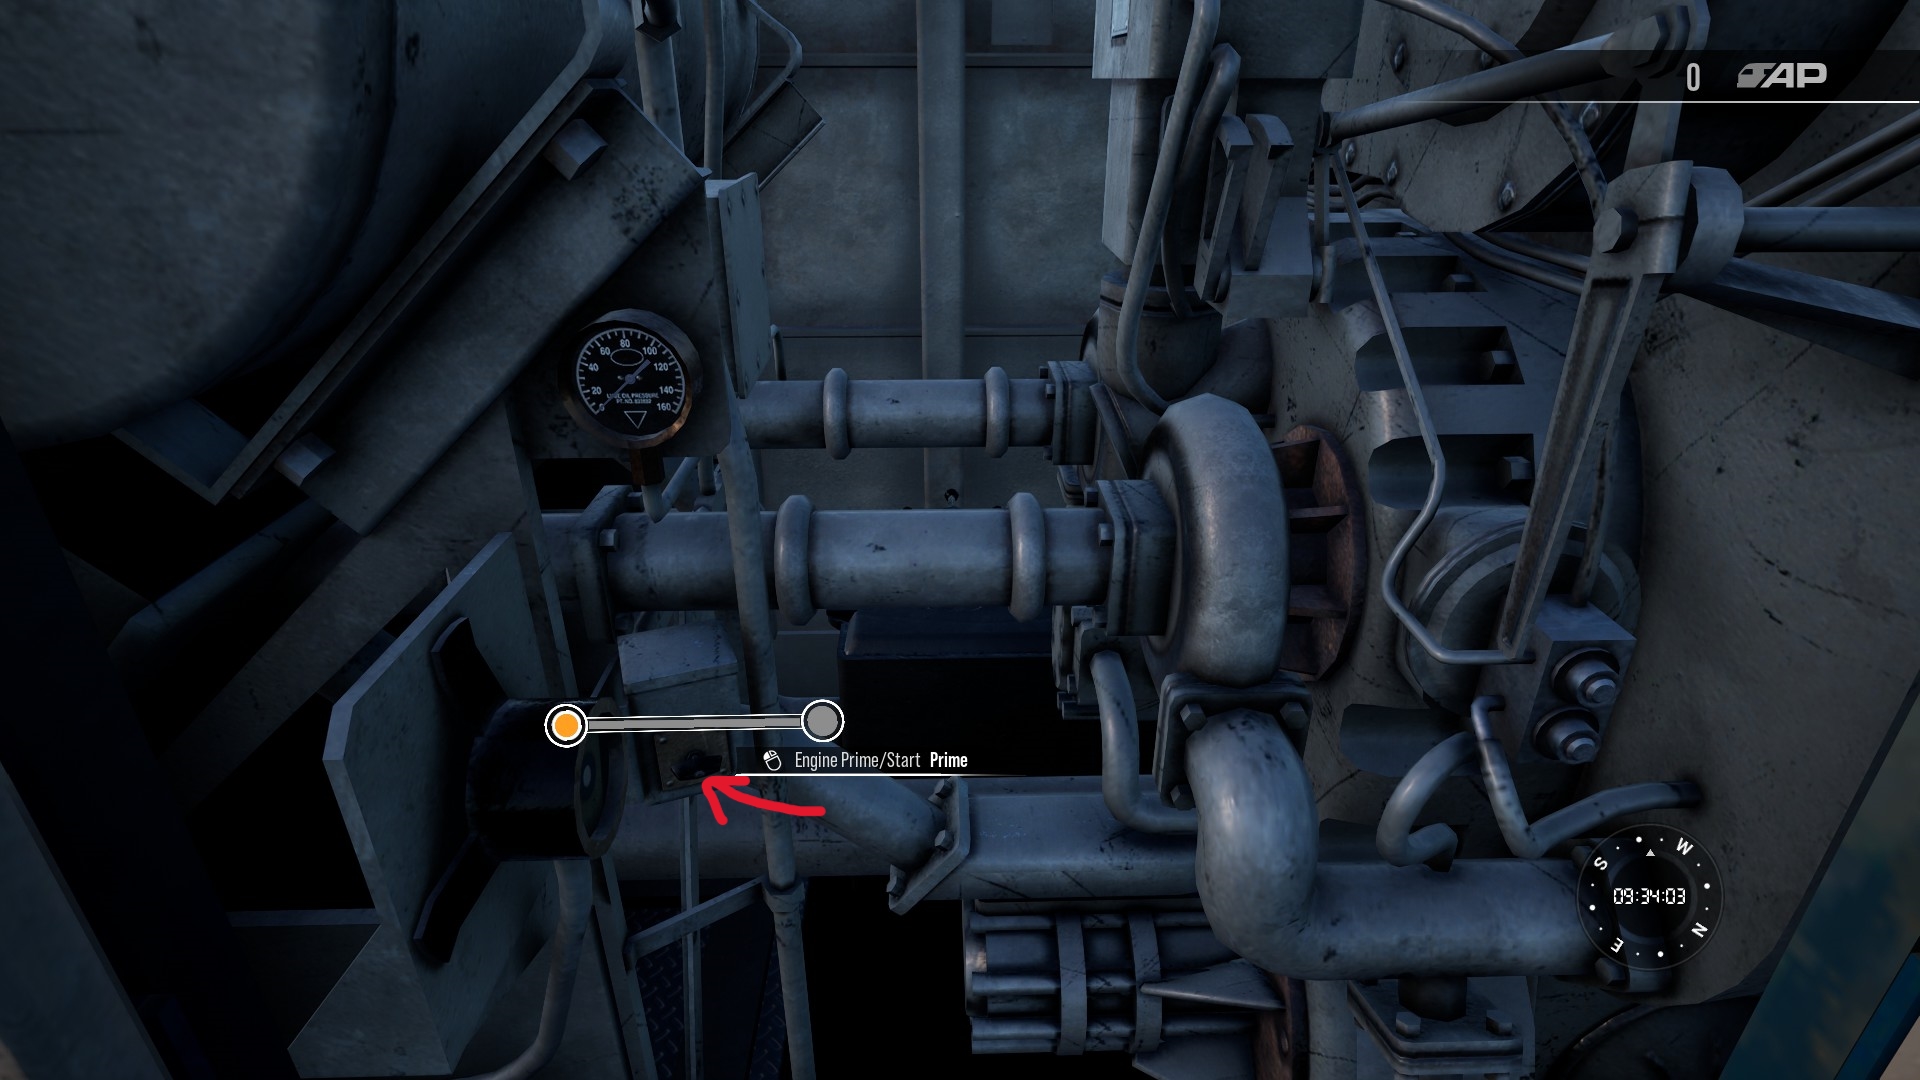
Open the doors then find the Engine Prime/Start switch. First hold the switch to the left in the Prime position for around 5 seconds:
You should hear an engine noise for a few seconds then it will stop, at which time you can release the switch.
Next move the same switch rightwards to the Start position then release it. You don’t have to hold it down like you did for the Prime setting.
The engine won’t make any noise for like 10 awkward seconds, but then with a little luck you should hear the motors kick on.
Finally go back to the Isolation Switch in the cab and switch it from Start Stop Isolate to Run.
Misc
In real life a train could run out of fuel and then you wouldn’t be able to start it. But as far as I know this isn’t possible in the game.
See Also
Go check out the actual real life SD40-2 Operator’s Manual: http://tcrc320.org/MEMBERS/SD40-2_Operator_Manual.pdf – [tcrc320.org]
Don’t be intimated, it’s surprisingly readable, especially after you’ve been playing TSW2 for a while. It covers the proper procedure for doing a lot of things, plus gives you some background detail that explains what the different controls are actually doing.
Here we come to an end for Train Sim World® 2 How to SD40-2 or GP38-2 Train Moving hope you enjoy it. If you think we forget something to include or we should make an update to the post let us know via comment, and we will fix it asap! Thanks and have a great day!
- Check All Train Sim World® 2 Posts List


Leave a Reply