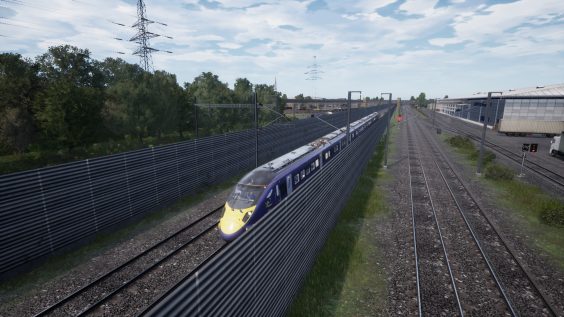
Introduction and Video Link
WATCH VIDEO FOR BETTER UNDERSTANDING
Video provided Eng Subtitle
ECW BRIGHTON-SEAFORD-BRIGHTON ONLY
This Route Guide based on experience
Therefore, (Personal Advice) mark with ()
[Actual Limit] mark with [], this is not an accurate guide
(BRAKE POINT)(BP) should work even in rain
During winter, expect longer distance for brake
If no instruction given, Use B2 at (BP) and adjust once reach 35mph
The signal might marked inaccuratly
If Video was cut out, wait for a few seconds
Video are present from Brighton to Seaford, then another video from Seaford to Brighton
Brighton-Seaford txt
[DEPT Brighton] (Preparation of DEPA) [DEPT 20mph] [Brighton-Lewes]
[Banner Repeater]
[SP 25mph][Main Signal]
(When Passing Brighton Junction, Entering Eastbourne Way]
(Raise Speed 25mph)
[SP 30mph]
(Either Raise Speed when visual contact [Skyscraper])
(Or calculate [Bulge] on Bridge after [SP Limit]
[Order: No1……..No2,No3] Raise Speed when at No3)
[SP 55mph]
(BP: When entering Platform]
[APRO London Rd.] (Beaware of 4-car stop pt.)
[DEPT London Rd.][DEPT 55mph]
[DEPT Signal],[Tunnel]
[Coasting Board] (Next stop 800 Yard)
[Repeater Signal]
[SP 70mph] (Break Point)
[APRO Moulsecoomb] (Beaware of Short Platform)
[DEPT Moulsecoomb] [DEPT 70mph]
[Main Signal]
[Repeater Signal] (Next SP Limit 400 Yard)(B1 till 60mph)
[SP 60mph] (Next Stop 800 Yard) (BP)(Use B1)
[APRO Falmer] (Beaware of 4-car stop pt.)
[DEPT Falmer][DEPT 60mph] (Next stop 4.4mile)
[Main Signal]
[SP 70mph][Tunnel](Raise Speed 70mph)
[Coasting Board] (Next stop 3.7mile),[Radio Channel]
[SP 70mph] (Next Sp Limit 2mile)
[Repeater Signal] (Check Speed)
[Main Signal]
[Repeater Signal] (B2 till 55mph)
[SP 55mph] (Next stop 1.2mile)
[AWS][Next SP 10mph] (Next SP limit 0.9mile)
[Tunnel]
[Flyover](B1)
[AWS Off] (BP) (B till 25mph) (Next SP Limit 450 Yard)
[Main Signal]
[Oppo Shunt Indic](BP)(Next SP Limit 100 Yard)
[SP 10mph]
[APRO Lewes] (Beaware 4-car stop pt.)
[Lewes-Seaford]
[DEPT Lewes][DEPT 10mph]
(Check before DEPT) [Main Signal]
(When Entering Main Line) [SP 40mph]
(Passing Flyover)
(When APRO Junction)(Raise Speed 40mph)
[Main Signal][SP 60mph] (Hold 40mph if to Seaford)
[Main Signal][Route Indic][Sp 40mph]
(Passing: Lewes Junction to Seaford)
[SP 70mph]
(Around 7 sec) (AWS) (Raise Speed 70mph)
[Next SP 70mph]
[Repeater Signal]
[Radio Channel][Level Crossing]
(Around 20 sec) [Coasting Board] (Next Stop 1mile)
(End of Curve to Right)(BP)(B3)
[Whistle Board](Next Stop 400 Yard)
[SP 60mph](Check SP BELOW 35)
[APRO Southease](Beaware of Short Platform)
[DEPT Southease][DEPT 60mph]
[SP 70mph] (Raise Speed 70mph)
[Whistle Board]
(In Curve)[Whistle Board]
[AWS Off][Coasting Board][Level Crossing]
[Main Signal]
[AWS On](Next Stop 1mile) [Next SP 35mph]
[AWS Off][Main Signal] (B1, switch B2 when passing [SP 15] till 45mph)
(Caution SP Limit)
[SP Right 15mph] (Caution next SP Limit)
[Repeater Signal][SP 35mph] (Next stop 600 Yard)
[APRO Newhaven Town](BP)(B3)(Stop at end)
[DEPT Newhaven Town][DEPT 35mph]
[Repeater Signal][SP 35mph](Next stop 600 yard)
(Visual on Oppo Platform)(BP)(B3)
[SP 20mph]
[APRO Newhaven Harbour](Beaware of Short Platform)
[DEPT Newhaven Harbour][DEPT 20mph]
[Main Signal][Route Indic][SP 20mph]
(Passing: Newhaven Junction to Seaford)
[SP 70mph](Single-track) (Next Stop 1.3mile)
(When Visual Flyover, Raise Speed 70mph)
[Abandoned platform](Next Stop 800 Yard)(BP)(Till 45mph)(When leaving)
[Coasting Board]
[AWS On](BP)[Next SP 15mph]
[APRO Bishopstone](Beaware 4-car stop pt. on LEFT)
[DEPT Bishopstone][DEPT 70mph]
[AWS On] (Next SP 800 yard) (Raise 50mph and hold)
[Flyover](Brake Point)
(Caution of SP Limit) (Before Platform) [SP 15mph]
[APRO Seaford] (Stop at end)
Seaford-Brighton txt
[DEPT Seaford] (Preparation of DEPT) [DEPT 15] [Seaford-Lewes]
[SP Limit 70][Signal]
[Around 20 sec][Raise Speed 50]
[Flyover] (Next stop 900 yard]
[Attention to RIGHT](Oppo Signal) (BP)(B3)
[APRO Bishopstone] (Stop pt. after bridge)
[DEPT Bishopstone][DEPT 70]
[Signal]
[AWS ON]
[Next SP Limit 20][Whistle Board]
[Abandoned platform](Pass with FULL speed)
(when aware of signal)(B1)
[Signal](B2)
(when aware of) [Flyover] (B3)
[SP Limit 20]
(Pass: Newhaven Junction to Lewes)
[APRO Newhaven Harbour] (Beaware 4-car stop pt)(BP Platform)
[DEPT Newhaven Harbour][DEPT 20]
[SP Limit 35][Signal]
(Raise 30 AFTER 10 sec]
[Radio Channel](BP)
[APRO Newhaven Town] (Stop pt at 2nd monitor)
[DEPT Newhaven Town][DEPT 35]
(Check before DEPT)[Signal]
[SP Limit 70]
(Around 7 sec) (Raise Speed 70)
[SP Limit 70]
[Signal]
[Coast Board]
[Whistle Board]
(In Curve) [Whistle Board]
(End of Curve) (B2 to 20)
[Whistle Board] (Next stop 250 yard)
[SP Limit 60]
[APRO Southease] (BP Platform) (B2 or B3) (Caution: Short Platform)
[DEPT Southease][DEPT 70]
[SP Limit 70]
[AWS ON](Covered)[Next SP Limit 40]
[AWS OFF]
[Signal] (B1 to 60)
[AWS ON] [Next SP Limit 40]
[AWS OFF](B1 to 40)
[Signal]
[SP Limit 40]
(Pass: Lewes Junction to Lewes)
[Coast Board][SP Limit 60][Next SP Limit 40]
[Signal]
[AWS ON]
[Next SP Limit 10 (Left) 20 (Main)]
[SP Limit 40]
[Signal][Route Indic]
(When visual Oppo Shunt Signal)(B3 to 20)
[SP Limit 10(Left) 20(Main)](B2 to 10)
[APRO Lewes][Caution 4-car stop pt]
[DEPT Lewes][DEPT 10][Lewes-Brighton]
[Signal]
[SP Limit 55]
(Around 20 sec) (Raise Speed 55)
[Signal][Tunnel]
[Radio Channel]
[SP Limit 70] ([Bridge] Ahead)
(Raise Speed 70 before Bridge) [Bridge]
[Signal]
[Signal]
[SP Limit 70][Signal][Tunnel]
(When Enter Tunnel)(B1)
(Exit of Tunnel)[SP Limit 60](BP)
[APRO Falmer](Caution 4-car stop pt)
[DEPT Falmer][DEPT 60]
[Signal]
[SP Limit 70]
(Around 5 sec)(Raise Speed 70)
[Signal](B1 to 50)
[Signal](BP)
[APRO Moulsecoomb](Caution Short Platform)[Next Speed Limit 55]
[DEPT Moulsecoomb][DEPT 55]
[SP Limit 55][Coast Board]
[AWS ON] [Next SP Limit 30]
[Signal] (B1 to 45)
[Tunnel](BP with B3When Exit)
[APRO London Rd.](Stop pt end of platform)
[DEPT London Rd.][DEPT 30]
[SP Limit 30]
[Signal](B1 to 20)
[SP Limit 20]
[APRO Brighton] (Stop pt end of platform)
This is all for Train Sim World® 2 Route Guide:East Coast Way Brighton-Seaford Branch hope you enjoy the post. If you believe we forget or we should update the post please let us know via comment, we will try our best to fix how fast is possible! Have a great day!
- Check All Train Sim World® 2 Posts List


Leave a Reply