This guide details the steps necessary to implement all aspects of LOD generation using the latest tools.
It will show how to generate terrain LOD, cached grass LOD, stitched textures, meshes, and billboards, and dynamic LOD visuals. The reader is assumed to be using game version 1.5.97 and Mod Organizer 2.
I have plans to create a version for game version 1.6x and probably Vortex as well.
However since I don’t currently use either of those, this guide targets the earlier versions.
Note that testing and research has revealed that grass caching is not currently possible with game version 1.6x.
The set of mods and routines needed for grass caching require ancillary support mods and libraries that are not currently available in the newer game versions and, according to their authors, will not likely be updated. Workarounds may eventually be available but there are no plans currently on the horizon.
The other tools (xLODGen, TexGen, and DynDOLOD) all work just fine with new game versions.
These tools and processes should be run after you have finalized your load order and tested your game.
Changes to your load order after these tools are run will usually mean they need to be re-run.
Introduction
This tutorial will take us through installing, configuring and using the latest modding tools to implement
— Terrain LOD meshes and textures
— Grass LOD using your favorite grass mod(s)
— Stitched Textures and Billboards for LOD generation
— Dynamic LOD visuals
We will be using the following tools and mods:
SSEEdit
xLODGen
No Grass in Objects
Grass Generation MO2 Plugin
TexGen
DynDOLOD
So, first we need to obtain and install those tools.
You may have some of these tools already installed.
Good on you – but please read these notes carefully because the versions and configurations have likely changed since you last installed them.
A note about performance. Each of these implementations have at least some impact on performance. Some more than others. Terrain LOD and TexGen have minimal impact, but Grass Cache and DynDOLOD can potentially significantly lower your frame rate.
It is critical that you read and understand all of the parameter and INI settings for all of these tools.
Obtain and install these modding tools
We will be obtaining some of the tools via the S.T.E.P. web sites.
The forum titles for versions may change so start with the parent topic here:
https://stepmodifications.org/forum/forum/223-dyndolod-xlodgen/ – [stepmodifications.org]
The versions of the tools we refer to in this guide are the latest stable versions available at the time of this writing. I recommend using the latest version of any of these unless noted otherwise.
It is best, but not required, that the tools be on the same physical drive as the game and mod manager.
Many folks create a “Modding Tools” folder and subfolders in there, one for each tool.
That is the approach we will be taking in this guide.
— SSEEdit
Download the SSEEdit archive from Nexus.
https://www.nexusmods.com/skyrimspecialedition/mods/164 – [nexusmods.com]
Create a folder for SSEEdit in the Modding Tools folder (“C:\Modding Tools\SSEEdit”).
Extract the contents of the SSEEdit archive to the SSEEdit folder.
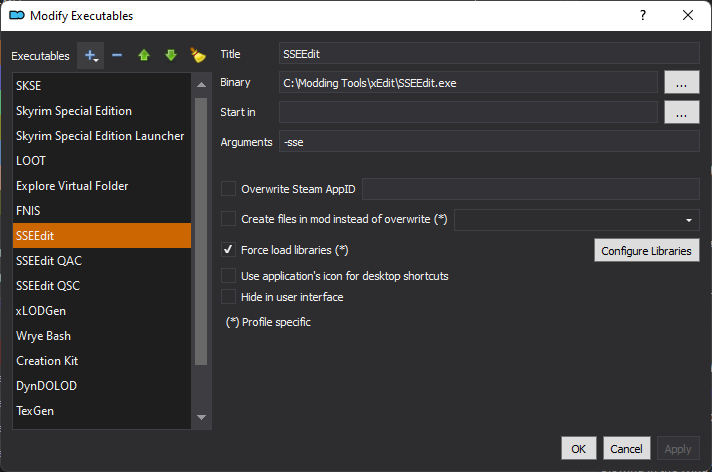
Configure the SSEEdit executable in the MO2 Gears icon like this:
Binary C:\Modding Tools\SSEEdit\SSEEdit.exe
Arguments -sse
— xLODGen
Get xLODGen from here (current version as of this writing is Beta-93)
https://stepmodifications.org/forum/topic/13451-xlodgen-terrain-lod-beta-93-for-fnv-fo3-fo4-fo4vr-tes5-sse-tes5vr-enderal-enderalse/ – [stepmodifications.org]
Note that the version (and therefore the forum topic title and URL) may have changed since this writing. However, it is easy to spot “xLODGen – Terrain LOD” in the parent topic list.
Open the topic and find the download for the current version.
Create a folder in Modding Tools named xLODGen.
(“C:\Modding Tools\xLODGen”)
Extract the contents of the downloaded 7-Zip xLODGen archive to “C:\Modding Tools\xLODGen”.
Now download one of the xLODGen Resource files from Nexus.
https://www.nexusmods.com/skyrimspecialedition/mods/54680 – [nexusmods.com]
There are three files from which to choose, select only one.
The differences between them are the amount of terrain area covered (read the mod description).
I chose the most coverage, there is no measurable impact on performance so why not?
Don’t extract the file from the archive right now, we’ll install it as a mod (temporarily) later.
For now, just save it in C:\Modding Tools\xLODGen
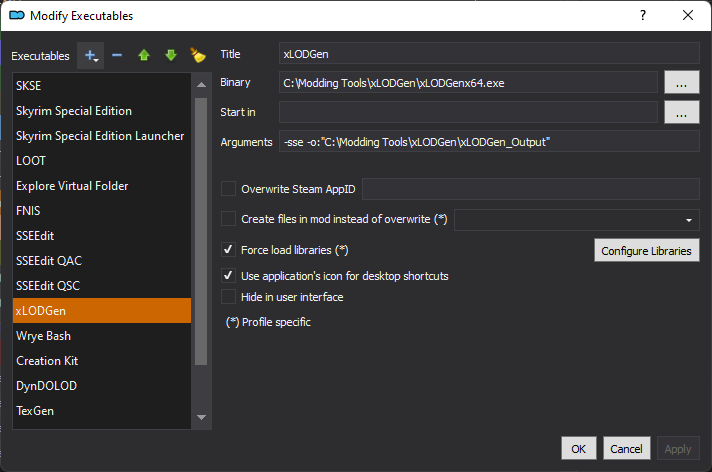
Configure xLODGen in MO2 like this:
Binary C:\Modding Tools\xLODGen\xLODGenx64.exe
Arguments -sse -o:"C:\Modding Tools\xLODGen\xLODGen_Output"
— No Grass In Objects (NGIO)
No Grass In Objects (NGIO) is a Skyrim Special Edition mod available on Nexus.
https://www.nexusmods.com/skyrimspecialedition/mods/42161 – [nexusmods.com]
Download the main mod file with the mod manager and install it and activate it.
Also get the MO2 Plugin file from the Files section – download this manually, we will be installing it later.
Note the mod prerequisites – you must have .NET Script Framework installed as well.
https://www.nexusmods.com/skyrimspecialedition/mods/21294 – [nexusmods.com]
The Script Framework mod has its own requirements – DLL Plugin Loader
https://www.nexusmods.com/skyrimspecialedition/mods/10546 – [nexusmods.com]
Ok, now we’re going to install the MO2 Plugin.
Open the plugin archive we just downloaded and you’ll see a file named “GrassPrecacher.py”
Extract that file (just drag and drop it) into MO2’s Plugins folder.
Close and re-open MO2 and verify that “Precache Grass” appears as an entry in the “Puzzle Piece” icon.
Don’t select it yet, we’re not quite ready to run it.
Download this SSEEdit script:
Worldspaces with Grass SSEEdit Script for No Grass In Objects
https://www.nexusmods.com/skyrimspecialedition/mods/55152 – [nexusmods.com]
Open the downloaded archive and extract “List worldspaces with grass.pas” to C:\Modding Tools\SSEEdit\Edit Scripts.
— TexGen and DynDOLOD
Open the S.T.E.P. parent forum link again and look for the DynDOLOD 3.0 topic.
As of this writing the latest version is Alpha 84 but that will likely have changed by the time you read this.
As a cautionary step, read the latest entries in the forum topic to get an idea of the stability of the latest version.
If lots of folks are having trouble with the current alpha – wait a day and check back.
Sheson is prolific and very competent, any issues will be addressed essentially immediately.
Ok, create a DynDOLOD folder in C:\Modding Tools
Download the DynDOLOD Standalone 3.0 archive (whatever version) and extract it to the C:\Modding Tools\DynDOLOD folder.
Download the latest DynDOLOD Resources file from the same link.
Don’t extract this file, just save it to the C:\Modding Tools\DynDOLOD folder.
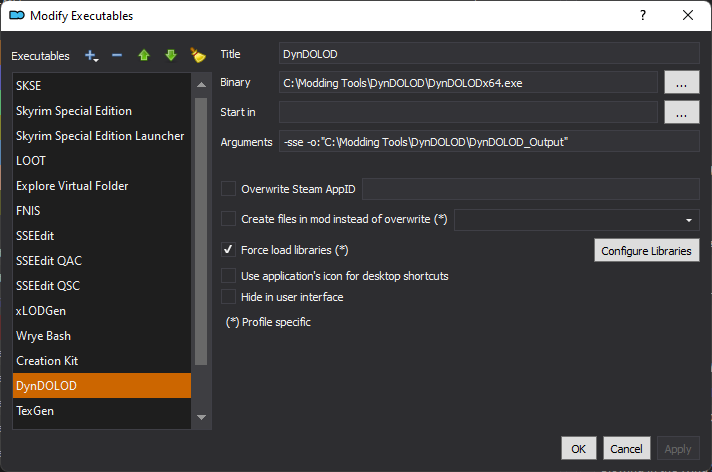
Now configure MO2 to be able to execute TexGen and DynDOLOD.
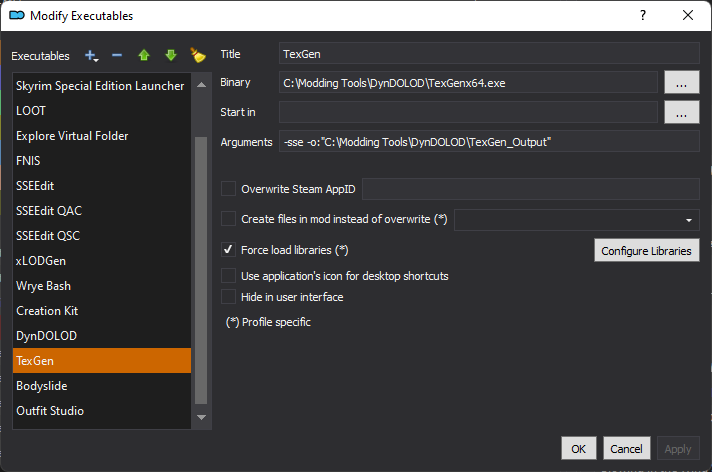
Here are their entries in the Gears icon.
Binary C:\Modding Tools\DynDOLOD\TexGenx64.exe
Arguments -sse -o:"C:\Modding Tools\DynDOLOD\TexGen_Output"
Binary C:\Modding Tools\DynDOLOD\DynDOLODx64.exe
Arguments -sse -o:"C:\Modding Tools\DynDOLOD\DynDOLOD_Output"
In MO2, select Install Mod (disk icon) and navigate to Modding Tools\DynDOLOD and select the DynDOLOD Resources file we just downloaded and install it as a mod and activate it.
At this point, load order isn’t important but to keep things tidy place the resources file mod at the bottom of your load order.
Now is an appropriate time to talk about load order. There is much disagreement about where to place the output of these tools.
I can only say that I place them close to the bottom of the load order. I keep them in their own section.
Please use advice from those you trust, I don’t have enough knowledge to make a strong recommendation, I can only report what works for me.
This the bottom of my load order (though it is followed by FISS output mods).
xLODGen Output
No Grass In Objects
DynDOLOD Resources SE
TexGen Output
DynDOLOD Output
Housekeeping
Before we begin in earnest, we need to make sure no leftover files are hanging around that may interfere with this run.
In MO2, if you have any tool output mods from xLODGen, TexGen, or DynDOLOD left over from previous runs, deactivate and remove them.
If you already have NGIO installed, right-click on that mod in MO2 and Open In Explorer.
If there is a grass folder there, delete it.
If you have any old output files in your Modding Tools directories, including the raw textures and meshes and any zip archives, delete them.
INI File Settings
Make sure your Skyrim.ini has these values:
[Grass]
bAllowCreateGrass=1
bAllowLoadGrass=0
fGrassMaxStartFadeDistance=6144
fGrassMinStartFadeDistance=0.0000
fGrassFadeRange=14128.0000
Make sure your SkyrimPrefs.ini has these values:
[Grass]
fGrassMaxStartFadeDistance=6144
fGrassMinStartFadeDistance=0
fGrassStartFadeDistance=6144

[TerrainManager]
fTreeLoadDistance=150000.0000
fBlockLevel0Distance=57344
fBlockLevel1Distance=147456
fBlockMaximumDistance=327680
fSplitDistanceMult=1.0000
bShowLODInEditor=1
In MO2, right-click in the left pane on the No Grass In Objects mod and select Open In Explorer.
In the explorer window, drill down from the NetScriptFramework folder through the Plugins folder.
Here we will find GrassControl.config.txt.
Edit this file to find and change, if necessary, the following values:
UseGrassCache = True
ExtendGrassDistance = True
ExtendGrassCount = False
EnsureMaxGrassTypesPerTextureSetting = 15
OverwriteGrassDistance = 6144
OverwriteGrassFadeRange = 14128
OverwriteMinGrassSize =50
GlobalGrassScale = 1.15
OnlyLoadFromCache = True
DynDOLODGrassMode = 1
It is highly recommended that you read the notes in this file that accompany each of these settings and understand what effect they may have on game appearance and performance.
Also review the S.T.E.P. recommended settings found here:
https://stepmodifications.org/wiki/SkyrimSE:Grass_LOD_Guide – [stepmodifications.org]
We need to make one more change to the GrassControl.config.txt file.
Open SSEEdit from withing MO2.
Press OK in the Module Selection window to load all plugins.
When the Background Loader finishes, you may see a Mod Group Activation confirmation window.
If so, just press OK in that window.
In the left pane of SSEEdit, right-click on any plugin and select Apply Script…
In the Script dropdown selection box find and select “List worldspaces with grass”.
Click OK and wait until the script finishes.
When it is done you will see a box with a long line of text (see the image)
Right-click in the text box and select Copy.
Press OK in all windows to close SSEEdit.
Find the OnlyPregenerateWorldSpaces entry in GrassControl.config.txt and paste the list of worldspaces between the quotation marks.
Now save and close the GrassControl.config.txt file.
Generate Terrain LOD
Install the Terrain LOD Resource file we downloaded earlier as a mod.
In MO2, click on Install Mod (the disk icon) and navigate to the Modding Tools\xLODGen folder.
Select the resource file we downloaded earlier and press OK.
Move the installed mod to the top of the load order, just below the game masters and activate it.
Launch xLODGen from within MO2.
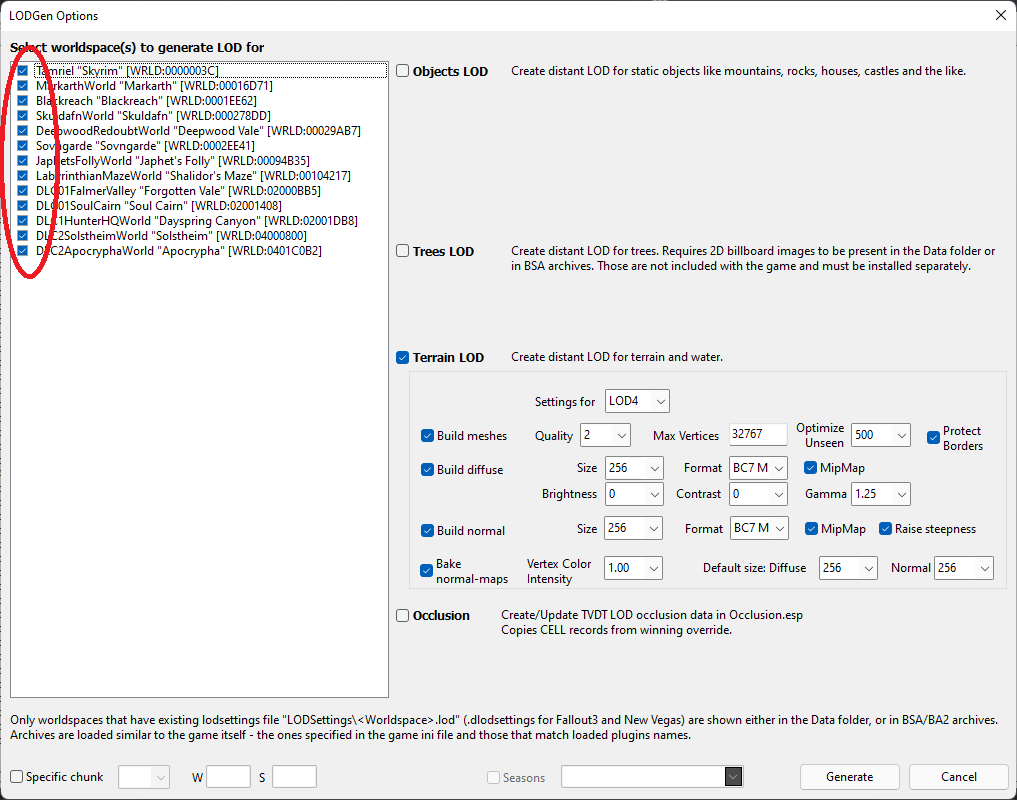
When the Background Loader finishes, right-click in the left pane of xLODGen and Select All.
Make sure only the Terrain LOD box is checked. The Objects LOD, Trees LOD, and Occlusion boxes must not be checked.
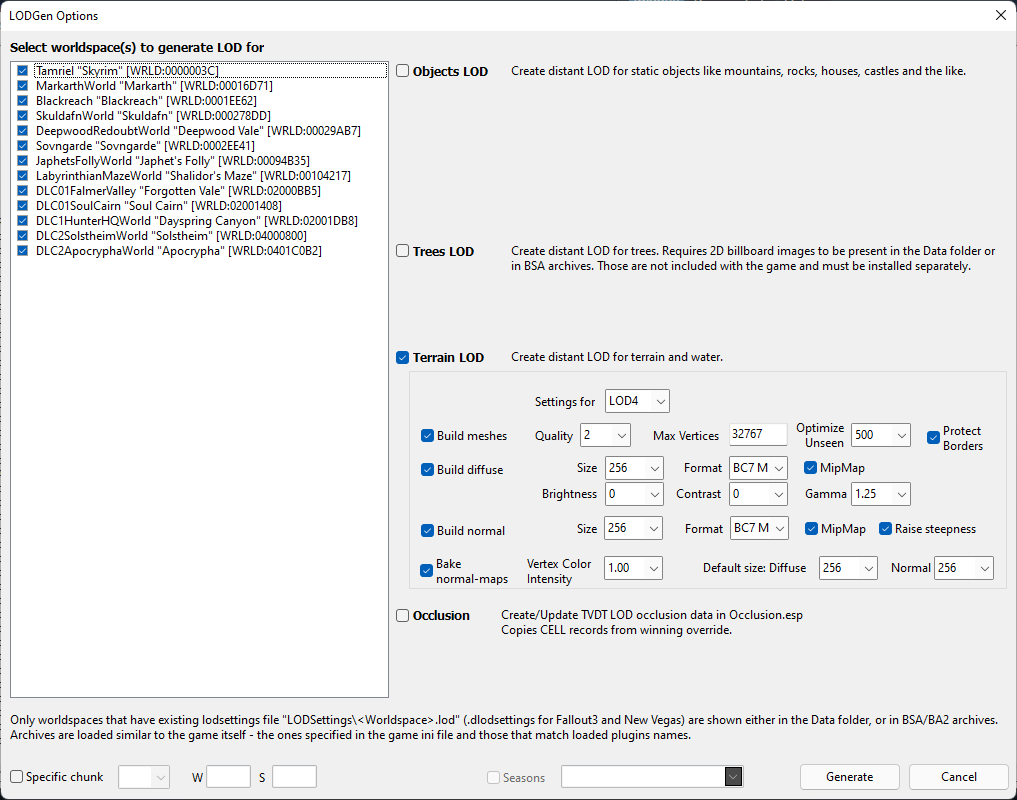
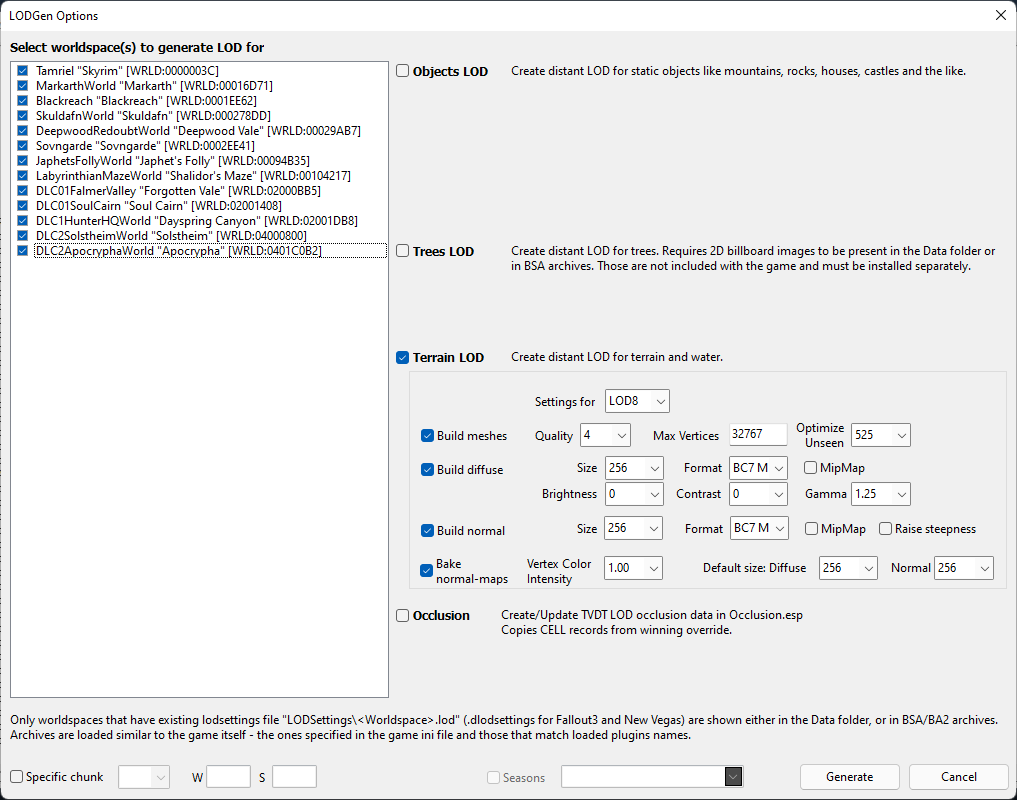
In the Terrain LOD box, the dropdown list has an entry for each of the four LOD types.
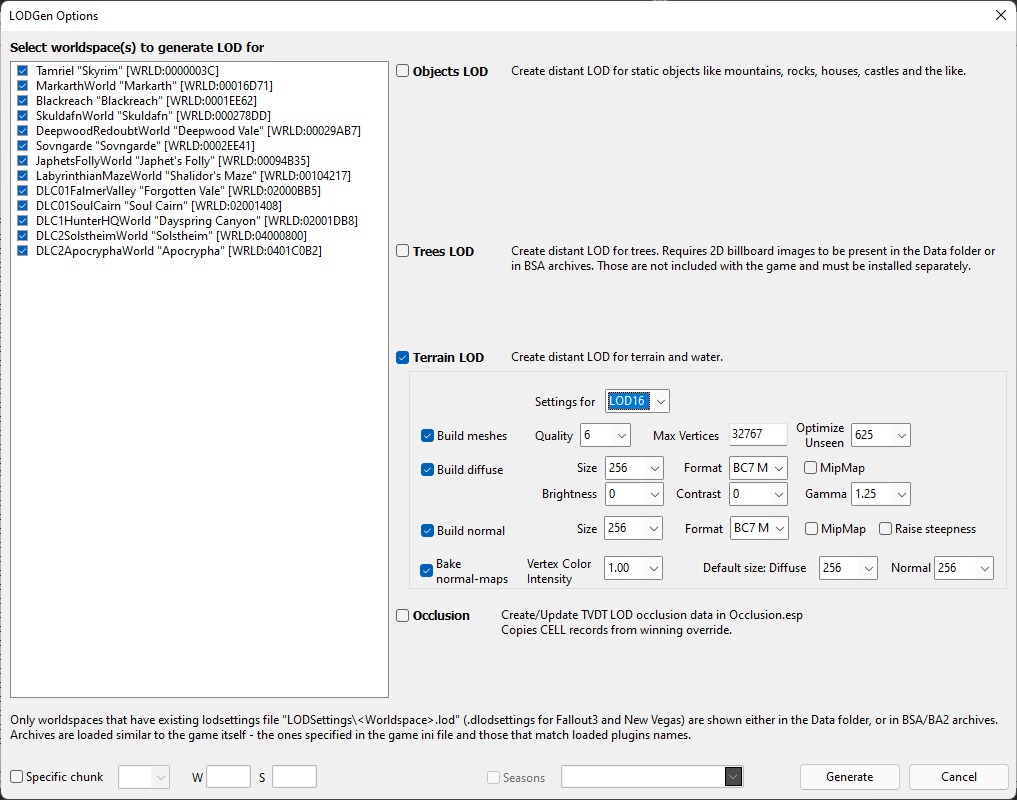
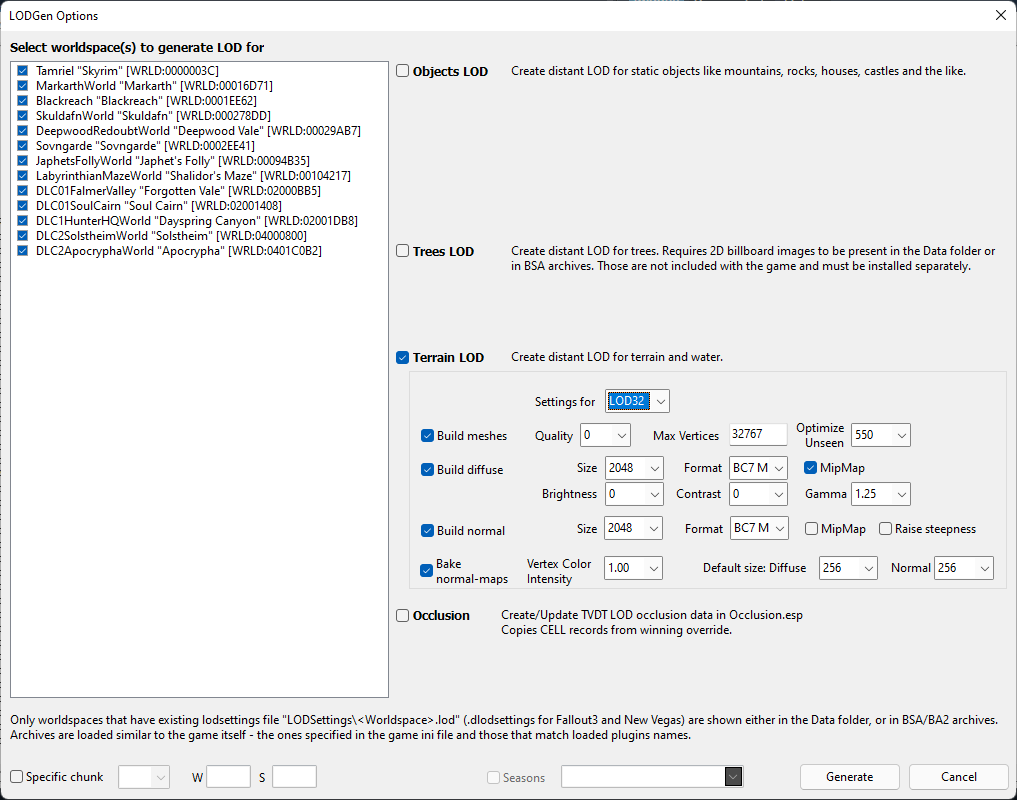
We will be configuring each of them by selecting one of the LOD types from this list and entering parameters as shown in the below images.
Think of this screen as a series of four “pages”. The active page is determined by the dropdown list. All of the settings for all four LOD types are collected and saved when we press the Generate button, and LOD files for all types will be generated.
In the Terrain LOD box, set the dropdown list to LOD4 and use these settings:
Set the dropdown list to LOD8 and use these settings:
Set the dropdown list to LOD16 and use these settings:
Set the dropdown list to LOD32 and use these settings:
Press the Generate button to start the process. This will take some time to complete.
When it is done, you will see a completion message in the log window:
[04:05] LOD generation complete
Close the log window with the X button at the top right, also closing xLODGen.
Now open an Explorer window and navigate to Modding Tools\xLODGen.
Your xLODGen_Output folder should now be populated with meshes and textures.
Right-click on the xLODGen_Output folder and compress the folder to a zip archive.
The exact mechanism for creating an archive varies from OS version to OS version and also depends on what compression tool you use. In any case, you should end up with an archive named “xLODGen_Output” with an appropriate file extension for your compression tool.
I use 7-Zip so my archive is named “xLODGen_Output.7z”.
Now select Install Mod (the disk icon) in MO2 and install “xLODGen_Output.7z” as a mod and activate it.
Place it close to the bottom of your load order – it will be the first of the output mods in the order.
Generate Grass Cache
We’re now ready to start generating the grass cache (*.gid) files.
These will be initially stored in MO2’s Overwrite folder.
I recommend, though it isn’t strictly necessary, to clear the Overwrite folder before beginning the cache. However, in addition to the grass cache files, the Overwrite folder will contain multiple crash logs from NetScriptFramework so, again, it it not important that it be cleared.
READ – THOROUGHLY – the description page for No Grass In Objects
https://www.nexusmods.com/skyrimspecialedition/mods/42161?tab=description – [nexusmods.com]
Also review the S.T.E.P. guide to caching grass which will give you some additional information on RayCasting and other aspects of NGIO. There shouldn’t be any conflicting info there but please use your own discretion if any differences are noted. Please bring them to my attention as well so we can revise the guide if necessary to change info or explain the differences.
https://stepmodifications.org/wiki/SkyrimSE:Grass_LOD_Guide – [stepmodifications.org]
This is a long process (up to an hour, more in rare cases). The caching will completely take over your machine during this time and it is critical that it not be disturbed.
The way it works is that once the caching is started, the mechanism will start the game automatically. A message will appear telling you that it is in process and that you can open the console with the tilde (~) key to observe the progress.
The game will crash multiple times during the caching process. This is totally expected and the game will restart automatically after each crash.
When it is complete, a message will appear in game telling you it is finished. When that message is acknowledged, the game will close and a similar message will appear in MO2 telling you that it is, indeed, all done. Close that window.
Now right click on the Overwrite folder and select Open In Explorer. Note that there is a “grass” folder now in Overwrite.
Also right click on the No Grass In Objects mod and select Open In Explorer.
Drag the grass folder from the Overwrite folder to the NGIO folder then close both Explorer windows.
Clear the Overwrite folder, and the grass caching is finally all done.
If something goes wrong – change your grass mods. The only time I’ve seen this process actually fail is when I had multiple grass mods active and that caused some sort of incompatibility. The symptom was that the cache process crashed on the exact same cell repeatedly and got stuck in a loop where it would not progress past that point. Removing all but one grass mod solved the issue.
Generate TexGen
From the DynDOLOD help and info page:
TexGen is a tool which updates a select list of object LOD textures and tree/grass LOD billboards which are then used by DynDOLOD to create the final texture atlasses used by object LOD and tree LOD in the game.
The first time TexGen is started, some settings like the Base size, Units per pixel and the Max texture size are adjusted to the current game resolution as determined by the Prefs, Custom or Display Tweaks INI.
Once the Start button is clicked, the current settings are saved as a preset to ..\DynDOLOD\Edit Scripts\DynDOLOD\Presets\DynDOLOD_[GAME MODE]_TexGen_Default.ini for the next time TexGen is started.
That means we should have to pay close attention to these settings only once, they will be loaded again for the next run.
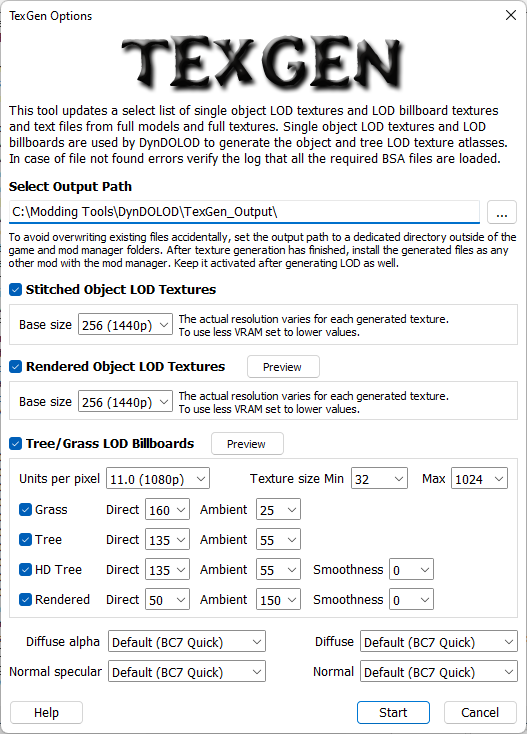
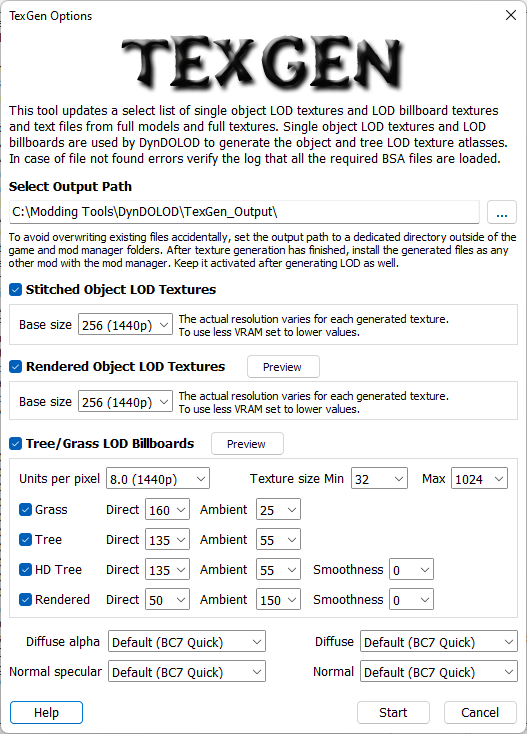
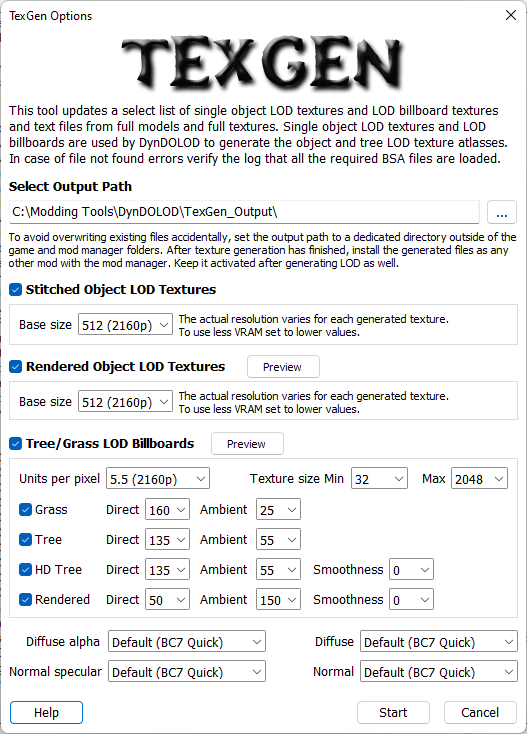
These are the settings I use. The tool authors strongly caution against using higher-than-recommended settings. That will significantly impact performance with no appreciable influence on graphic quality.
Use the setting corresponding to rendered game resolution: 1080p = HD, 1440p = QHD, 2160p = 4k
HD
QHD
4K
Start the generation. When it is complete, there will be a TexGen_Output folder in the DynDOLOD folder. Use the same compression and installation methods we used to install the Terrain Output mod to install the TexGen_Output as a mod. Activate it and move it to the appropriate place in the load order.
Generate DynDOLOD
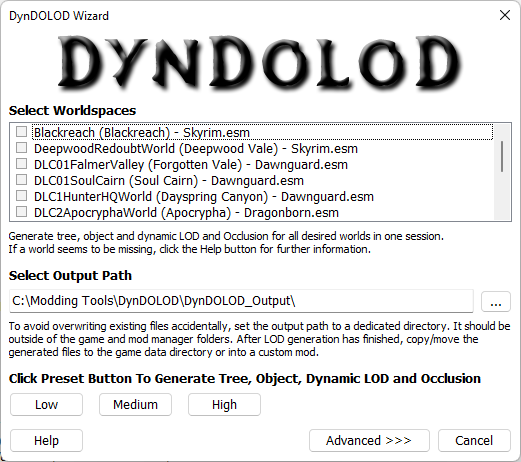
Launch DynDOLOD from MO2. The first window to appear will be the Wizard.
Press the Advanced button to open the Advanced Mode
Right-click in the Worldspaces window and Select All.
Press the High button in the upper right.
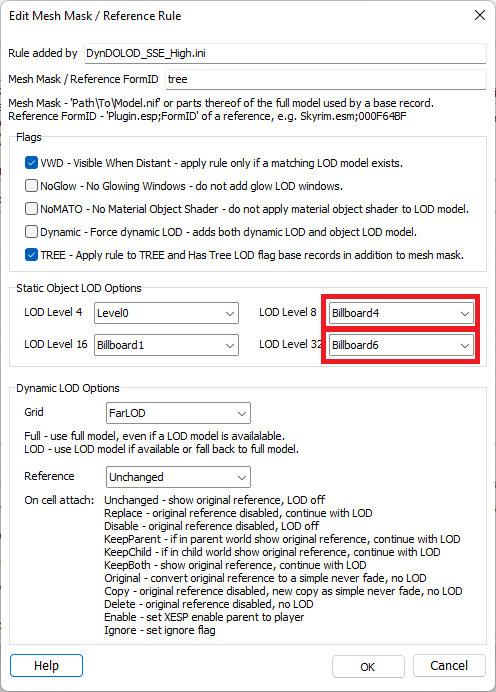
Scroll the mesh rules window to the very bottom. The last two lines should be the tree rule and the root (/) rule.
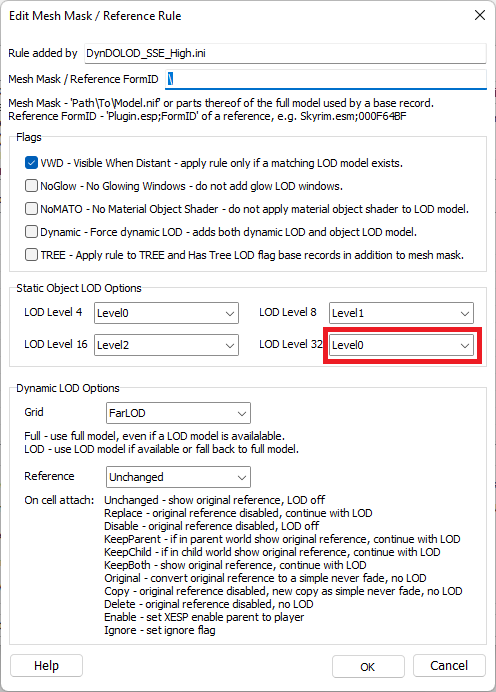
Double-click the line with the tree rule and change the LOD Level 8 and LOD Level 32 rules as shown:
Press OK to save and close the tree rule window.
Double-click on the root (/) rule window and change the LOD Level 32 rule as shown:
Press OK to save and close the root rule window.
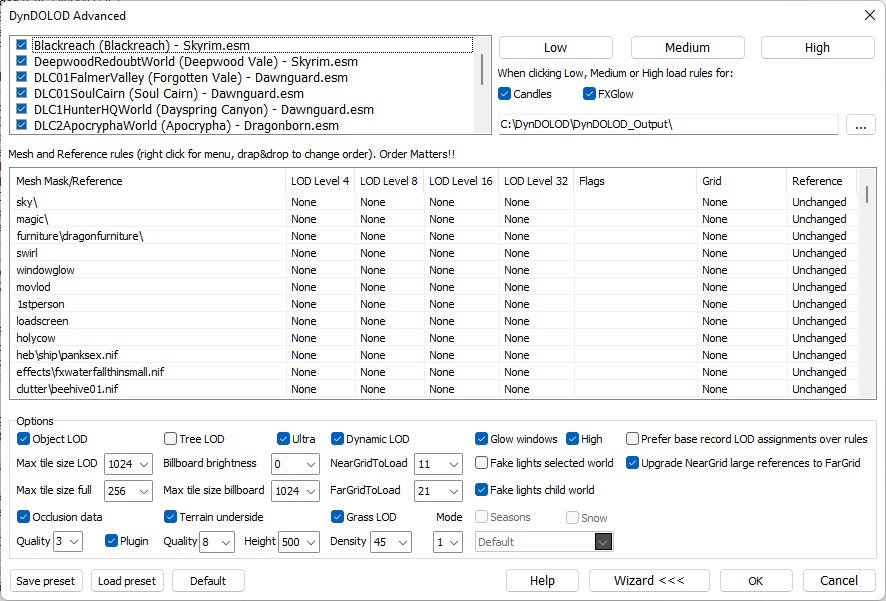
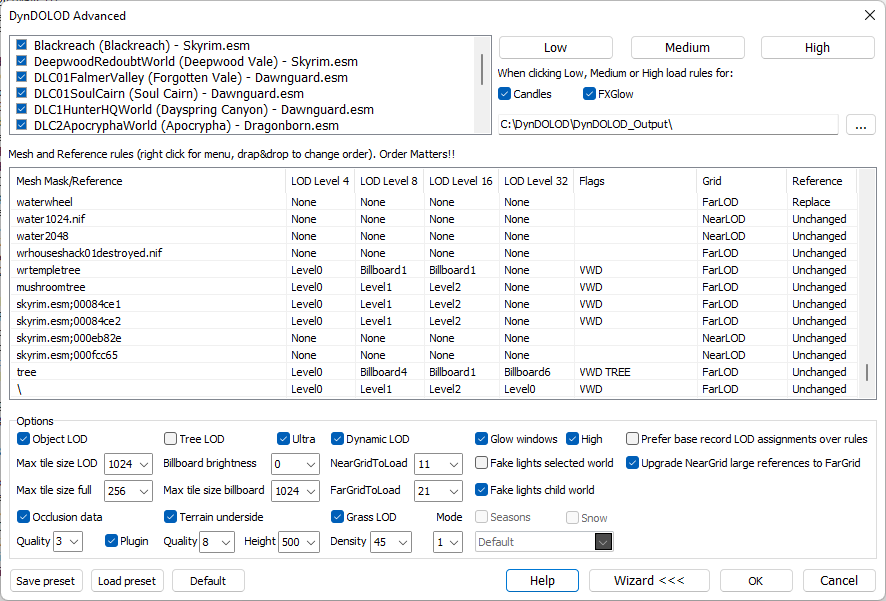
Once those rules are updated, your DynDOLOD window and parameters should look like this:
Carefully match all of the parameters to those shown.
Press the OK button to begin generating dynamic LOD. This will take a while.
Once DynDOLOD is finished a completion window appears. Press the Save & Exit button.
As we’ve done previously, create a compressed archive from the output folder DynDOLOD_Output and install it as a mod in MO2.
This will also install several plugins in the left pane of MO2. As a precaution (it shouldn’t be necessary) right-click in the plugins window and Enable All plugins.
Finishing up
One final step – remove that terrain resource mod we installed early in this guide.
Then sort your plugins with LOOT.
The processes are now all complete. You may start the game.
If you use Alternate Start – Live Another Life (recommended) then go ahead and configure your MCM and select a starting location.
If that location is an interior space, go outside.
Watch for a “DynDOLOD successfuly initialized” message in the upper left of the game window.
If you miss it or you think it didn’t happen, check DynDOLOD in the MCM.
Go to a vista point that overlooks some grassy area and enjoy the view.
Have fun!
If something goes wrong
If any of these steps fail, it will need to be restarted but do the cleanup first. Make sure there are no leftover files from previous runs for the particular step that failed, and try it again.
If it still consistently fails, please do ask for help.
There are plenty of helpful individuals in the Steam forums and the S.T.E.P. forums.
ToDo List
Plans for future revisions or versions of this guide.
- A version without grass caching.
- A version that includes instructions for Vortex.
- A version that includes instructions for game versions later than 1.5.97
Here we come to an end for The Elder Scrolls V: Skyrim Special Edition Obtain and install these modding tools + Game Version 1.5.97 hope you enjoy it. If you think we forget something to include or we should make an update to the post let us know via comment, and we will fix it asap! Thanks and have a great day!
- Check All The Elder Scrolls V: Skyrim Special Edition Posts List


Leave a Reply