A comprehensive 100% Achievement Guide for Mighty No. 9!
Introduction
Mighty No. 9’s achievements are no joke, some may be easy but many of them require very specific strategies and skillful play. This guide will provide the optimal strategies to collect all 70 achievements, but be warned, this will challenge even the most skilled 2D Action/Platforming players, good luck.
Note: Neither the Vermillion Destroyer or Retro Hero DLC packs are required to obtain all 70 Achievements.
Story Related Achievements
The following are Story Related Achievements that cannot be missed as long as you beat the game.
Beginner: Complete the opening stage.
Complete the first level, City
Together Again: Complete 8 main stages and rescue all Mighty Numbers.
Complete the eight Mighty Number stages (Pyrogen’s Oil Platform, Cryosphere’s Water Works Bureau, Dynatron’s Power Plant, Seismic’s Mine, Battallion’s Military Base, Aviator’s Radio Tower, Brandish’s Highway, and Countershade’s Capitol Building)
Good Call!: Complete a stage with Call.
Complete the only level in the game where you play as Call instead of Beck, Prison.
Super Fighting Robot: Complete the game on NORMAL difficulty.
Defeat Trinity in Battle Coliseum and complete the game on Normal Difficulty. See Appendix 1 for Boss Weaknesses.
Miscellaneous Achievements – Part I
Here are some miscellaneous achievements you will either likely get while playing the game naturally, or should aim for after completing Normal Difficulty by re-entering your save file.
3 Combo: Get 3 100% Absorption combos in a row.
See 50 Combo!!!!!
5 Combo!: Get 5 100% Absorption combos in a row.
See 50 Combo!!!!!
10 Combo! Get 10 100% Absorption combos in a row.
See 50 Combo!!!!!
20 Combo!!: Get 20 100% Absorption combos in a row.
See 50 Combo!!!!!
30 Combo!!!: Get 30 100% Absorption combos in a row.
See 50 Combo!!!!!
40 Combo!!!!: Get 40 100% Absorption combos in a row.
See 50 Combo!!!!!
50 Combo!!!!!: Get 50 100% Absorption combos in a row.
100% absorption occurs that you AcXelerate (Dash) into an enemy as soon as they reach critical HP and are flashing a color. You need to do this 50 times in a row and finish the stage in order to get this achievement. The best level to do this on is Capitol Building because there’s a lot of enemies to absorb. Use Battallion’s missile and absorb the enemies as soon as you detonate it on the enemy throughout the level in order to obtain a 50 combo. Make sure not to forget Countershade himself as he’s an enemy as well! This achievement can also be done in conjunction with Maximum Result, 7 Golden Letters, and Absorptionist since those requires a 100% absorption rate.
Absorptionist: Achieve an A rank or higher and 100% Xel absorption rate result.
To get a 100% absorption rate, you must AcXelerate (Dash) into an enemy the moment they start flashing. Generally the best way to do that to an enemy is to use Battallion’s ReXelection once or twice on the enemies but any weapon will do as long as you absorb them the moment they start flashing. If you miss this with any enemy or die, you must restart the level. I found this easiest to do on Countershade’s Capitol Building but it can be done on any stage you wish. Don’t forget to do this for the bosses when they start flashing too! Doing this will naturally earn you the Maximum Result and 7 Golden Letters achievements as well.
7 Golden Letters: Complete any stage with a 100% absorption rate.
Naturally obtained by obtaining the Absorptionist achievement, as described above.
Maximum Result: Achieve an S rank result.
Achieving an S Rank requires a certain score that differs per stage. Generally, as long as you do not die, have a 100% absorption rate, and move decently quickly, you’ll get an S Rank. I found the easiest levels to do this on are the City Stage or Countershade’s Capitol Building since there’s only one checkpoint in that stage anyways. The Prison Stage is a good one too since by default you’ll get an S Rank if you don’t die and move decently fast since you don’t absorb enemies with Call.
Per Stage, the point requirements are:
City: 64,500
Oil Platform: 66,500
Water Works Bureau: 66,500
Power Plant: 81,500
Mine: 66,500
Military Base: 76,500
Radio Tower: 66,500
Highway: 71,500
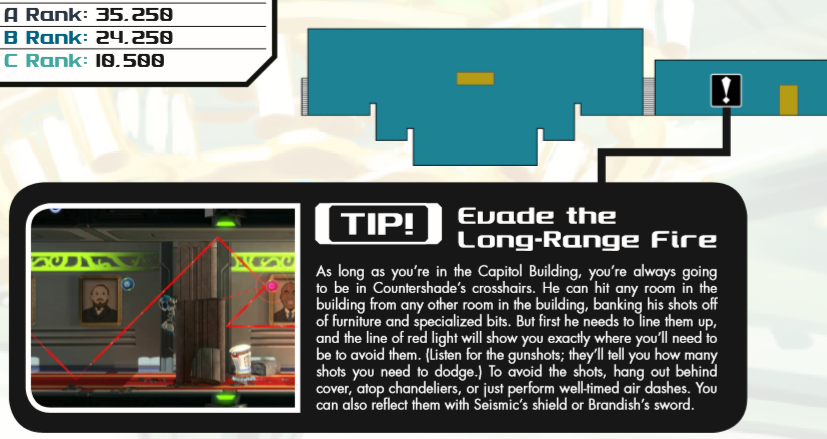
Capitol Building: 64,500
Prison: 28,500
Robot Factory: 79,000
Battle Colosseum: 74,500
We Can Work It Out: Don’t attack for the first 30 seconds of a boss battle.
Self explanatory, reach a boss and simply dodge for 30 seconds without shooting. You’ll get the achievement once 30 seconds are up. The easiest boss to do this on is Round Digger in the City Stage since it has relatively easy attacks to dodge.
Mighty Collector: Score 10,000 points in total.
See Mighty Millionaire. You will likely get this achievement within the first level, the City Stage
Mighty Hoarder: Score 100,000 points in total.
See Mighty Millionaire. You will likely get this achievement before beating all 8 Mighty Number stages.
Mighty Millionaire: Score 1,000,000 points in total.
You’ll earn points as you beat stages which contributes to an invisible point total. You will likely earn this achievement on one of your repeat playthroughs while going for the other achievements.
Beefed Up: Activate all ability boosts at the same time.
As you absorb enemies, you will build up a meter that, when filled, will give you one of three boosts. Absorbing red enemies gives you damage up (AcXel Shot), absorbing green enemies gives you movement up (AcXel Speed), absorbing yellow enemies gives you defense up (AcXel Armor). Activate all three at once to get the achievement, which you are likely to do before beating the game anyways, but is easiest done on Battle Colosseum.
You Only Live Twice: Complete any stage with just a single death.
Self explanatory, die once then beat the stage without dying again. This is easiest done on the Intro Stage, the City.
Eternal Battle: Defeat any Mighty Number without letting them heal. [Secret]
Whenever you are fighting the Mighty Numbers, they will start to glow when you attack them enough. Make sure you absorb them immediately by dashing into them so as to not let them heal the damage you dealt. If they do heal, die and restart the fight to try again. This is most easily done with Round Digger in the City Stage. The achievement will pop on the results screen.
Built to Last: Get more than 10 game overs in your play lifetime. [Secret]
Self explanatory, get 10 Game Overs (

). You will probably do this while playing the game but if you somehow don’t get 10 Game Overs, there are instant death spikes right at the beginning of Seismic’s Mine.
Heart Attack: Defeated a boss with 1% or less health on Beck.
Self-explanatory, but not necessarily easy to do. You must defeat any of the end-of-level bosses with your health bar at 1%. If you don’t get it naturally, the easiest boss to do this for is Round Digger since the missiles do a very small amount of damage, and the other attacks do more damage, so you can fine tune your health well before beating it. The achievement will pop on the results screen.
Diffused!: Defeat Mighty No. 5 before he detonates his special attack. [Secret]
Make sure you have Cryosphere’s ReXelection before attempting this. Go to the Military Base stage and get to Battallion’s boss fight. Halfway through, he will hop to one side of the stage and fire a giant missile. Getting hit by it as it flies across the screen is instant death, so be sure to crouch dash (Down + Dash) under it or jump over it. Once he does this, you must defeat him before he detonates the missile, which isn’t super difficult to do if you use his weakness, Cryosphere’s ReXelection. Fire the weapon multiple times until he flashes, stunning him in place not unlike Spark Mandrill getting stunned by Shotgun Ice in Mega Man X, then dash into him. Repeat this at a brisk pace to defeat him before he detonates the missile. If he does, you must die and restart the battle to try again. The achievement will pop on the results screen.
Smooth Dive: Drop 100m without touching anything.
You must drop 100 meters in-game without touching a platform or enemy. The easiest place to do this in is Aviator’s Radio Tower at the last section before the boss fight at the giant area where there is wind blowing up. Simply jump from the top of the area and land on the platform all the way at the bottom without touching the enemy, rings, or other platforms to get the achievement as soon as you land. MAKE SURE YOU LAND, as dying will void the achievement!
Miscellaneous Achievements – Part II
Aerodynamic: Ascend 100m without touching anything.
You must rise 100 meters off of the ground without touching any other platform or enemy. The easiest place to do this is in Aviator’s Radio Tower at the last section before the boss fight at the giant area where there is wind blowing up. You can either continuously dash up and reach the top without touching the rings, enemy, or platforms, or use Aviator’s ReXelection to make it easier if you revisit the stage after beating it.
Wonderful!: Achieve a WONDERFUL! technical bonus.
Getting a WONDERFUL! Bonus means getting 6 100% absorption combos in a row. The easiest place to do this is in the Battle Colosseum at the beginning when the square enemies are floating towards you. Use Battallion’s ReXelection to blow up six of them at once, then jump and dash into all of them (this will also earn you Sie das Ziel, ich der Jäger.
Sie das Ziel, ich der Jäger: Attack and absorb enemies 5 times in the air before landing.
The easiest place to do this is in the Battle Colosseum stage at the beginning when the square enemies are floating towards you. Use Battalion’s ReXelection to blow up five of them at once, then jump and dash into all of them before touching the ground. (For those curious, this roughly translates to “You are the target, I am the hunter.”)
Please, I Beck You: Get defeated by a boss at less than 10% health.
Self explanatory, die to a boss when they are at 10% health or less. The easiest boss to do this with is Round Digger in the Intro Stage. Attack until the health bar is almost depleted and then die.
A Mighty Helping Hand: Witness every helping event by Mighty Numbers.
You will naturally see this by playing each of the Mighty Number stages & Robot Factory once, then replaying the first stage you beat again as there is one helping hand per stage. The Mighty Number that helps you in the stage is also a cue that their weapon is the weakness of the boss (except Robot Factory). These include:
Pyrogen thawing the ice for the boss room in Water Works Bureau.
Cryosphere freezing enemies in the background in Military Base.
Dynatron diffusing some electrical wires in Capitol Building.
Seismic destroying a truck in Highway. (Aesthetic only).
Battalion destroying the instant-death drills in the Mine.
Aviator destroying some of the instant death pillars on the Oil Platform.
Brandish destroying some enemies in a few sections in the Power Plant.
Countershade sniping some of the enemies in Radio Tower.
All 8 Mighty Numbers teaming up to destroy the enemies in Robot Factory.
Mighty Anniversary: Complete Mighty No. 9 on the 9th. [Secret]
Self explanatory, beat the game on the ninth day of any month. There are two things to keep in mind. First, you don’t have to beat the entire game. If you have a completed file you can just beat Battle Colosseum once more when it’s the ninth and the achievement will pop once Trinity is defeated. Second, while you CAN technically set the date on your computer/console to be the ninth if you’re impatient, I strongly recommend you do not because several achievement tracking sites will ban you if you do.
Conserving Energy: Complete any stage without using healing items.
Self-explanatory, finish any level without picking up any healing items. This is easiest done in the Mine Stage since there aren’t that many healing items to dodge without being a super difficult level comparatively. If you do pick up a healing item, you will have to exit the stage and restart.
Warm Jacket: Complete the Water Plant stage without being frozen.
Self-explanatory, beat the Water Works Bureau stage without being frozen, but it’s a lot more difficult than it sounds. There are pillars of freezing water that start to pop up around halfway through the level, make sure you don’t try to dash past them as you will likely be frozen. Bait the enemy out from them then destroy the ice blocks individually. Cryosphere herself will also start trying to freeze you during the second mid-boss battle, you need to be very careful because if you get frozen, you must quit the stage and restart. Use Battalion’s ReXelection to destroy the mid-boss in 3ish hits. Finally, you need to be careful during the boss fight as getting hit by her ice pillar attack will also void the achievement, as will getting hit by the ice gun blast. You’ll want to use Pyrogen’s and Battalion’s ReXelections to destroy Cryosphere fast, and when she starts doing the ice blast attack, stay behind her as much as possible to avoid the attack. The achievement will pop as soon as you complete the level.
Ex-Xel-lent Marksmen: Complete any stage without using a ReXelection or missing an attack.
You must beat any level without missing an attack or missing a ReXelection, but what the game doesn’t tell you is that you don’t have to attack anything at all. The easiest way to do this is to play the City Stage and simply avoid every enemy possible except for the ones that are required, which are the first enemy, and those in the Crescendo where you must defeat the enemies to proceed. For the Crescendo enemies, wait until they are really close to you then use a Buster Shot to hit them, then absorb when they start glowing. Don’t forget that this applies to the boss, Round Digger as well (weak to Cryosphere’s ReXelection)! If you miss an enemy or ReXelection, you must restart the stage. The achievement will pop as soon as you complete the level.
Fuel is Expensive: Complete any stage by dashing only 9 times or less.
Self explanatory, complete any stage dashing nine times or less. This is best done on the Opening level, the City Stage, as you can beat the level by dashing exactly nine times (you have to dash to destroy a the first enemy and the boss in addition to a few times to make it through the smaller corridors. There’s one segment towards the middle with a big jump you can bypass using Aviator’s ReXelection to jump higher). The achievement will pop as soon as you complete the level.
With the feet on the ground: Complete any stage by jumping only 30 times or less.
Self explanatory, complete any stage by only pressing the jump button 30 times or less. This is best done on the Opening level, the City Stage. If you plan your jumps properly, you will jump far less than 30 times. The achievement will pop as soon as you complete the level.
Miscellaneous Achievements – Part III
Dashing Star: Complete any stage without pressing normal movement inputs for longer than 1 sec. at a time.
Self-explanatory but tougher to pull off than it sounds. By “normal movement inputs”, the achievement means not pressing any button on the D-Pad for more than 1 second at a time. This means you will have to rely primarily on the AcXelerate (Dash) and your jump in order to beat the stage. You can use the direction briefly to grab onto ladders, do a crouch dash, or turn around but that’s about it. I suggest doing this on the City Stage as the level isn’t too difficult. The achievement will pop as soon as you complete the level.
All I Need is Win: Complete any stage without absorption combos or technical bonuses.
Self-explanatory but more difficult than it sounds. Do not absorb any enemies if you can, and if you need to, wait several seconds before dashing into them so you don’t get a combo. If you do get a combo, you have to quit and restart the level. You also have to be careful not to get any technical bonuses such as SPRINTER!, AMAZING!, NICE CLEAR!, QUICK CLEAR!, and any other ones. The best way to avoid those is to take it slow throughout the level. The achievement will pop as soon as you complete the level (if you get a D Rank, you probably got the achievement as the game is showing you how to get a bad rank).
The Floor is Lava: Complete any stage with Beck’s feet touching the ground for no more than 1 second.
Self-explanatory, but not as easy as it sounds. You have to continuously jump throughout the entire stage, including during the boss fight in order to get this achievement. Unfortunately, you cannot obtain this on the City Stage because you have to dash through narrow corridors on the ground in order to beat the level. As a result, the easiest level to complete this in is probably Battalion’s Military Base. Make sure you keep jumping throughout the level! The achievement will pop as soon as you complete the level.
Everlasting Love For My Boost: Maintain ability boosts for 60 seconds in any stage.
Get a red, yellow, or green ability boost and keep it for one minute. The best stage to do this in is Countershade’s Capitol Building since there’s a lot of enemies in a row, and if you move fast, you’ll maintain the boost for well over a minute.
Invincible No. 9: Complete the City stage without taking damage.
This sounds harder than it actually is. Revisit the City level once you beat Battalion’s Military Base so you have Battalion’s ReXelection, and use that to blow up the enemies from a safe distance so you don’t get hit. Taking any damage from any enemy or obstacle (including getting instantly killed by a bottomless pit or spikes) will require you to exit the stage manually and try again. For Round Digger (the boss), use Cryosphere’s weapon since it kills it very quickly, meaning you won’t have to worry about almost all of it’s attacks.
Unbreakable: Complete any stage without taking damage.
Contrary to what the achievement says, you CANNOT do this on the City Stage, as it instead wants you to choose one of the other stages to beat without taking a hit. I highly recommend choosing Dynatron’s Power Plant as similar to the City, most of the enemies can be taken out from a safe distance thanks to Battalion’s ReXelection, and Dynatron herself not being too difficult to beat damageless (use Brandish’s ReXelection here, and remember to charge the weapon when she flies into the foreground and use the downward stab to destroy all her nodes in one go. Similar to Invincible No. 9, if you get hit at all or die, you must manually exit the stage and try again.
Difficulty Specific & Speedrun Achievements
Super Hardcore Fighting Robot: Complete the game on HARD difficulty.
Hard Difficulty is unlocked after beating Normal, but contrary to it’s name it might be easier than Normal. Despite the enemies moving faster and dealing more damage, you start with all of your weapons unlike in Normal, so you have a lot more options for getting through the game. I suggest a slightly different order than Normal this time, which I will list below. Unlike Normal Mode, you do only start with 2 lives so you’ll want to be more careful, especially if you’re going for the Legendary Peacekeeper achievement. The achievement will pop after you beat Trinity.
Suggested Order:
1. City
2. Radio Tower
3. Oil Platform
4. Water Works Bureau
5. Military Base
6. Mine
7. Highway
8. Power Plant
9. Capitol Building
10. Prison
11. Robot Factory
12. Battle Colosseum
Legendary Peacekeeper: Complete the game without restarting on HARD difficulty.
Similar to Super Hardcore Fighting Robot, you must complete the game on Hard Mode, only this time, you cannot see the Game Over screen by losing all of your extra lives, or you must restart the game from scratch. You sadly cannot exit a stage and re-enter it either as that voids the achievement as well. My best recommendation is to pair this up with Cleared Story (Super Fast) as if you get a Game Over, you likely won’t get that achievement, and it’s best to speedrun the game on Hard due to starting with all your weapons. Move fast but above all else, play it safe so that you don’t instantly die from spikes or Game Over. Don’t be afraid to use AcXel Recovers by pressing – if you get low on health. The achievement will pop after you beat Trinity.
Cleared Story (Fast): Complete the game within 120 minutes.
You must complete the game with the in-game timer being under 2 hours. I recommend doing this on Hard difficulty due to the fact that you start with all of your weapons. See Cleared Story (Super Fast) for more details since you will naturally get this achievement by getting that one. The achievement will pop after you beat Trinity.
Cleared Story (Super Fast): Complete the game within 60 minutes.
You must complete the game with the in-game timer being under 1 hour. I recommend doing this on Hard difficulty where you start with all of your weapons. I recommend using the order suggested in the description for Super Hardcore Fighting Robot while moving relatively quickly and avoiding as many deaths as possible. Use Appendix 1 to see boss weaknesses. The in-game timer does NOT count when you are in loading screens or in between stages on the select screen, but WILL count when you die. The timer starts when you start the City Stage and ends when you defeat Trinity. The achievement should pop after Trinity’s defeat. Good luck, this is one of the hardest achievements in the game but you can do it with practice!
Super Turbo Hyper Fighting Robot: Complete the game on HYPER difficulty.
Hyper Difficulty is unlocked after beating Normal. Good luck, Hyper is VERY challenging. Enemies do a lot more damage and move faster, you start with 2 lives like in Hard, and the Patch support robots that drop health are no longer present, making it a lot harder to make it through the stages. The bosses in particular have new, more difficult patterns and will kill you in about 3 to 4 hits. You’ll need to really learn the enemy patterns as much as possible and build up your AcXel Recover (health restore) as soon as possible in order to succeed. The achievement will pop after you defeat Trinity. It’s tough, but doable with practice. I suggest using the same order I put in Super Hardcore Fighting Robot. Good luck, and be patient, this won’t be easy.
Mighty Dash 9: Complete the Factory stage within 9 minutes with all transformations.
You must beat the Robot Factory stage in under 9 minutes while using each Mighty Number transformation (Pyrogen, Cryosphere, Dynatron, Seismic, Battalion, Aviator, Brandish, Countershade) at least once. For a transformation to count, it must hit a target. I use Battalion’s missiles throughout the stage, Aviator’s to jump up the blocks and float through the instant death segment, Cryosphere’s to defeat the two M.O.M. robots, Coutnershade’s to destroy the enemies during the segment with a lot of ledges, Pyrogen’s to hit the switches, Brandish’s and Seismic’s to destroy the tiny robots when the Mighty Numbers are attacking the factory, and Dynatron’s to defeat Nameless. Nine minutes is a lot of time, as long as you don’t die, you should make it.
Technical Bonuses
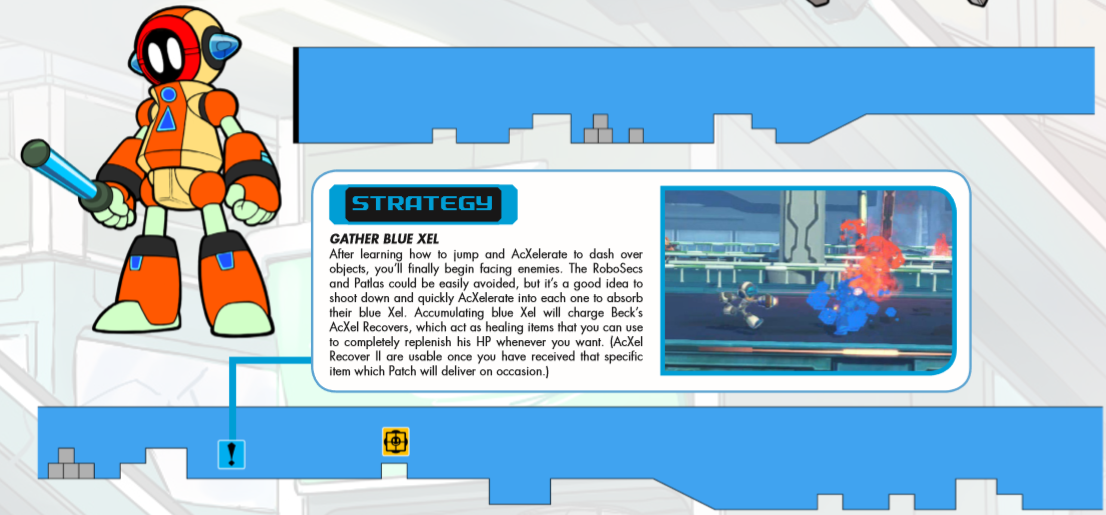
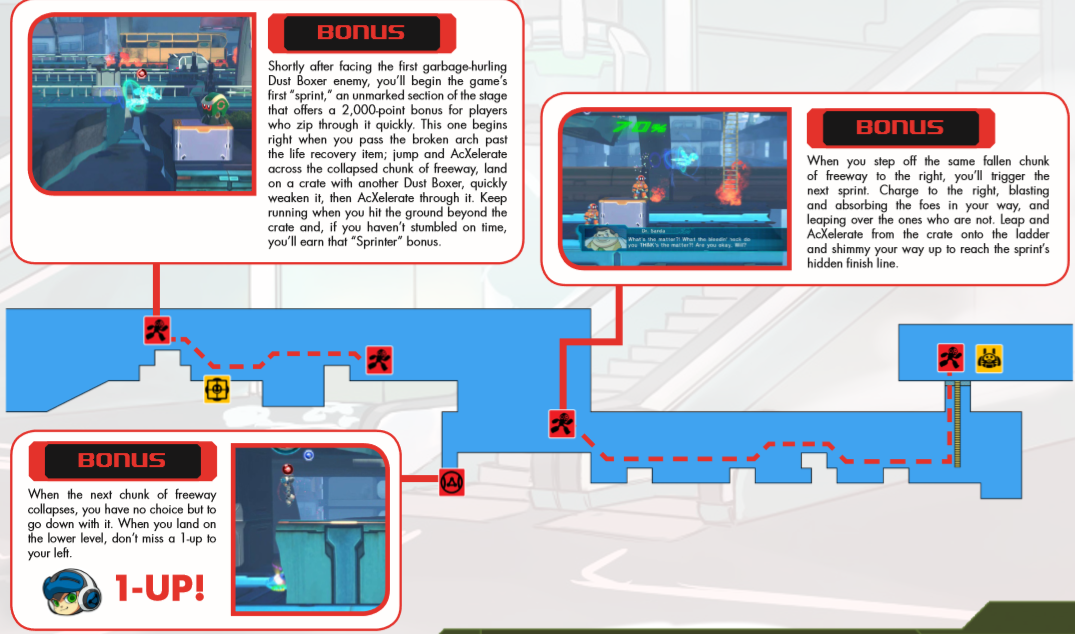
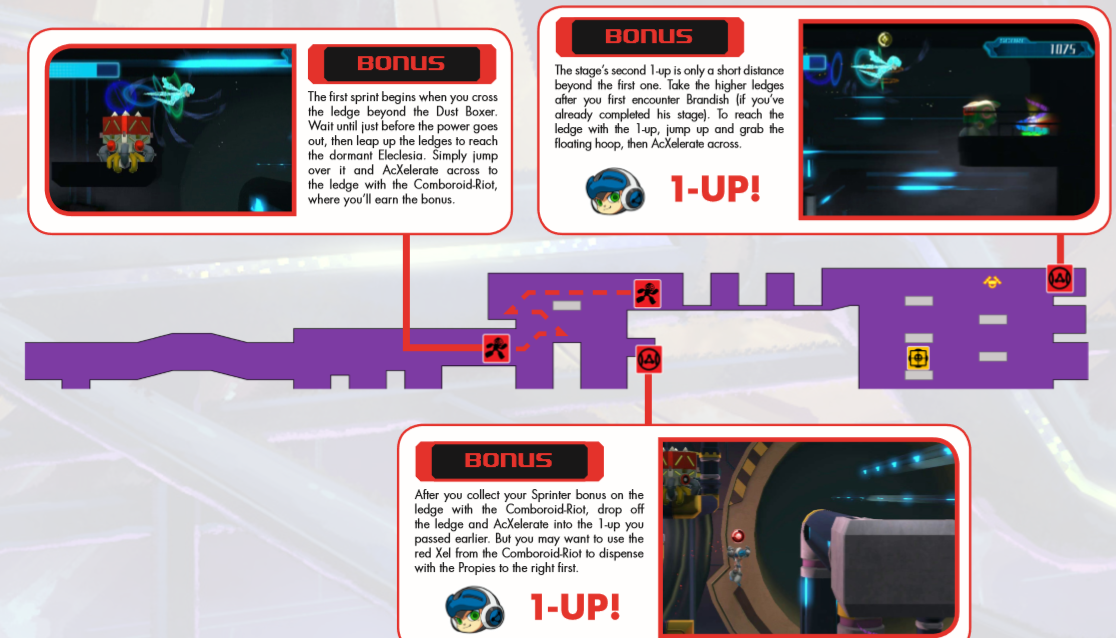
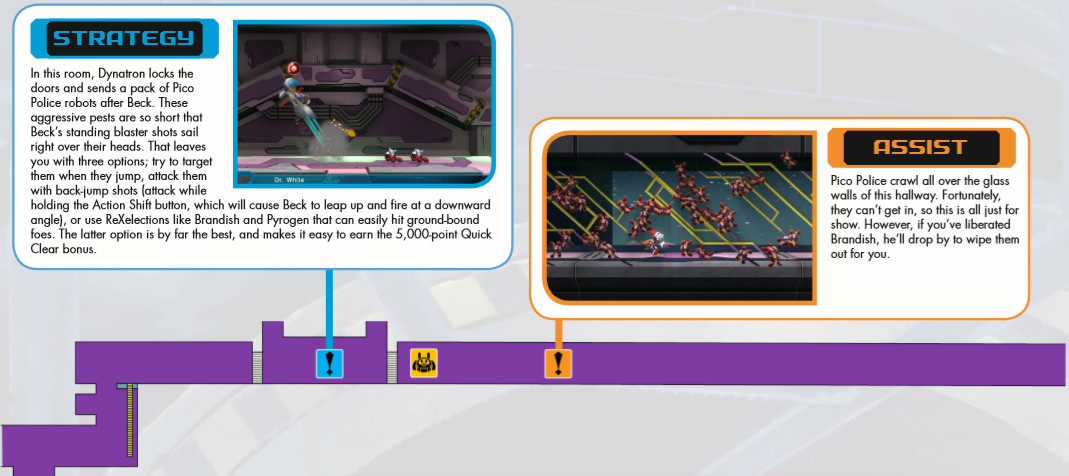
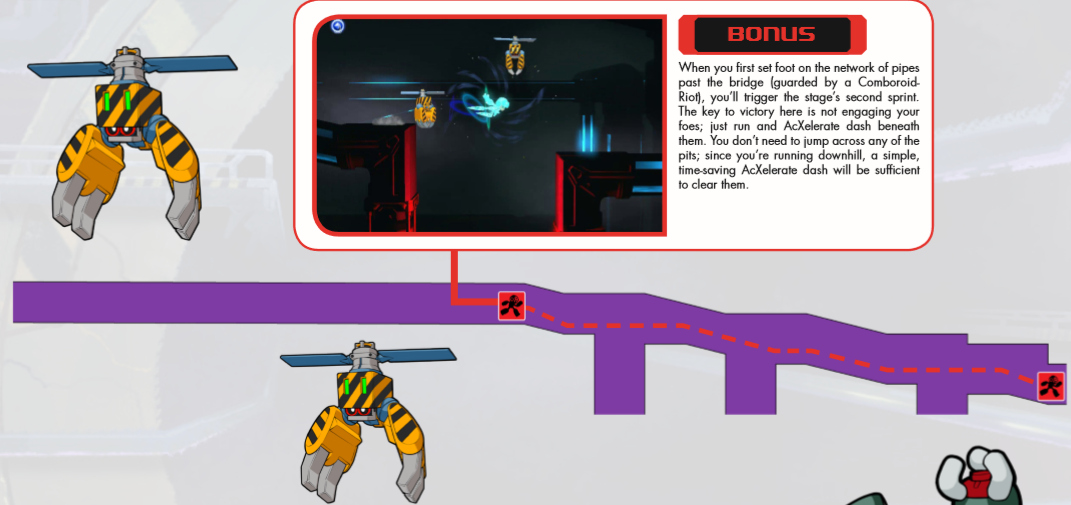
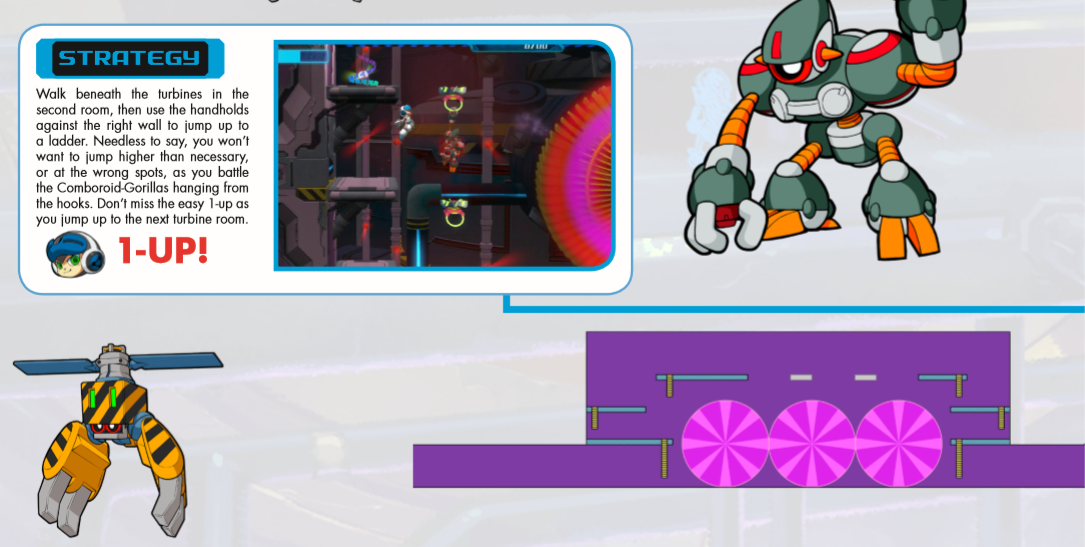
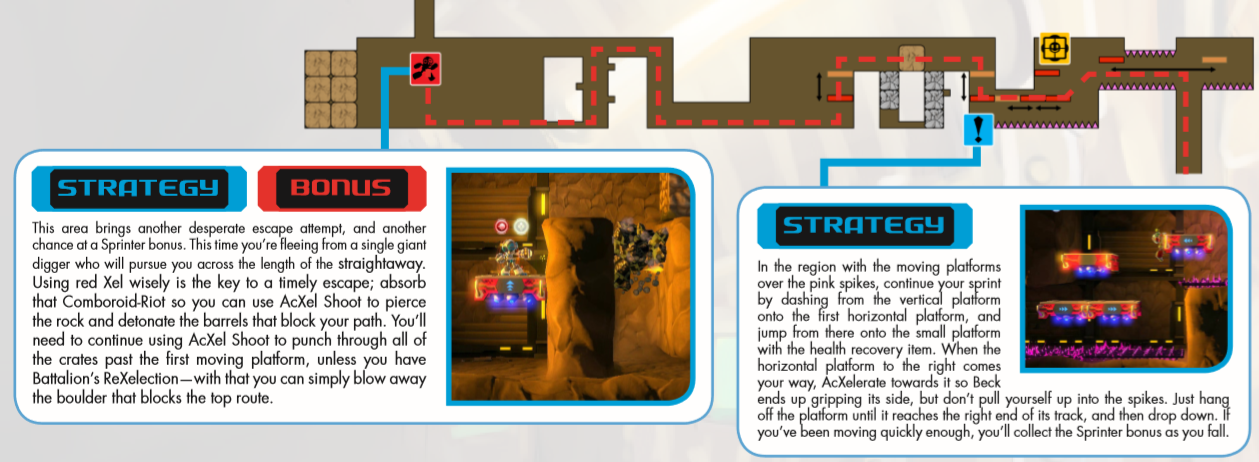
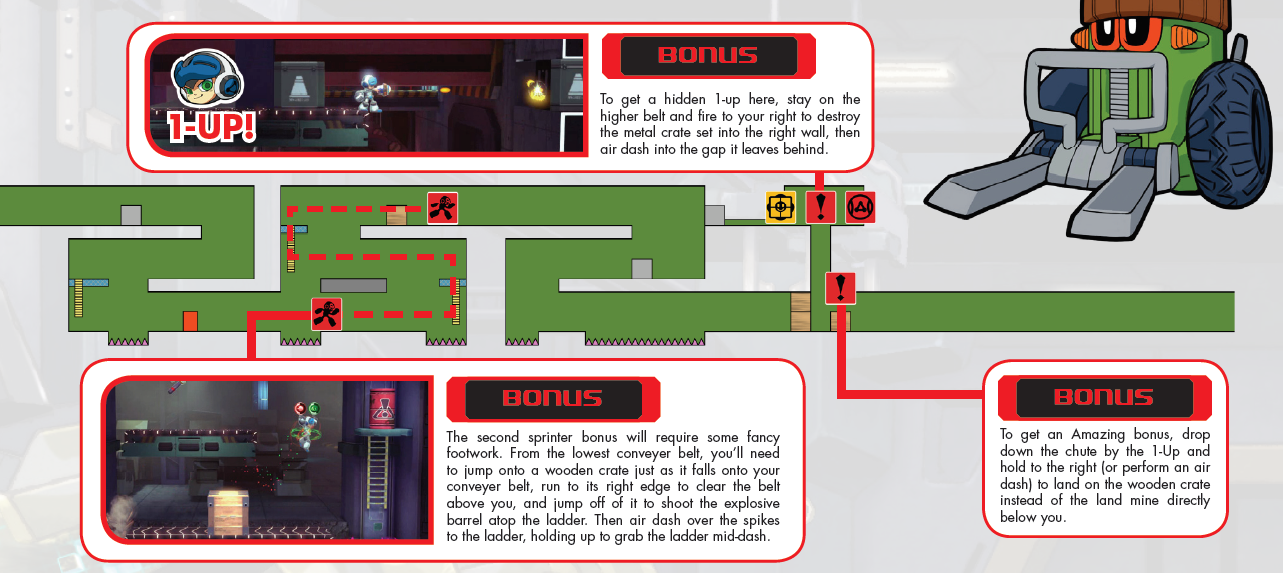
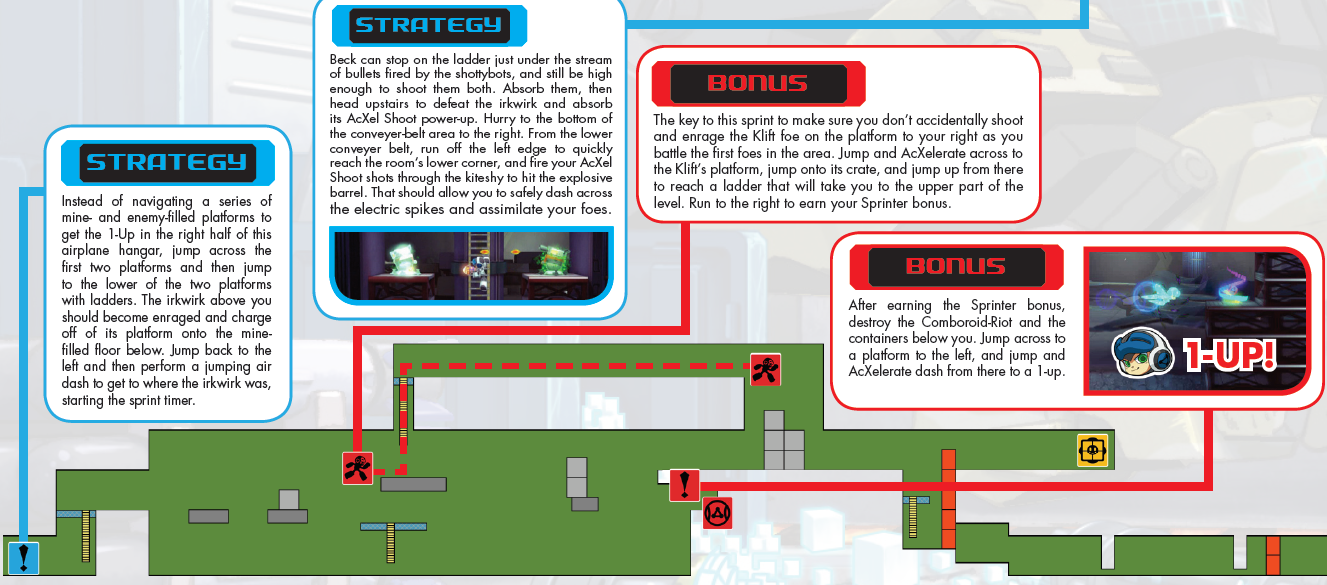
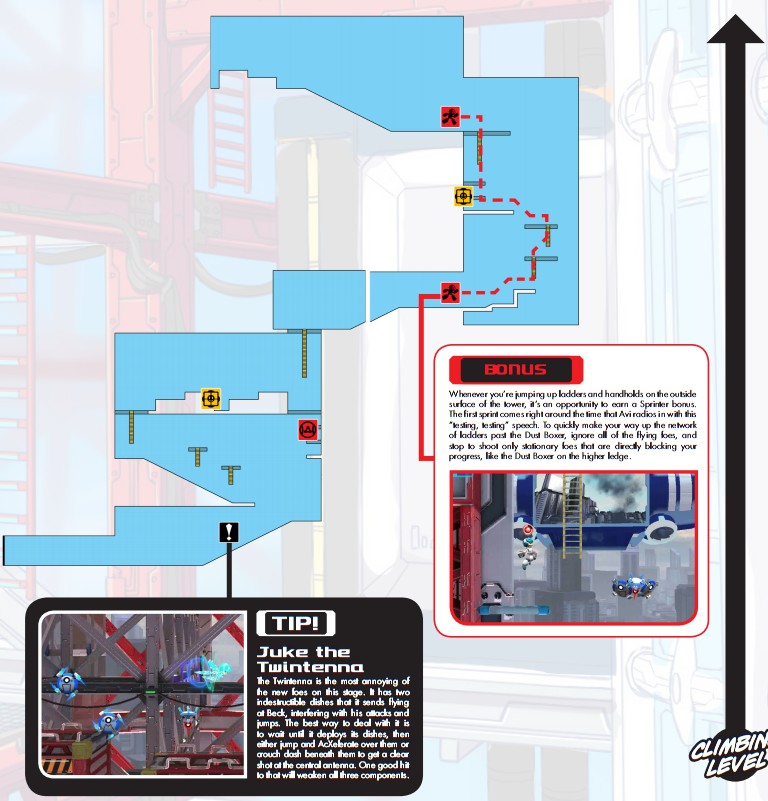
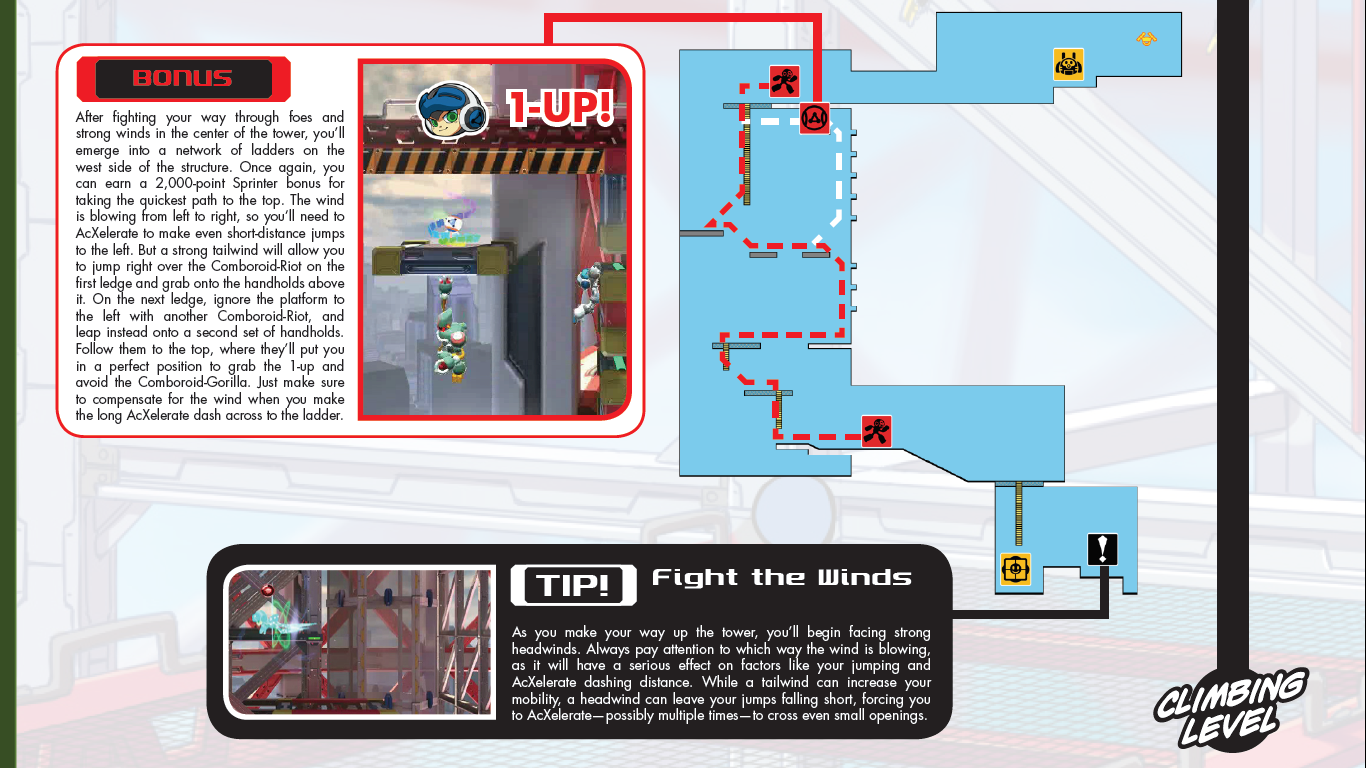
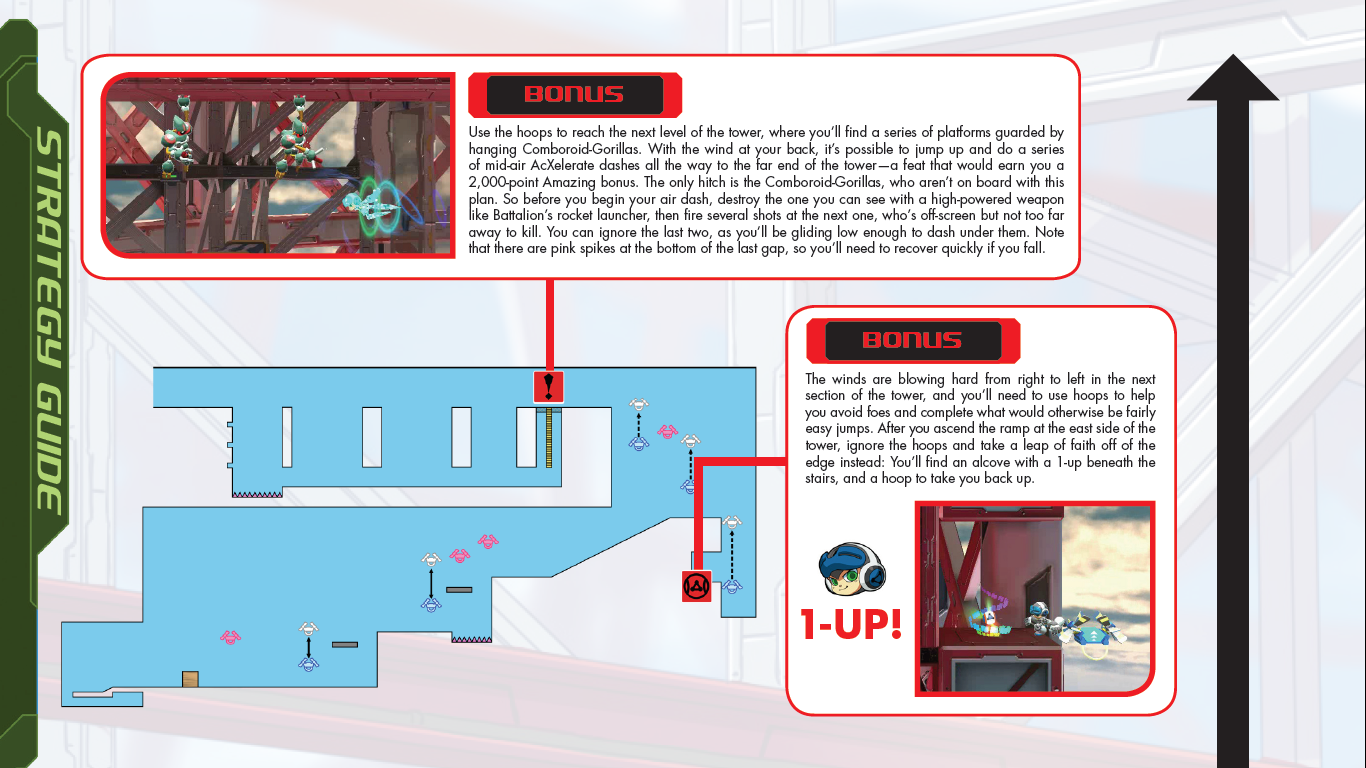
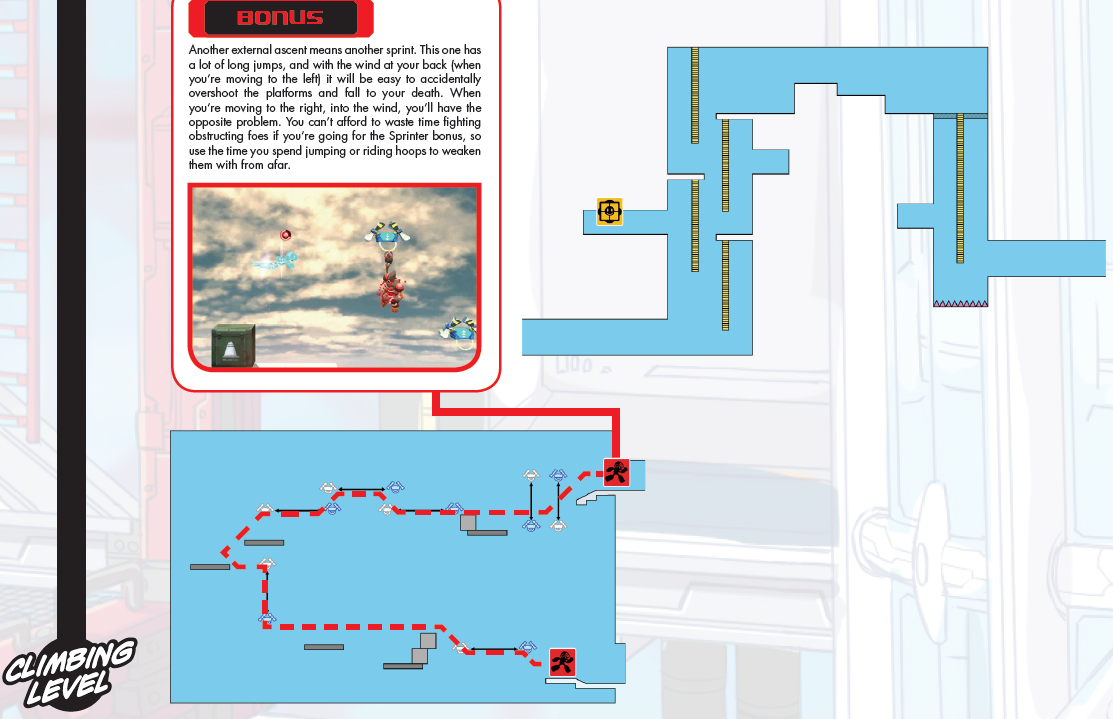
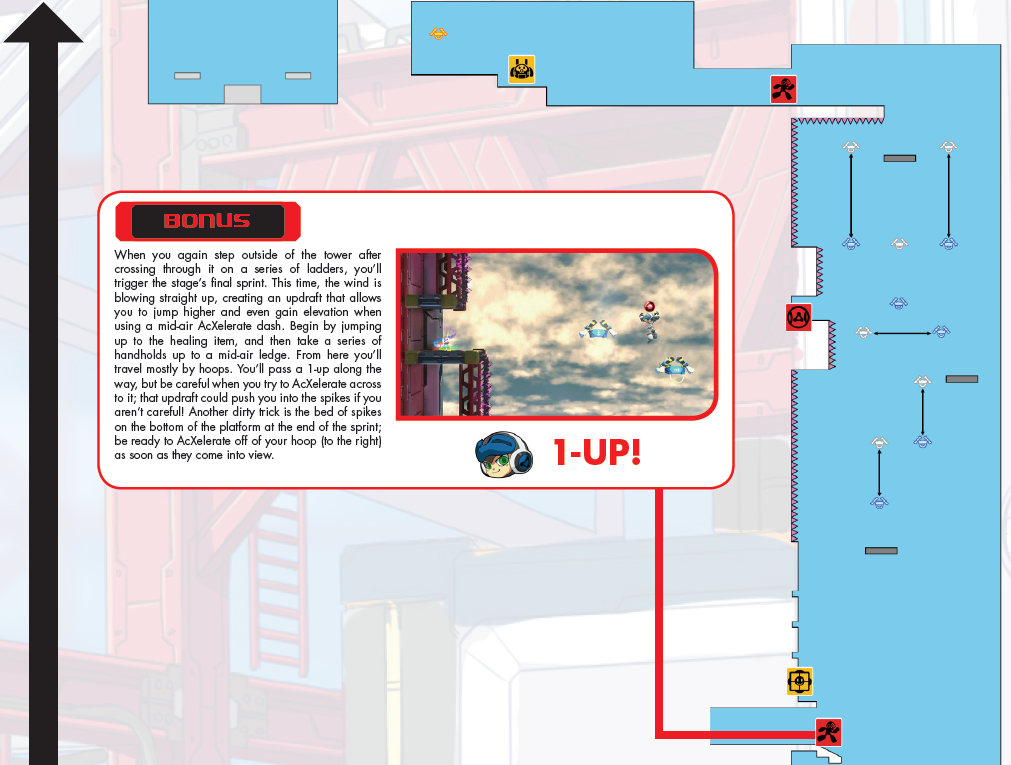
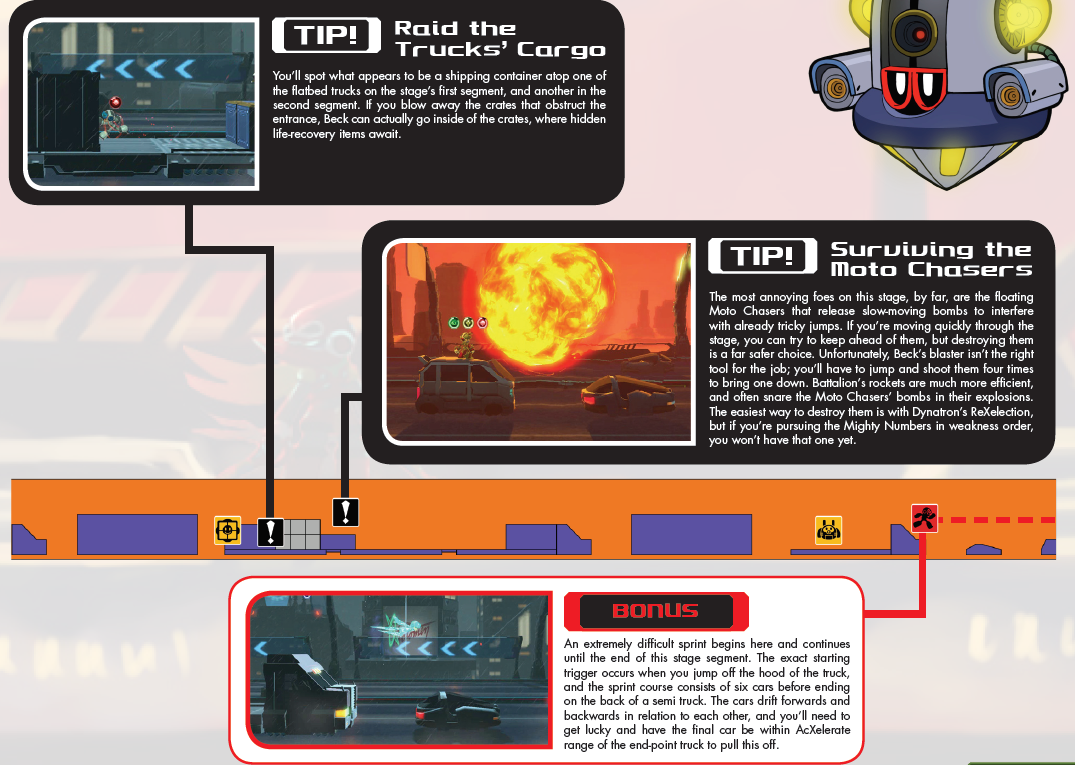
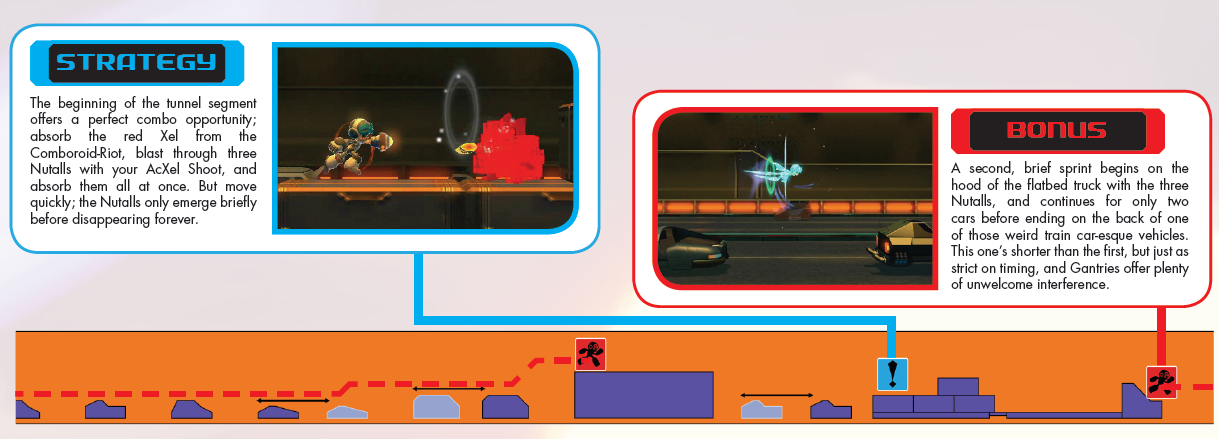
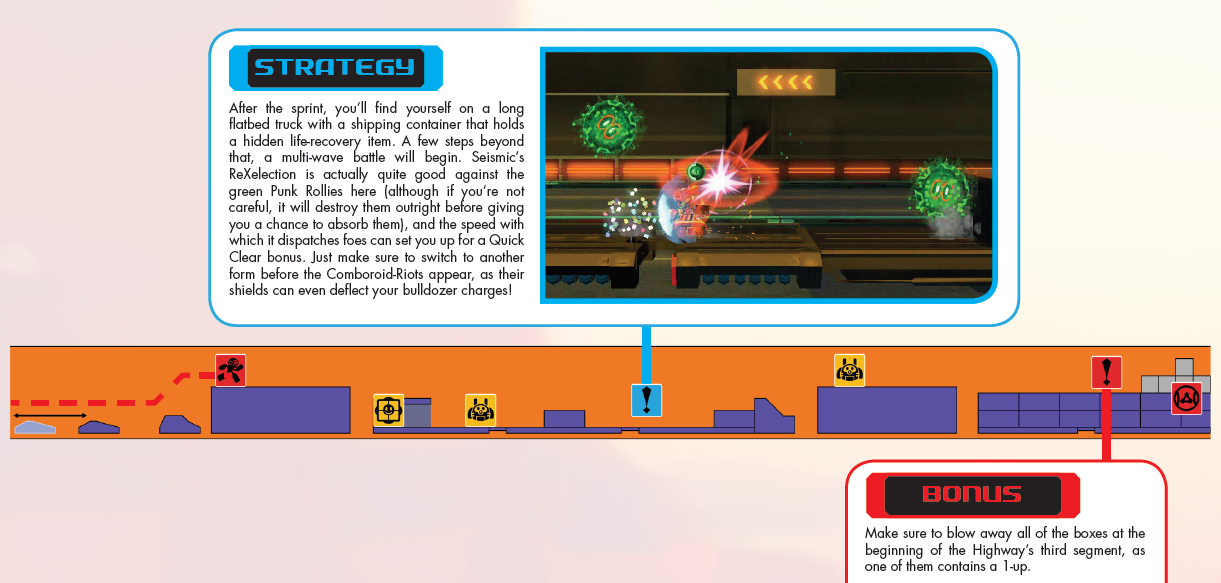
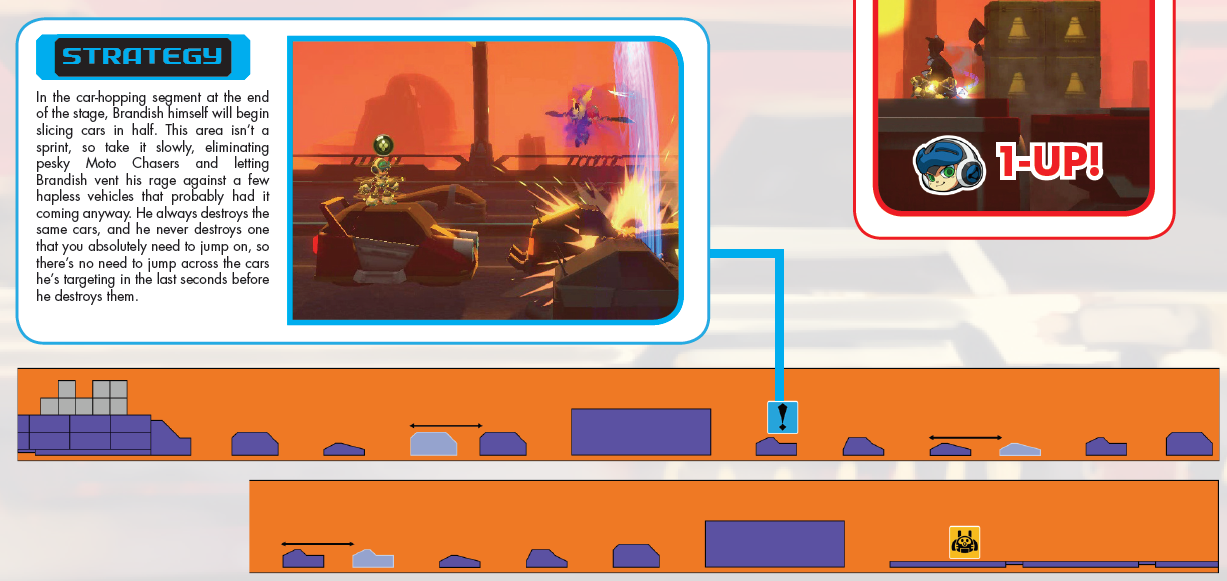
The following achievements are for technical bonuses. Below I will be showcasing images from the Mighty No. 9 Wiki that showcase how to get every technical bonus (besides the FINE PLAY! achievements, which are in the Boss Specific Achievement segments.)
Mighty Sprinter: Complete every SPRINTER! technical bonus.
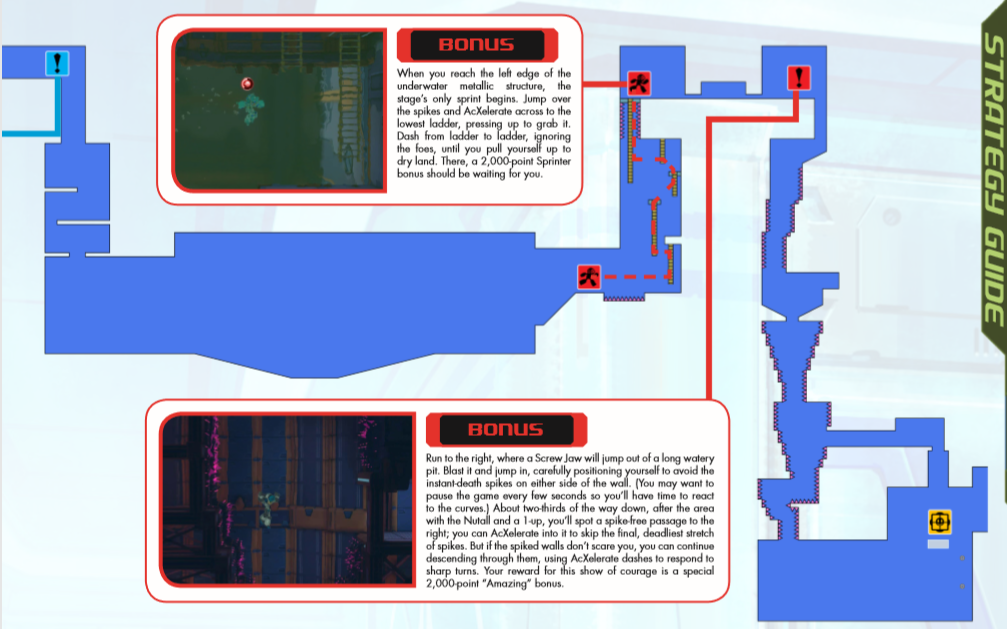
These involve getting through a certain part of the stage fast enough, there are 37 of these.
Mighty Amazing: Complete every AMAZING! technical bonus.
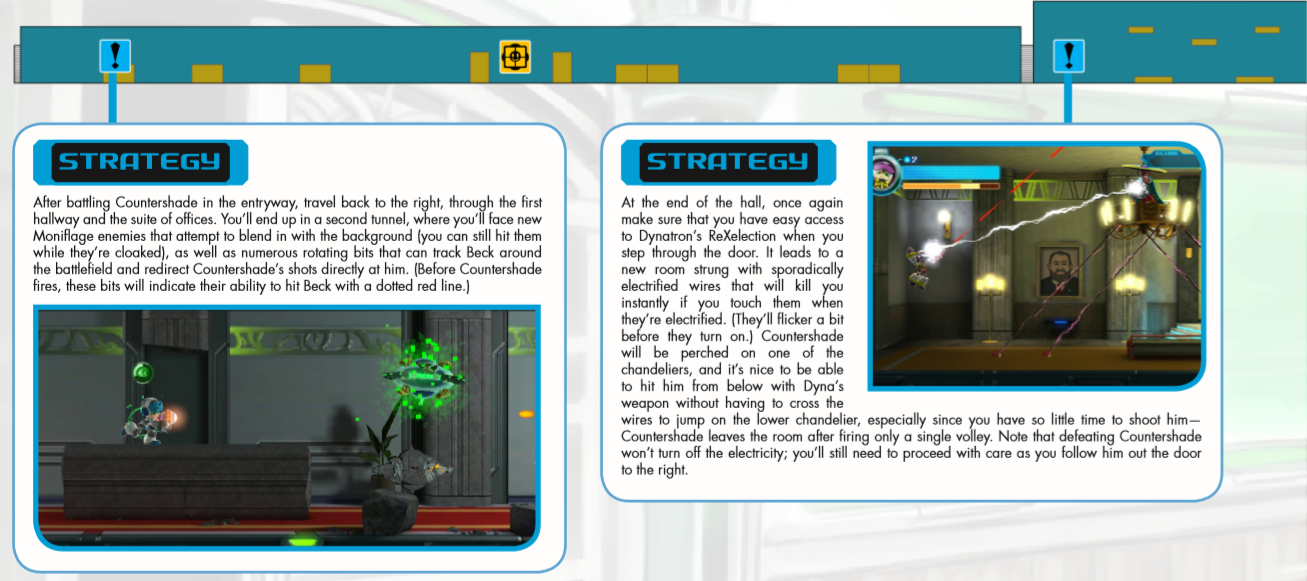
These involve taking a secret shortcut in a few of the stages, there are 6 of these.
Mighty Survivor: Complete every QUICK CLEAR! And NICE CLEAR! technical bonus.
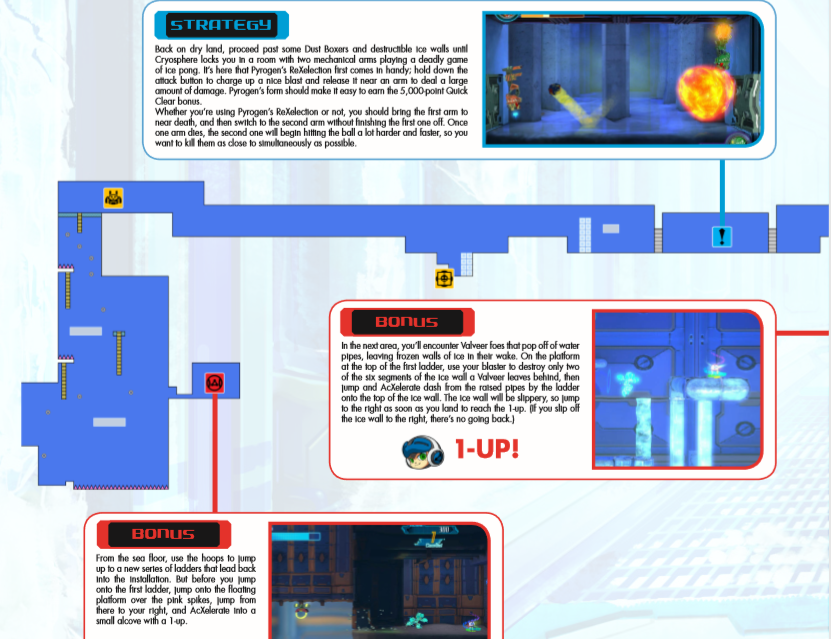
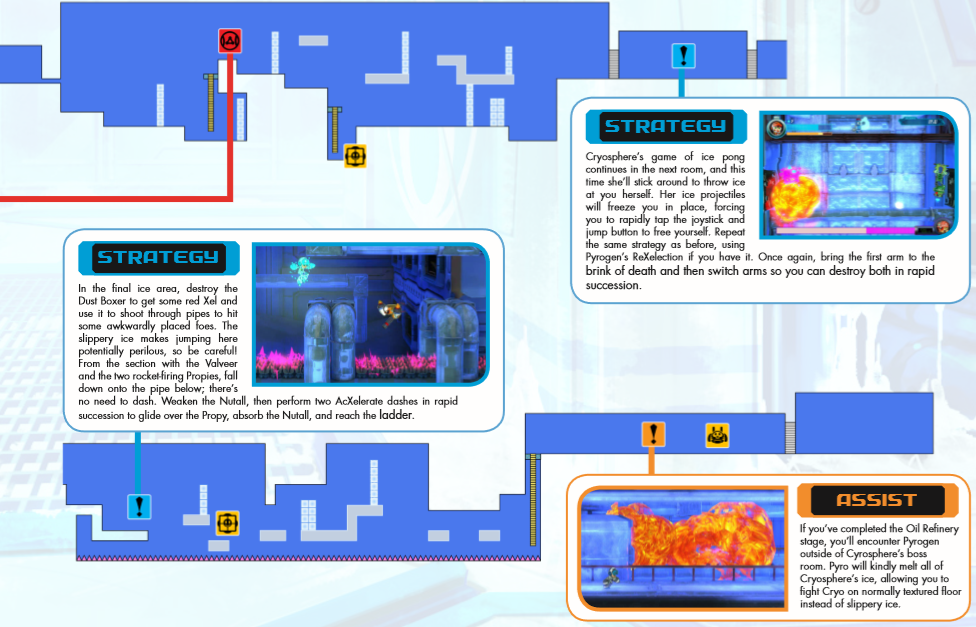
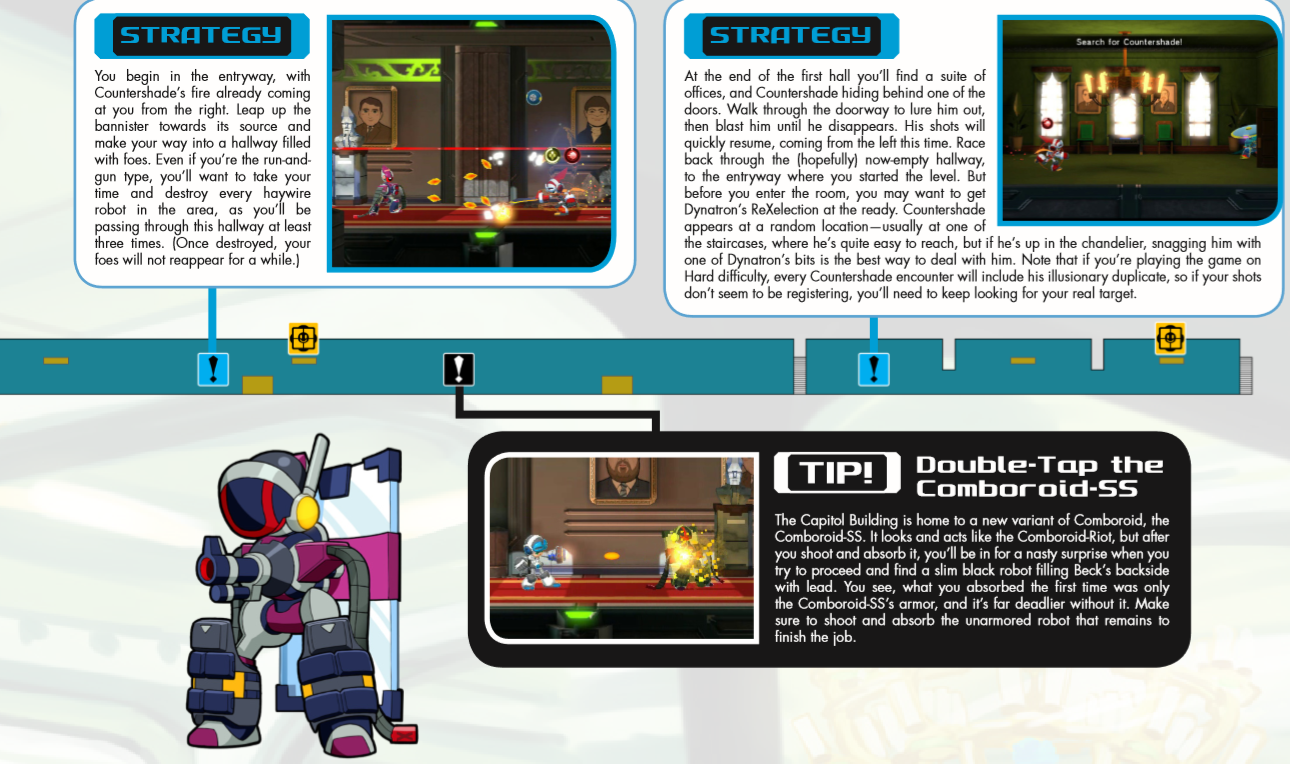
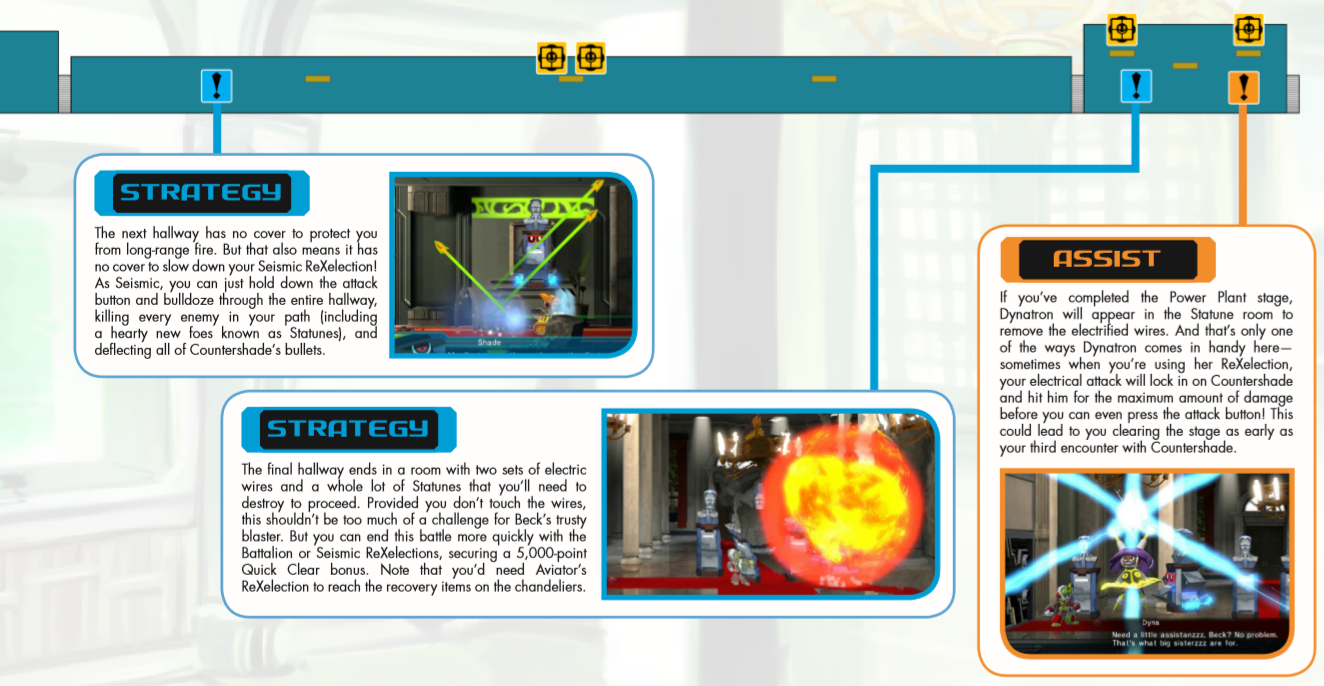
QUICK CLEAR! means that you cleared the “Crescendo” enemy hall segments quickly, with NICE CLEAR! referring to specific other enemy segments in Robot Factory and Robot Colosseum. There are 11 Quick Clears and 2 Nice Clears.
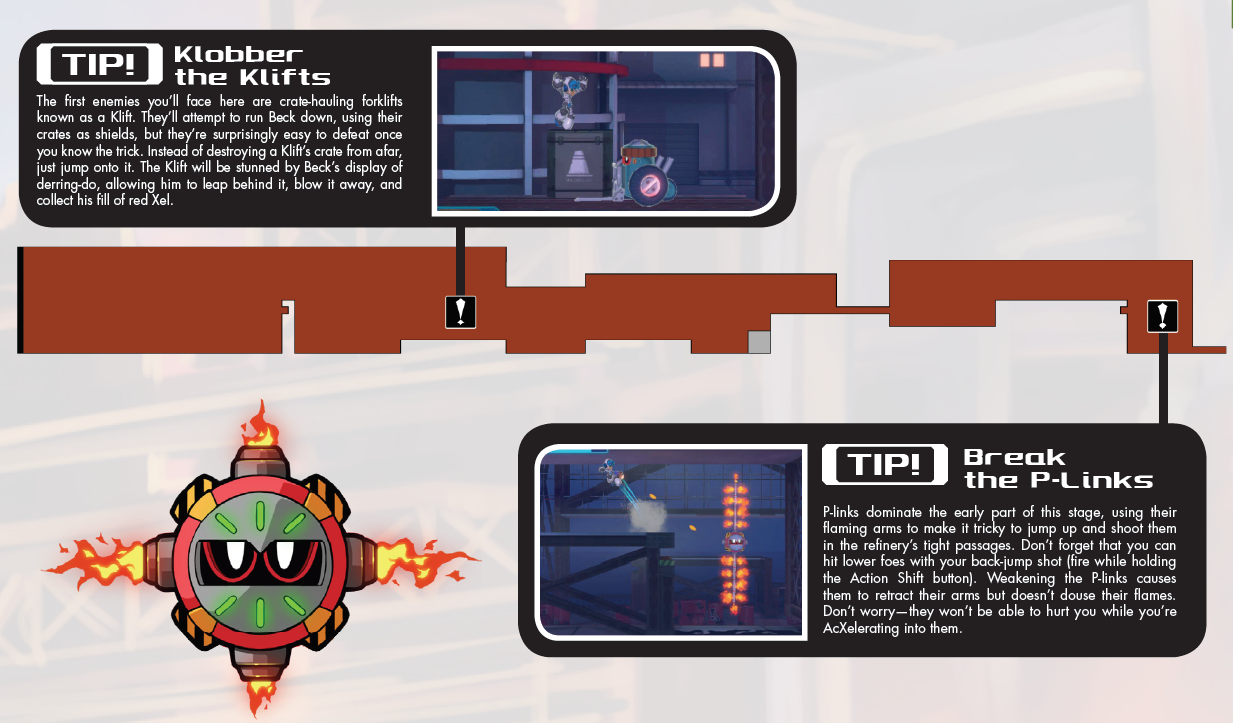
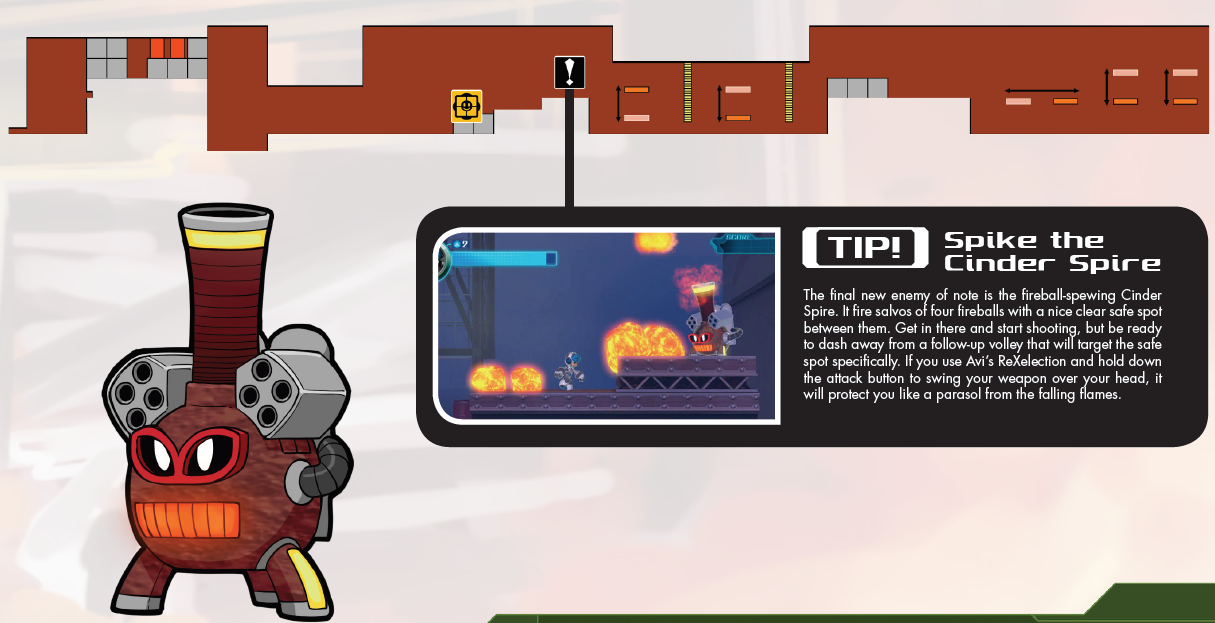
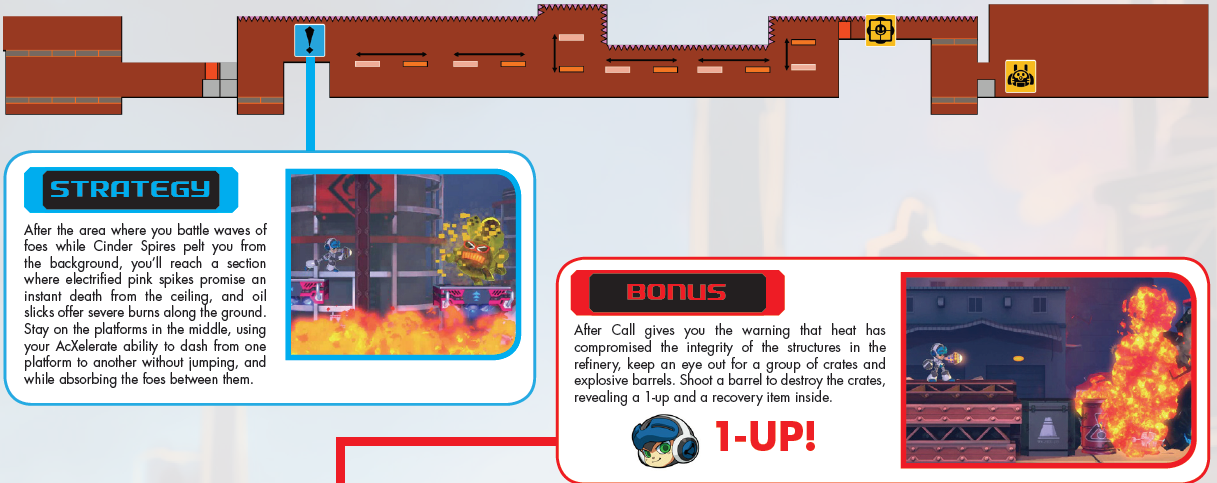
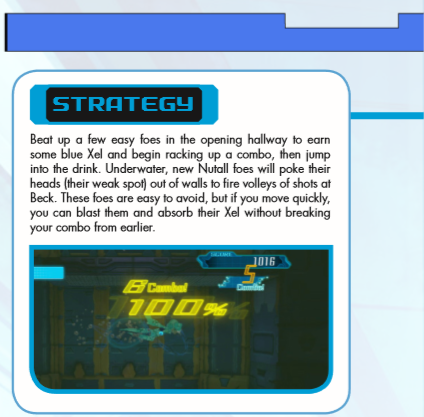
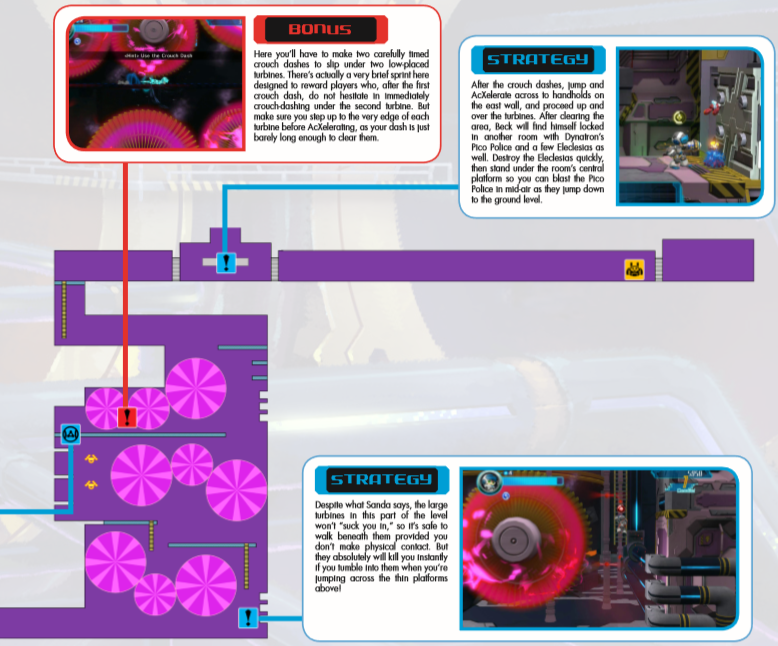
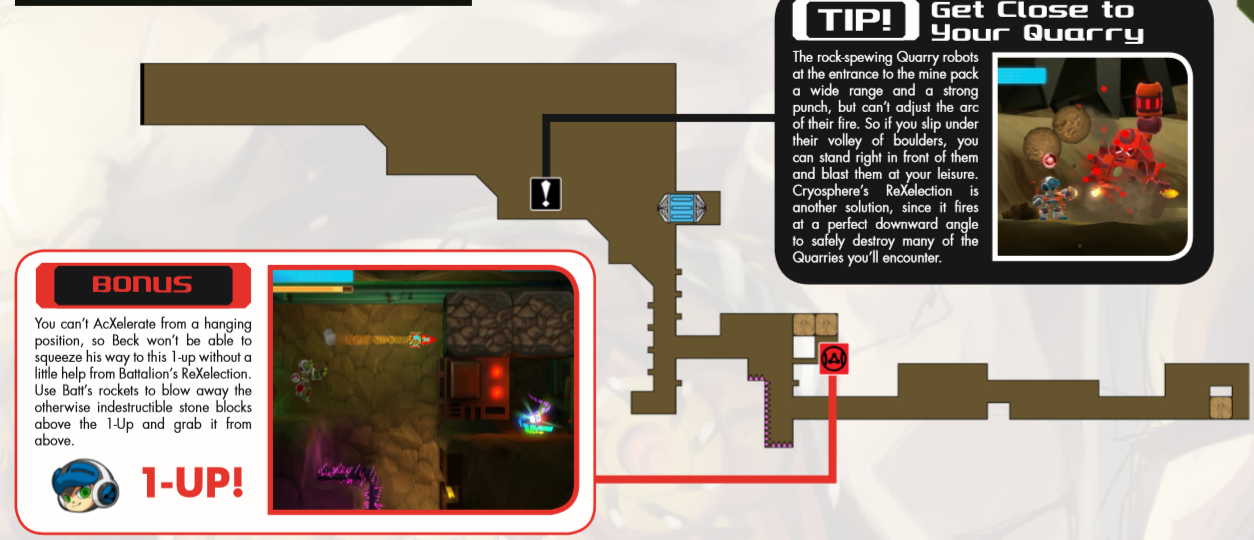
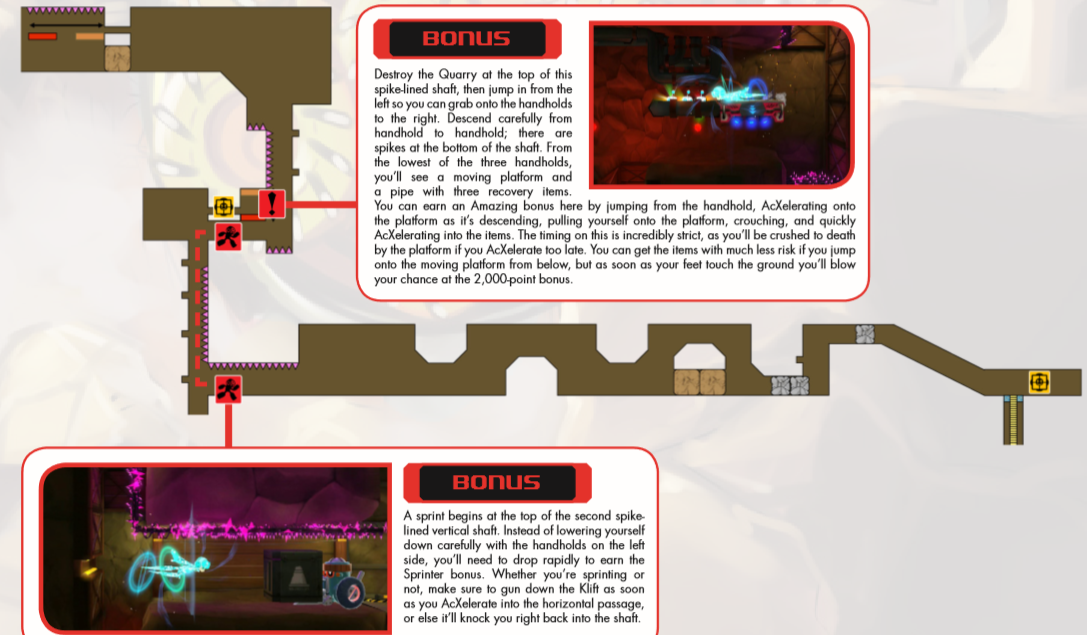
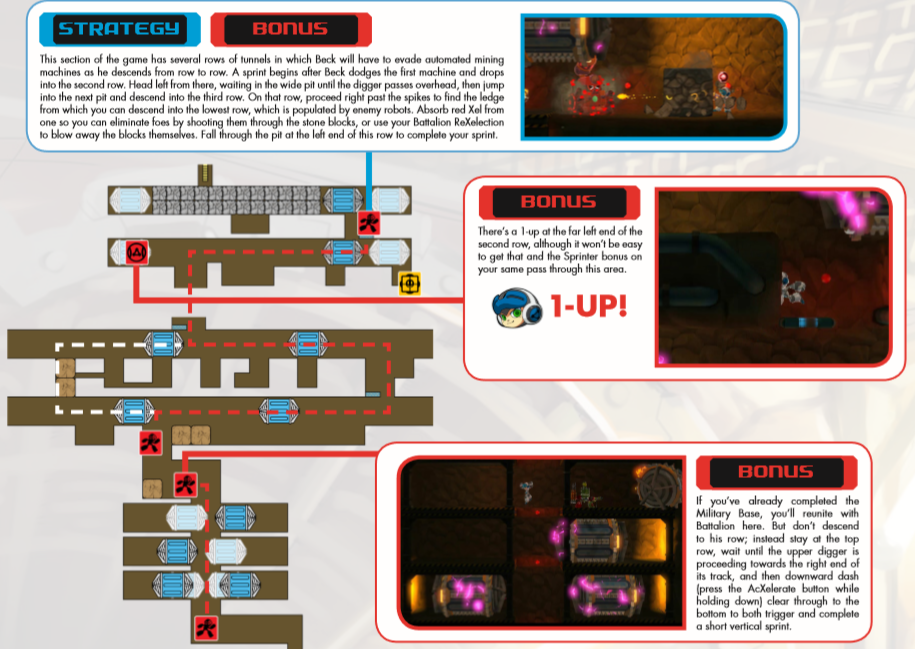
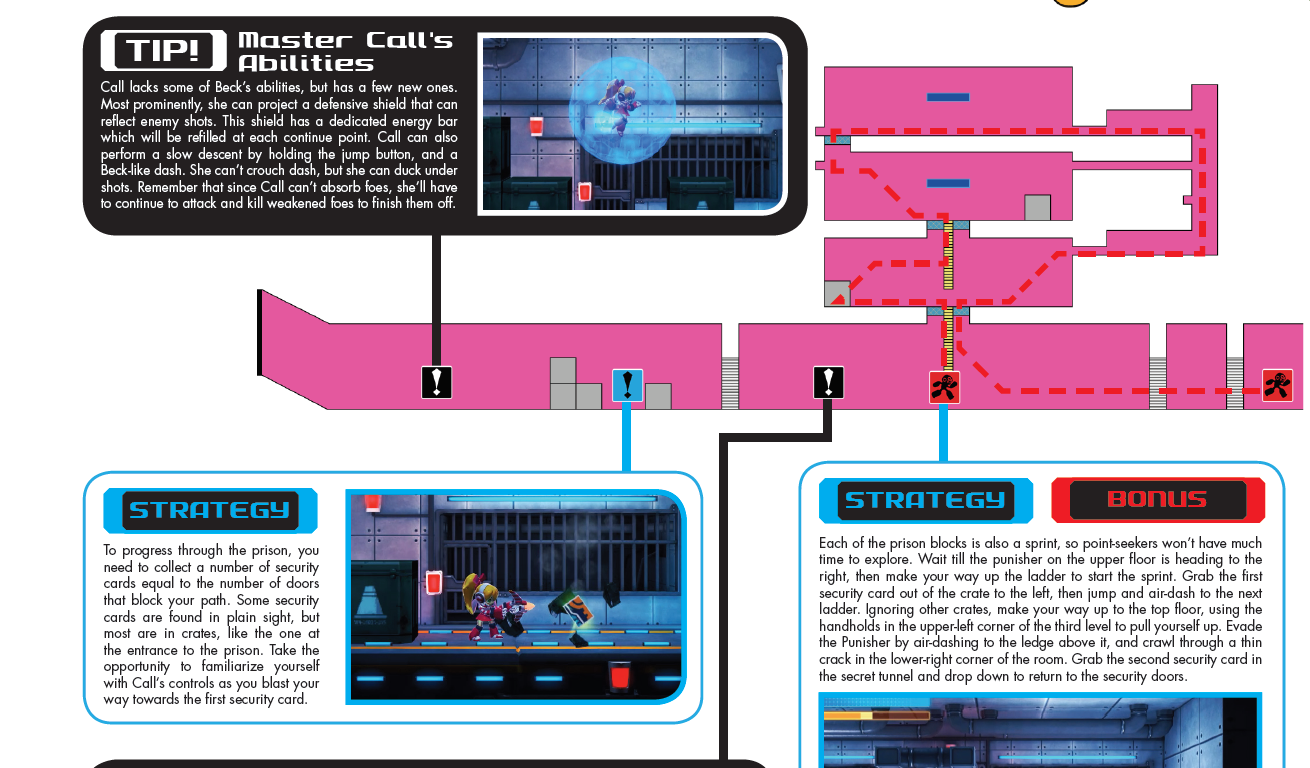
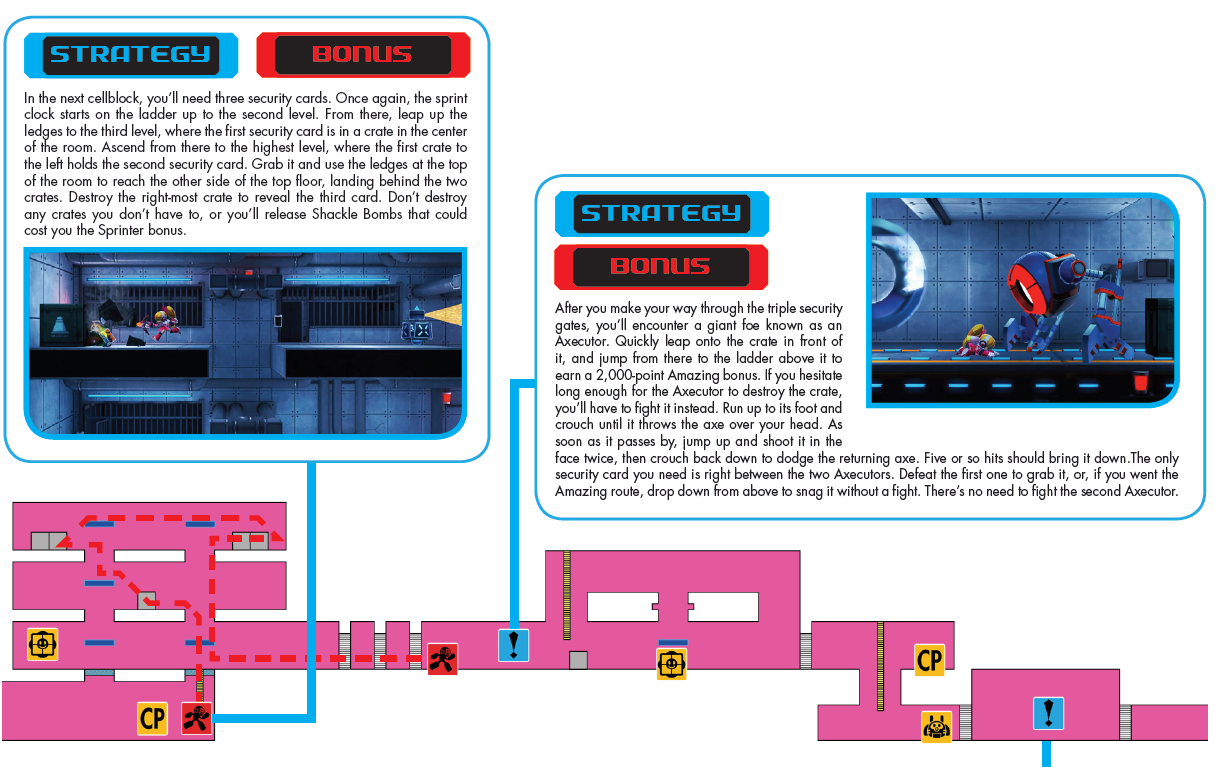
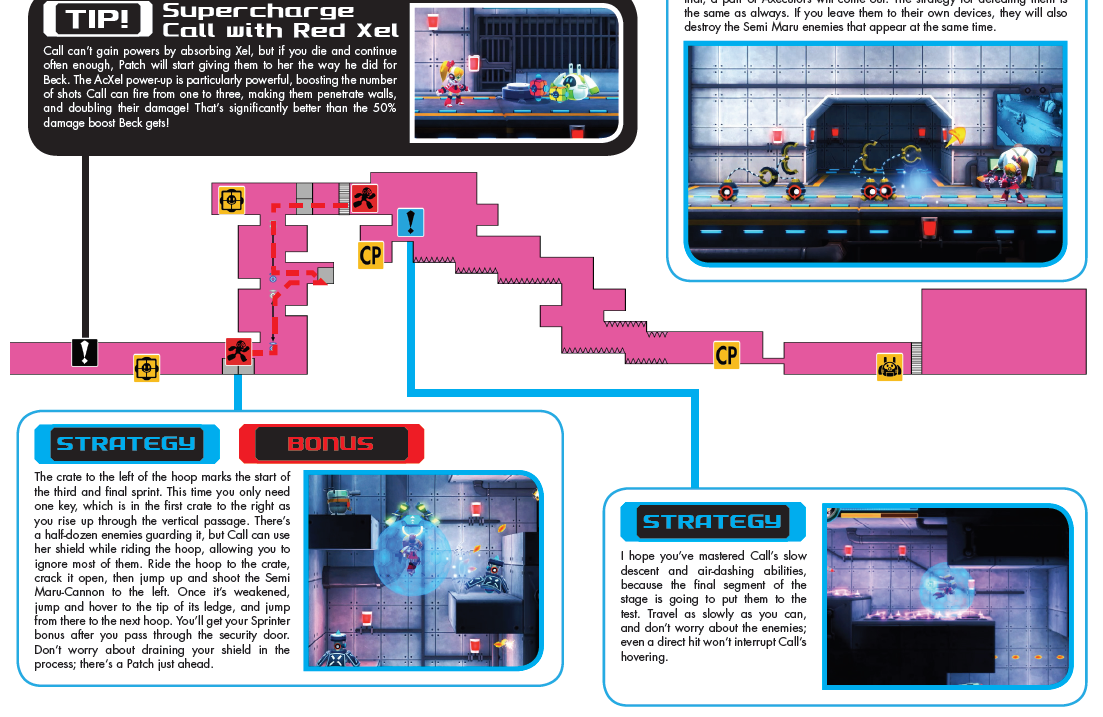
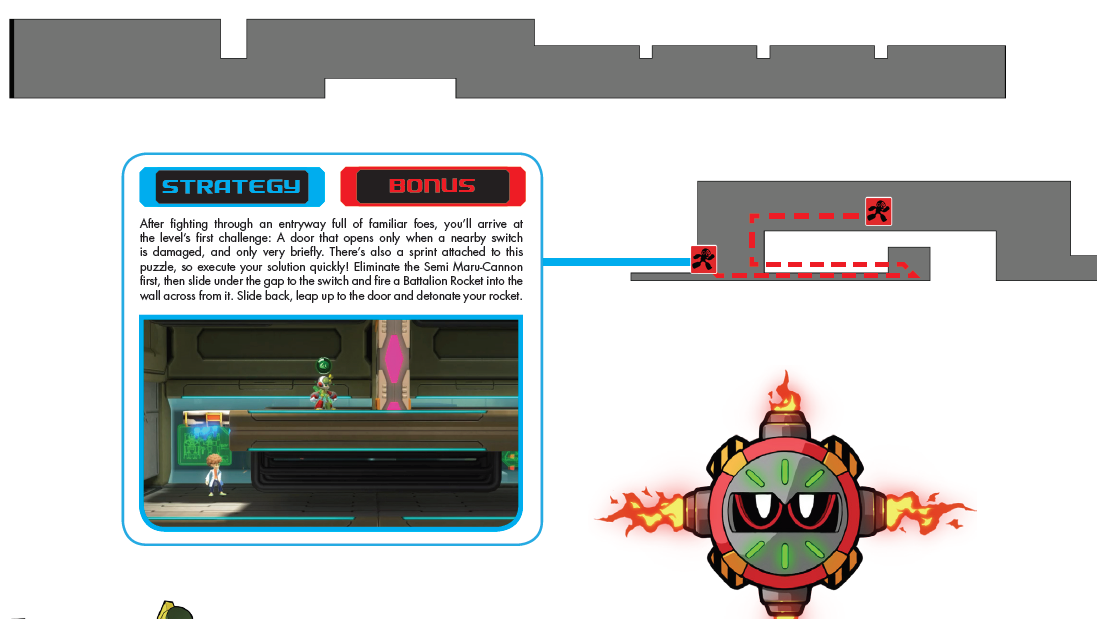
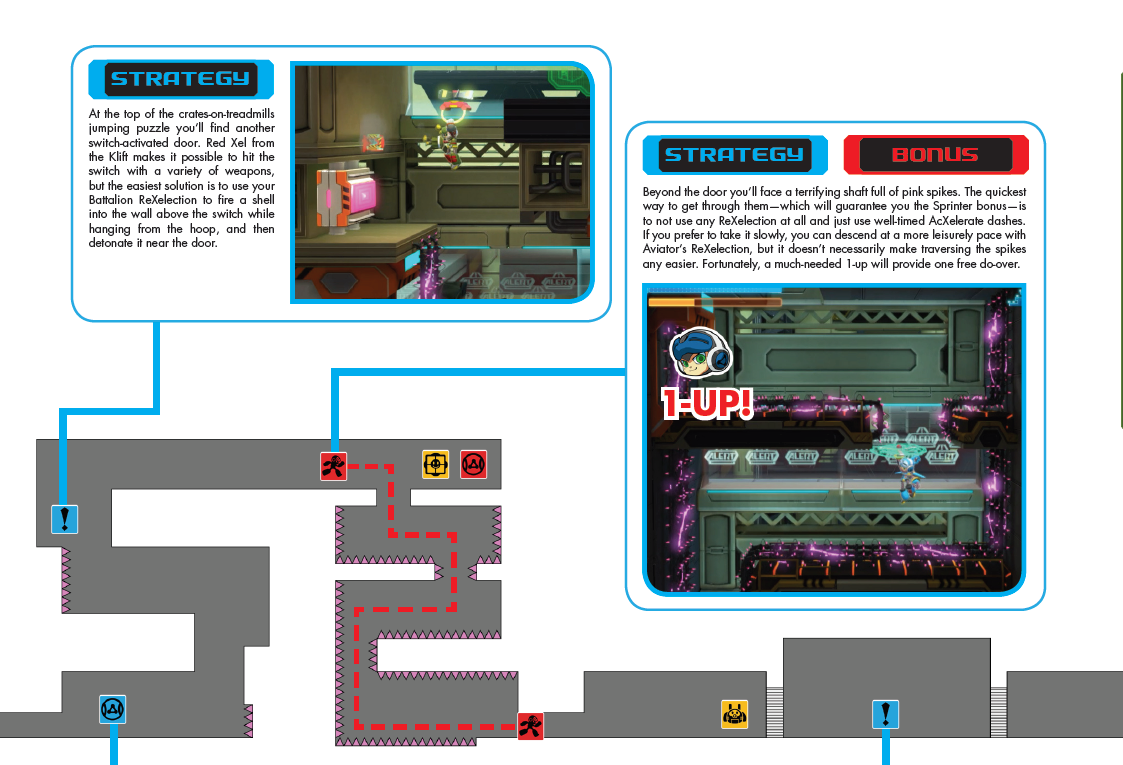
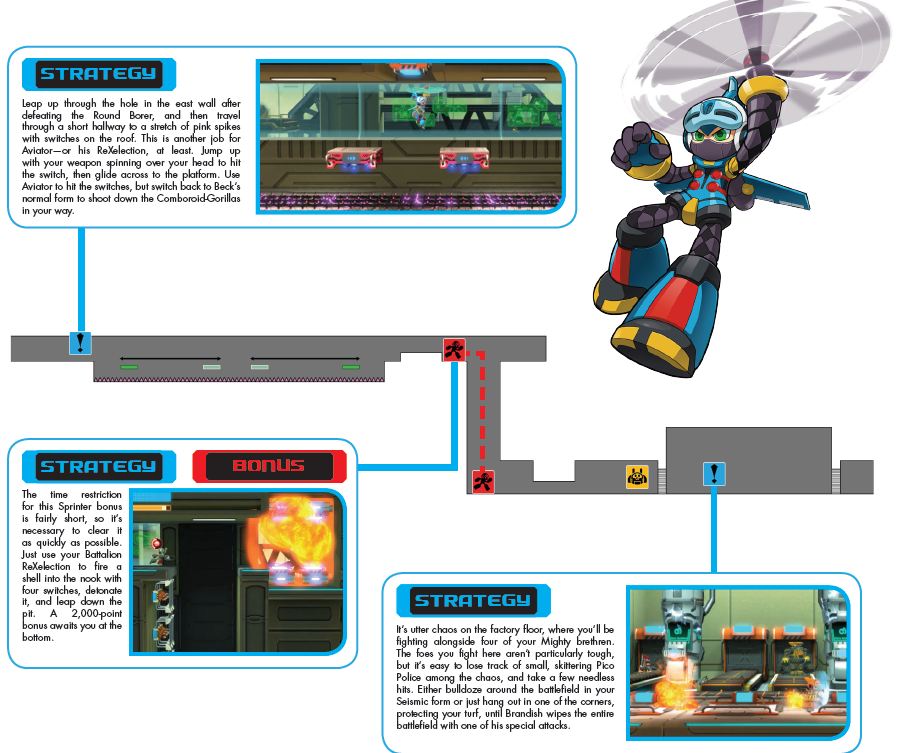
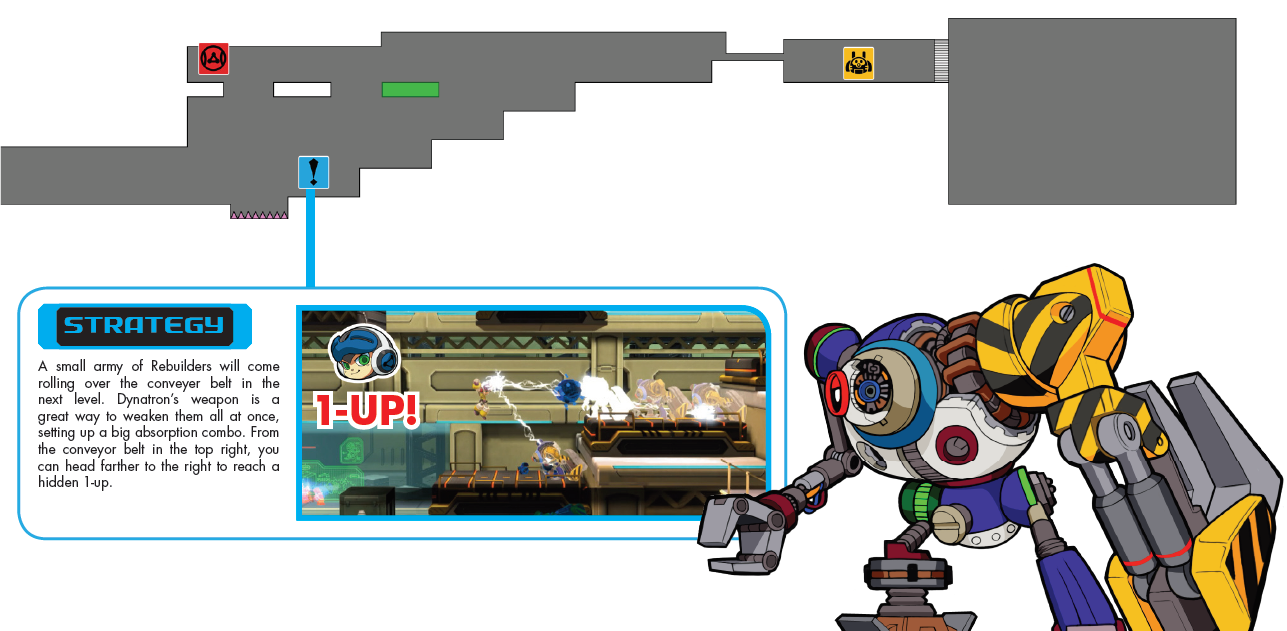
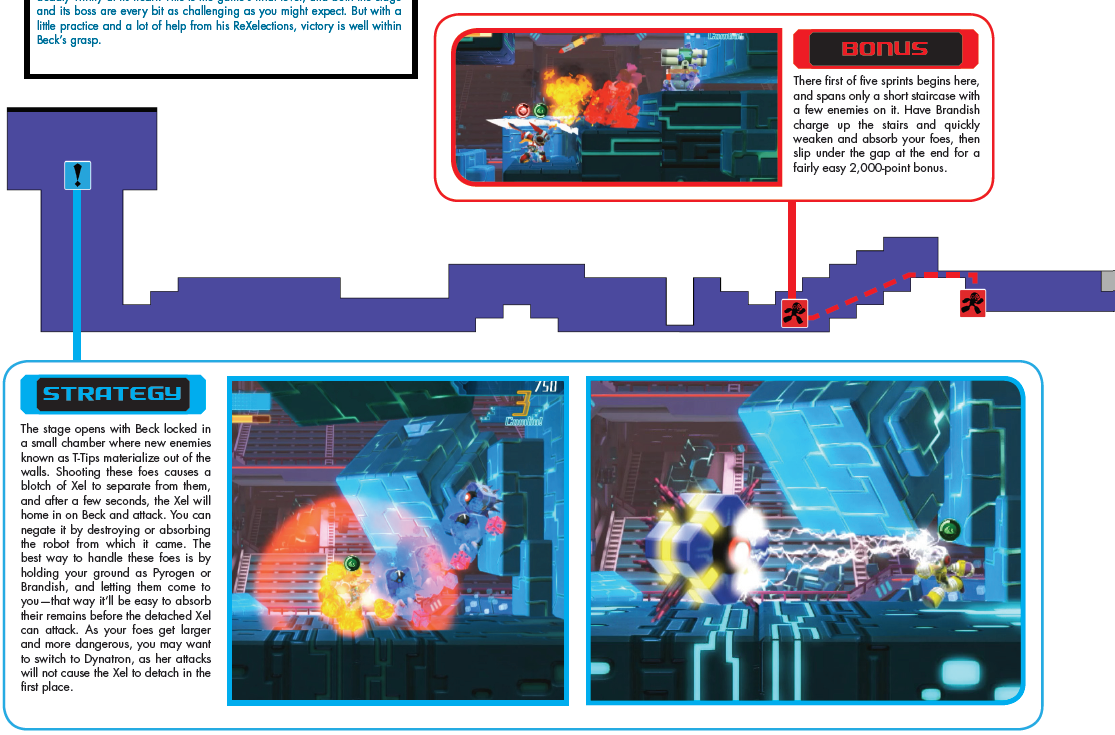
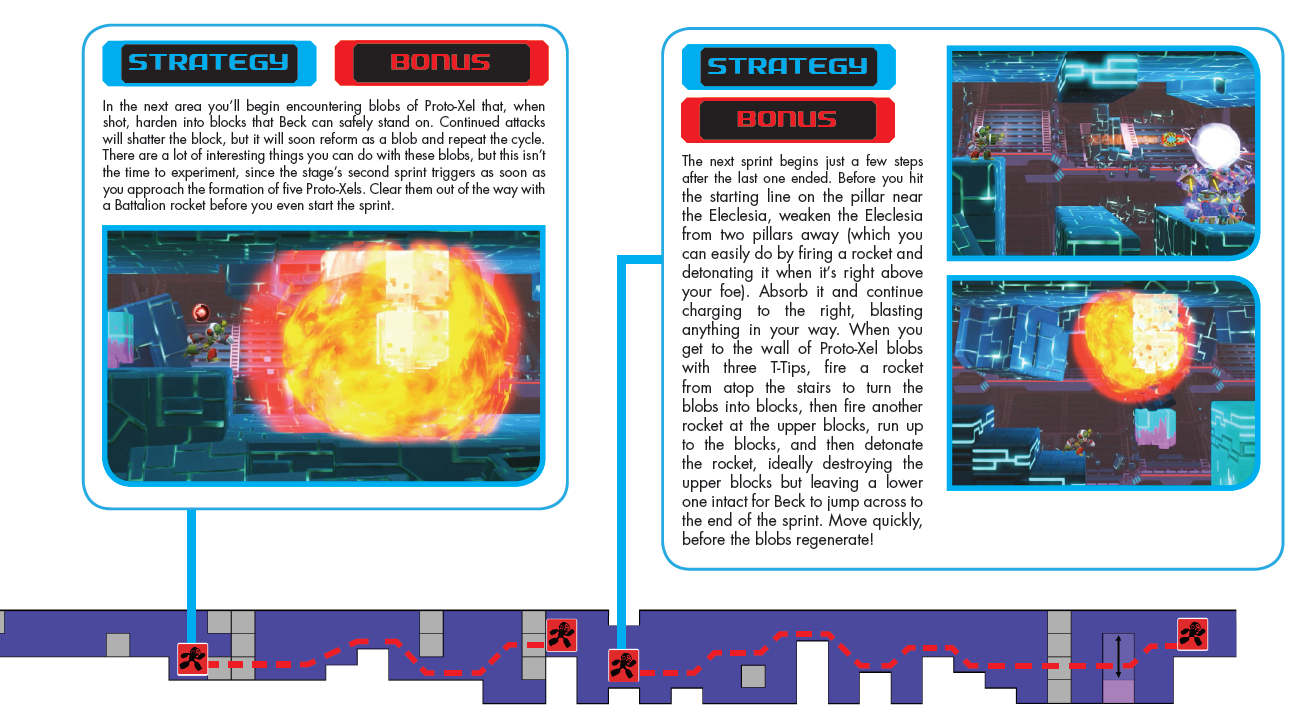
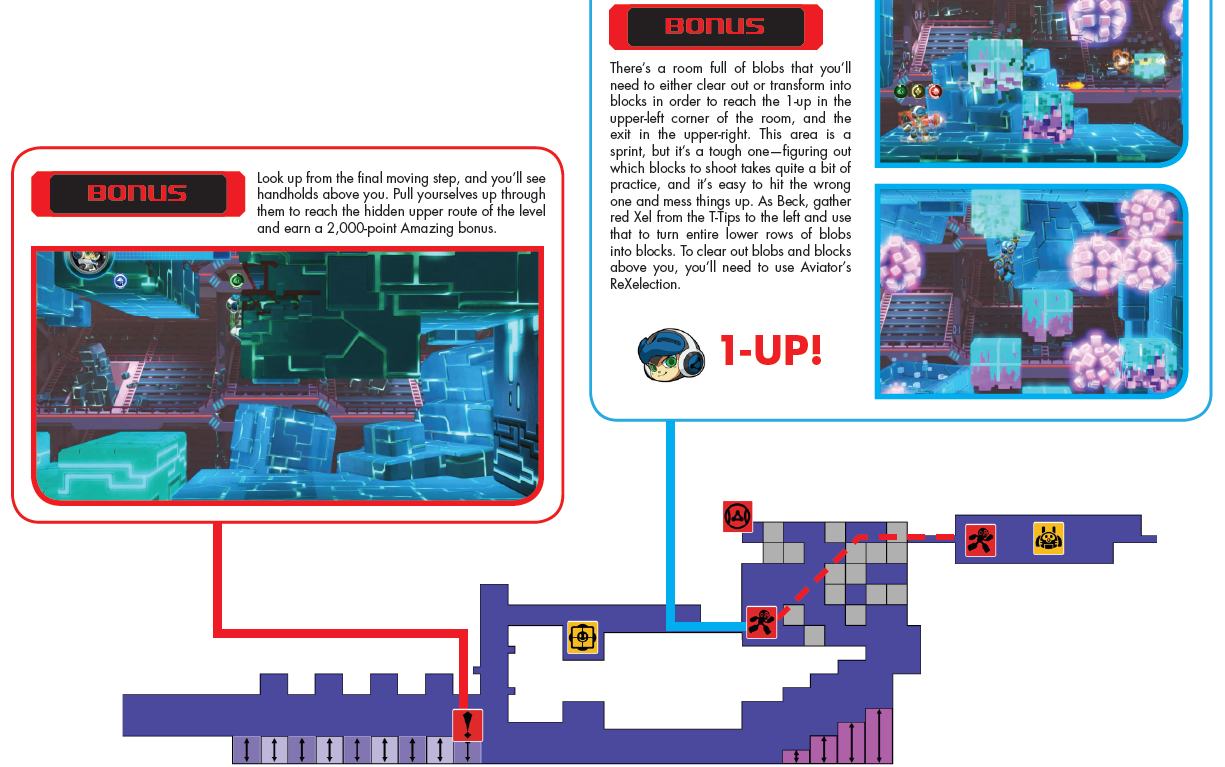
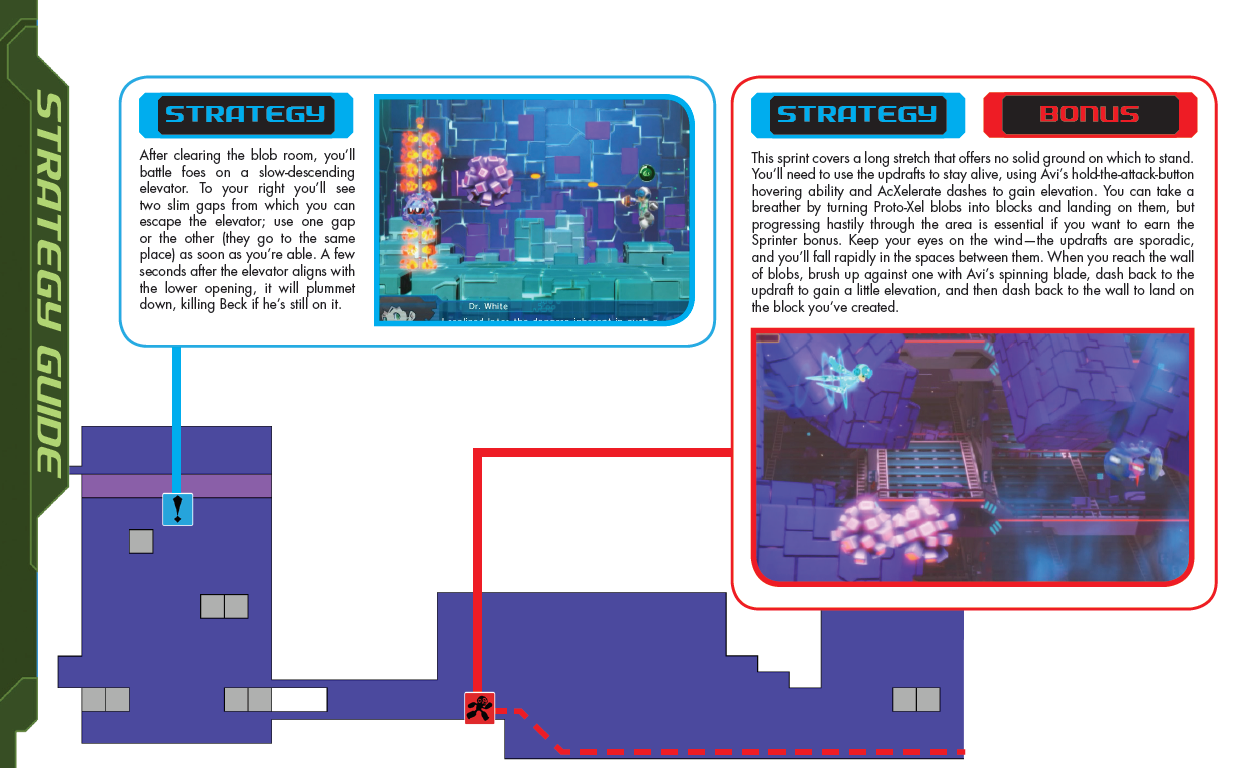
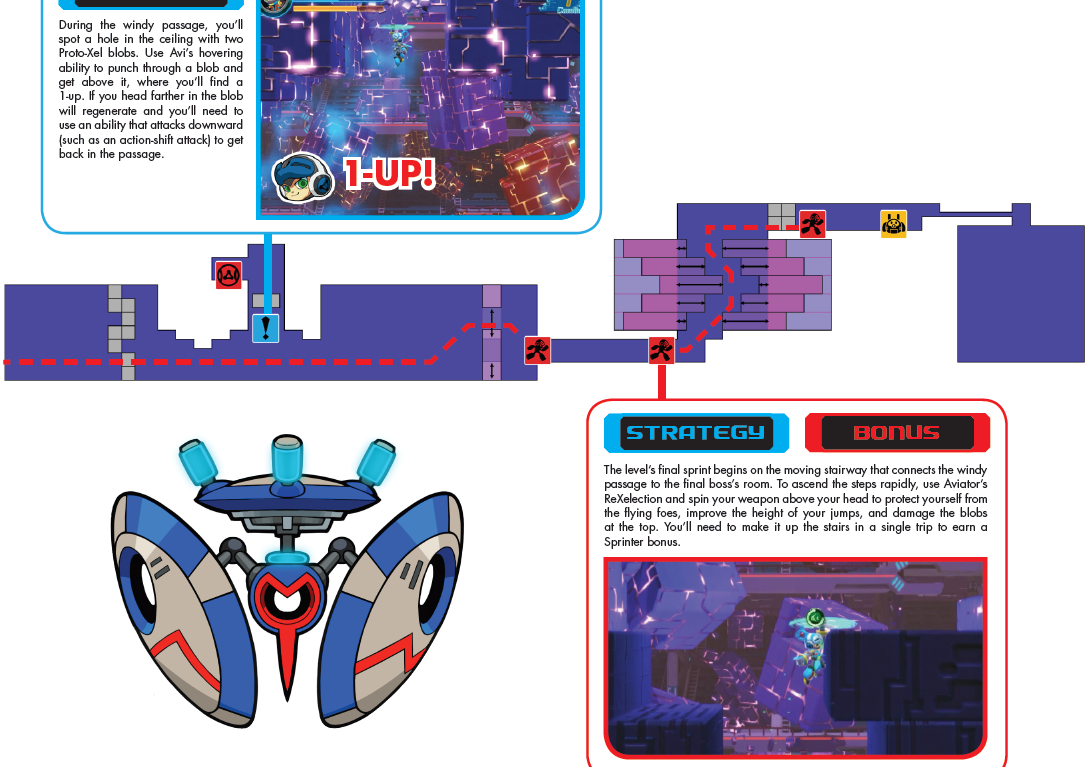
Use the maps below to find each technical bonus. All credit is given to the Mighty No. 9 Fan Wiki – [fandom.com]
City:
Oil Platform:
Water Works Bureau:
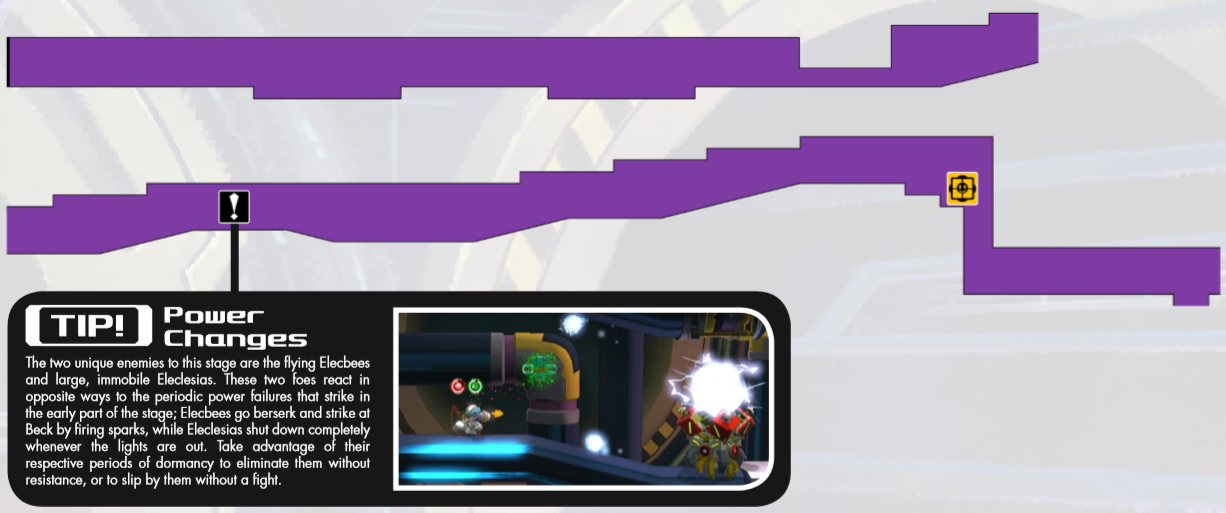
Power Plant:
Mine:
Military Base:
Radio Tower:
Highway:
Capitol Building:
Prison:
Robot Factory:
Battle Colosseum:
Boss Achievements – Part I
The following achievements require you to get a FINE PLAY! bonus on the boss battles. When you perform the specific tasks, the audio cue will play and the phrase will flash. You do not have to get all of the FINE PLAY! bonuses all in one run, as long as you eventually get them all, the achievement will pop as soon as you get the last one.
FINE PLAY! (Opening Boss): Achieve all FINE PLAY! technical bonuses in the Opening Stage boss battle.
Round Digger:
1. Destroy all three red missiles before they explode (use Brandish’s ReXelection)
2. Absorb Round Digger’s energy while it’s dashing at you. Crysophere’s weapon will allow you to get Round Digger to a level where you can absorb it quickly
FINE PLAY! (Mighty No. 1): Achieve all FINE PLAY! technical bonuses in the Mighty No. 1 boss battle.
Pyrogen:
1. Absorb him while he charges at you. Be careful when he’s glowing because getting caught by his bear hug is instant death.
2. Absorb him while he jumps into the air to crush you.
Note: You can tell what attack he’s going to do next from the audio cues.
FINE PLAY! (Mighty No. 2): Achieve all FINE PLAY! technical bonuses in the Mighty No. 2 boss battle.
Cryosphere:
1. Destroy her ice pillar in one attack, best done with a Battalion missile or a fully charged Pyrogen attack.
2. Absorb her while she is using the ice stream when she gets below half health.
FINE PLAY! (Mighty No. 3): Achieve all FINE PLAY! technical bonuses in the Mighty No. 3 boss battle.
Dynatron:
1. Absorb her as she’s charging up the lightning. Leave one electric seed note on the ground to make sure she starts to charge up the attack.
2. Destroy her shield immediately in the halfway point through the fight when she flies into the foreground. This is easily done by charging Brandish’s Spin Slash and then holding down on the D-Pad while jumping and releasing the button as soon as Dynatron summons the shield. Make sure you’re close to her.
FINE PLAY! (Mighty No. 4): Achieve all FINE PLAY! technical bonuses in the Mighty No. 4 boss battle.
Seismic:
1. Absorb him while he does the dashing move
2. When he raises his hand to summon a boulder and toss a rock at you like Guts Man from Mega Man 1, destroy the rock using Battalion’s missile.
FINE PLAY! (Mighty No. 5): Achieve all FINE PLAY! technical bonuses in the Mighty No. 5 boss battle.
Battalion:
1. Crouch dash under the standard missiles he uses during the fight
2. Crouch dash (Down + Dash) under the instant death missile Battalion fires halfway through the fight.
FINE PLAY! (Mighty No. 6): Achieve all FINE PLAY! technical bonuses in the Mighty No. 6 boss battle.
Aviator:
1. Absorb Aviator as he is using his attack where he flies from top to bottom (or bottom to top) or when he’s shooting at you.
2. Absorb him when he is firing missiles at you. This is a lot trickier than it sounds, use Countershade’s ReXelection thrice to cause him to flash, then when he drops missiles, jump really high and dash.
FINE PLAY! (Mighty No. 7): Achieve all FINE PLAY! technical bonuses in the Mighty No. 7 boss battle.
Brandish:
1. Absorb him while he is doing his grounded spin attack, interrupting the attack.
2. Absorb him while he is spinning in the air, interrupting the attack.
FINE PLAY! (Mighty No. 8): Achieve all FINE PLAY! technical bonuses in the Mighty No. 8 boss battle.
Countershade:
1. Interrupt his attack when he’s about to fire his rifle
2. Interrupt his attack when he’s throwing out the target
3. Interrupt his attack when he has a clone out
FINE PLAY! (Prison Boss): Achieve all FINE PLAY! technical bonuses in the Prison boss battle. [Secret]
K9:
1. Avoid every projectile it shoots from it’s mouth. The best way to do this is to duck and hide under it’s mouth.
2. Make K9 eat a bomb (required to finish the boss battle)
FINE PLAY! (Robot Factory Boss): Achieve all FINE PLAY! technical bonuses in the Robot Factory boss battle. [Secret]
Nameless/M.O.M.:
1. Use Seismic’s ReXelection to bounce on the arm and destroy it
2. Avoid all the missiles Nameless shoots in the second half of the fight (use Aviator’s ReXelection)
3. Absorb Nameless as it dashes towards you.
FINE PLAY! (Last Boss): Achieve all FINE PLAY! technical bonuses in the Last Stage boss battle. [Secret]
Trinity:
1. You must dodge all of her segments during the attack that resembles the Yellow Devil from Mega Man. This is most easily done by spamming Brandish’s ReXelection as it allows you to slip past through the segments. This is during the Trinity Cloud phase (Phase 1)
2. Destroy all three stem segments at once using Battalion’s ReXelection, then dashing into them using the Trinity Wurm phase (Phase 2).
Lemon Pellets: Defeat all Mighty Numbers with only normal attacks.
Defeat Pyrogen, Cryosphere, Dynatron, Seismic, Battalion, Aviator, Brandish, and Countershade using only the Mighty Buster. This is a difficult task but doable if you learn the patterns and be careful with Dashing (Dashing into an enemy means you take double damage and knockback). Use your AcXel Recover if necessary to get through the fights! Some more specifc tips:
- Pyrogen: His attacks are differentiated with audio cues, and watch for his bear hug, that’s instant death
- Cryosphere: Stay behind her when she does the ice blast move, and try to destroy her ice blocks.
- Dynatron: Mash left/right/jump to get rid of the seeds, and destroy the seed shields quickly
- Seismic: Try to knock him off guard by dashing into him when he tries to toss the block at you like Guts Man from Mega Man, as that block does a decent amount of damage
- Battallion: Do not get hit by the missile, that’s instant death. Try to keep your distance overall
- Aviator: It’s hard to get a lot of damage in on Aviator, so take it slow and focusing on dodging. When he fires bullets at you while going from the top to the bottom of the screen or vice versa, hang off the opposite side of the platform.
- Brandish: He moves really fast so keep your distance. Also, when he does the multi-hit sword swipe attacks, walk left, jump, dash left, fall, walk right, dash right, jump, then dash left, and you should dodge the difficult attack,
- Countershade: Fairly self explanatory, but above all else, avoid the purple bullets as those reverse your controls! You can tell which Countershade is the real one by if your shots land or not. The real one also has a blue glow as opposed to a red glow.
One of These Has to Work…: Attack the final boss with every single Mighty Number ability.
This is a very misleading achievement. As it indicates, you need to hit Trinity with all 8 ReXelections, however, you not only need to win the fight after doing this, but also hit all 8 on one phase. If you use 4 of the ReXelections on Trinity Cloud and the other 4 on Trinity Wurm, it doesn’t count. If you die, you have to use all 8 abilities again. I recommend using all 8 on Trinity Cloud since she often leaves herself open during a number of attacks, and once you use all 8, focus on winning the fight. Don’t be afraid to use your AcXel Recover!
Boss Achievements – Part II
Self-Imposed Challenge: Defeat all bosses with only normal attacks.
It’s the same as Lemon Pellets, but now you have to beat all of the bosses. On top of the Mighty Numbers, you must also beat:
- Round Digger: You’ll do this naturally on your first playthrough
- K9: You’ll also do this naturally on your first playthrough since you must play as Call in the Prison level.
- Nameless/M.O.M.: Focus on playing defensively with Nameless around. Since you can’t use Seismic or Aviator’s weapons to cheese two of the attacks, you’re going to need to learn how to dodge them. Dash over/under the hand, and stay to the left side of the arena when he shoots the missiles, dodging when necessary. It’s hard, but doable. When you destroy a Nameless robot, dash over to M.O.M. immediately and mash as hard as you can, repeating the process till M.O.M. dies.
- Trinity: The final boss doesn’t mess around. For Trinity Cloud, you need to jump over the third, fourth, and ninth Xel blob to dodge. Start spamming the Mighty Buster when her form shrinks, and don’t be afraid to use the action jump if you are too close to a Xel blob. The other attacks are more self explanatory. In the Trinity Wurm phase, focus on shooting the bottom segments from across the screen to lower the head, then mash the Mighty Buster when the segment glides along the ground. When she sprouts out from the ground, destroy the two segments on the bottom then retreat to the top left/right to avoid damage.
I’ll See You in Xel: Beat the final boss with zero lives remaining and low health.
Go to Battle Colosseum on Normal and set your lives to 2, the minimum amount. Die twice in the opening section and then play through the entire rest of the stage without dying. You should be able to build up a AcXel Recover if you play properly and be in good shape for Trinity. By “low health”, the achievement means Beck must be low enough for the HP bar to flash red so Beck is panting. I suggest trying to conserve as much HP as possible until you’re just about to win, then get hit a few times. If you screw up, start the stage again.
Boss Rush/Challenges I
Boss Rush Mode Cleared: Complete Boss Rush Mode for the first time.
See Super Boss Killer for more info
Super Boss Killer: Complete Boss Rush Mode in less than 20 minutes.
The Boss Rush mode is easily one of the hardest things in the game. You must defeat all 12 bosses of the game in a row with only one life on Hyper Difficulty, and your health does not refill in between stages. This includes, in order:
1. Round Digger
2. Pyrogen
3. Cryosphere
4. Dynatron
5. Seismic
6. Battalion
7. Aviator
8. Brandish
9. Countershade
10. K9
11. Nameless/M.O.M.
12. Trinity
DO NOT WORRY ABOUT THE TIMER. As long as you use the appropriate weaknesses it is very unlikely that it will take you longer than 20 minutes. Generally, you can use most of the same strategies as in Hyper Difficulty, just make sure you prioritize not taking damage over the course of the run as much as possible over attacking because you have a lot of bosses to overcome. The good news is that you do have two AcXel Recovers, so use those at the opportune time to avoid dying. I used mine at Brandish and Trinity.
Brave the Gauntlet: Complete all themes in single-player Challenge Mode.
There are 36 single player challenges that range from learning basic game mechanics to beating the entire game in one life. Below I will list every challenge and give some tips as to how to beat them:
1:
You can’t Dash or Attack, just run and jump to the end. Make sure you grab the green Xel Boosts to make it to the goal!
2:
This course is similar to Course 1, but requires more precision, remember to press up if you’re holding onto a ledge to pull yourself up! Also make sure to jump from the top of the ladders to avoid death.
3:
Now you can AcXelerate (Dash). Use this to your advantage to cross the myriad of gaps. You can dash infinite times in the air so use that to cross the large gaps. You can also Duck Dash by pressing Down + AcXelerate and Dash Down by pressing Down + AcXelerate in the air. Be warned though, once you start a down dash, you can’t stop it till you die or reach a floor!
4:
The first of 9 Super Smash Bros. style Training Courses. Use the Mighty Buster to destroy every target.
5:
Get a 10 combo before the time runs out, in other words, just make sure you absorb the enemy as soon as it starts glowing 10 times.
6:
There’s a ton of pink electricity which is instant death. Take your time and make good use of AcXelerate to avoid your demise! You can also jump up ladders to climb faster.
7:
The 2nd of 9 Super Smash Bros. style Training Courses. Use Pyrogen’s ReXelection to destroy all the targets. Remember that you can charge this weapon by holding the button to cause a bigger explosion.
8:
The 3rd of 9 Super Smash Bros. style Training Courses. Use Cryosphere’s ReXelection to destroy all the targets. Remember that the ice balls go through the walls and floors, meaning you can hit some of the targets from different angles than normal.
9:
The 4th of 9 Super Smash Bros. style Training Courses. Use Dynatron’s ReXelection to destroy all the targets. Remember that the nodes spread out further as they travel and go through walls, meaning you can hit several targets at once.
10:
The 5th of 9 Super Smash Bros. style Training Courses. Use Seismic’s ReXelection to destroy all the targets. Remember that you can jump on the targets to destroy them like a Mario game.
11:
The 6th of 9 Super Smash Bros. style Training Courses. Use Batallion’s ReXelection to destroy all the targets. Remember that you press the button, then press it again to cause an explosion in addition to holding the button than releasing.
12:
The 7th of 9 Super Smash Bros. style Training Courses. Use Aviator’s ReXelection to destroy all the targets. Remember that you can hold the button to hold the propeller above you and do a high jump
13:
The 8th of 9 Super Smash Bros. style Training Courses. Use Brandish’s ReXelection to destroy all the targets. Remember that you can charge this weapon by holding the button to do a spin slash. If you press down when releasing the button, you’ll do a downwards stab. Finally, your weapon ammo doesn’t deplete if you use uncharged slashes.
14:
The 9th of 9 Super Smash Bros. style Training Courses. Use Countershade’s ReXelection to destroy all the targets. Remember that you only get 3 shots, to make them count! They do reflect off of surfaces though and home in on the bombs, making this an easier challenge.
15:
You aren’t able to move in this challenge, instead being forced to rely on Pyrogen’s ReXelection in order to destroy the enemies. Generally, you’ll want to do short semi-charged bursts to destroy enemies before they get too close. Be sure not to run out of ammo or you’re in trouble!
16:
You’re locked into Cryosphere’s ReXelection and can only take one hit as you need to navigate an obstacle course full of mines. One Cryosphere ball will freeze the land mine, and then you can get close to it to detonate it, or try to rush past it. You’ll want to move fairly quickly as the timer is tight here, but don’t be afraid to take it slow if you’re struggling at a particular point.
17:
Same as Challenge 5, but now with Dynatron’s ReXelection and a different objective (survive till the timer runs out). Remember that if you cause an enemy to glow when an electric node is attached, you can dash anywhere on the screen to absorb them. You’ll want to be close to the enemy when firing the nodes because that way more nodes will hit the enemy, allowing you to kill them quicker.
18:
One of the harder challenges, you need to use Seismic’s ReXelection to dash all the way to the end and bounce off the enemies. You need to dash for the entire duration of the level or else you will fail, you can stop holding the D-Pad or Control Stick if you want to stop moving for a moment. The enemies are lined up in such a way that you can either press and hold jump to cross the gaps, or just hold nothing.
19:
You need to use 6 Battalion ReXelections to destroy every single enemy. The optimal strategy is as follows: Use your first shot to destroy the circle of enemies in front of you. Use your second shot at the very bottom, be careful because the gap to shoot the missile through is very small. Use your third shot close to the top of the passage to the swarm of enemies, and use it to blow up the small enemy behind the brick block. Climb up to the second half of the stage. Use your fourth shot through the small middle passage to blow up the brick. Use the fifth shot to attach the missile to the enemy that floats up and down, then let it detonate the enemy and both brick blocks simultaneously. Finally, use the sixth shot to attach the missile to the spiked wheel, then blow it up when it gets close to the explosive barrels which will take out the last enemy.
20:
Use Aviator’s ReXelection to climb to the top of the level. When the enemies are shooting projectiles at you, you can hold the button to spin the gyro above your ahead to block them.
21:
You’re restricted in place and need to use Brandish’s ReXelection to destroy the enemies until the time runs out. You can also cut the enemy bullets to deflect them.
22:
Use Countershade’s ReXelection to destroy the 35 enemies by deflecting the bullets off of the walls to hit the enemies. Remember they home in on targets but you still need to aim precisely because the time limit can be pretty strict. Try to hit multiple enemies at once!
23:
A combination of Challenges 1-22, use every single ability at your disposal to reach the goal! The time limit is pretty forgiving so take it slow and focus on using everything you’ve learned to clear the obstacle course.
Challenges II
Challenges 24-35 are beating each of the main game stages in one life, with Challenge 36 being the entire GAME in one life. Difficulty is set to Normal. You will have access to all of your ReXelections.
24:
City Stage: Pretty straightforward, use Cryosphere’s ReXelection against Round Digger to kill it quickly.
25:
Oil Platform: Take the last part with the pillars very slow or else you risk getting instantly killed by them. You also need to be careful of Pyrogen when he gets down to half health and jumps into the foreground to power-up. If you get hit by that, he’ll bear hug you and you’ll instantly die.
26:
Water Works Bureau: Kill the mid-boss quickly with Batallion’s ReXelection and try your best to not get frozen, as that will set you up to take a lot of damage.
27:
Power Plant: A pretty easy stage, just be careful about your duck dashing during that one segment with the low lying turbines.
28:
Mine: The only stage where building up an AcXel Recover is next to impossible, you’ll need to get by without it. Be careful of the pink drills as they are instant death, and if Seismic says “Watch your head!”, move to the opposite side of the arena, jump up the ridges on the wall, and dash to the other side
29:
Military Base: Straightforward but it has a very tough section at the end. Take that part slow to avoid getting hit by a block and getting knocked into an instant death trap below. Do not get hit by Battalion’s missile either as that is instant death.
30:
Radio Tower: Pretty straight forward level, just play it safe around the bottomless pits and use Aviator’s ReXelection to fly up.
31:
Highway: Above all else, do not fall onto the highway itself, that’s instant death. Focus on building up your AcXel Recover early so you can use it for Brandish since his special attack is hard to dodge and hits really hard. For the autoscrolling segment, try to take it slow.
32:
Capitol Building: Use Batallion’s ReXelection to hit Countershade when he’s surrounded by the instant death lasers and be careful since it’s a rather long stage. In addition, if you hit all of Dynatron’s nodes on Countershade, it’ll deal a lot more damage than if you hit him with only one of them.
33:
Prison: Since you’re playing as Call, you’ll need to play more defensively. BE VERY CAREFUL AT THE END! The segment right before K9’s boss fight where you have to dash through the instant death spikes is very tricky, you’ll want to hover over to that point, dash once to clear half of the segment, then wait a moment before dashing again, otherwise you’ll either be too high or too low and die instantly.
34:
Robot Factory: Use your AcXel Recover before you enter the room where all the small enemies start spawning and the Mighty Numbers would normally show up to help (they don’t here). You can easily build up another AcXel Recover from that part alone. After that, for Nameless & M.O.M, I recommend using the Mighty Buster or Brandish’s ReXelection on M.O.M. on the first cycle before switching to Cryosphere as that way you won’t have to deal with the annoying attacks Nameless starts doing when M.O.M. is below half health.
35:
Battle Colosseum: This stage is very straightforward, but I highly recommend you save your AcXel Recover for Trinity since the boss is two phases.
36:
The Entire Game: This is by far the hardest challenge in the game. It’s Challenges 24-35 all in one go. If you die at all in any of the levels, you restart from the City Stage. This is very difficult and requires memorization of all the challenging segments to succeed. The main thing to keep in mind is that your AcXel Recover DOES NOT carry over in between stages. If you’re about to die against a boss, use it because you may not get to the next level otherwise. Besides that, make sure you memorize the segments with lots of instant death traps (especially the one at the end of the Prison Stage) because this run will take close to an hour (my successful run was about 53 minutes). Good luck, and stay mighty!
Appendix 1: Boss Weaknesses
Here is a list of all of the boss weaknesses in Mighty No. 9 by their ReXelections:
Round Digger (City): Cryosphere
Pyrogen (Oil Platform): Aviator
Cryosphere (Water Works Bureau): Pyrogen
Dynatron (Power Plant): Brandish
Seismic (Mine): Battallion
Battallion (Military Base): Cryosphere
Aviator (Radio Tower): Countershade
Brandish (Highway): Seismic
Countershade (Capitol Building): Dynatron
K9 (Prison): N/A*
Nameless (Robot Factory): Dynatron
M.O.M. (Robot Factory): Cryosphere
Trinity Cloud (Battle Colosseum): Battallion
Trinity Wurm (Battle Colosseum): Battallion
*Note: K9 is a special boss as he is weak to the bombs that drop from the crates he summons, if he summons one, push it into his mouth. If he drops a sentry, you’ll have to destroy his eye camera with Call’s Buster to deal damage
Recommended Stage Order:
1. City
2. Military Base
3. Mine
4. Highway
5. Power Plant
6. Capitol Building
7. Radio Tower
8. Oil Platform
9. Water Works Bureau
10. Prison
11. Robot Factory
12. Battle Colosseum
Appendix 2: General Gameplay Tips
Here are some tips that will help you throughout the game that aren’t required for any achievement, but makes the game a lot easier.
Mapping Special Weapons: You can map four of your Special Weapons to the right stick’s four cardinal directions by changing your controls in the pause menu. I personally mapped Seismic’s, Batallion’s, Brandish’s, and Aviator’s weapons to the right stick.
Action Shift: By holding the RT (or ZR) button and pressing either jump (defaulted to A) or attack (defaulted to X), you’ll do either a Back Jump or a Back Jump Shot. While you do a Back Jump, you are impervious to enemy attack for a brief window, allowing you to slip through their moves. The Back Jump Shot is the same but you also fire whatever weapon you have equipped.
Fast Transformation: By default it’s mapped to Y, but it allows you to switch between whatever ReXelection you have equipped and the Mighty Buster instantly.
Use AcXel Recovers without pausing the game: Press the – button
ReXelection Tips:
- Pyrogen: Do not let your meter overheat by holding the charge button too long, or else you will be unable to move while attacking
- Cryosphere: Enemies that are frozen have a longer period in which they can be absorbed for a 100% rate. The freezing shots go through walls. Don’t spam this weapon as it causes damage over time, be sparing with it.
- Dynatron: Try to be close to the enemy when using this, so all the nodes hit it and cause more damage. In addition, when they start to glow, if your electric nodes are still attached, you can dash at any point and it will absorb the enemy.
- Seismic: If you run into certain enemies, they will go flying and that can damage other enemies. You can also jump on enemies like in Super Mario Bros. while using this.
- Battalion: The missile will stay attached to a surface for as long as you like, but if you move far away it will detonate automatically. You can destroy certain blocks with the missile, which is helpful for opening shortcuts. I suggest using this weapon throughout the majority of the game since it destroys most enemies in 1 to 2 hits.
- Aviator: If you hold the button down, the propellor will block enemy projectiles above your head, and you also jump higher. If you press the button while the gyro boomerang is out, it will immediately return to you.
- Brandish: The regular sword swipe takes no ammo. If you hold the button, you can either do a Spin Slash (by releasing it) or a Falling Slash (by releasing it and pressing down). This will consume ammo but both moves are very powerful. Brandish’s blade also deflects enemy projectiles and allows you to phase through Trinity Cloud’s Yellow Devil-like split attack (referencing the boss from Mega Man).
- Countershade: You can only fire three of these before your ammo depletes so use them wisely. The bullets will also home in on enemies if they bounce off walls which can be useful.
MegaXel ReXelection:
If you backed this game through the Kickstarter at 60 dollars or more, you get an additional transformation called MegaXel. By pressing the attack button, you can lay down up to three safety mines that shoot beams once an enemy moves into it’s vicinity. This can be done horizontally or vertically. You can also hold the Action Shift button to stop the mines from attacking if necessary. Sadly, this has never been made available to all users.
Golden Beck:
Another Kickstarter bonus for those who pledged 60 dollars or more, this is purely cosmetic but can be changed from the Options Menu on the Stage Select screen. Similar to the MegaXel form, this has never been released to the public.
Useful Glitches:
Multiple Aviator Gyros: If you shoot a gyro, and swap to the Mighty Buster and back using Y (default controls), you can fire 2 gyros on screen at once, which is normally impossible. This is especially useful in Pyrogen’s boss battle.
Invincibility Glitch: Tricky to pull off but very useful to learn. If you shoot Battalion’s missile onto a breakable crate, jump on it, and then do a Back Jump at the same time as detonating the missile to break the crate, the game will think you are still doing a back jump and you will be invincible as long as you don’t touch instant death traps. This effect will end when a cutscene plays (like when you enter an enemy hall).
Other Tips:
- If you dash into an enemy, you get knocked back further and have a longer stun animation
- Hold RT (Action Trigger) as Call to summon a barrier that nullifies all projectiles. This is especially useful during segments with a lot of enemies, but be aware that you cannot attack while using it.
- Normally you can hang onto ledges, but you cannot do this for icy surfaces like in Water Works Bureau.
- You can set the number of in-game lives you receive for Normal difficulty by going to the options menu from the main menu. It can be set anywhere from 2 to 9. On Hard and Hyper, the player will always start with 2 lives.
Hope you enjoy the post for Mighty No. 9 Achievements Guide & Secrets, If you think we should update the post or something is wrong please let us know via comment and we will fix it how fast as possible! Thank you and have a great day!










Leave a Reply