Helicopter Bridge Attack

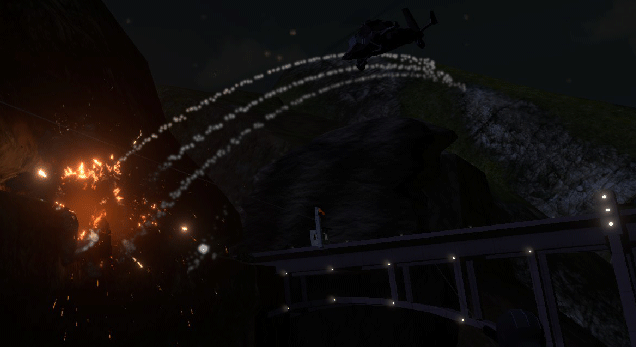
The Guards have a defence helicopter that can be launched via any of the large red buttons that appears after 2 ½ minutes at 5:30. The chopper will take out anyone on the overpass and adjacent ridge. The three locations for this launch button are:
- roof antenna room interior
- upstairs camera room
- downstairs camera room

As an intruder, have a plan to quickly get off the bridge as this time gets close.
Using the Mortars
Spotting (if you dont have co-ordinates):
Grab the binoculars, aim at your target from the mortars location and read the bearing in the center rectangle. This gives you a rough angle, then determine the pitch based on target distance and height.

Manning:
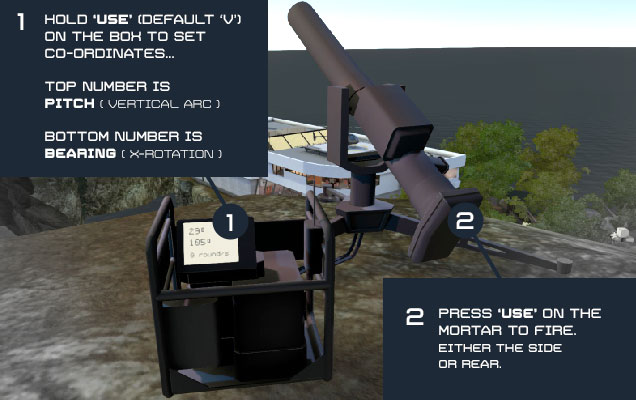
Press and hold ‘use’ (default ‘V’) on the small box next to the mortar to aim: horizontal mouse movement is the bearing angle (displayed at the bottom), vertical mouse movement is the pitch (displayed at the top). Personally I find it easier to set heading first, pitch second. Once set, look at the mortar and press ‘use’ to fire. You only get 5 rounds so make them count.
Controlling the roof Mortar:
You control this one via a screen on the wall in the upstairs camera room holding ‘use’ on the top screen for movement, and the press ‘use’ on the red button below to fire. Although it is very difficult to control as the graphics are bad and much of the lower view is obscured. I’ve seen this fired more than 5 times so I presume ammunition is unlimited.
Mortar Targets: Preface
Please note that the obtaining of the below information could be construed as a ‘sweaty’ pursuit, and the utilising of such data whilst wearing a goof hat is considered not only incongruous, but also bad form.
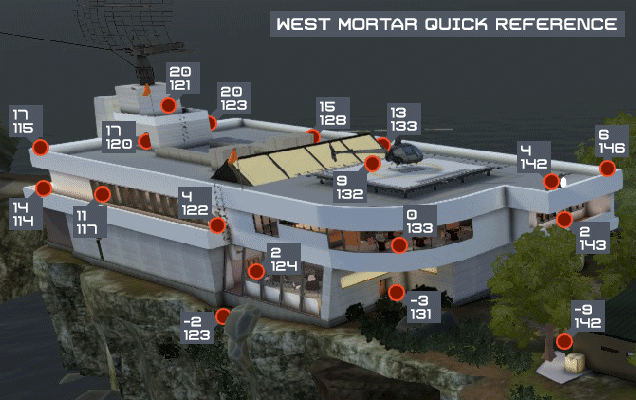
West Mortar Co-ordinates (high ground)
To get to the west mortar as intruders, jump onto the zip-line near the sniper watchtower at spawn. You can either let it take you the full way, or jump off when you notice a slightly lighter coloured rock on the ridge. Be careful with the latter, you can easily die by missing it!

Roof
| Target | Pitch | Bearing | Notes |
| Corner: Far Left | 17° | 115° | |
| Antenna doorway | 17° | 120° | |
| Antenna 1st Level | 18° | 121° | |
| Antenna 2nd Level | 20° | 121° | |
| Antenna – Behind right Peeker | 19-20° | 123° | 20° 123° for corner peekers |
| Antenna – Behind right Middle area | 18° | 125° | |
| Corner: Far Right | 21° | 124° | |
| Behind Right Grey Box | 15° | 128° | |
| Skylight – left | 7° | 124° | |
| Skylight – Middle | 10° | 128° | |
| Skylight – Right | 14° | 132° | |
| Stairs | 13° | 133° | |
| Extraction helicopter | 7 or 9° | 131-132° | 8° hits chopper tail |
| Mortar | 4° | 142° | |
| Corner: Near Right | 6° | 146° |
Mid level
| Target | Pitch | Bearing | Notes |
| Balcony Far left Corner | 14° | 114° | |
| Balcony Far left Window | 11° | 117° | |
| Balcony binocs | 4° | 122° | |
| Exec office balcony | 1-2° | 143° | 2° 143° is doorway |
| Exec office balcony Right | 2° | 144° | |
| Arc windows | 0° | 133-136° | Mid-Right Corner |
Ground
| Target | Pitch | Bearing | Notes |
| Lake Vine top (by rock) | -2° | 123° | |
| Sun Room External Doors | -3° | 131° | |
| Sun Room Internal Doors | 2° | 124° | |
| Barracks (near) Doorway Left | -9° | 142° | tunnel side |
| Barracks (near) Doorway Right | -10° | 158° | Bridge side |
| Barracks (far) Doorway Left | -1° | 151° | tunnel side |
| Ground Below Exec Corner | -1° | 146° | |
| Truck park 2 (3 Box truck) | 0° | 145° | |
| Rocks Crawl – Trucks | -5° | 167° | |
| Rocks Crawl – Right Entrace | -6° | 174° | |
| West Bridge – Trucks near windsock | -7° | 164° | |
| West Bridge Left Center | -12° | 162° | |
| West Bridge – Truck (Direct) | -14° | 173° | |
| Guard Tower Closest | -16° | 201° | |
| Rocks Close | -1° | 230° |
Mountain area and East Perimeter
| Target | Pitch | Bearing | Notes |
| Extraction East (short of) | 33-35° | 110° | 5 secs |
| Guard Tower | 37-46° | 108° | 5 secs |
| Sneaky Mountain ‘crevice’ | 14-18° | 95-97° | Crevice to above / Mid to right |
| Mortar to Mortar | 15° | 101° | |
| Extraction Roof | — | — | Out of Range |
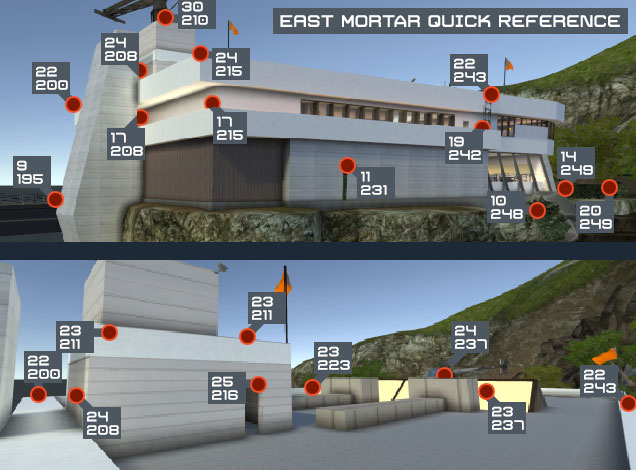
East Mortar Co-ordinates (low ground)
To get to the east mortar as intruder, there is a gap on the overpass near spawn, drop down and take the zip to the east. Drop down the mountainside heading toward the building, at the bottom you will see it towards the right.

Roof
| Target | Pitch | Bearing | Notes |
| Antenna behind pillar | 24° | 208° | |
| Antenna 1st Level | 25-27° | 211° | |
| Antenna 1st Level platform | 23° | 211° | |
| Antenna 2nd Level | 30° | 210° | |
| Antenna 2nd Level (left) | 28° | 208° | |
| Roof Corner (Closest) | 24° | 215° | |
| Antenna Doorway | 24-25° | 216° | |
| Stairs | 23° | 223° | |
| Skylight (Mid) | 23° | 227° | |
| Skylight (Right) | 23° | 237° | |
| Skylight/helipad | 23° | 232° | |
| Helicopter Extraction | 24-25° | 237° | |
| Far Left Roof Corner | 27° | 236° | |
| Near Left Roof Corner | 22° | 200° | |
| Roof Mortar | 27° | 242° |
Mid level
| Target | Pitch | Bearing | Notes |
| Balcony behind pillar | 17° | 208° | |
| Balcony Corner | 17° | 215° | |
| Balcony Binocs | 19° | 242° | |
| Balcony/roof Ladder Top | 22° | 243° |
Ground
| Target | Pitch | Bearing | Notes |
| Barracks Door | 20° | 249° | |
| Vine Top | 10° | 248° | |
| Distant Right hand Bushes/Rock | 21° | 257° | |
| Sun Double doors, Corner | 14° | 249° | |
| Vent Hole | 11° | 231° | |
| East Bridge: East, far side | 9° | 195° | near side is about 7° |
| East Bridge: West, near side | 5° | 164° | |
| East Bridge: West, far side | 8° | 164° | |
| Extraction Close | 8-9° | 137° |
Map timings: ETA to specific locations
Just for additional reference, I did a quick test of how long it took me to get to certain positions on the map. These are quick tests and not professional speedruns. I typically pick up a sight and binoculars as well — although this is optional. I’ve not accounted for locked doors which are random. Also note I aim to have at least 50 energy by the time I reach the ziplines or go prone with a sniper. This means not letting energy dip below 20 as it takes longer to replenish past that point. I was running not sneaking to get fastest times.
Format =time in seconds (ingame timer based on an 8 minute round)
Intruders
- Run along overpass: 41s (7:19) to zipline, 48s (7:12) to roof, 55s (7:05) to armoury door
- Run along overpass, zip drop to lake, scale to vent:1m 19s (6:41)
- West Zipline +watchtower code detour… to sunroom doors: 1m (7:00)
- East Zipline +Manta detour… to armory door: 1m (7:00)
- East Zipline, drop early, drop to lake, scale to vent: 1m 12s (6:48)
Guards
- Run to Roof Stairs: 13s (7:47)
- Run to Exec office +code: 18s (7:42)
- Run to run to armoury…delay for code… +sniper, to balcony: 18s+15s = 33s (7:27)
- Run to Exec office +code, then run to armoury +sniper, to balcony: solo 48s (7:12)
- Run to and scale sneaky mountain crevice: 46s (7:14)
Notes on results
- A single locked door adds 2-6 seconds to timings. I’d estimate 3½ seconds on average.
- A guard can potentially solo pick up the armoury code, pickup the sniper and get in position before an intruder gets to the zipline. Although in the 2nd test I hit two locked doors and it took me 55 seconds to solo it, missing a zipping intruder, so random chance heavily affects timings.
- Those placing sensors +C4 realistically need not worry about sensors going off before the 7:05 mark
XP
XP is awarded at match end.
| Event | XP Rewarded (each) |
| MatchesWon | 300 |
| MatchesLost | 100 |
| RoundsWonCapture | 70 |
| RoundsWonHack | 70 |
| RoundsWonTimer | 70 |
| RoundsWonElimination | 40 |
| RoundsLost | 10 |
| Captures | 40 |
| Pickups | 25 |
| NetworkHacks | 25 |
| Survivals | 10 |
| Arrests | 20 |
| Kills | 5 |
| knockdowns | 5 |

Leave a Reply