Introduction
hexceed is a logical deduction puzzle game which takes inspiration from classical mine-hunting games and expands on them. Whereas the classic games only told you how many hints are in directly adjacent cells, hexceed changes the formula with unusually shaped levels and hints that can point to far away cells (even on the entire opposite side of the level).
The Tutorial Isle levels in hexceed guide you through the basic building blocks of these levels, but it encourages you to learn its rules through experimentation – seeing what works and what doesn’t and internalizing the rules that way. This guide will build on these levels by explaining explicitly what the game is trying to teach to help those who are getting tripped in understanding what the levels are trying to teach.
Throughout this guide, hexes may be referred to in a notation similar to the following: “basic-1”. This describes the type of hint the hex uses (in this case, “basic”), and the value of that hint (“1”).
Because of the simplicity of most of the Tutorial Isle levels, it’s impossible for this guide to not spoil at least some of the levels. However, it tries to show the minimum amount possible to describe the rules a level is introducing so that you can still try and solve the rest of the level on your own.
Even when it does spoil a level, hexceed contains many hundreds of levels, and the levels of Tutorial Isle are simple by design so that you experience each new mechanic in a controlled manner. The challenge in these cases is in identifying what the level is trying to teach you, and that is all this guide helps you learn.
Note: This guide only covers the mechanics introduced in the Tutorial Isle world. In the Animo DLC, a new mechanic is introduced that is not covered by this guide. However, this should help you learn the language of hexceed to allow you to learn these new mechanics yourself.
Additionally, since hexceed does not tell you anything with words, the names and terms I reference throughout this guide (indicated in bold) are my own and are used for consistency. If/when official names for them are revealed, I will update this guide accordingly.
Basic Controls
The basic controls for each level are the following:
- The WASD keys scrolls you around the level.
- The Mouse Scroll Wheel zooms the level in and out.
- Left-clicking a hex indicates you think the hex is safe and does not contain a mine. If you are correct, the hint on the hex is revealed. If you are wrong, you receive a strike.
- Right-clicking a hex indicates you think the hex is dangerous and contains a mine. If you are correct, a red warning icon is placed on the hex. If you are wrong, you receive a strike.
- Middle-clicking a revealed hex allows you to Chord. If all mines the revealed hex points to have been found and indicated, chording will reveal all of the remaining hexes that hex points to. If there are unfound mines, the chord will fail.
- Click-and-holding a revealed hex will highlight any hexes that hint points to. This can be useful on larger levels when certain hints can reference hexes across the level.
When you receive a strike, the counter in the top left will start blinking red as a warning. Receiving another strike while the counter is still blinking will revert the last few moves you made, forcing you to solve them again and discouraging you from guessing wildly.
If you are truly stuck, guessing can be an option. Since a hex can either be safe or unsafe, guessing wrong immediately tells you that the hex should actually be the opposite of what you first tried. However, all of the levels in hexceed are hand-crafted to not require guessing. If you think you need to guess, then you are likely overlooking or misreading an existing hint.
Starting a Level
A level in hexceed consists of a layout of hexes. These hexes are placed adjacent to other hexes along one of their six edges. They can also be broken up into multiple islands of hexes. Hexes are only considered “adjacent” to those that they share a side with. The objective is to correctly indicate whether every hex on the level contains a mine or not.
When you first open a level, all of the hexes on the level will be hidden. Most of them will be darkened and flat. However, some of them will be lightened and raised – these hexes are your Starting Hexes for the level. These hexes are always safe and may be revealed. They are used to provide you a starting point to the level.
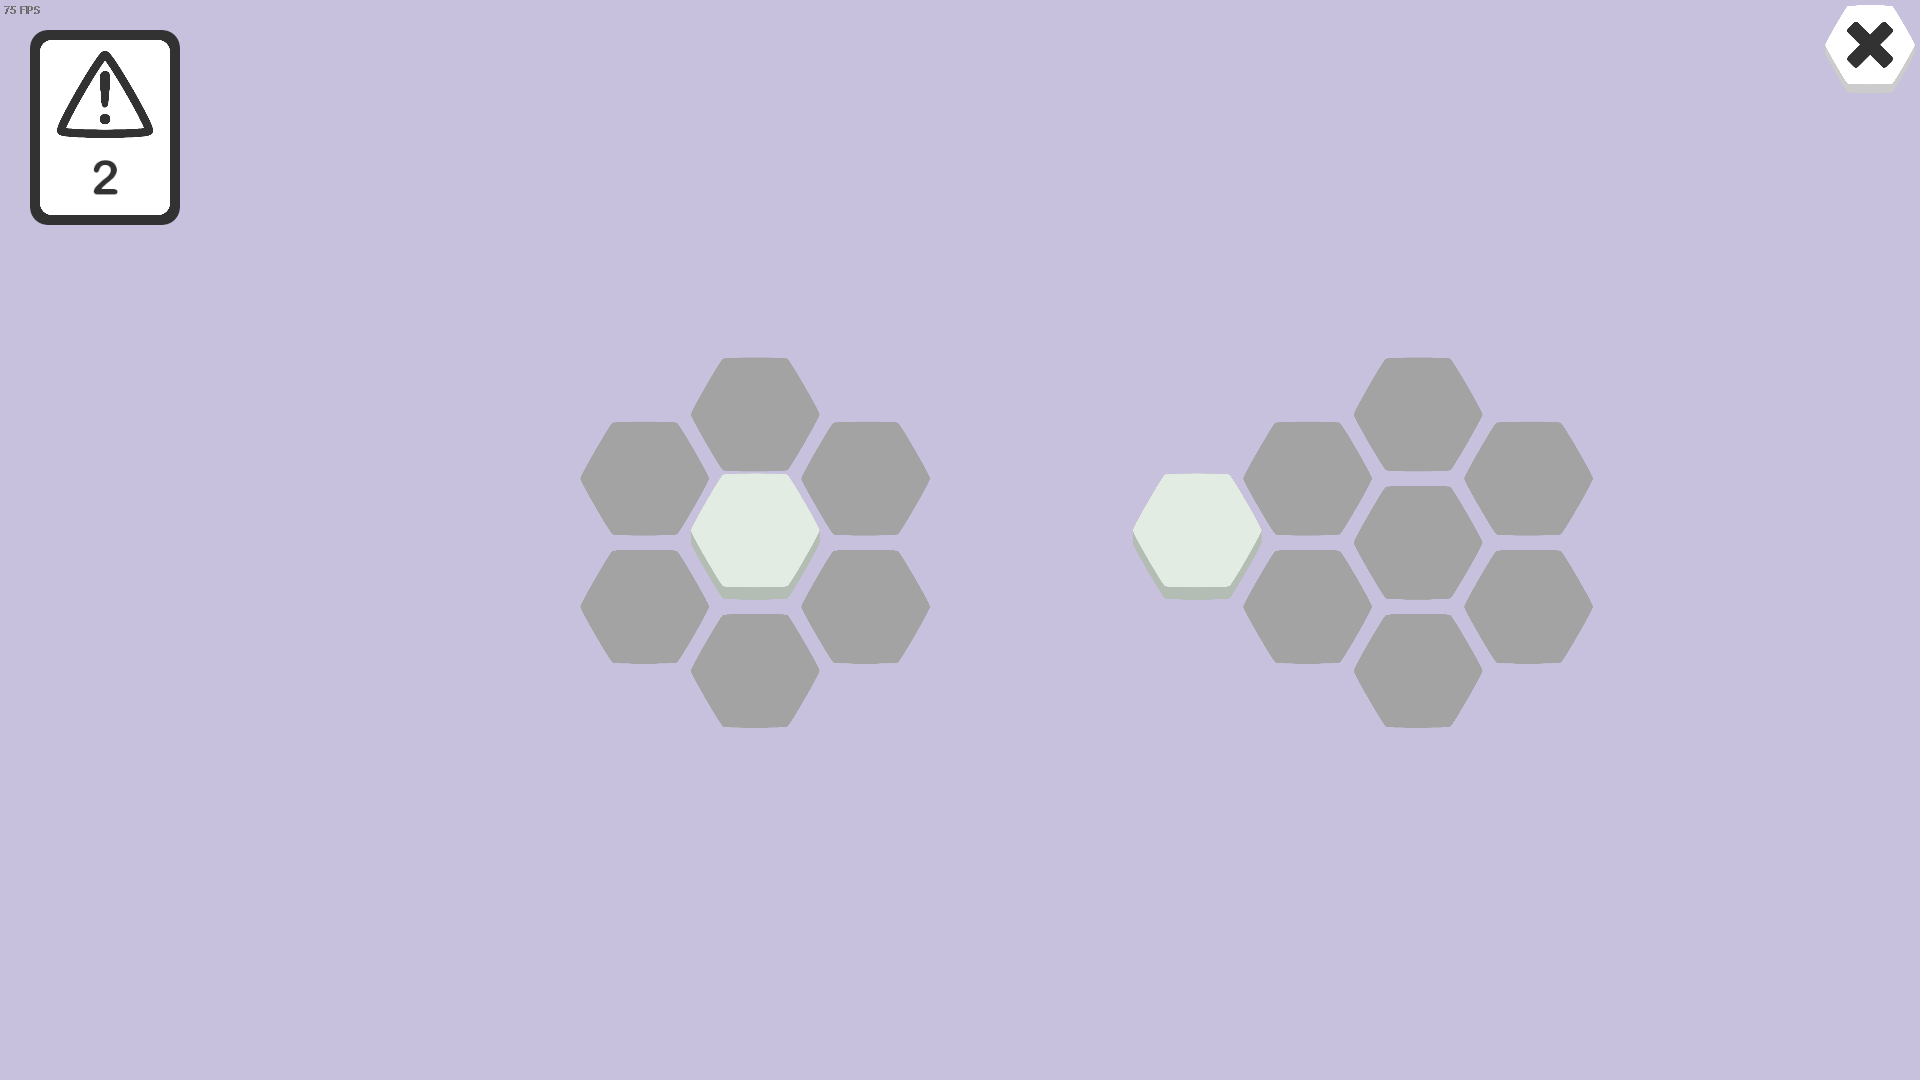
The following screenshot demonstrates a level containing two islands. Each island has its own Starting Hex, although this is not always the case.
Clicking the two Starting Hexes will reveal their hints. A hex containing only a number (no colors or symbols) is a Basic Hint. Basic hints point to the six hexes it shares a side with, and they indicate how many mines are contained within those six hexes. They do not jump over gaps between islands, nor do they connect with any hexes across their corners.
Identifying mines is the primary goal for each level. To complete a level, you must successfully indicate on every cell whether that cell is safe by left-clicking it (thus revealing its hint) or a mine by right-clicking it. Even once you’ve identified every mine on a level, you must still go through and reveal every hex in the level in order to complete it.
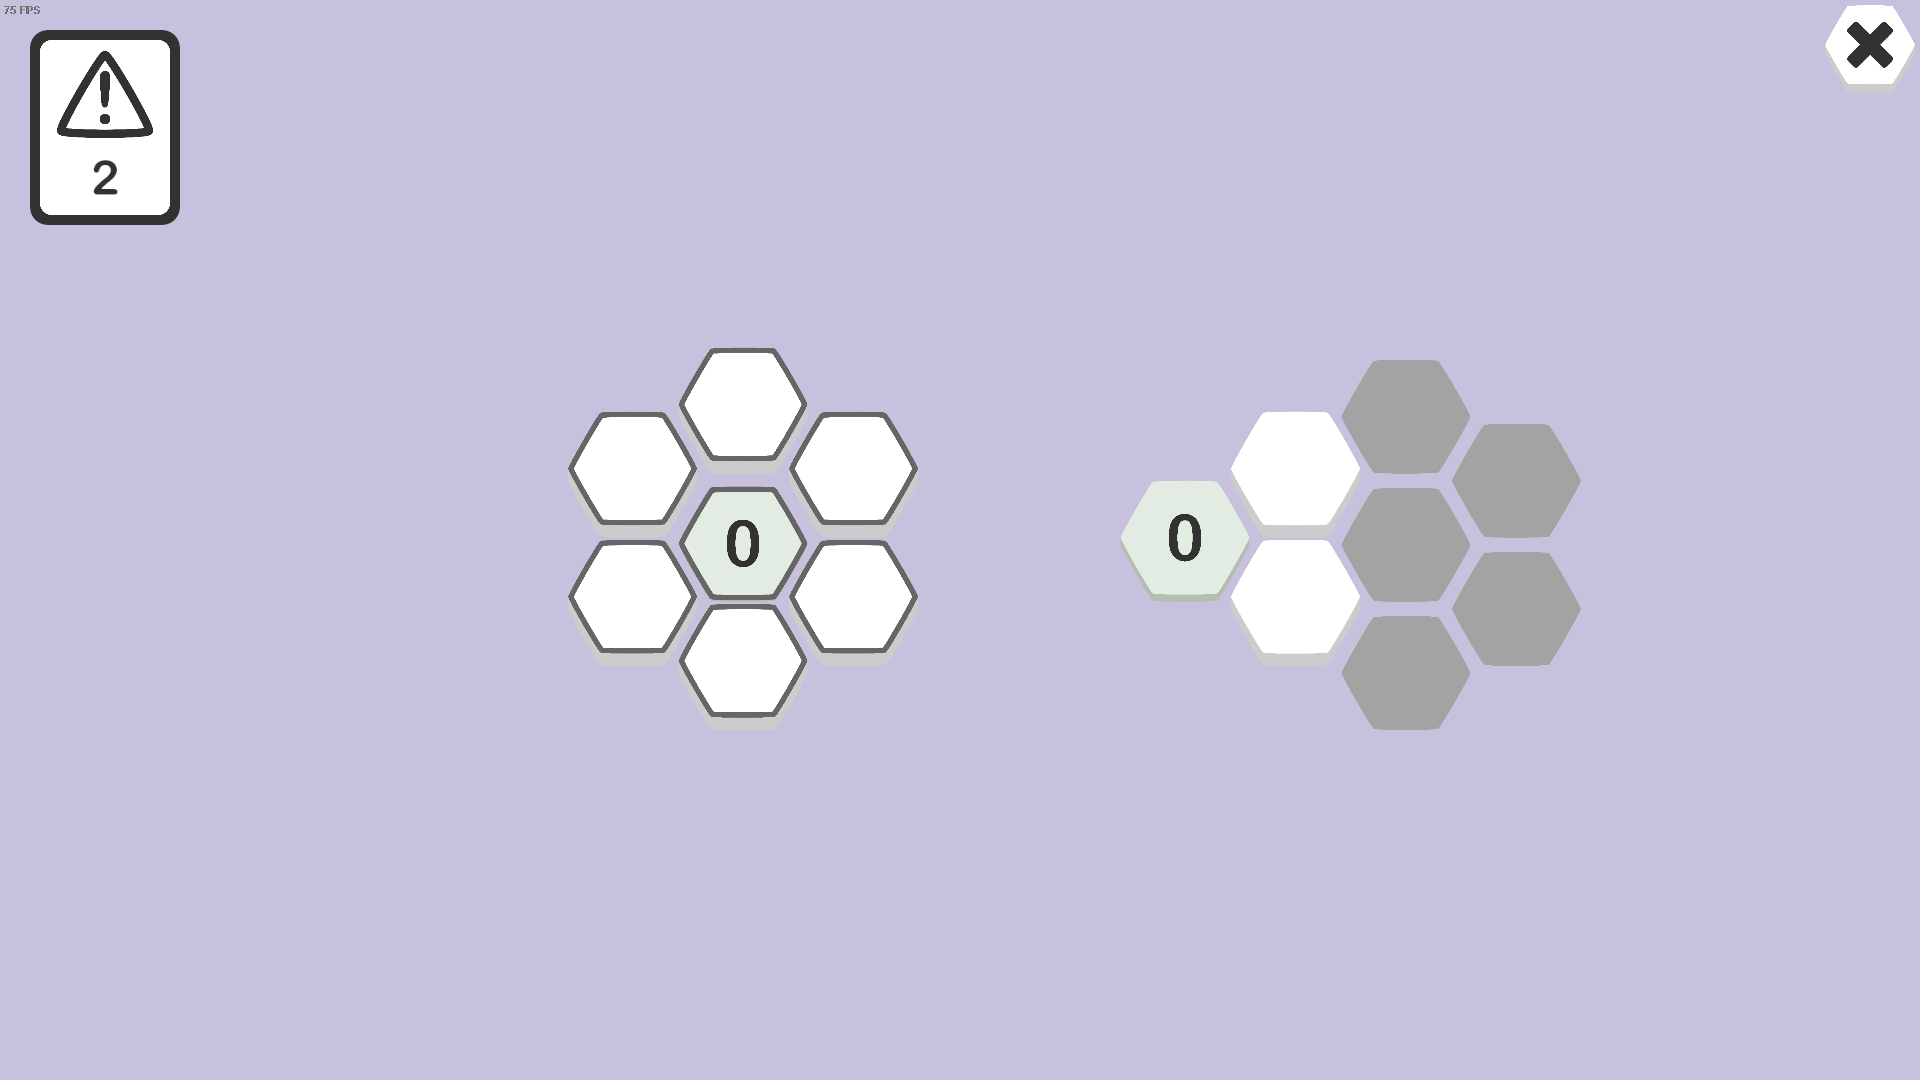
In the following screenshot, which has revealed the two starting hexes from before, each has been shown to contain a basic-0.
- The basic-0 on the left indicates that none of the six hexes there contain mines and may be safely revealed (hint: 0s are excellent candidates for Chording since they can never point to a mine, and therefore will always chord successfully). Here, that hex is being click-and-held which highlights the hexes it is pointing to.
- The basic-0 on the right only points to the two hexes to its right. Since it’s a 0, that still means those two hexes are safe.
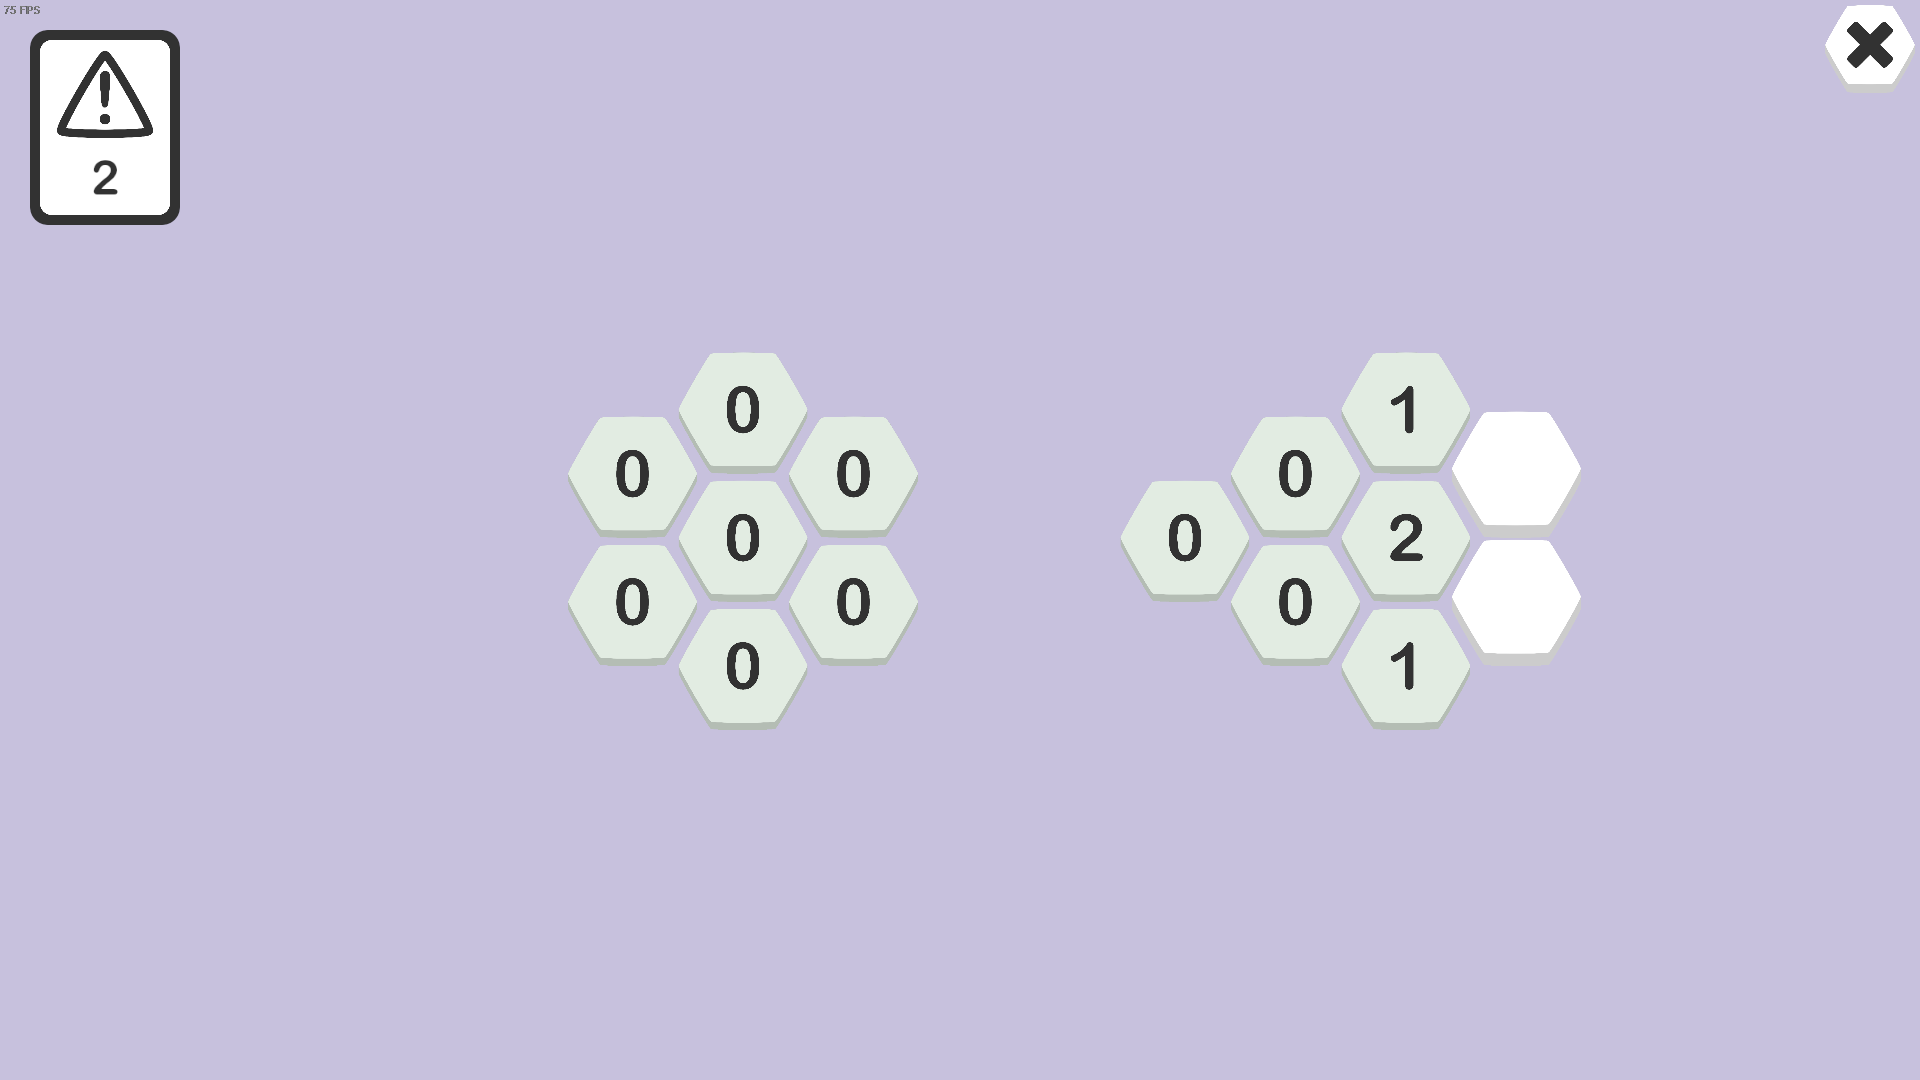
Continuing through this level, you will eventually reach the following state. The two basic-1 hexes indicate that there is a single mine adjacent to them, and the basic-2 indicates that there are 2 hexes adjacent to it.
The basic way to solve any level is by process of elimination. In each of these three hexes, the number of unrevealed hexes still adjacent to them is exactly equal to the number of mines that hint indicates. As a result, you can deduce that those unrevealed hexes must contain mines.
In this level, each of these three hexes in this scenario can individually locate their remaining mines. In later levels, you will have to look at multiple hints together to deduce which combination of hexes can satisfy all of their hints together. The next section provides an example of this.
When you reveal a safe hex, the hexes that hint points to will lighten. Through this, you can tell at a glance whether there are any hints that point to an unrevealed hex, although you will still have to locate those hints yourself. Because of this, once you have successfully located all mines a hint points to, it is recommended to reveal all of the safe hexes it points to as well so that you don’t forget and accidentally think one of those safe hexes might contain a mine.
Mine Counter and Unseen Hexes
In the top-left corner of your screen is a counter. This is the Mine Counter, and it indicates how many hexes on the board contain mines. As you successfully find mines, the counter will count down alongside them so that it always indicates how many mines are left to find. When this counter reaches 0, any remaining unrevealed hexes may be safely revealed.
Occasionally, the mine counter can also be a critical piece of the logic needed to solve a level.
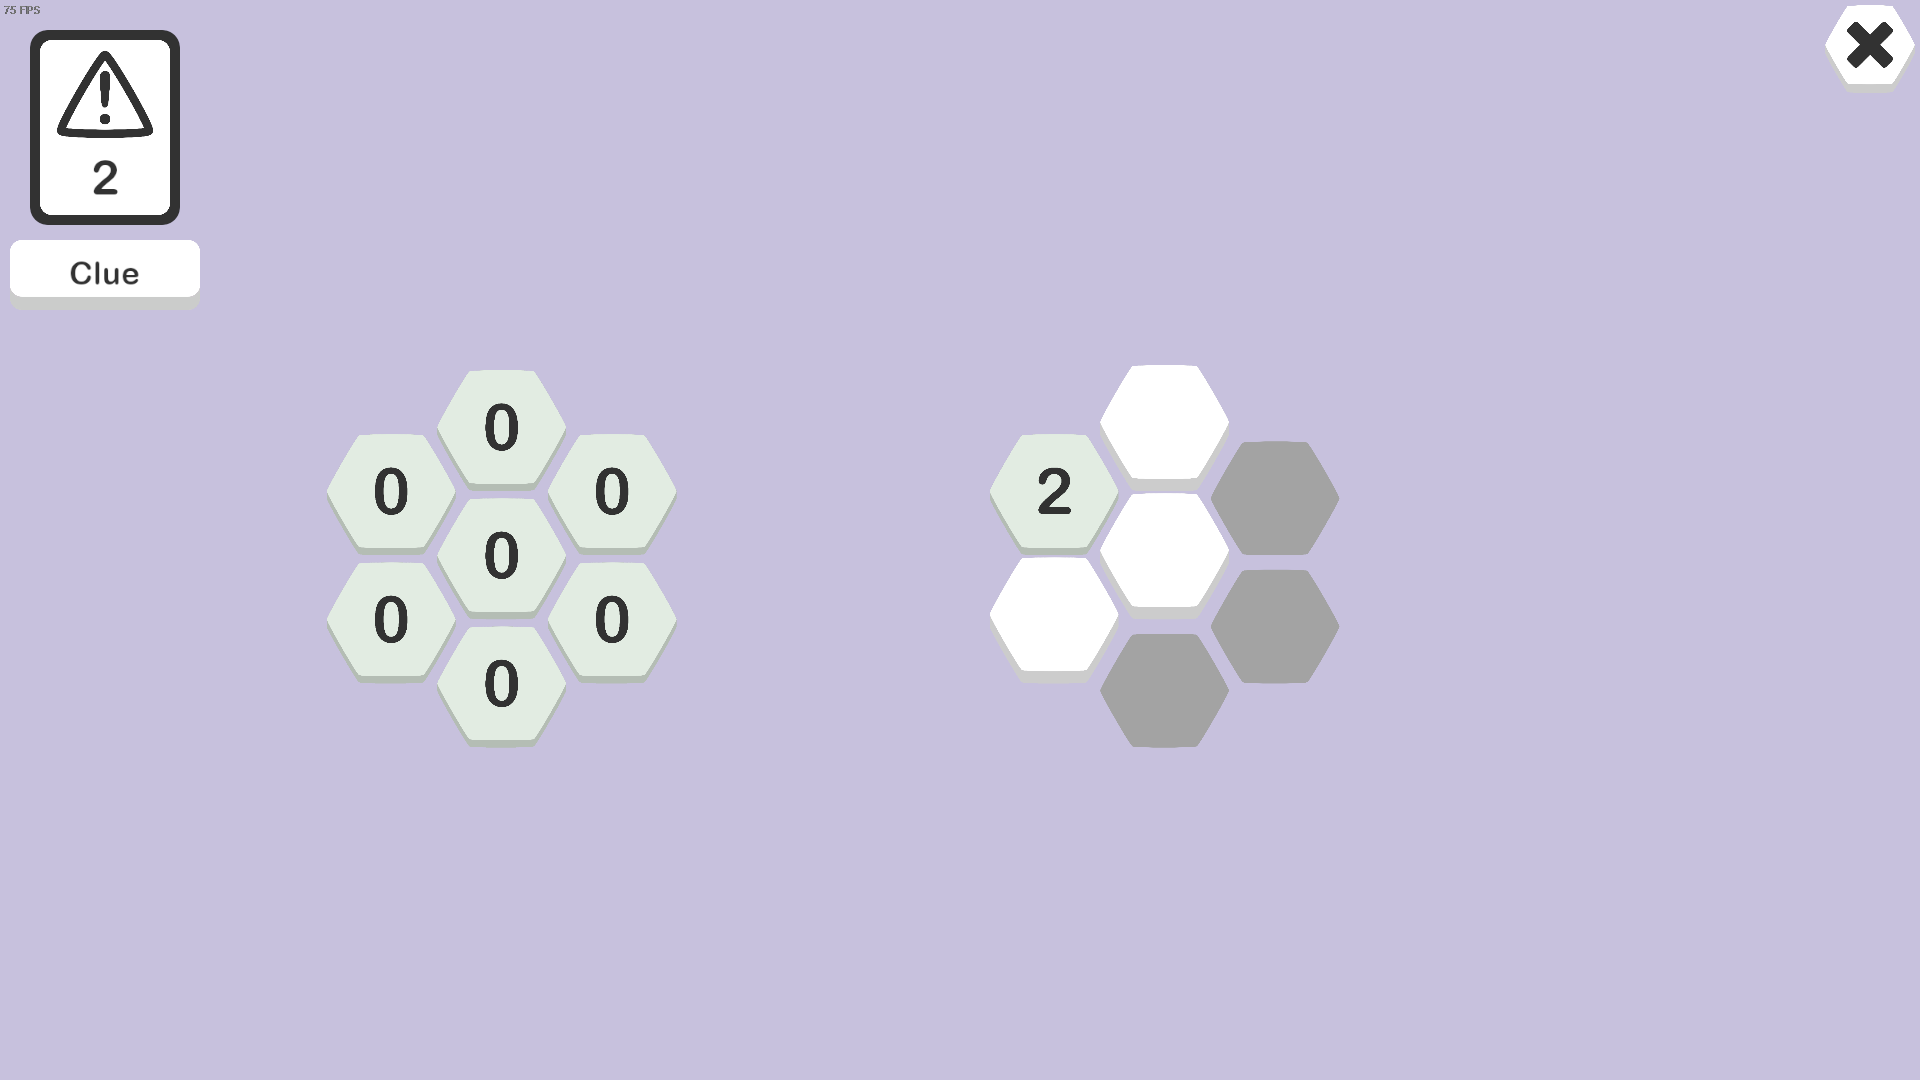
In this example, the basic-2 hint points to three hexes, each of which is still unrevealed. There are no other hints revealed that can help identify which hexes contain mines and which are safe.
Now consider this layout again with the mine counter factored in. The mine counter is indicating that there are two mines left to place. We have a basic-2 hint that does not yet point to any mines, so we know two mines must be pointed to by that hint. The combination of those two hints tell us that all of the remaining mines on this level must be pointed to by this basic-2 hint.
Because of this, we see that there are three darkened hexes where it is impossible for there to be mines. These darkened hexes are Unseen, meaning that no revealed hints on the board point to these hexes. However, this does not mean you cannot try and reveal or place mines on these hexes. Many levels are solved at the end because the mine counter renders all remaining unseen hexes safe. It is also possible for the logic of a level to force all remaining unseen hexes to be mines as well.
This kind of deduction forms the core of hexceed’s gameplay – combining multiple hints to make them both more precise until each hex can be specifically identified. You can also do this process in reverse by asking “What would happen if this hex [was a mine / was safe]?” Here, if you asked “What if one of the unseen hexes contained a mine?” you would find that the basic-2 is still looking for two mines but the mine counter would indicate there is one mine left. Because these two results are in conflict, the answer to your question must be “It cannot contain a mine,” which allows you to mark it safe instead.
Walls
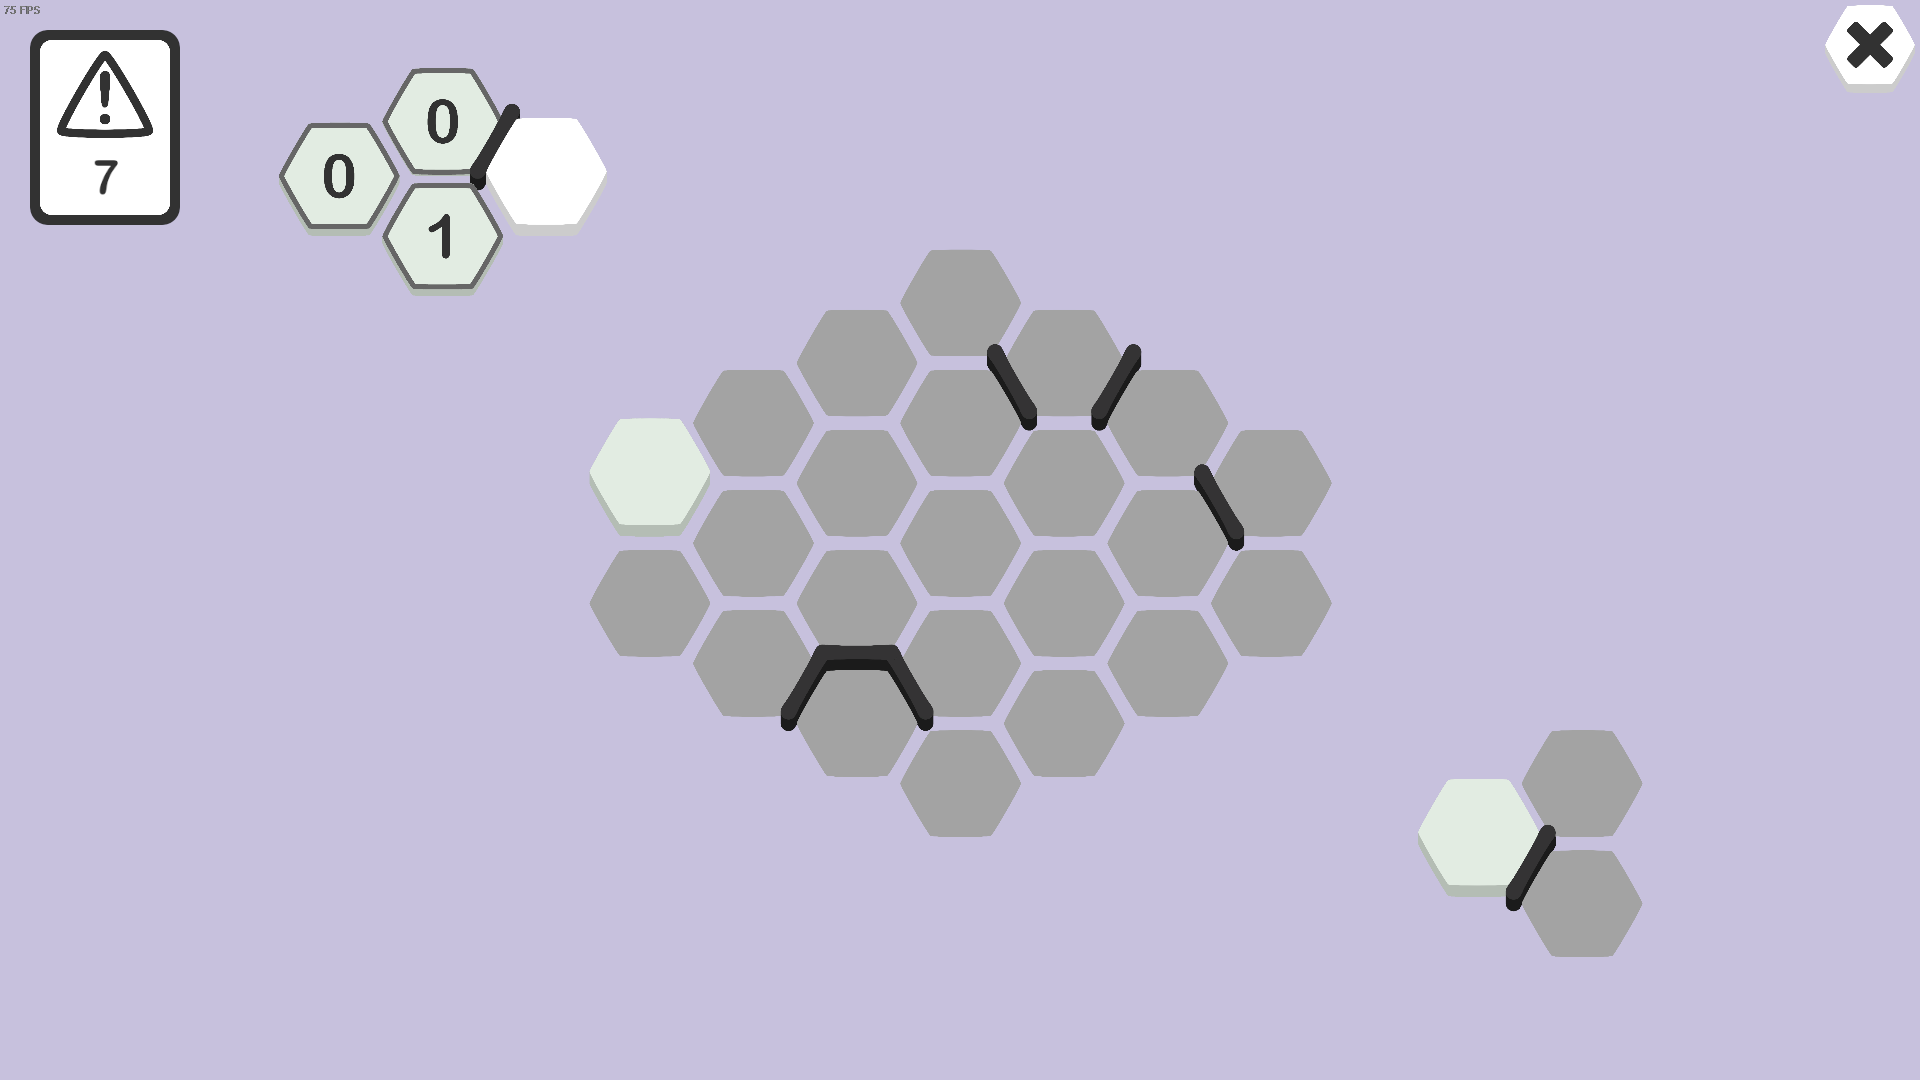
The thick raised line between hexes is a Wall. Walls can block visibility between two hexes, which changes how some hints interact with the level.
In this image, the top-most basic-0 hint is being highlighted (hint: hold Middle-Click on a revealed hex). The highlighting indicates that this hint points to the hexes to its southwest (another basic-0) and south (a basic-1), but not to the unrevealed hex to the southeast. The basic-1 forces this unrevealed hex to be a mine, but the wall means the basic-0 does not see it, which is what allows that hex to report 0 mines.
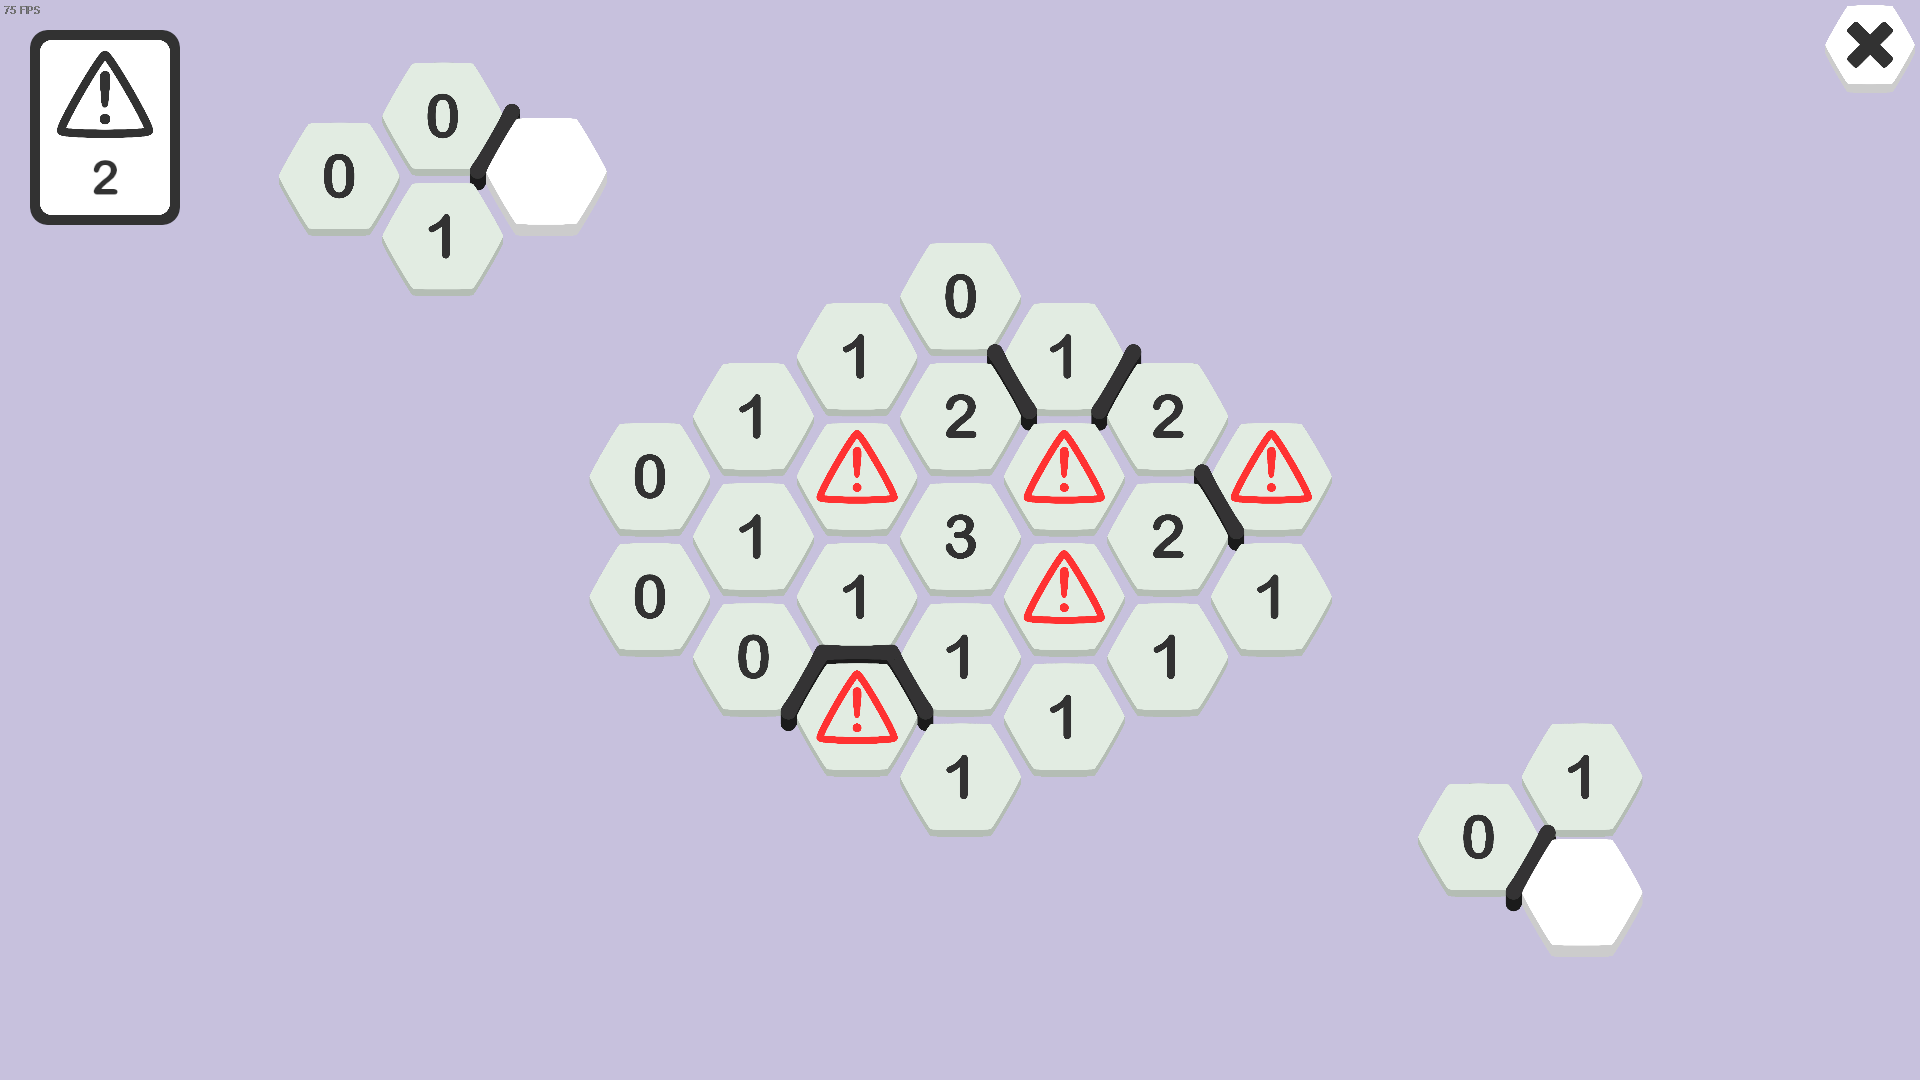
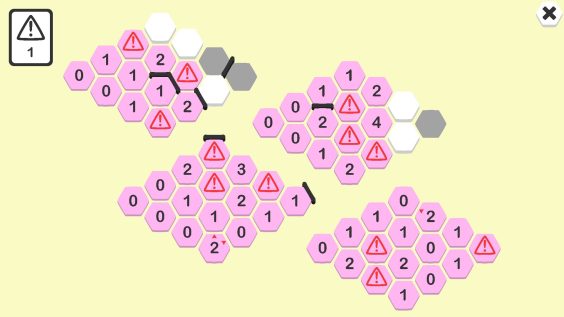
This screenshot shows additional examples of this. In the center island, several walls break the level up. At the bottom-left of the island, there are two basic-1 hints which are cut off from the lower-left mine. To the middle-right, the basic-2 is also cut off from another mine. To solve those hexes, you must reveal hints that move around the wall.
Walls are a common source of confusion in a level. When trying to find the next move, it is easy to overlook walls, and this can make a level seem dramatically more difficult than it actually is.
Line Hints
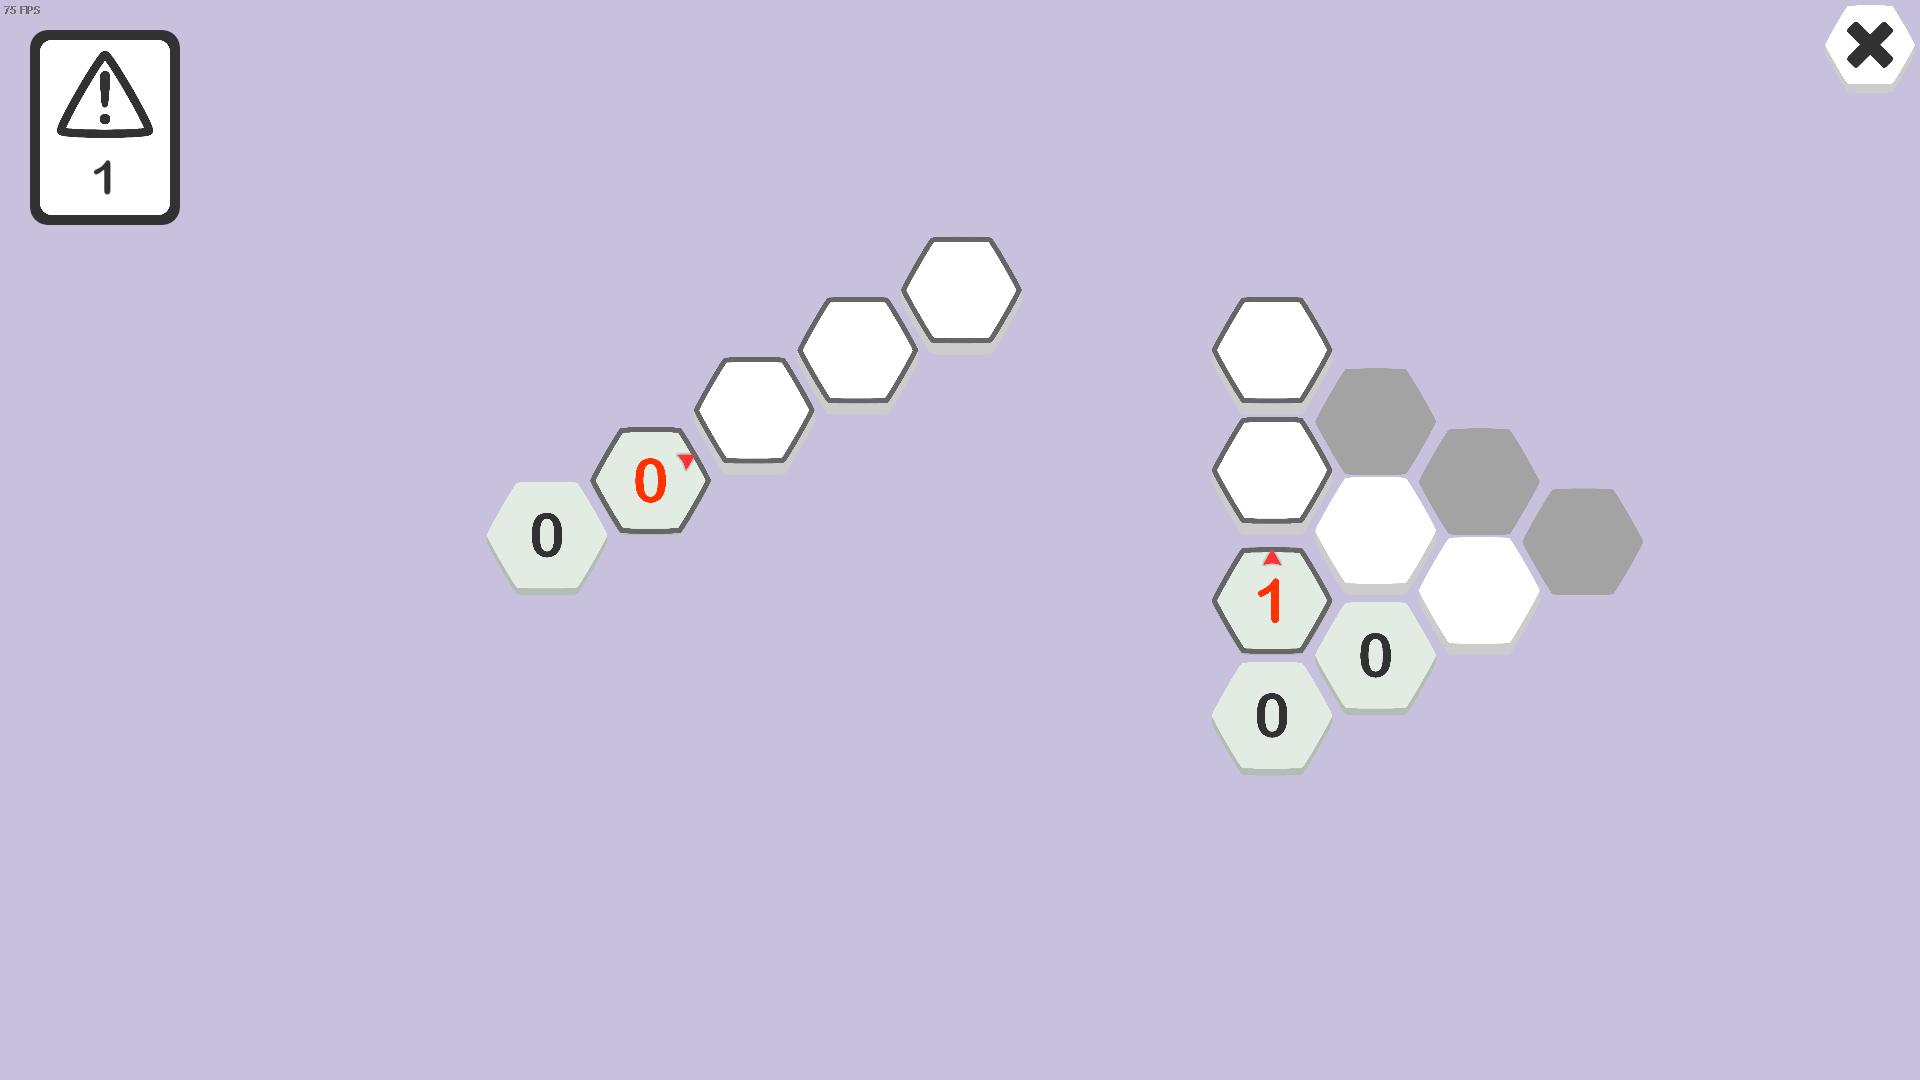
Hexes with a red arrow pointing to a side of a hex are Line Hints. A line hint points to all hexes in the direction indicated by the arrow that are any number of hexes away. This hint will always point to a hex’s side and never to its corner (a later hint will point to a hex’s corner with different rules).
This is the first special hint the game introduces. Special hints do not count as basic hints. Instead, they entirely replace the rules of a basic hint. In this case, the two highlighted line hints only point to the hexes along their arrow. They do not point to any other hexes adjacent to them like basic hints do. In this example, the line-0 hint on the left points to three hexes, and the line-1 hint on the right points to two hexes. Adjacent basic hints still interact with and point to a line hint as normal.
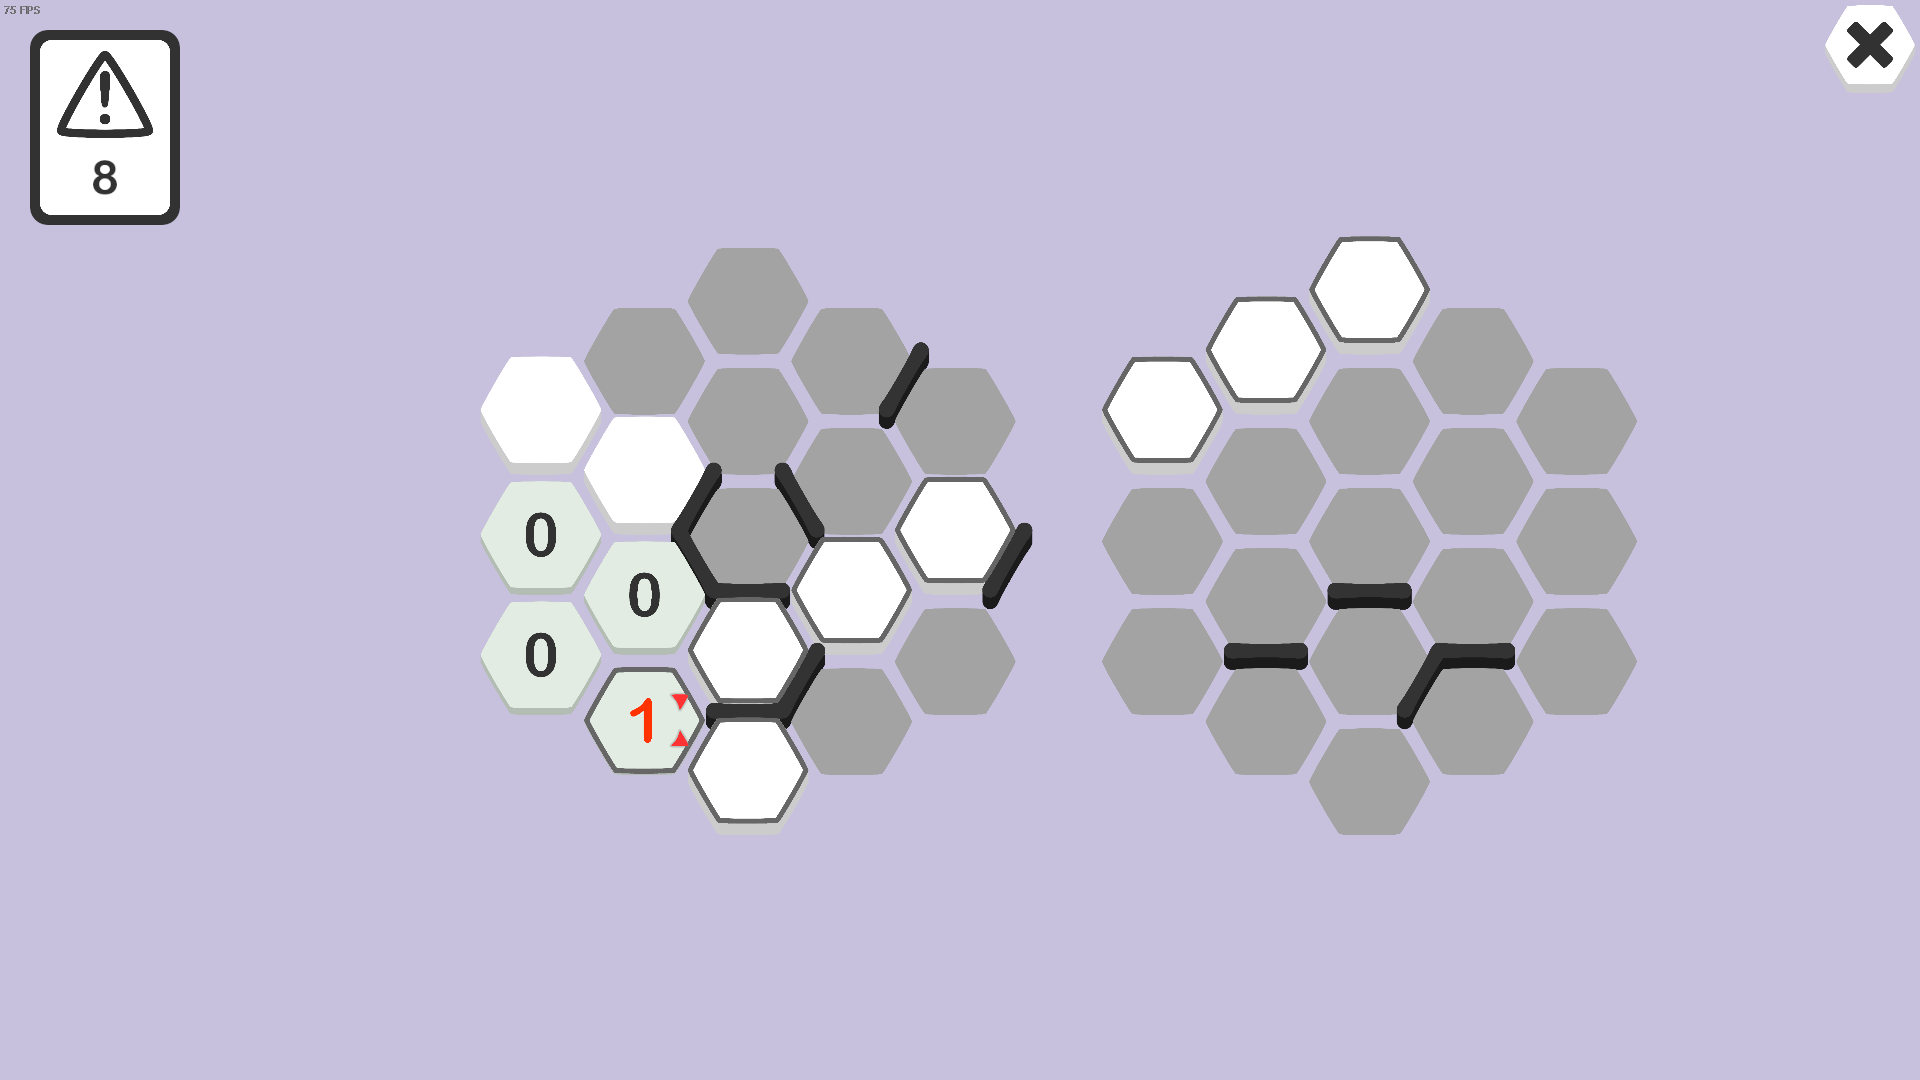
Line hints can have multiple arrows on the same hint pointing in unique directions. In these hints, the value of the hint refers to the number of mines that all of the lines combined contain.
Additionally, line hints can jump open spaces in the level, allowing them to cross between islands. In the example here, the line-1 hint points in two directions: the north-east direction points to six hexes, and the south-east direction points to one hex for a total of seven hexes. There is exactly one mine between all seven of these hexes, and the north-east line is able to cross to the right island.
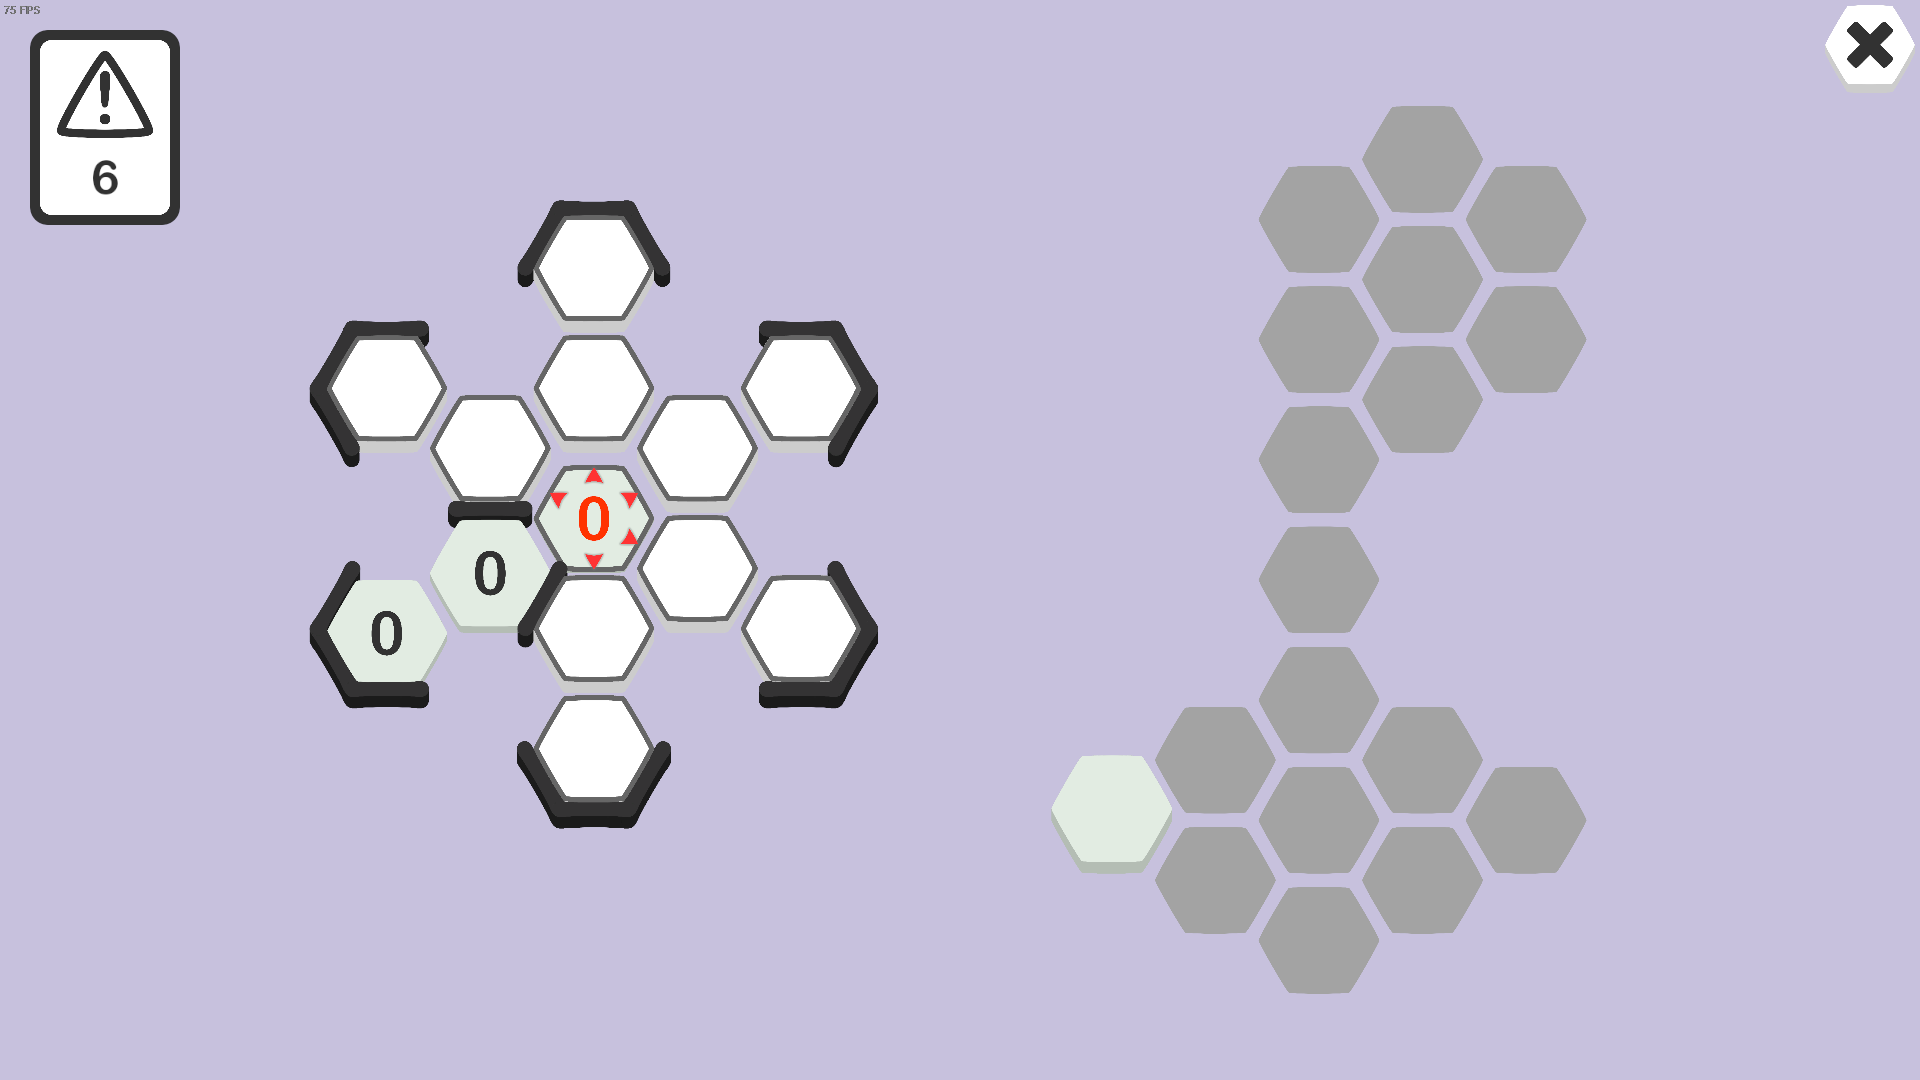
Notably, line hints are also affected by Walls causing them to stop and not continue past the wall. In this example, a line-0 hint points off in many directions, but the south-east line would otherwise point to some hexes on the right island (jumping the gap as before). Because of the walls, however, the south-east line only goes two hexes, stops at the wall, and does not cross the gap.
Shield Hints
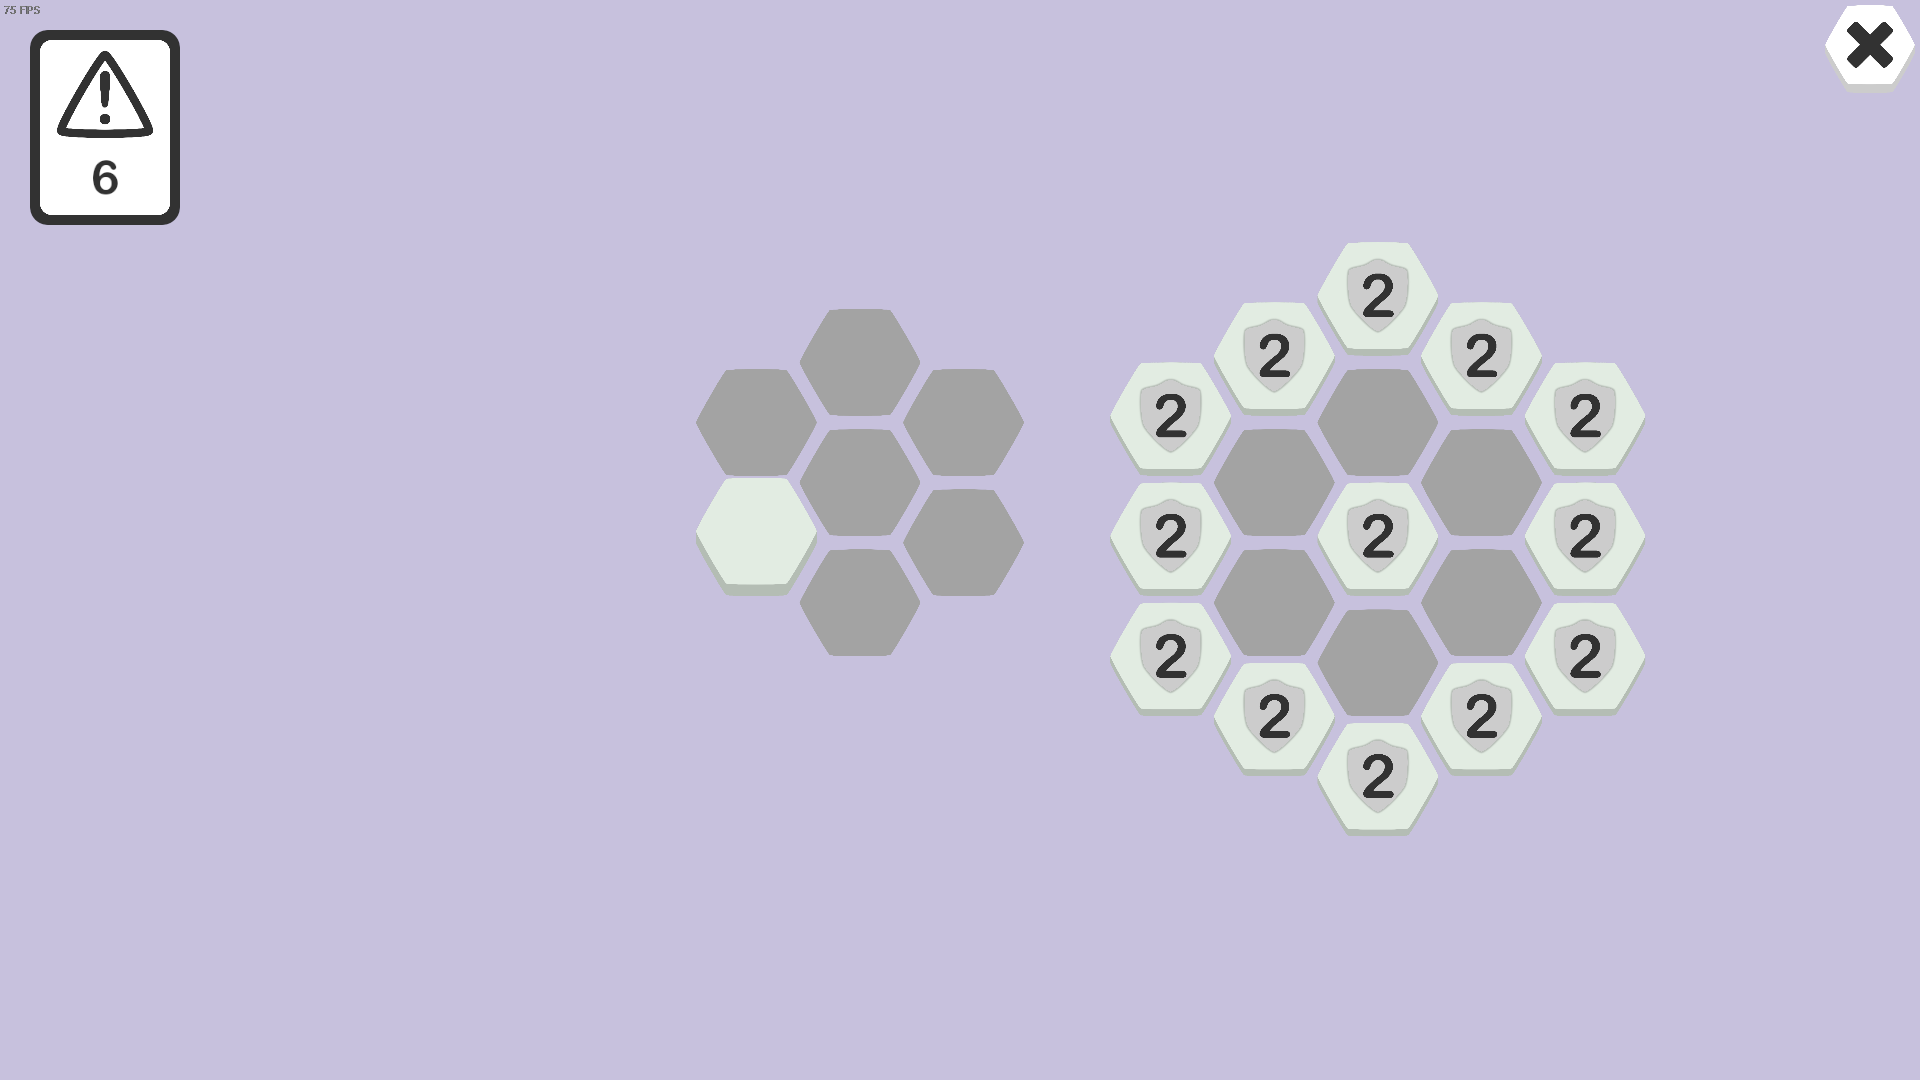
Shield Hints are indicated by the shield icon behind their hint number. These hints are visible at the start of a level alongside the starting hex. However, the number on them does not indicate the number of adjacent mines. Instead, a shield hint locks you out from trying to reveal the shielded hex until you place the number of mines the hint indicates elsewhere on the level.
As you place mines in the level, the number on the shield will count down like a miniature mine counter to track your progress towards that hex. Once you count the shield down to 0, the hex is automatically revealed and its real hint becomes visible.
A shield hint tells you that you can successfully place at least the number of mines on the shield without having to use the shielded hex’s actual hint. In this example, there are numerous shield-2 hints indicating that you must find two mines elsewhere on the level before you can see their value.
Ring Hints
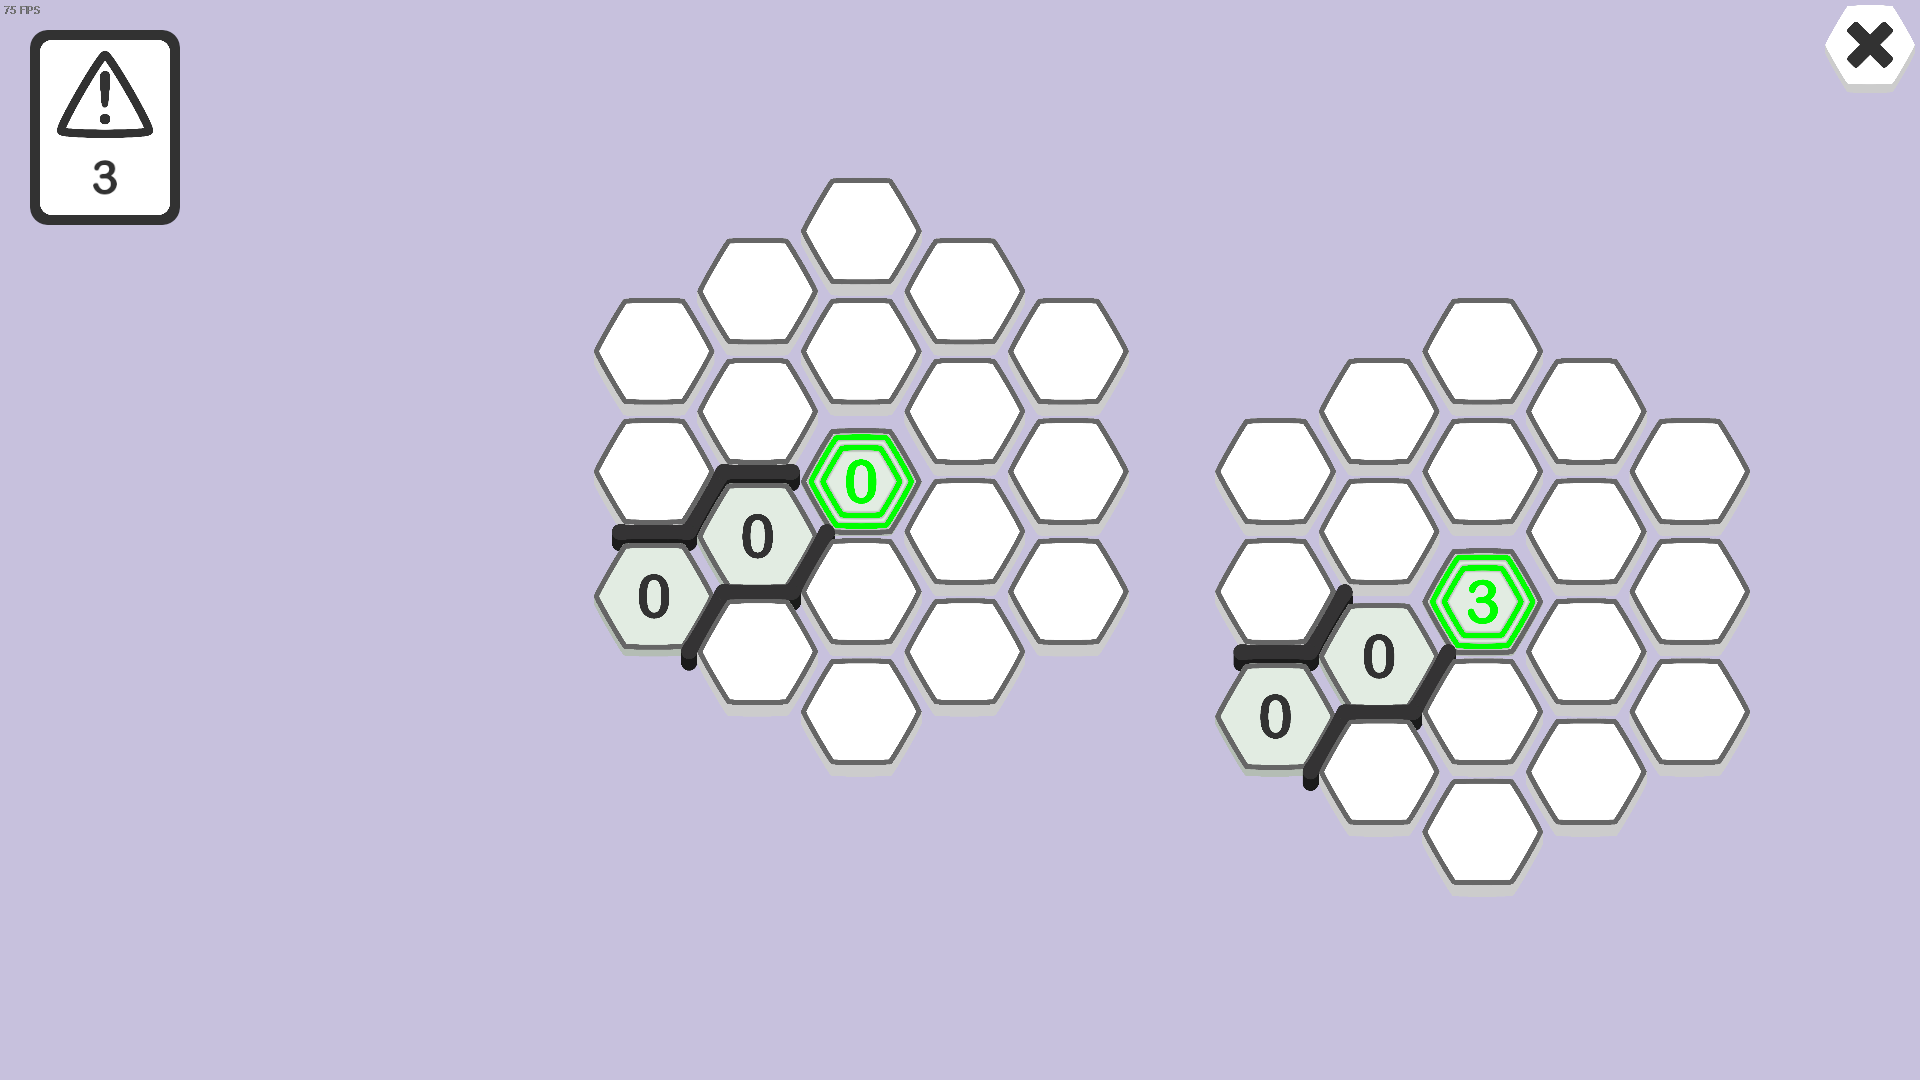
Hexes that are outlined with green rings are Ring Hints. Ring hints can be thought of like super-basic hints. A ring hint points to all hexes within two hexes of itself. The hexes it points to form a larger hexagon shape. Each side of this larger hexagon has a side of three individual hexes.
In this example, both islands have a ring hint at their center that exactly cover the entirety of their islands. The ring-0 hint indicates the entire island contains no mines (hint: chord), and the ring-3 hint indicates that island will contain three mines.
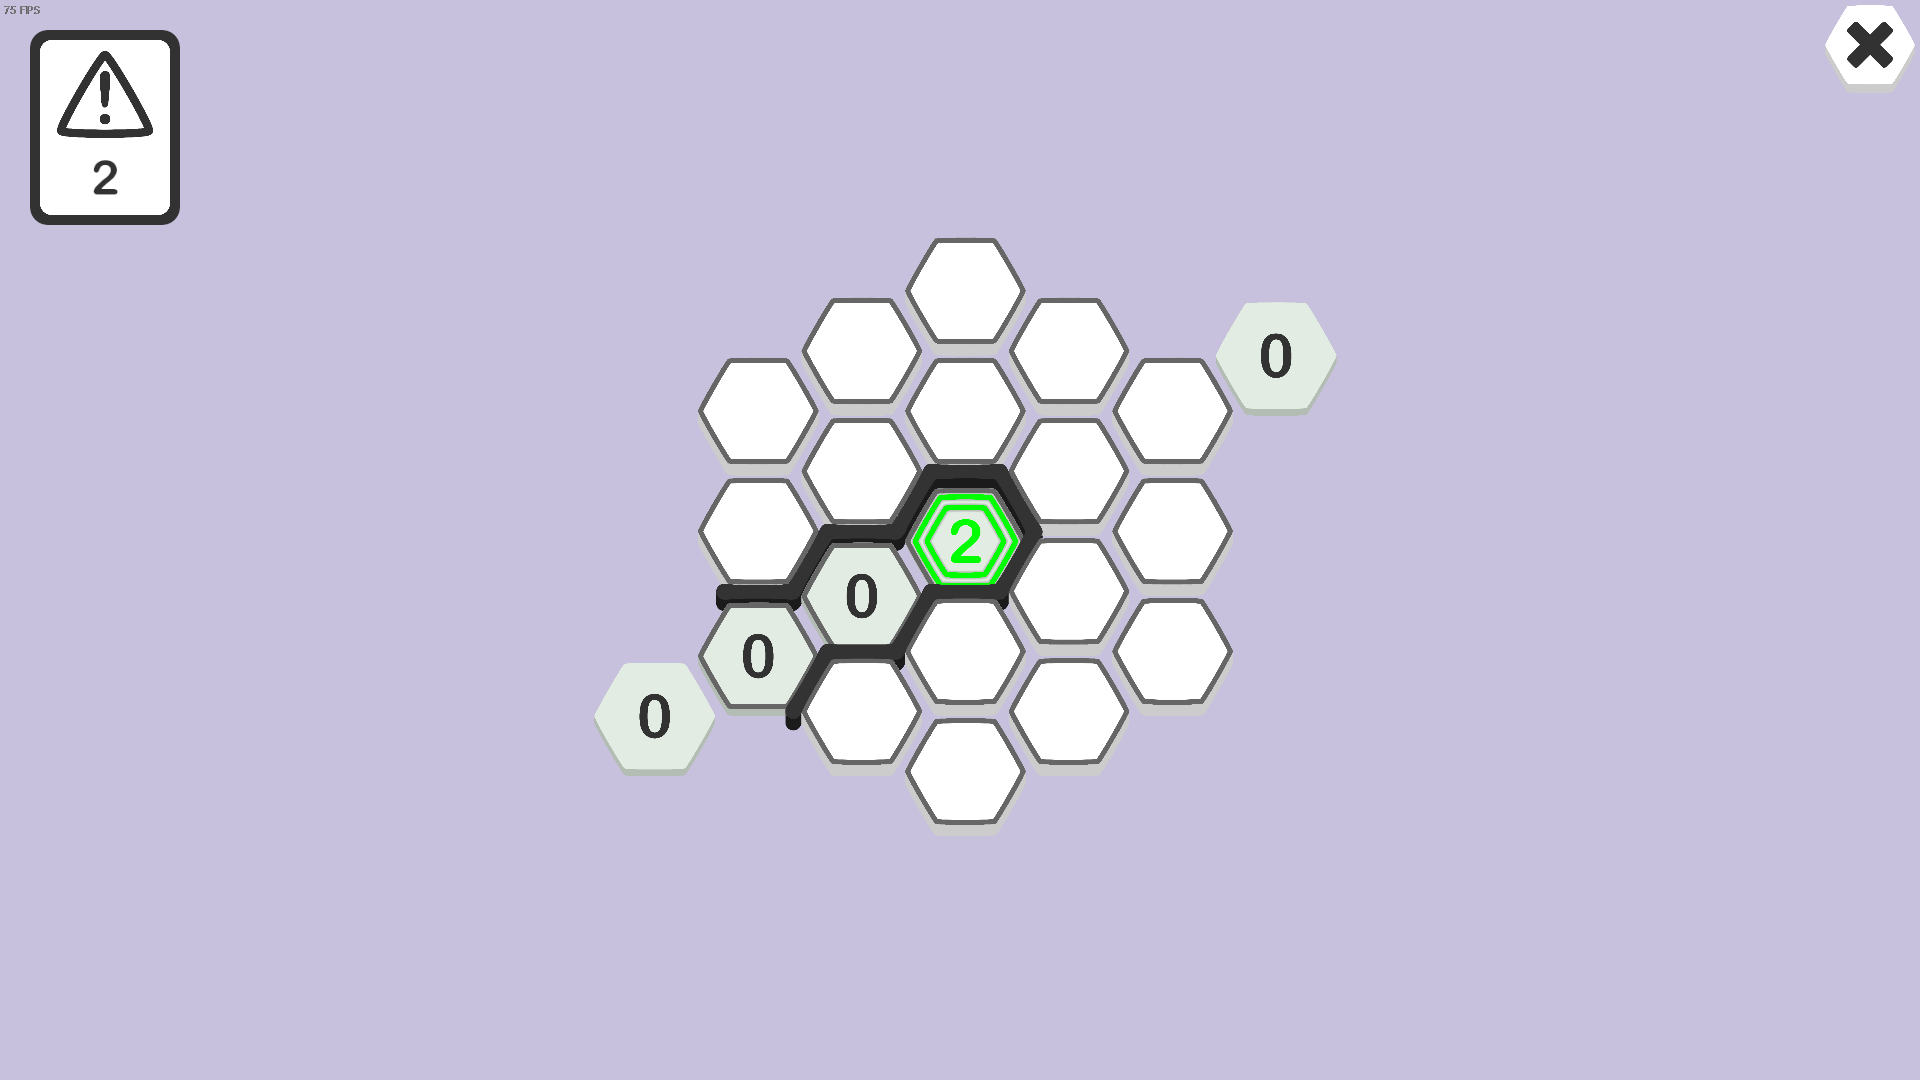
Ring hints are also the first example of a hint that ignores Walls. If a hex is within two hexes of the ring or within the larger hexagon shape described above, it is bound by the ring hint. Here, despite the ring-2 hint being walled off from the rest of the island, the hint still points to each of the hexes surrounding it.
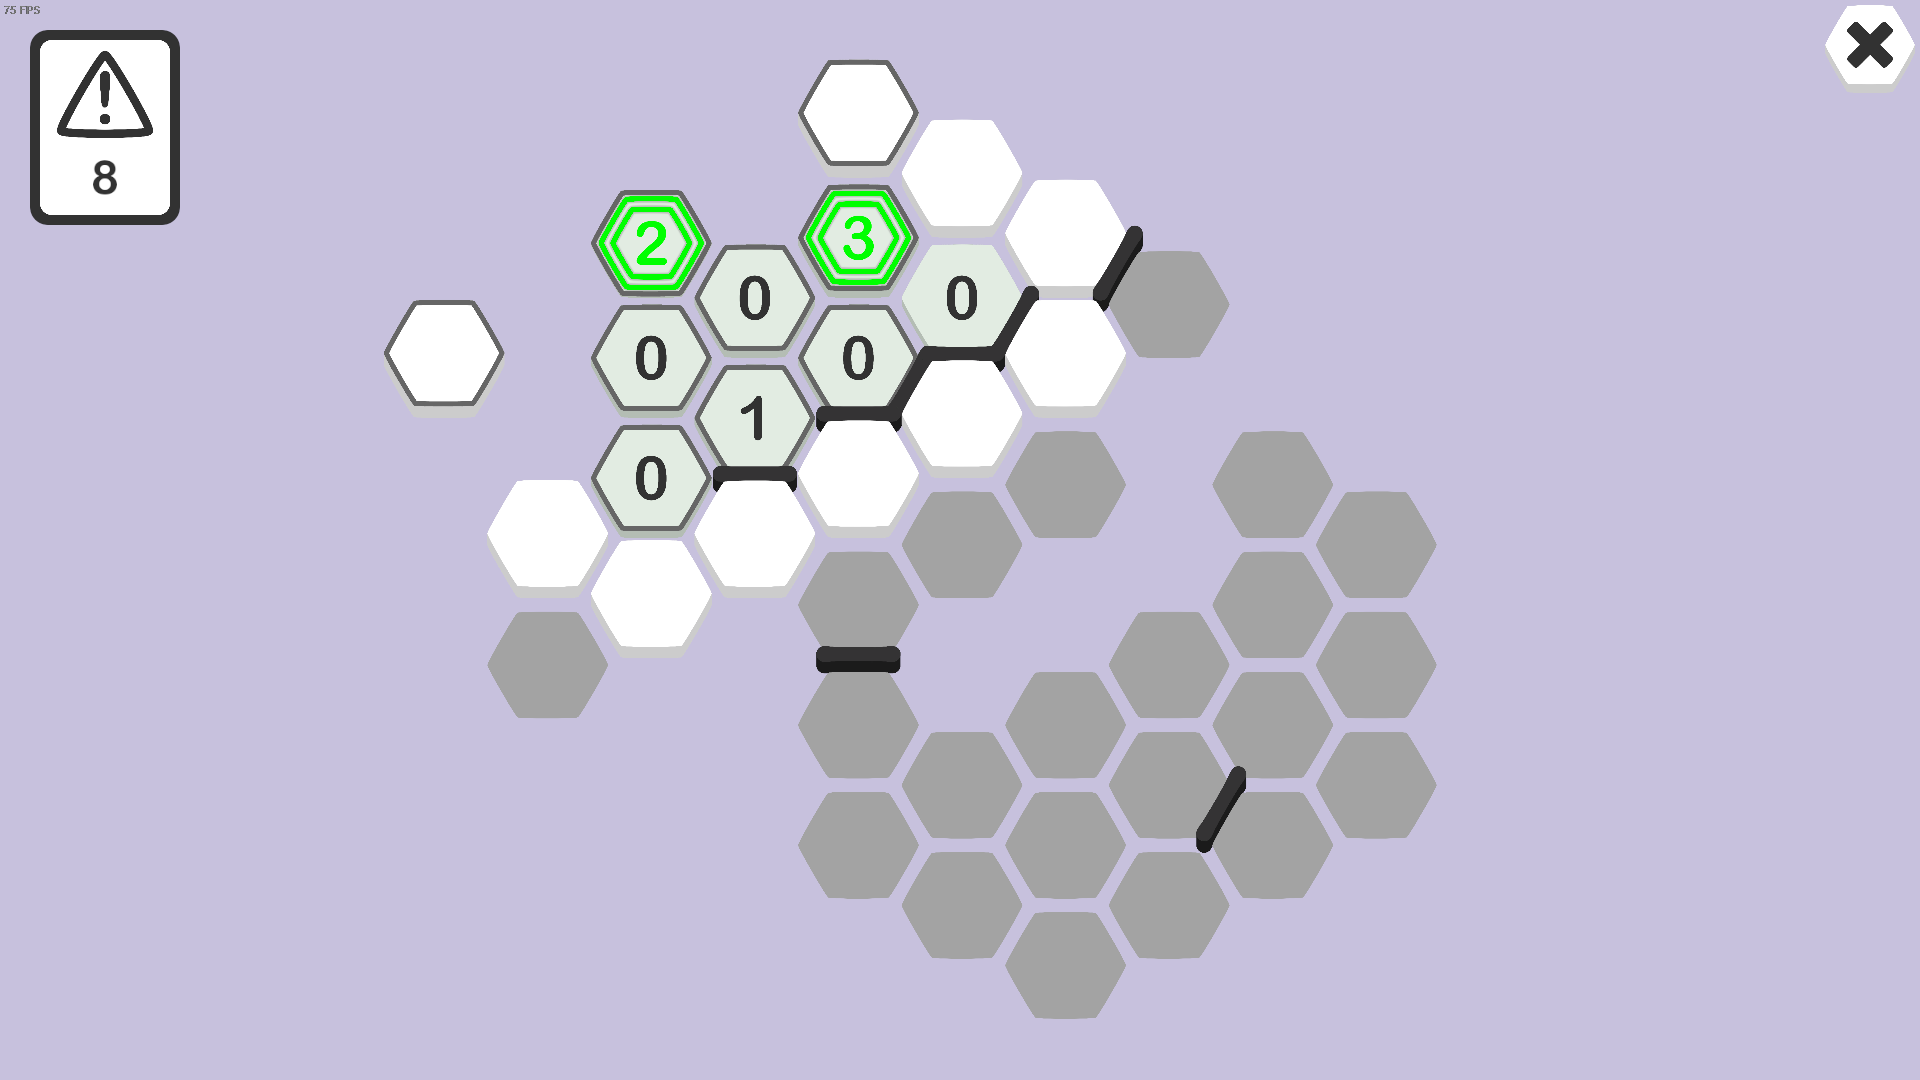
Ring hints are also capable of jumping gaps in the level like line hints. Here, the ring-2 hint is able to see both the top-most hidden hex (just north of the ring-3) and the isolated single hex to the left.
Cone Hints
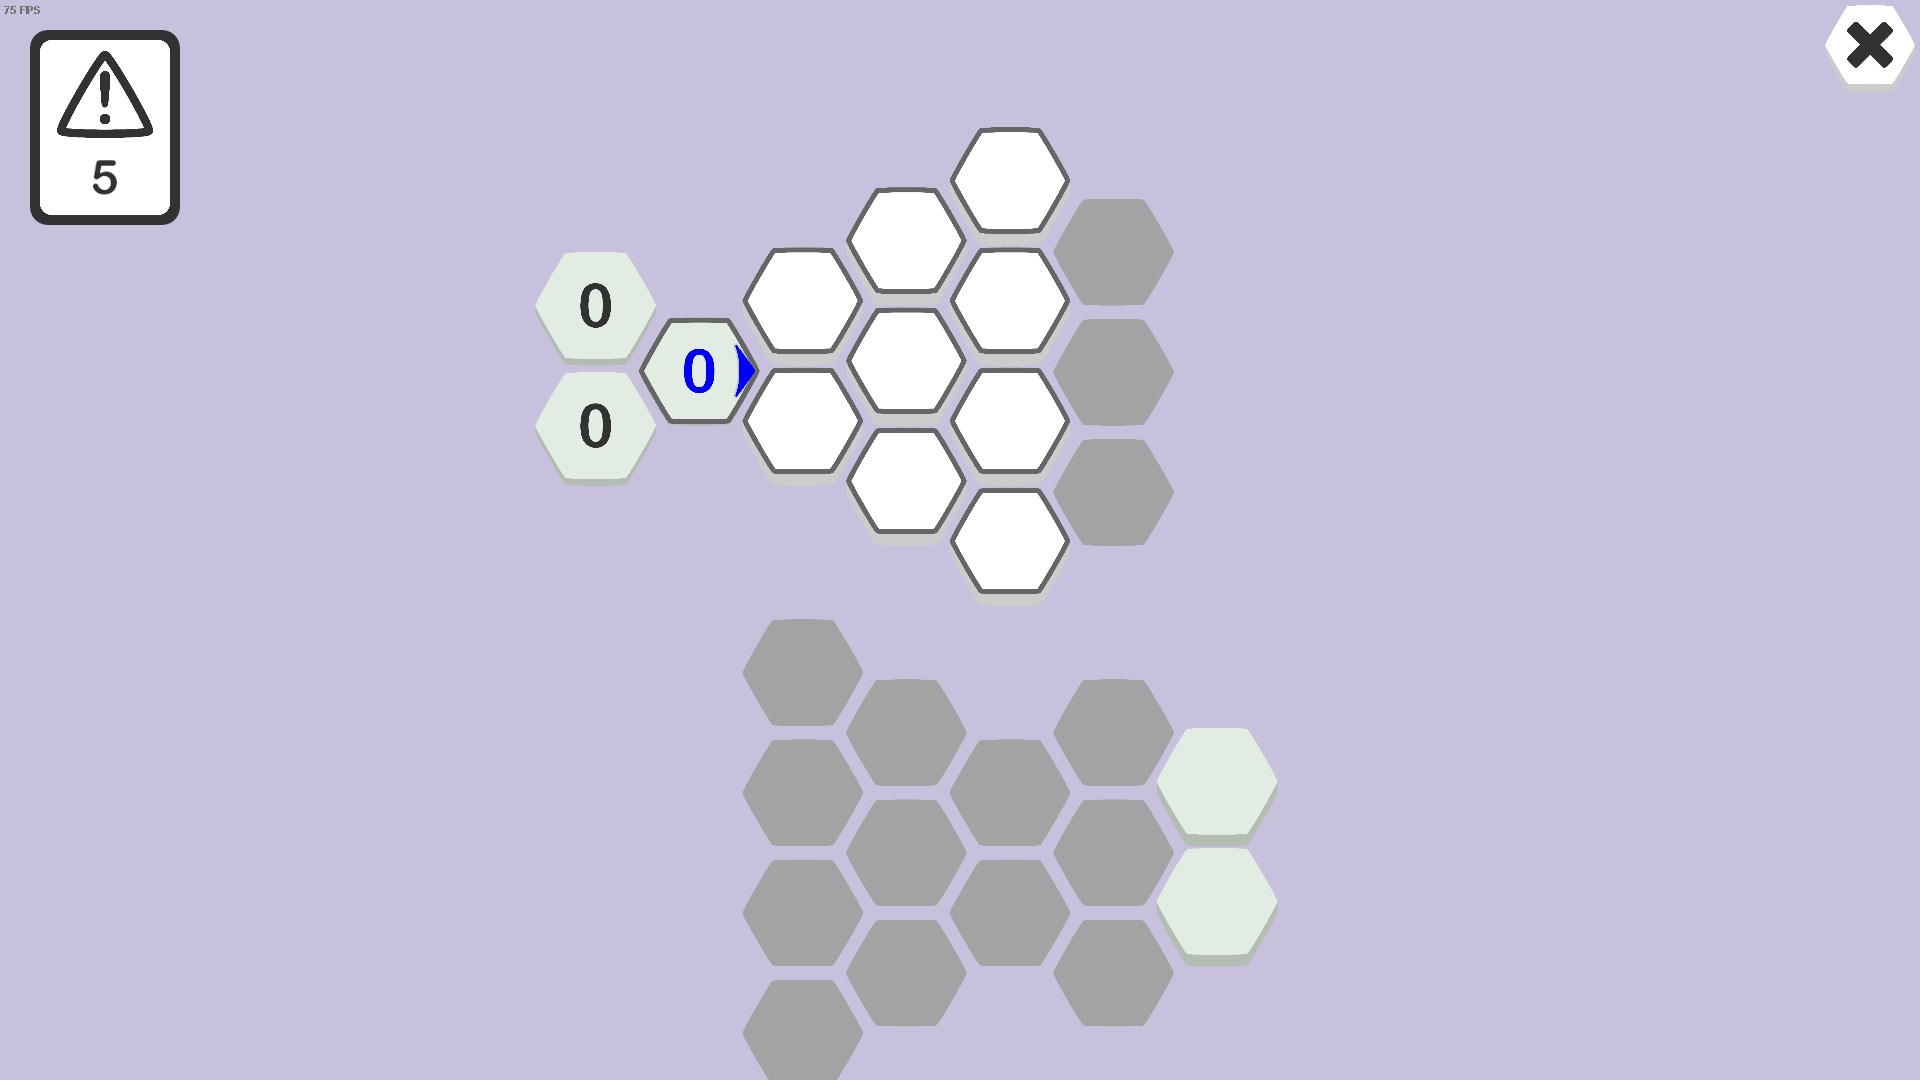
A Cone Hint is indicated by a large blue arrow pointing off a corner of a hex. A cone hint points to the nine hexes in a cone-shaped pattern up to three hexes away in the direction indicated (think of a bowling pin pattern).
You can differentiate between a cone and a line hint based on the size of the arrow and how the arrow points:
- A line hint uses a small red arrow that points along an edge of its hex.
- A cone hint uses a large blue arrow that points off a corner of its hex.
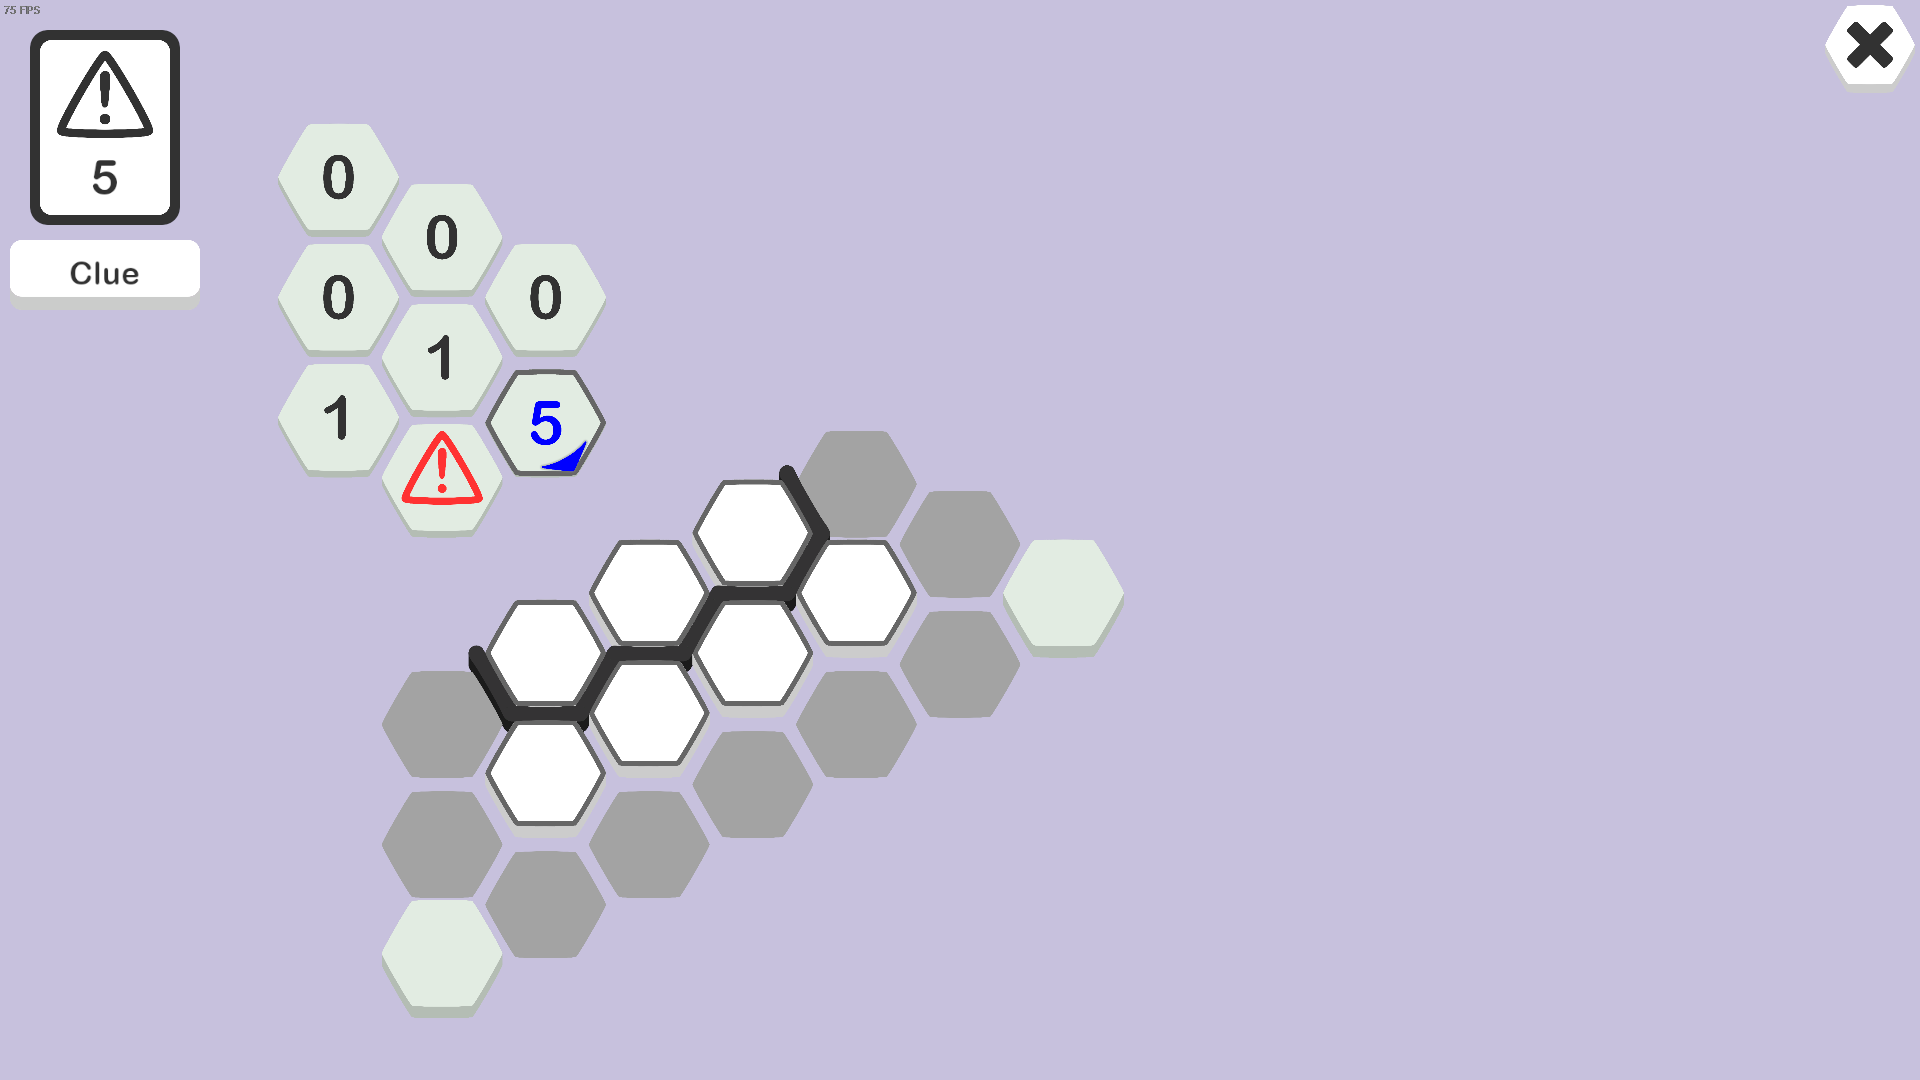
Like ring hints, a cone hint is able to jump across walls and gaps in the level.
In later levels, you will also encounter multi-cone hints. These hints work the same way that multi-line hints work for normal line hints – multiple cones in the indicated directions all share the single mine count of the hint.
Here we come to an end for hexceed Understanding the Rules and Language hope you enjoy it. If you think we forget something to include or we should make an update to the post let us know via comment, and we will fix it asap! Thanks and have a great day!

Leave a Reply