This guide should help you to correctly adjust your car for the best performance.
§ INTRODUCTION
Greetings!
I don’t have an engineering degree, all the recommendations provided in this guide are based on the information/feelings I have collected and are subjective as such.
Along this guide I will also provide my settings for Spector RS (S15) that I found good both for drifting with my FFB wheel and keyboard.
§ SUSPENSION SECTION PT. 1
In this section you will find the adjustments for the following components:
- Spring length
- Spring stiffness
- Damper: slow bump and rebound
- Damper: fast bump and rebound
- Toe
- Camber
Spring length
The spring size determines how low your car is. Generally lower stance allows for better car control because of the lower center of gravity.
You should avoid the extremely low settings though as you’d risk bottoming out the car. Basically with very low settings you will lose control on curbs and bumps.
The front springs should be higher than the rear ones, this is useful when you enter a drift while braking, so your rear end doesn’t lose that much traction because of weight transfer.
| Parameter | Front springs length | Rear springs length |
|---|---|---|
| Value | 9 cm | 8 cm |
Spring stiffness
The spring stiffness allows you to control how reactive the suspension will be.
Higher values (stiffer springs) mean very fast response but high chance of losing the car at the same time, this is because you need to be much more precise with your inputs.
Lower values will make suspension’s response smoother and more forgiving.
Usually you want to make the front suspension stiffer and the back softer.
⚠️ If your car understeers, make the front suspension stiffer and/or the rear one softer.
⚠️ If your car oversteers, make the front suspension softer and/or the rear one stiffer.
| Parameter | Front stiffness | Rear stiffness |
|---|---|---|
| Value | 75 kN/m | 60 kN/m |
Damper: slow bump and rebound
“Slow” defines weight transfers from driver’s input. This includes braking, accelerating, drifting, making transitions and so on.
Bump determines how much resistance is applied on suspension’s compression.
Rebound determines how much resistance is applied on suspension’s decompression.
Higher values mean more resistance, slower reaction.
Lower values mean less resistance and faster reaction.
Extremely high values will not allow suspension to compress leading to a traction loss.
Extremely low values will provide the same effect as above, the car body will simply fall down, losing traction.
Generally, you want to find a sweet spot in which the car reacts fast enough to be controllable and smooth. Wrong setup will make it janky and unpredictable.
You can easily test the work of bump and rebound settings (slow and fast) with the help of “Suspension stiffness” slider. Simply drag it back and forth. Slow movements with mouse will correspond to slow settings and fast movements to fast settings. Your goal is the reaction where the car’s body remains at the same height and the wheel stays glued to the ground (no traction loss).
⚠️ If the body weight transfer is too fast and results in grip loss, increase the overall stiffness.
⚠️ If you lose grip because of a very slow weight transfer, decrease the overall stiffness.
⚠️ If you want an easier drift initiation, use higher settings on the front and/or lower settings on the rear.
| Parameter | Front bump | Rear bump | Front rebound | Rear rebound |
|---|---|---|---|---|
| Value | 7000 N s/m | 6000 N s/m | 9000 N s/m | 8000 N s/m |
Damper: fast bump and rebound
The working principle is the same as for the “slow” parameters. The difference is that “fast” parameters work mainly for fast weight transfers, like hitting road bumps and other imperfections.
⚠️ If you drive on bumpy tracks, decrease the overall stiffness.
⚠️ If you find your car jumping around bumps too often, increase the overall resistance.
⚠️ If you find your car losing drift because of a bump or jump, decrease the front settings and/or increase the rear ones.
| Parameter | Front fast bump | Rear fast bump | Front fast rebound | Rear fast rebound |
|---|---|---|---|---|
| Value | 10000 N s/m | 8000 N s/m | 12000 N s/m | 10000 N s/m |
Toe
Toe is the adjustment of the wheels according to the longitudinal axis of the vehicles. Negative toe means that the wheels are facing “outside” hence why it’s called toe-out, the positive one gives the opposite effect, thus the wheels are facing “inside”, alternatively called toe-in.
For front wheels I would recommend to use a negative setting, as it may help you with transitions between corners and increases the maximum steering angle.
A slight toe-in on rear wheels can be beneficial to gain grip and to push the car a bit forward when applying gas.
| Parameter | Front toe | Rear toe |
|---|---|---|
| Value | -0.3 | 0.25 |
Camber
The camber settings will help you to balance your car while in drift.
The less camber you have the more traction you have on a straight line and less traction while drifting. Meanwhile, in drifting, negative camber on front wheels can add traction. It is possible thanks to weight transfer. Usually the front camber should be more negative than the rear.
For the rear either stick with 0 or slightly positive camber, because the car will lower itself under power and that slightly positive value will make a perfect zero for the best traction.
⚠️ If your car understeers, decrease front camber and/or put rear camber slightly positive or to 0.
⚠️ If your car oversteers, increase front camber and/or increase camber on the rear.
| Parameter | Front camber | Rear camber |
|---|---|---|
| Value | -9.6 | 0.45 |
§ SUSPENSION SECTION PT. 2
In this section you will find the adjustments for the following components:
- Anti-roll bar
- Caster
- Ackerman angle
- Max. steering angle
Anti-roll bar
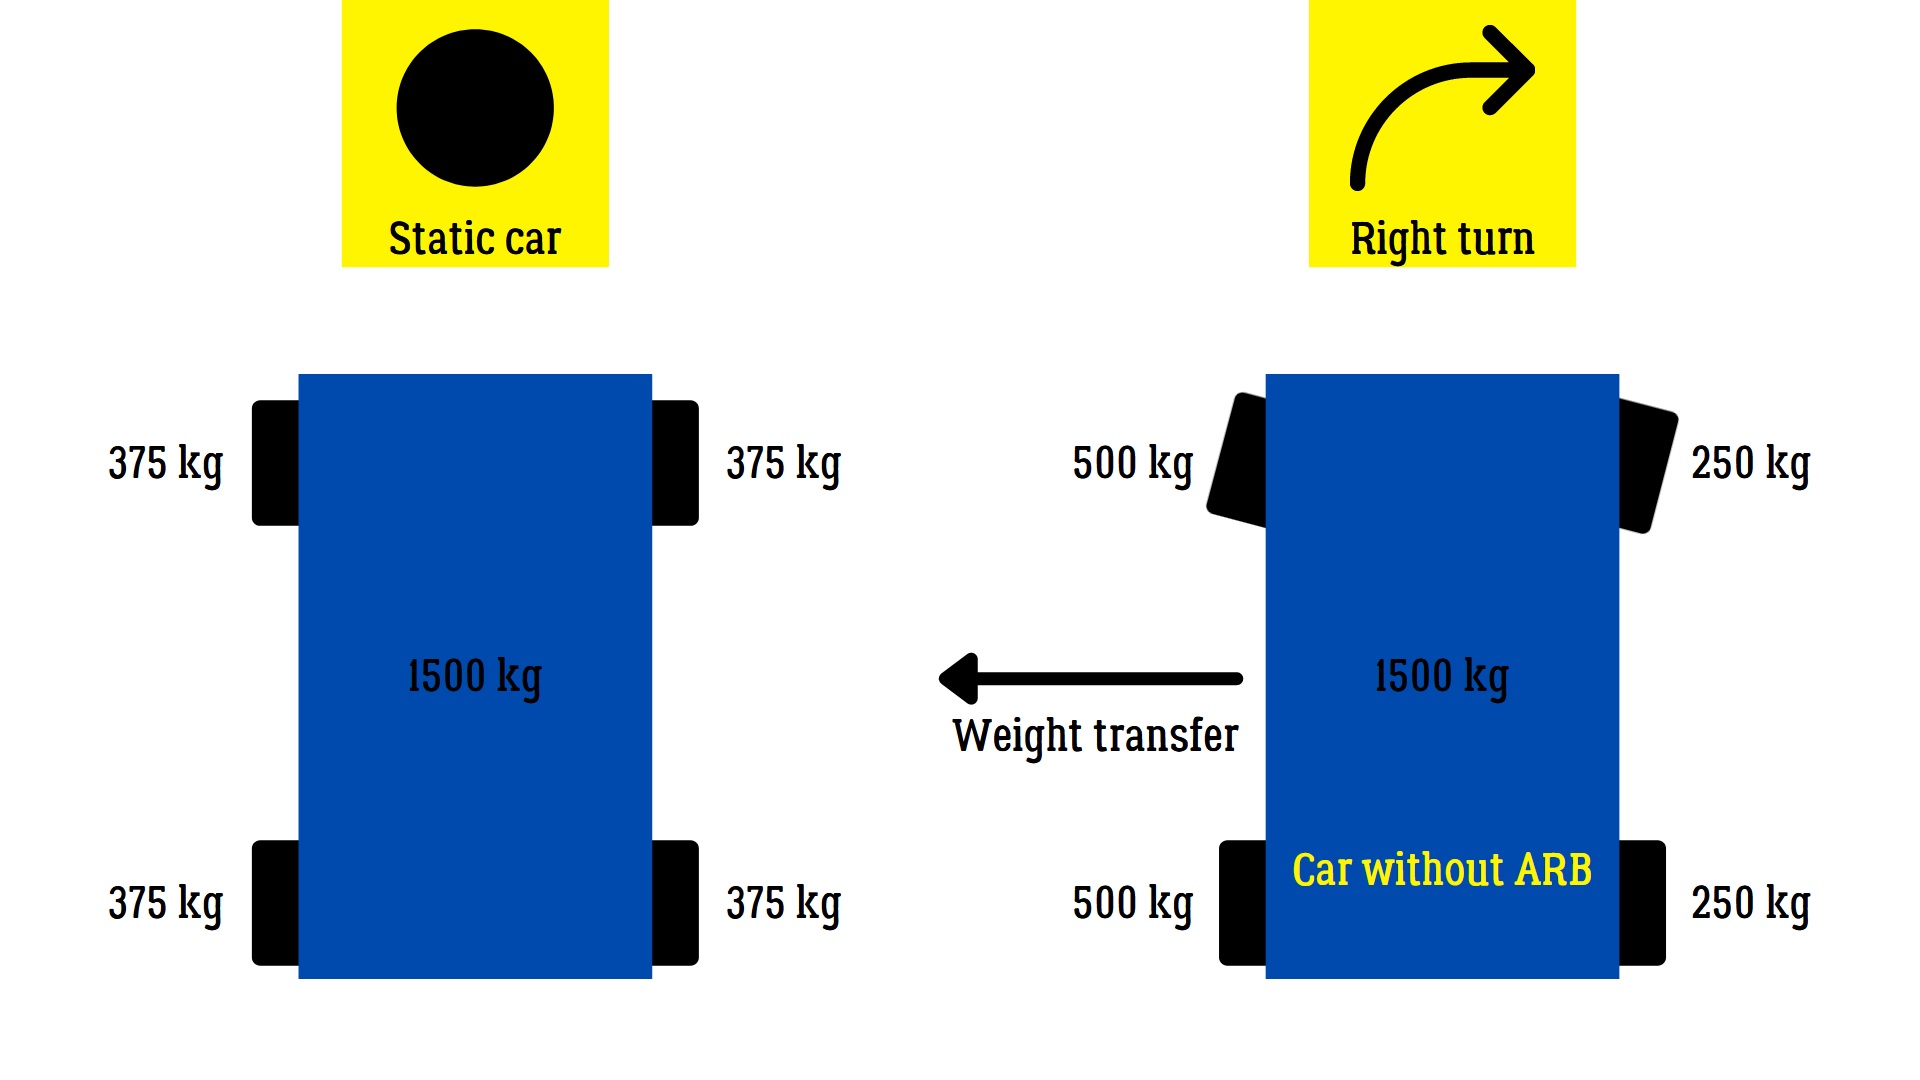
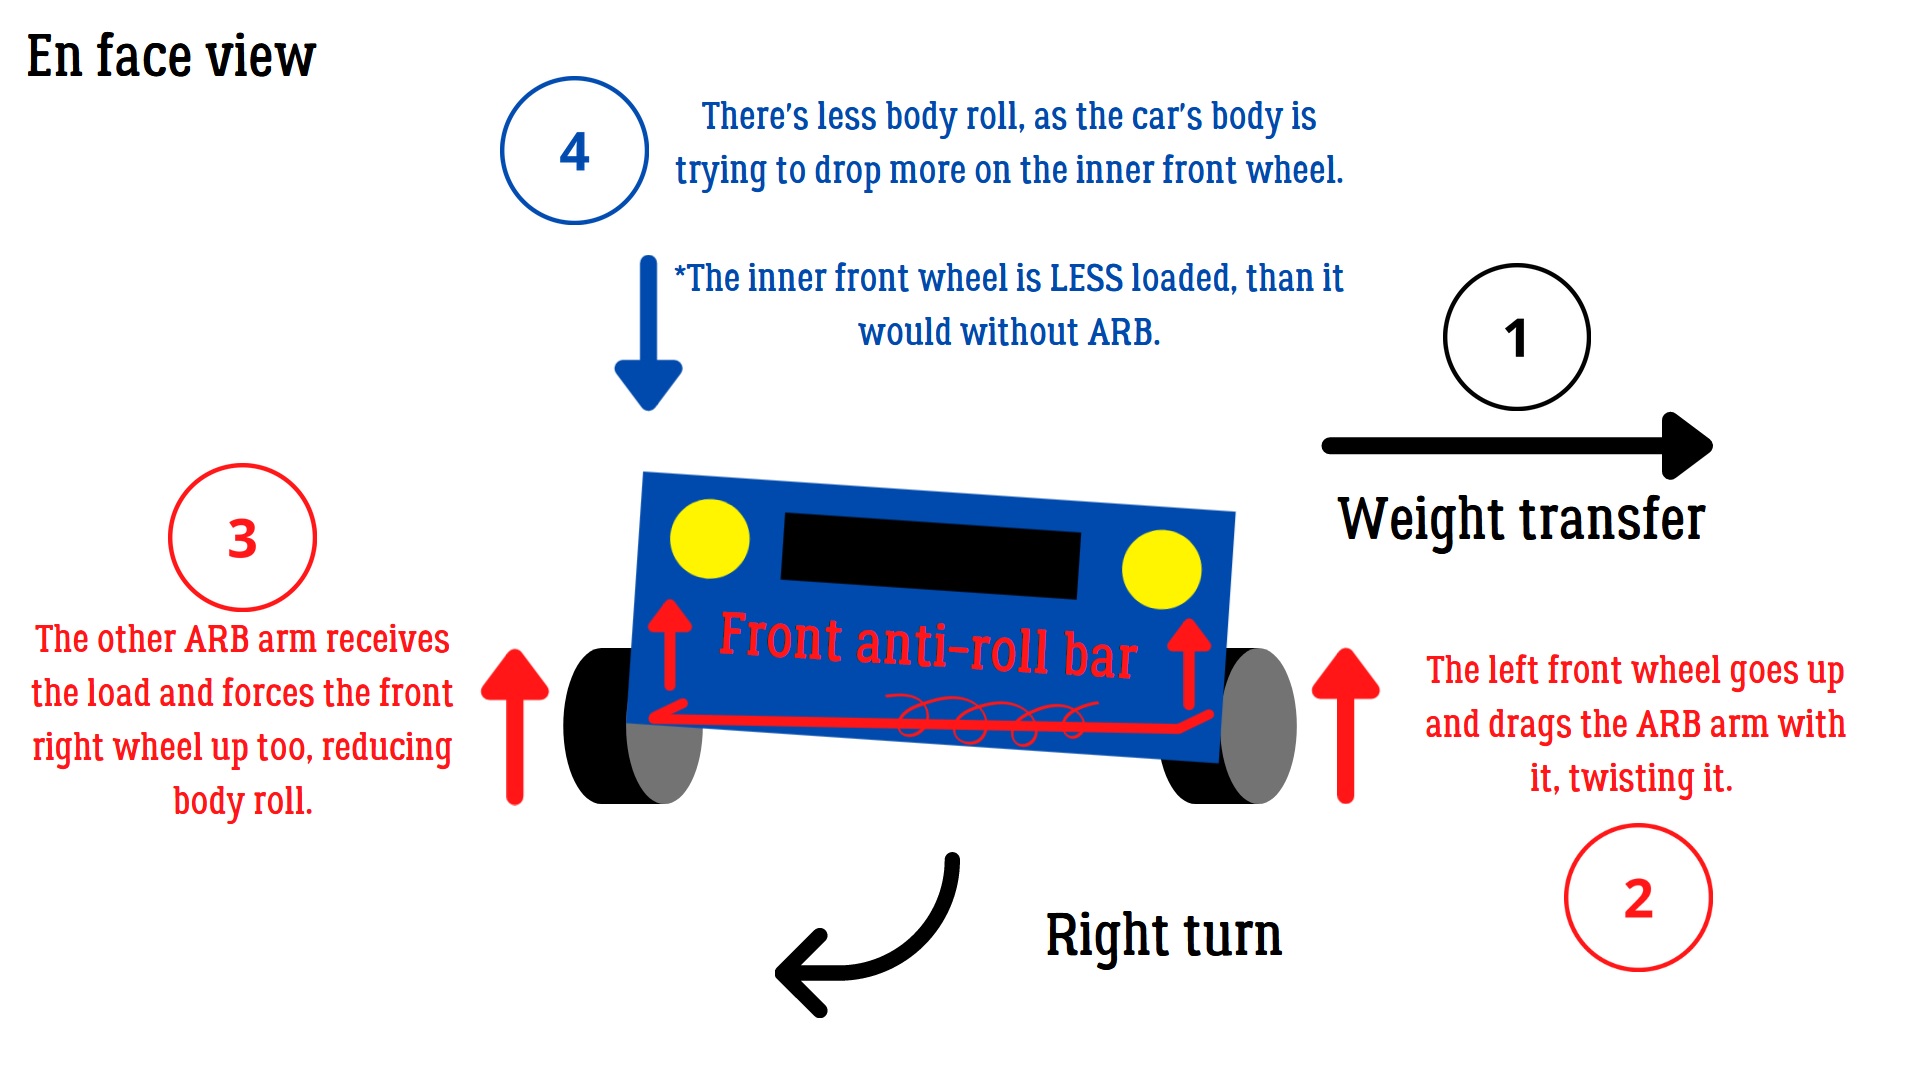
The anti-roll bar reduces body roll and allows to find balance between understeering and oversteering.
Do not underestimate the effect of this setting, this is one of the most important setting for controlling the amount of oversteer on your drift car.
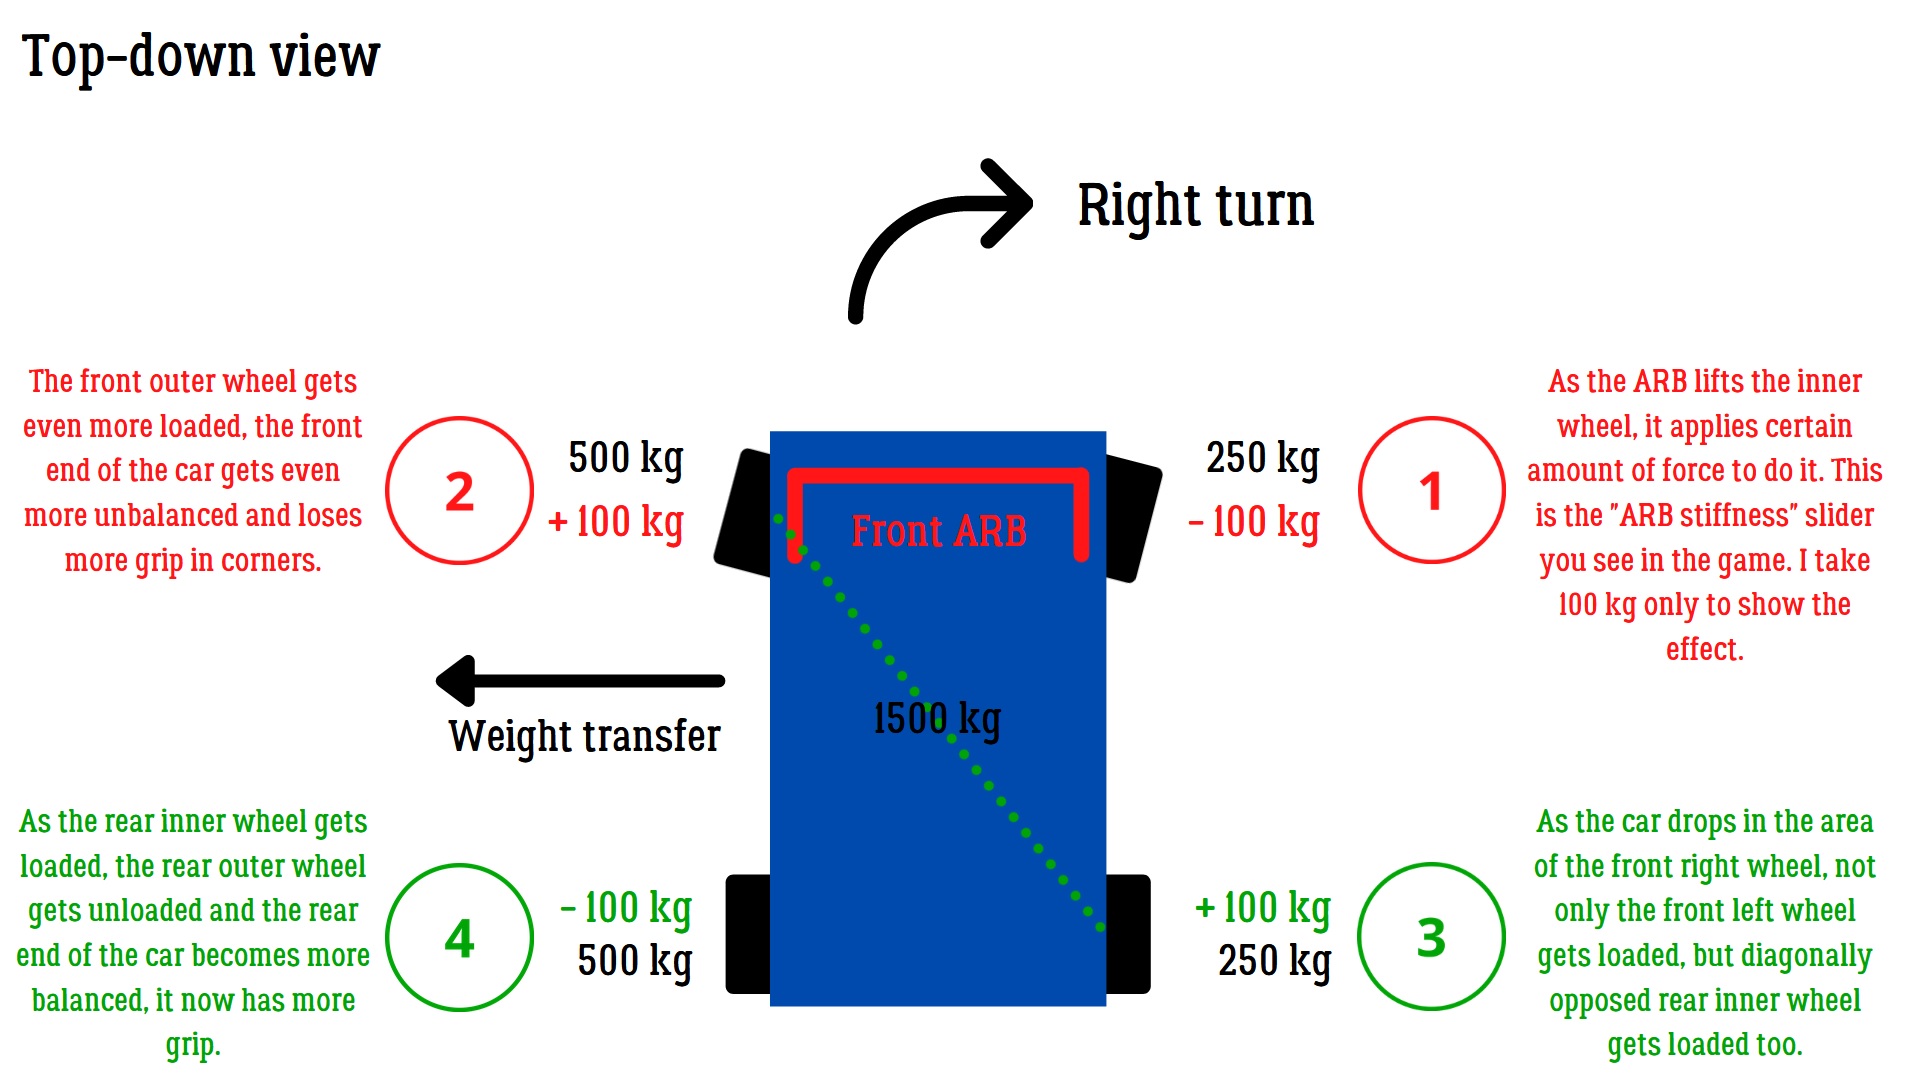
The anti-roll bar loads the outer wheel more and takes off load from the inner wheel, while forcing the latter up. This allows the car to roll less and reduces the grip on the end of the car where the ARB is installed. Meanwhile, the other end of the car becomes more balances and starts to have more grip.
If you install a stiff ARB in front, you give more traction to the rear end. This can be useful on a drift car, if you find that you lose the rear end too quickly and cannot hold angle for very long.
If you make your ARB in back is stiffer than in front, you will slide all over the place and the front will be grippier. This setting can help you if your car is underpowered or if you want your car to change its lateral position easier in drifting (for example for faster transitions).
| Parameter | Front ARB | Rear ARB |
|---|---|---|
| Value | 20 kN/m | 10 kN/m |
Caster
The caster angle helps to stabilize your car.
The more is the caster angle, the faster the steering wheel will return in its neutral position or even start going in the opposite direction, which is helpful for transitions.
| Parameter | Caster |
|---|---|
| Value | 10 |
Ackerman angle
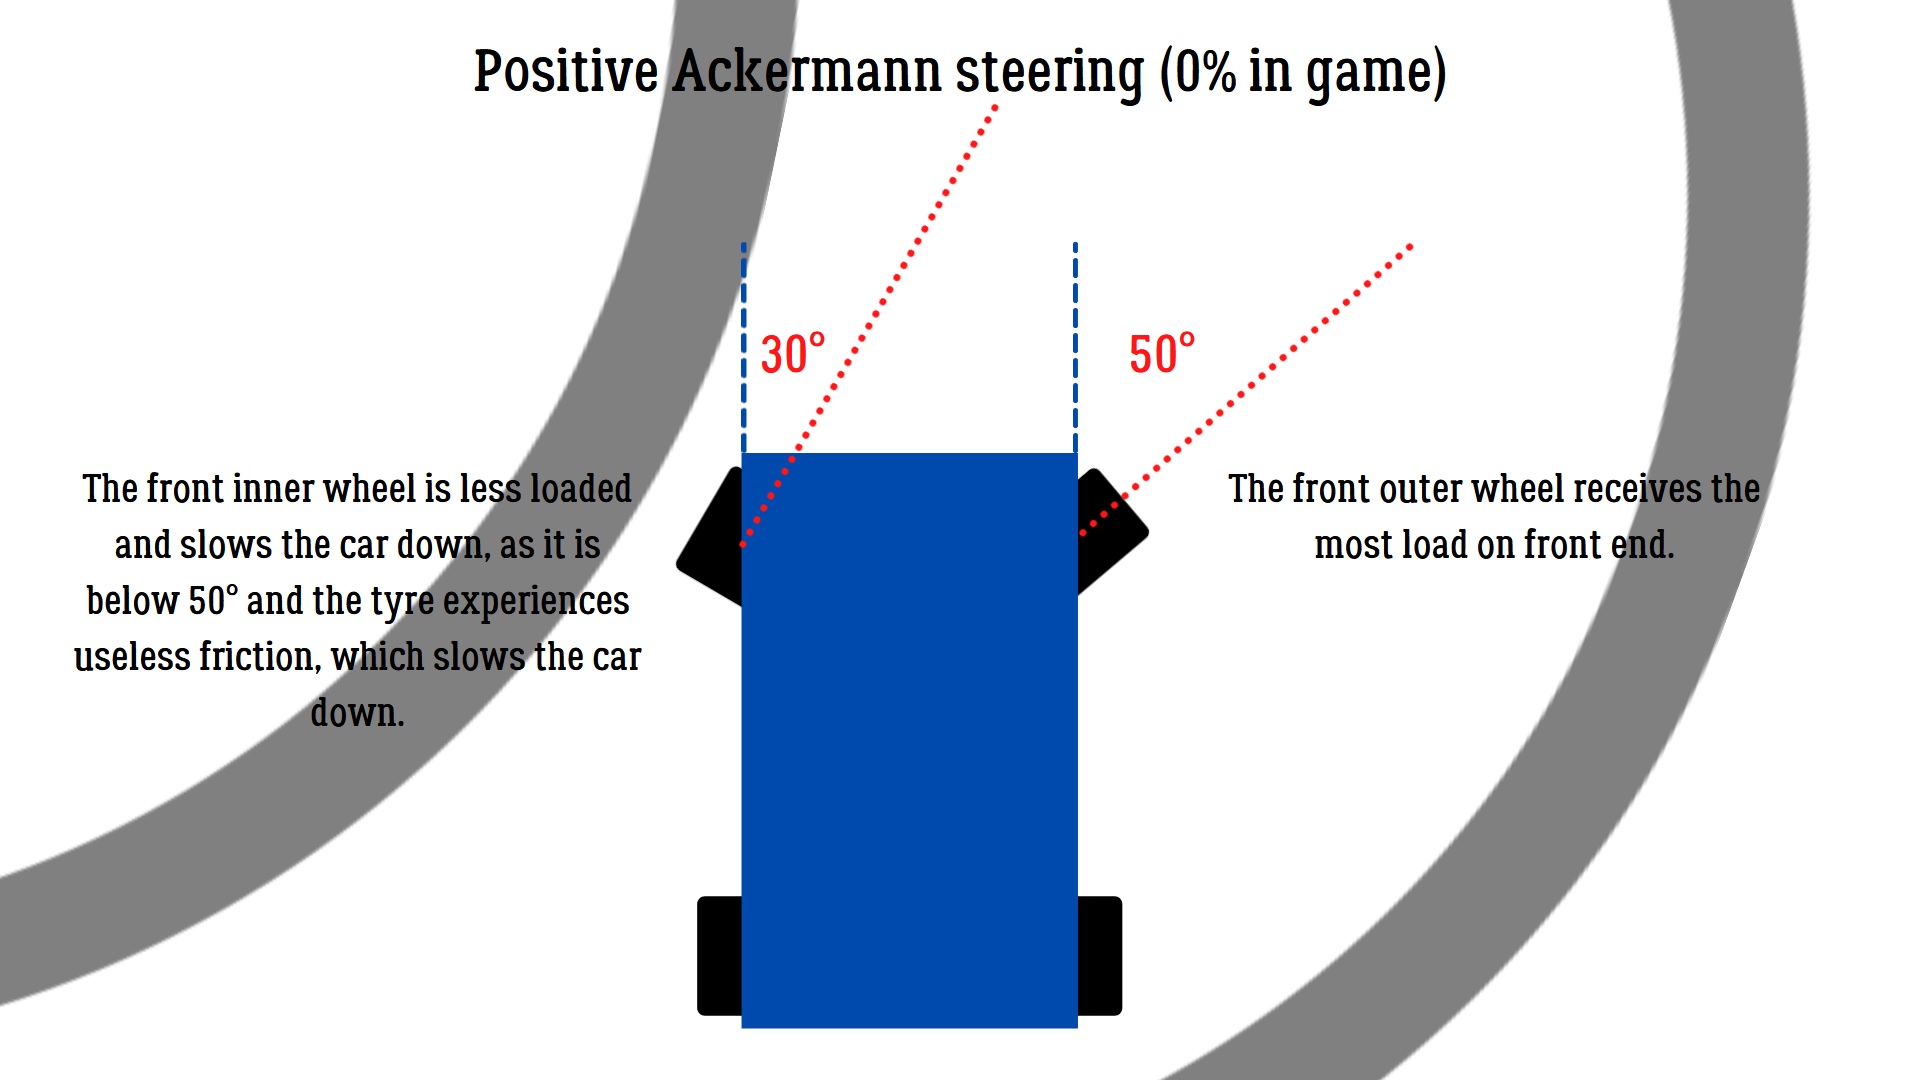
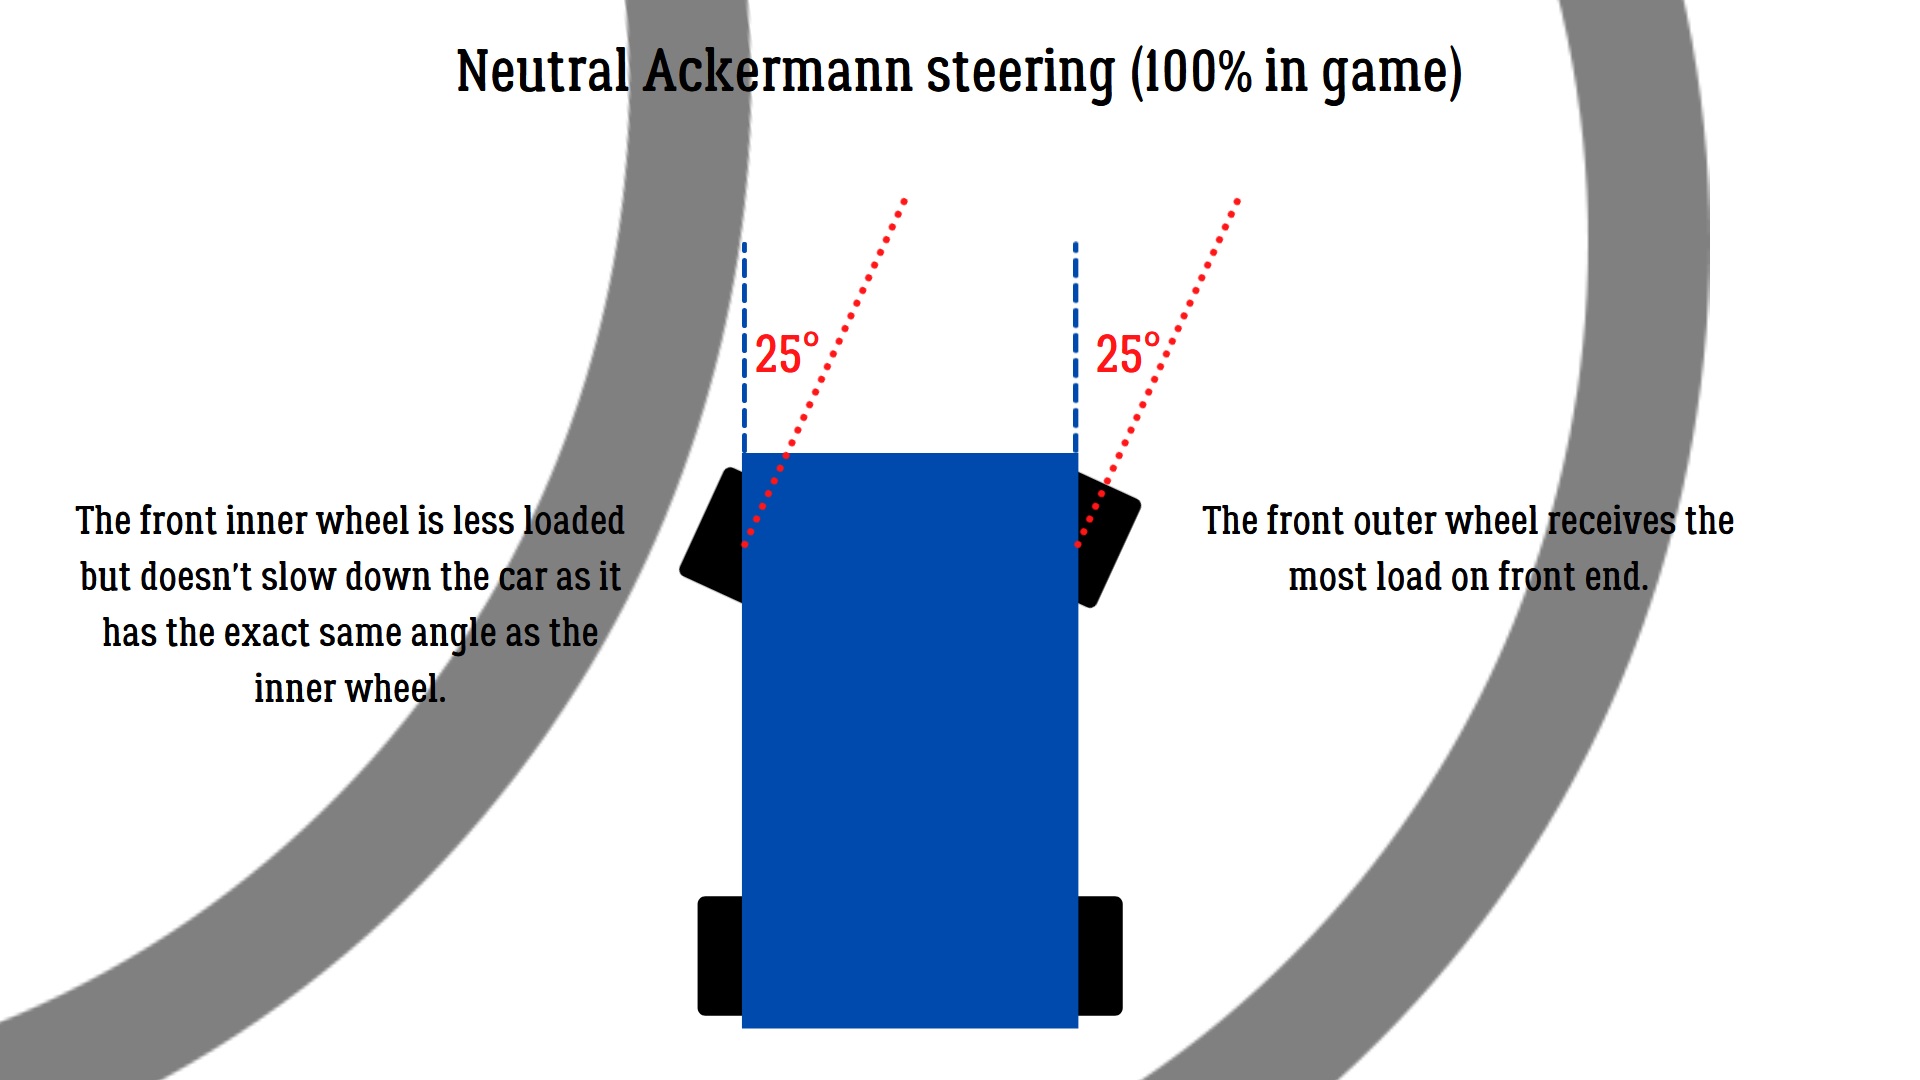
This setting is a personal preference.
- 0% is the maximum positive Ackerman setting (standard);
- 100% is the parallel Ackerman setting (zero);
Generally you want settings between 50% and 80% for speed. However, bear in mind, that with higher values you increase your chance of losing the car as it gets harder to hold a high-angle drift. Lower values give you a feeling of smoothness, but are actually making you slower through corners because of the increased front inside tyre friction.
I would recommend starting from 20-30% are and gradually increase the % as you get confident with driving and settings.
| Parameter | Ackerman angle |
|---|---|
| Value | 65 % |
Max. steering angle
A very easy and straightforward setting, just put it all the way up if you haven’t done so yet!
| Parameter | Max. steering angle |
|---|---|
| Value | 60 degrees |
§ WHEELS SECTION
In this section you will find the adjustments for the following components:
- Rim diameter
- Tyre width
- Tyre pressure
- Wheel adhesion
- Track width
- Tyre profile
Rim diameter
The bigger is the wheel, the harder it is to spin it.
⚠️ If you want an easier drift initiation, use lower rim diameters.
| Parameter | Front rim diameter | Rear rim diameter |
|---|---|---|
| Value | 18 in | 18 in |
Tyre width
The more the tyre width, the more traction you get from that tyre. Also bear in mind, that as with the rim diameter, wider wheel weights more and is harder to spin.
⚠️ If your car understeers, decrease width on front and/or increase it on rear.
⚠️ If your car oversteers, increase width on front and/or decrease it on rear.
| Parameter | Front tyre width | Rear tyre width |
|---|---|---|
| Value | 255 mm | 265 mm |
Tyre pressure
Tyre pressure determines how big is the contact patch (the amount of grip).
Higher pressure values make the contact patch smaller (the tyre touches less of pavement), lower pressure allows for more grip.
A pressure that is too low will not be beneficial for grip, as there will be excessive friction, that will slow you down.
As CarX doesn’t simulate tyres’ temperature, do not account for the heating of the rear tyres when adjusting this parameter.
⚠️ If your car understeers, increase rear tyres’ pressure and/or decrease the front tyres’ one.
⚠️ If your car oversteers, decrease rear tyres’ pressure and/or increase the front tyres’ one.
| Parameter | Front tyre pressure | Rear tyre pressure |
|---|---|---|
| Value | 140 kPa | 130 kPa |
Wheel adhesion
A very easy setting to understand, the more adhesion a tyre has with the pavement, the more grip and speed you get from it.
It is possible to present adhesion parameter as following:
- 90% – Vintage (old/used) tyres;
- 100% – Steet tyres;
- 110% – Semi-slicks;
- 120% – Slicks.
⚠️ If your car understeers, decrease rear tyres’ adhesion and/or increase front tyres’ adhesion.
⚠️ If your car oversteers, increase rear tyres’ adhesion and/or decrease front tyres’ adhesion.
| Parameter | Front wheel adhesion | Rear wheel adhesion |
|---|---|---|
| Value | 120 % | 120 % |
Track width
Track width allow for lower center of gravity and better control.
Usually drift cars have a wider front track for a better control during drifting.
| Parameter | Front wheel track | Rear base |
|---|---|---|
| Value | 5 | 1 |
Tyre profile
The smaller the tyre profile is, the more you get control over your car and the more grip there is overall.
Bear in mind, that a very low profile may yield unpredictable results, as there simply won’t be enough tyre wall to absorb car movements.
| Parameter | Front tyre profile | Rear tyre profile |
|---|---|---|
| Value | 35 % | 35 % |
§ ENGINE SECTION
In this section you will find the adjustments for the following components:
- Tune-up
- Max. torque
- Rev limiter
- Turbocharger
- Turbocharger air pressure
Tune-up
Basically an ECU tuning, the more the better.
| Parameter | Engine tune-up |
|---|---|
| Value | 5 % |
Max. torque
You do not want to put it very high, because the faster you have the maximum torque, the better. Very low settings though won’t allow you to squeeze all the power so you’ll need to raise the rpms.
Watch carefully for the data provided on the graph, you want the settings that yield you the faster acceleration numbers.
| Parameter | Max. torque |
|---|---|
| Value | 4800 rpm |
Rev limiter
Adjust it according to the graph provided in the game, there’s usually no need to go beyond the point of maximum power output.
| Parameter | Rev limiter |
|---|---|
| Value | 9115 rpm |
Turbocharger
A part that allows you to suck in more air into the engine, increasing the efficiency of the burning process and thus increasing power output.
While mandatory on some low powered cars, high tier cars may drift well without it. I personally believe there is such thing as too much power.
Adjust it to your preference.
| Parameter | Turbocharger |
|---|---|
| Value | Yes |
Turbo air pressure
This setting adjusts the efficiency of turbocharger, bigger values give you more power.
| Parameter | Turbocharger air pressure |
|---|---|
| Value | 2.0 atm |
§ TRANSMISSION SECTION
In this section you will find the adjustments for the following components:
- Diff. locking ratio
- Final drive
- Gears
Diff. locking ratio
Adjustable limited-slip differential.
- 0% is an open differential, which means that both of rear wheels are rotating independently.
- 100% is a completely locked differential, both of rear wheels are rotating at the same speed.
⚠️ The more the differential is locked, the easier it is to initiate drift.
| Parameter | Diff. locking ratio |
|---|---|
| Value | 0.70 |
Final drive
The final drive adjusts the overall length of all gears, without altering the ratios of every gear individually.
Bigger values mean shorter gears, lower values mean longer gears.
Typically this is adjusted according to the track layout, tracks with a lot of tight turns would need shorter gears for faster power output, while long configurations with high-speed sections would require longer gears. In the end you’ll want to find a sweet spot that would suite the majority of tracks.
| Parameter | Final drive |
|---|---|
| Value | 3.90 |
Gears
The individual adjustment of every gear’s ratio.
Bigger values mean shorter gear, smaller values mean longer gears.
This setting is useful if you find yourself switching gears on corners where it’s not really needed.
| Parameter | Gear 1 | Gear 2 | Gear 3 | Gear 4 | Gear 5 | Gear 6 |
|---|---|---|---|---|---|---|
| Value | 2.60 | 1.80 | 1.50 | 1.20 | 1.00 | 0.80 |
§ BRAKES SECTION
In this section you will find the adjustments for the following components:
- Brake torque
- Front brake bias
- ABS
- Launch control
Brake torque
The force applied to brakes, the bigger it is, the faster the car will stop.
More brake torque also can ease the wheel lockup if you do not use ABS and adjust a particular braking bias.
Adjust it to your liking.
| Parameter | Brake torque |
|---|---|
| Value | 3800 N/m |
Front brake bias
This setting tells the car where to apply the braking force.
More front brake bias will mean that the front wheels will do more to stop the car, than the rear wheels. Too much front bias can make car understeer when entering a corner. More rear bias (lower settings) will make initiating drift easier.
Very low settings, though, are not desirable, since they can make a car unstable when braking.
⚠️ If you want your car to straighten from drift on pedal braking, make a choice towards rear bias.
⚠️ If you want your car to remain sideways on braking, then adjust more braking to the front.
| Parameter | Front brake bias |
|---|---|
| Value | 75 % |
ABS
This settings helps you prevent locking the wheels when braking.
Disabling it in couple with rear braking bias will allow you to initiate drift with pedal braking (provided rear wheels will lock).
With the front bias, locking front wheels will lead to a massive understeer and missing a corner entry point.
| Parameter | ABS |
|---|---|
| Value | No |
Launch control
This setting is used in tandems mode. It allows you to have a clean start without too much wheelspin.
| Parameter | Launch control |
|---|---|
| Value | No |
Hope you enjoy the post for CarX Drift Racing Online How to Adjust Car for Drifting for Best Performance Updated!, If you think we should update the post or something is wrong please let us know via comment and we will fix it how fast as possible! Thank you and have a great day!

Leave a Reply