Intro and Assorted Tricks
After publishing a few non-orthodox maps pushing the boundaries of map-making, commenters kept asking how to reproduce my creations. This guide is a condensed collection of the most important techniques. The map editor is a complex and somewhat quirky tool that hides some of the more powerful features from you. Feel free to share your own non-obvious tricks in the comments.
To start off here are a few small ideas:
Quick Copy
Common landscape features like woods require you to place a lot of similar objects like trees. The https://steamcommunity.com/sharedfiles/filedetails/?id=1409336197 covers making individual copies by holding CTRL. A little less clear is that in the placement menu you can simply hold down the Shift key and keep placing (That’s what the hint “Hold [SHIFT] to add multiple objects” means). The objects will have a somewhat randomized rotation. Personally I think hand-placed forests where you individually rotate each tree look better (it’s easier to avoid noticable patterns of similarly rotated objects), but Shift is easily the quickest way to produce ambiance and background for an empty map.
Mixed Bridges
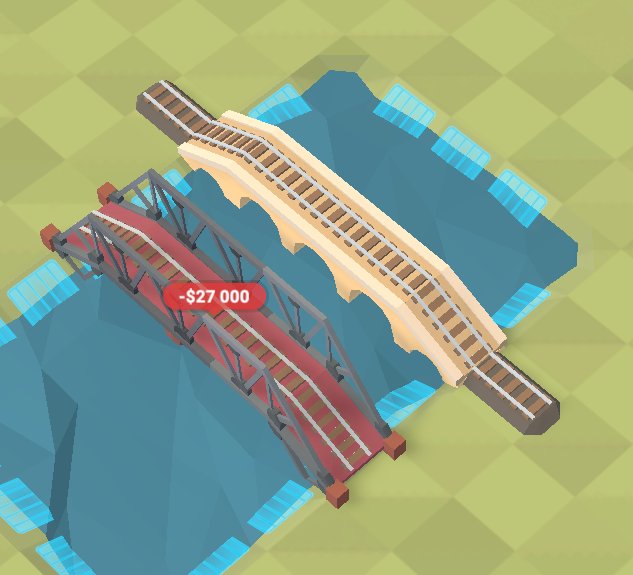
The menu for bridges and tunnels allows you to choose a style for bridges and every bridge placed by your players will follow that style. But nothing prevents you from choosing a different style for pre-built bridges. Select the ones that look best, place them and finally change the drop-down back to the style you want your players to use.
Drawing Order of UI Elements
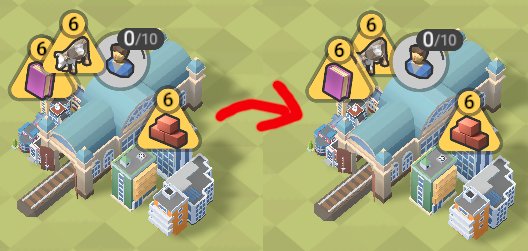
When creating complex scenery you will often place objects near each other or maybe you are force to do it because you ran out of space near an edge. That can sometimes lead to overlapping UI elements. The trick is that UI elements are drawn in the order the objects appear in the map file, which is usually the order in which you place them. So if you want a certain UI element on top, simply create a new instance of the object (easiest by CTRL-copying it) and it will get priority.
Custom Water Colours
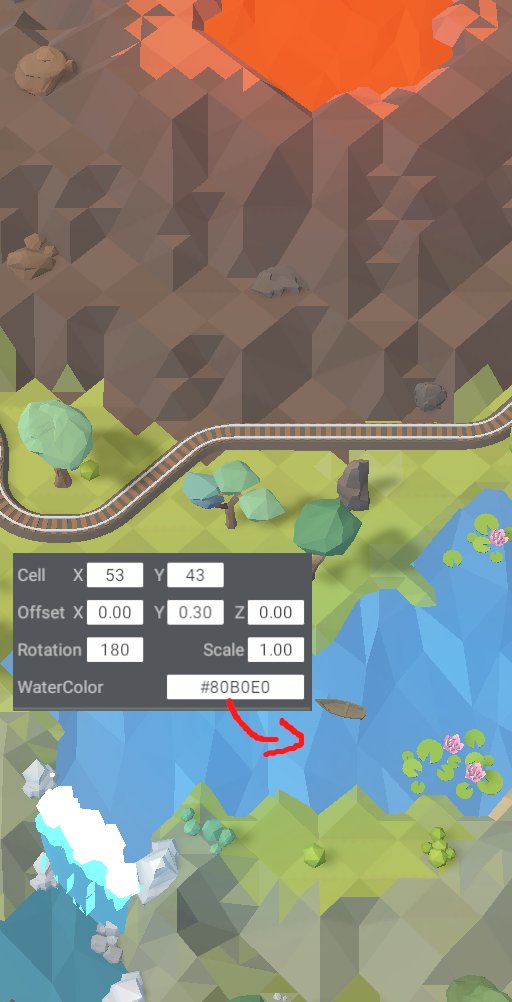
Water objects allow a custom “WaterColor” setting. You have to enter it as a hexadecimal RGB value. You start with a # and then you specify how much red you want on a scale from 0 to 255, but as a base-16 number, so from 00 to FF. Then you do the same for green and finally blue. The default water color seems to be #5392A7. If you want the end result to still look like water, this is a good jumping-off point. Adding to all 3 numbers produces a brighter blue (like the mountain lake in the picture; compare to the default water in the bottom left), subtracting from all 3 makes the colour darker. Changing the RGB numbers relative to each other will lead to a different hue. There are no limits to your imagination – something like the lava of a volcano like in the picture to the right or some purple alien goo totally works as well.
If you want your liquids to pop, don’t forget to add some flares of appropriate colour.
Receive-only Stations
Sometimes you just want an arrival-only resource sink. I haven’t found a way to entirely disable production, but we can get close. Setting the “Store size” to zero is important for visual clarity (so the player doesn’t expect workers to spawn), but if a production cycle finishes, the store size will for some reason revert to the default 10. So we just have to make sure that a production cycle never finishes and we have effectively created a receive-only station. This is done by setting a station’s “Time to produce” to something absurdly large like 70000 or even 150000 seconds. That way it will never actually produce a worker and it won’t even show a progress bar to the player.
The Power of Positional Values
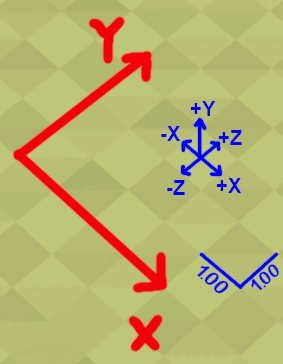
Let’s look at how position is handled in the editor. The tiles that form the large grid are called cells. Each cell’s position is defined by a postiive X-value and a positive Y-value (red in the image). But there is also a smaller grid where every cell is divided into 100 units (blue in the image). Confusingly that grid has zero in the middle of each cell, so each cell goes from -0.50 to +0.50. Even more confusingly the horizontal grid is comprised of x- and z-values while y is now elevation.
Placing objects only with the mouse, you might get the idea that there are certain positional limitations on the smaller grid. Often you will find a seizable dead-zone near the edge of a tile. But what if you want to place a decoration in the corner of a tile or spanning two tiles? What if you need a fence to smoothly connect? Thankfully most of these limitations are an illusion merely tied to mouse-inputs. If you use the numerical x-, y- and z-values on the object properties you have almost complete free-reign over object positions.
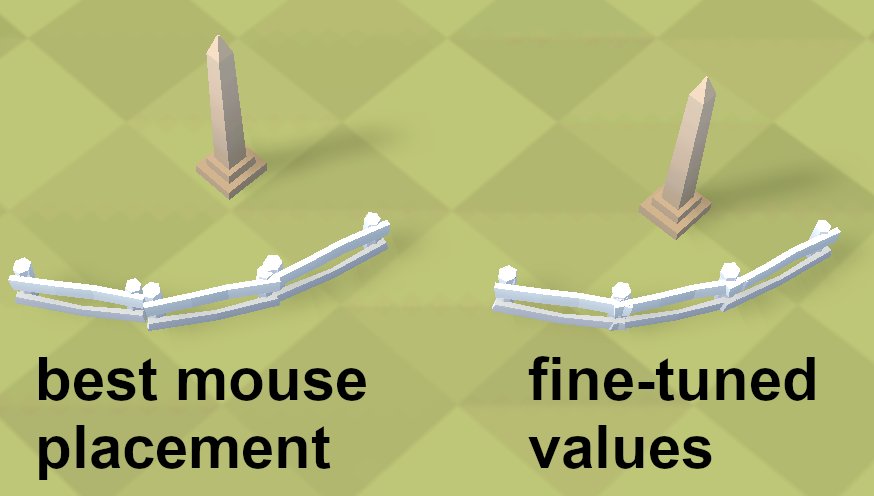
Scaling an object to a custom size has many uses. But I’m sure you have already noticed that sometimes moving a scaled object resets the size for seemingly no reason. Same deal, this only happens using the mouse to move. Just move the object via the positional values and the scale will always be kept! Values also allow you to temporarily move an object to reach something else behind or below and put it back exactly where it was later (say by adding and subtracting 10 to the cell position).
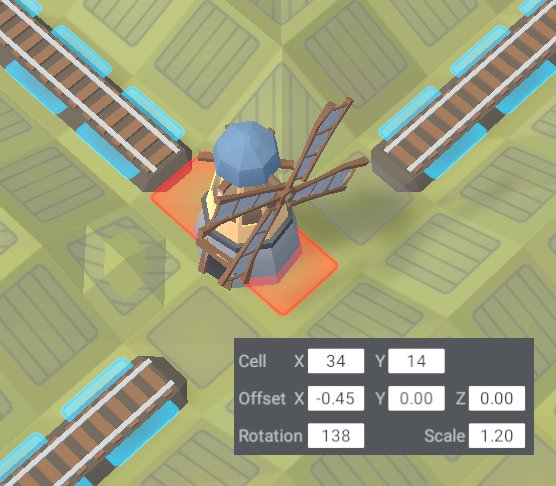
One thing to note is that with x- and z-offsets you can put an object very far away from the cell (X- and Y-value) it is anchored to. The game accounts for that and makes objects block rails in the cells they are actually present at, not in those they are anchored to. This allows us to do some neat tricks. We can take a 1-tile building (like the classic windmill pictured to the left), scale it up slightly and move it towards the edge of its cell until its footprint covers two cells. Now a 1-tile building can block a 3-way junction. Handy if you want a one-time payment to unlock the whole junction.
Also worth mentioning that the elevation value (y-value) is always relative to the ground. If you raise the ground, the object will keep the same relative position. Place a building on uneven ground and its edges are likely to float.
Custom Settings are Your Friend
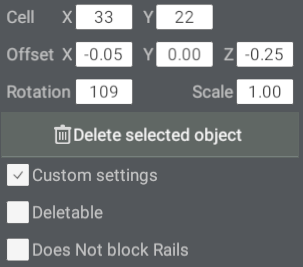
Hiding behind the “Custom settings” toggle are very useful options that allow you to fully customize the use of every decoration and obstacle in the game. Depending on what the default settings are (and they vary wildly by object) you can make an object invincible or deletable (and set its price) as well as add or remove collision. Settings are mutually exclusive, but it makes sense that you cannot delete an object that doesn’t get in the way in the first place.
Objects with “Does Not block Rails” allow you to decorate without interfering with trains. Flowers and roads are a good way to spice up otherwise empty plains, but with this setting you can use anything you want. On the other hand if you want flowerbeds to stop players from creating rails you can totally do that as well.
Making decoration permanent has the advantage of visually cleaning up your map. I find it most noticable in busy city areas, but even in a rural landscape like in the image below. I really don’t like how most of the objects show up as deletable and clutter the player interface. However, if you make what’s only there for decoration non-deletable, these objects don’t show up in red anymore. It also clearly indicates to your players that there are no hidden paths (like through the village in the image below) and it draws their eye to the gameplay obstacles you want them to notice (like the windmill blocking the rails).
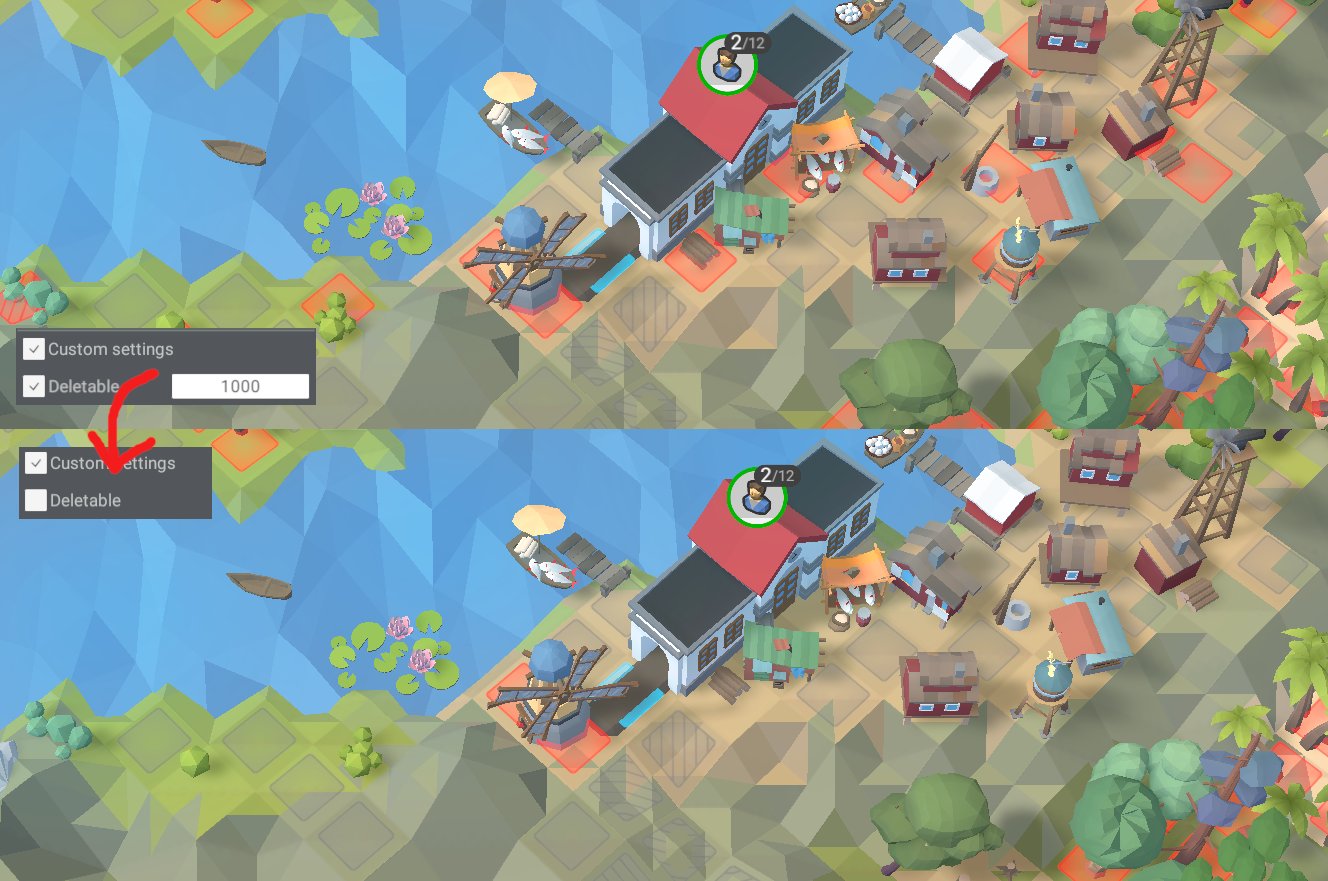
Besides cleaning up, this setting also allows you to use any decoration as a thematic blocker against player rails.
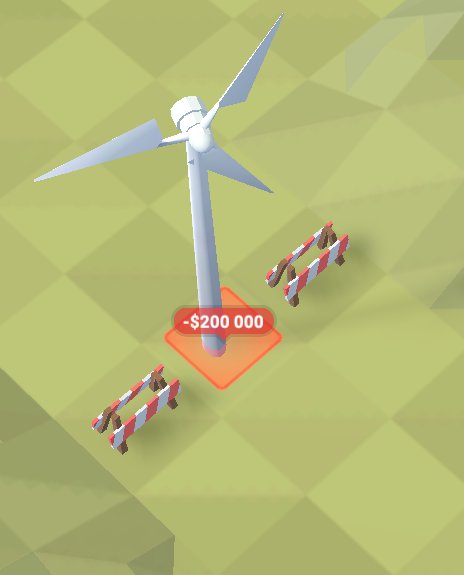
Finally, custom deletion costs allow you to fine-tune balance in your map. I think it is a good idea to leave hall-marks alone (red barns and windmills are somewhat famous from the campaign for costing 100k to remove), but custom values for obstacles can create some really interesting challenges in your maps (for example I’ve started using wind turbines as 200k obstacles).
Custom Buildings for Industries
Have you noticed how production buildings and stations don’t have rail lines in the editor? That is because the rail connections are dynamically drawn on top of the ground at the start of a level. Let me repeat that: The part that trains will interact with, the rail connection, is drawn on top of the ground, regardless of where the building is at the start of the level. Using custom y-values you can thus have floating buildings or (more commonly) hide them underground and they will still function and connect to players’ rail networks. This allows you to assemble any decoration you want into a custom production building!

Just make sure that you set your assets to be non-deletable (unless you want players to dismantle your custom industries). If you have a big building covering the rail lies (advisible since trains spawning from thin air doesn’t look very nice) you should probably remove the collision on it to ensure players can connect to the rail lines. Don’t worry about players plowing through your industry if you do that – the original underground building still projects a footprint with collision, preventing tracks from being layed.
Just as a visual aid for you as the creator it is a good idea to place some custom rail pieces where the entrance of the original industry is, just so you know what to design your building around. Also note that you do not have to stick to the footprint of the original building which can even help make your new building look better, since the interface will be offset a bit lower than with regular buildings (because the original industry is under the ground and the interface is anchored to it – for that reason make sure to only sink it down as much as is absolutely necessary). You also don’t have to stick to industries from the game – using Alchemical Labs or Universal Factories you can set up totally new produciton buildings and design a fitting exterior for them (I have for instance set up a restaurant and an oil terminal that way).
Intro to Map Files
Now this is where we leave the editor behind and start messing with the map files directly. Maps are stored in a Unity binary format called .bytes. On Windows their location is %user%\AppData\LocalLow\Oroboro games\TrainValley2\YourLevelName.tv2level.bytes. Like any other binary format you can use a hex editor to start rooting around and possibly change some values. I am using HxD, but any hex editor will do.
Warning! It isveryeasy to permanently destroy your level by making a careless edit. Always make back-ups and be very careful.
Indeed, a single wrong number can softlock the game whenever you try to load your map. But the pay-off of this risky endeavour is that you can do stuff that the editor normally doesn’t allow. For starters we should familiarize ourselves with the general structure of map files:
You can explore the other entries yourself, but what we will be mostly interested in is in the Productions category. Let’s take a closer look what each production entry contains (stripped of all the confusing stuff inbetween):
This is actually pretty approachable and looks like a list of variables defining how each produciton building acts. So we know that after the name “RequiredResources” there must be some kind of value telling us the inputs of that building. And if we figure this out, we can just change the inputs to whatever we want. Jackpot!
Custom Inputs
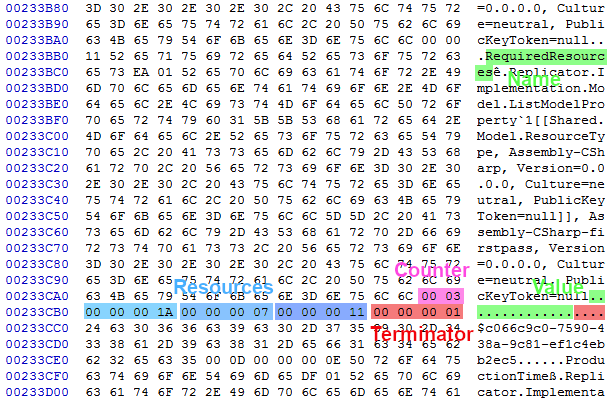
The image to the side shows you how such an entry for RequiredResources looks. The name is at the top of the block and the value at the very end. Values consist of a 4-digit counter telling you how many resources will follow. And the resources themselves are also simply hexadecimal numbers padded to 8 digits. So in the image we are dealing with a building that requires 3 resources. Looking up the individual resources in the table below we see that the inputs are workers, coal and gold ore, so we can deduce that we are looking at a Gold Melter!
This is where the danger of bricking your map file comes in. There must be exactly as many resources as the counter specifies or the game will not know how to continue reading the file! And you may never change the terminator at the end. Think of it as a comma or a closed bracket. It doesn’t belong to the value, but if you carelessly change it, the whole file will become unreadable to the game. I strongly recommend you do the hex editing right at the start of the map. That way you don’t lose progress if you mess up and at that stage the level file is also much shorter so it’s easier to find the right industry.
Here are some more examples:
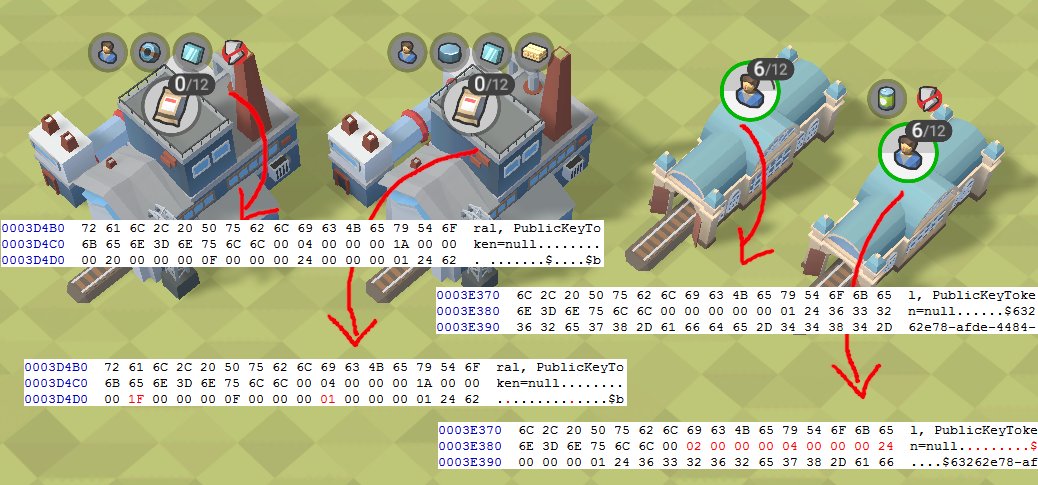
Note that stations internally count as just another production building. Their input counter is simply at 00, which means they automatically produce without any inputs. Don’t forgret to increment the counter if you want to add more resources!
Finally here is a list of the most important resources. Note that the ID is a hexadecimal number (so it goes to 0F before rolling over to 10).
| ID | Resource |
| 00 | Airplane |
| 01 | Boards (Wooden Planks) |
| 02 | Bricks |
| 03 | Building Materials |
| 04 | Canned Goods |
| 05 | Caoutchouc (Natural Rubber) |
| 06 | Cars |
| 07 | Coal |
| 08 | Computers |
| 09 | Copper Ingots |
| 0A | Copper Ore |
| 0B | Earrings (Jewelry) |
| 0C | Engines (Applicances) |
| 0D | Fuel |
| 0E | Furniture |
| 0F | Glass |
| 10 | Gold Ingots |
| 11 | Gold Ore |
| 12 | Goods |
| 13 | Grain |
| 14 | Handtools (Tools) |
| 15 | Iron Ore |
| 16 | Livestock (Cattle) |
| 17 | Machine Tools |
| 18 | Microchips (CPUs) |
| 19 | Oil |
| 1A | People (Workers) |
| 1B | Polymers |
| 1C | Rockets |
| 1D | Rubber (Processed Rubber) |
| 1E | Sand |
| 1F | Steel Slabs |
| 20 | Steel Plates |
| 21 | Uranium |
| 22 | Wire |
| 23 | Wood (Logs) |
| 24 | Electricity |
| 25 | Glue |
| 26 | Paper |
| 27 | Books |
| 28 | Engineers |
| 29 | Bonds |
| 2A | Dynamite |
| 2B | Money |
What follows beyond 2B are the colours used by the Passenger Flow mechanic (2C-33), the Christmas items and the Halloween stuff. I have not bothered to map them out, since I personally don’t intend on using them. For figuring this stuff out or even if you find stringing the right resources together cumbersome you can use one of the industries that allow custom inputs (Alchemical Lab, Universal Factory). Set your inputs in the editor, find them in the file and just copy them over the industry you want to change.
Here we come to an end for Train Valley 2 Advanced Map-Making Techniques hope you enjoy it. If you think we forget something to include or we should make an update to the post let us know via comment, and we will fix it asap! Thanks and have a great day!
- Check All Train Valley 2 Posts List


Leave a Reply