
Choosing your initial 3 survivors.
In tough mode, the first 3 survivors are critical. Choose the following survivors.
1.A Defender with holy warrior + any other good traits you might get on the Defender. Late game you will need a tank and the holy warrior Defender can equip the best late game gear. You might rescue one, but there is no guarantee and re-rolling with a ritual is hit-or-miss.
2. A scout with 2 of spotter/huntsmen/perceptive for the vision and sniper rifles + any other good traits you might find.
3. A survivalist with naturalist + other good traits. This gives you the entangle ability, which will really help with the first few assaults against your base. Survivalists also can put points into gather, which will greatly help with rescue missions and is very useful for solo scavenging. Put this survivor’s first 3 points in gather.
Rolling these 3 will probably take you 20-30 minutes of constant re-rolling.
Some players like to find a good researcher/constructor/crafter, but you will find all the gear you need scavenging and those traits are fairly common anyway.
Base design
Click on the photo to see larger images.
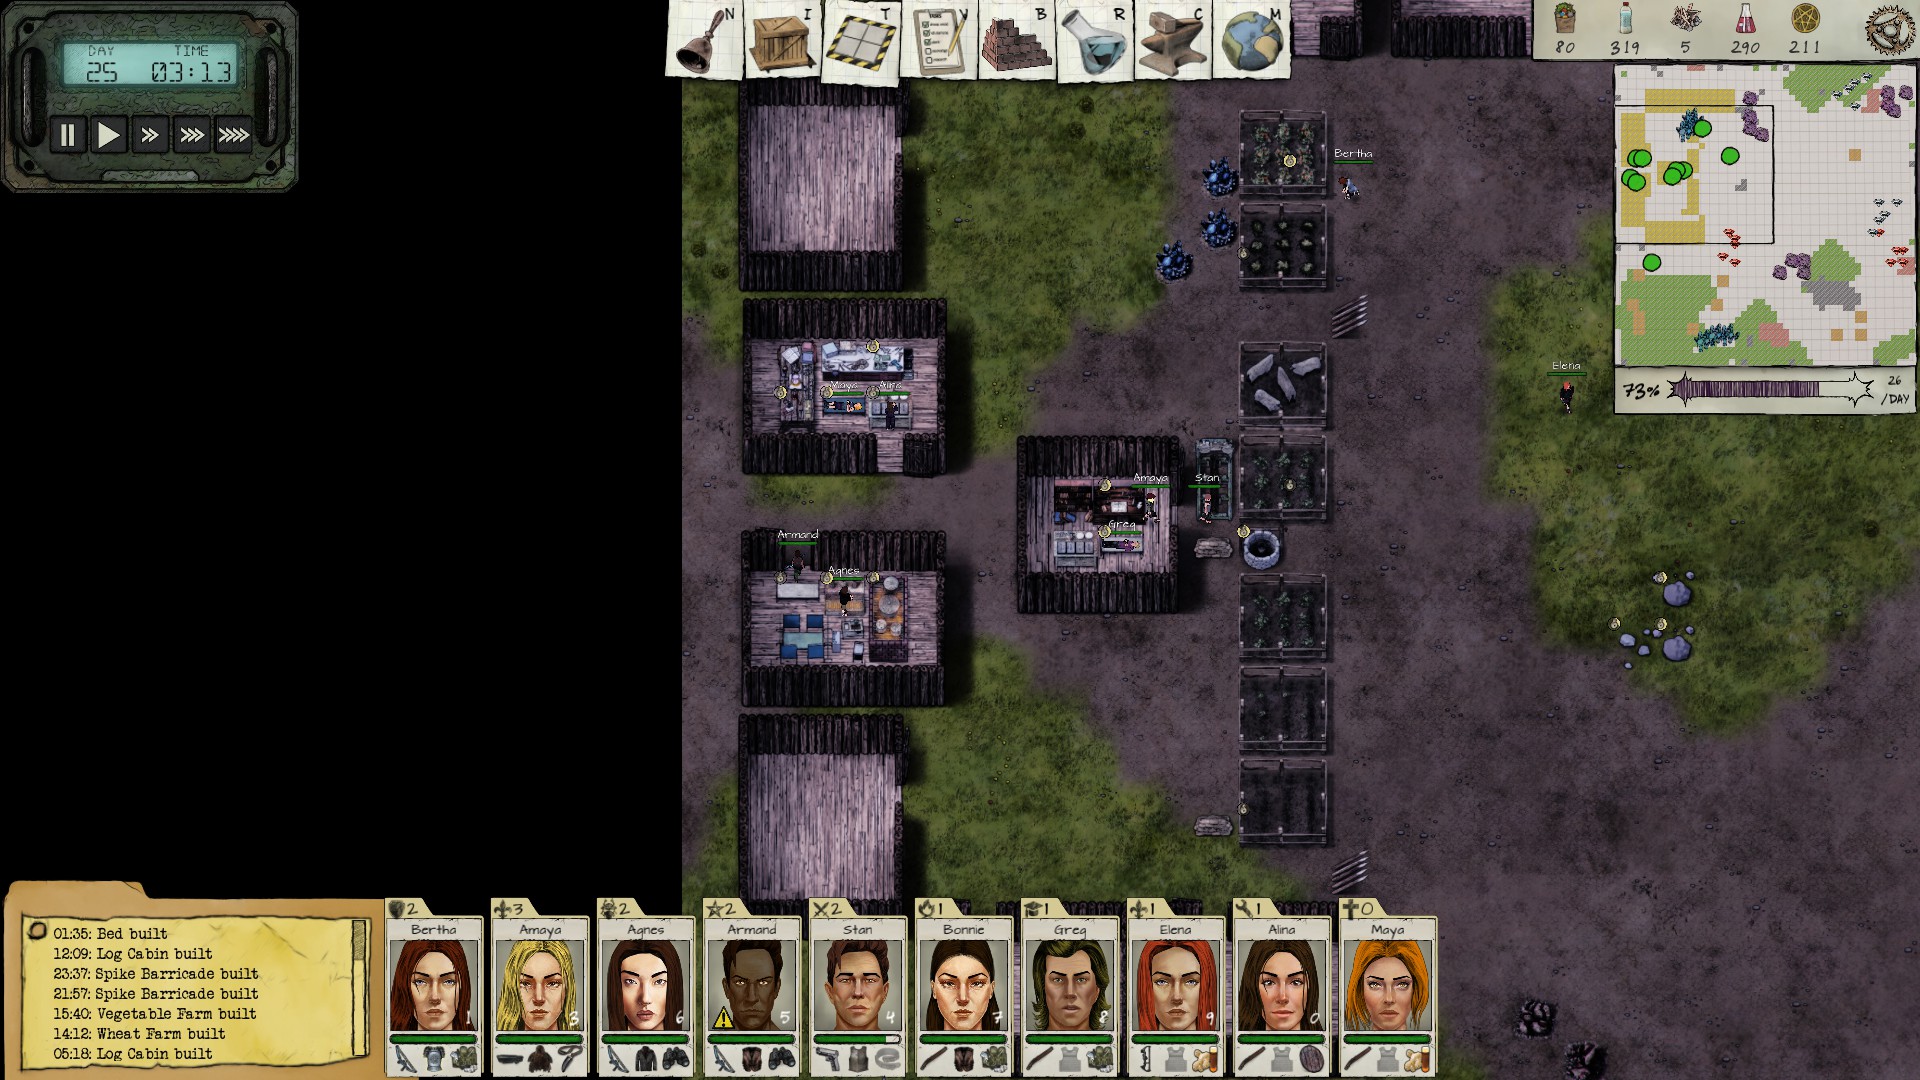
This is an early day-25 kill box. The kill box is at the T-intersection of the 3 middle cabins. Eventually you will want to transition to kill box designs depicted lower.
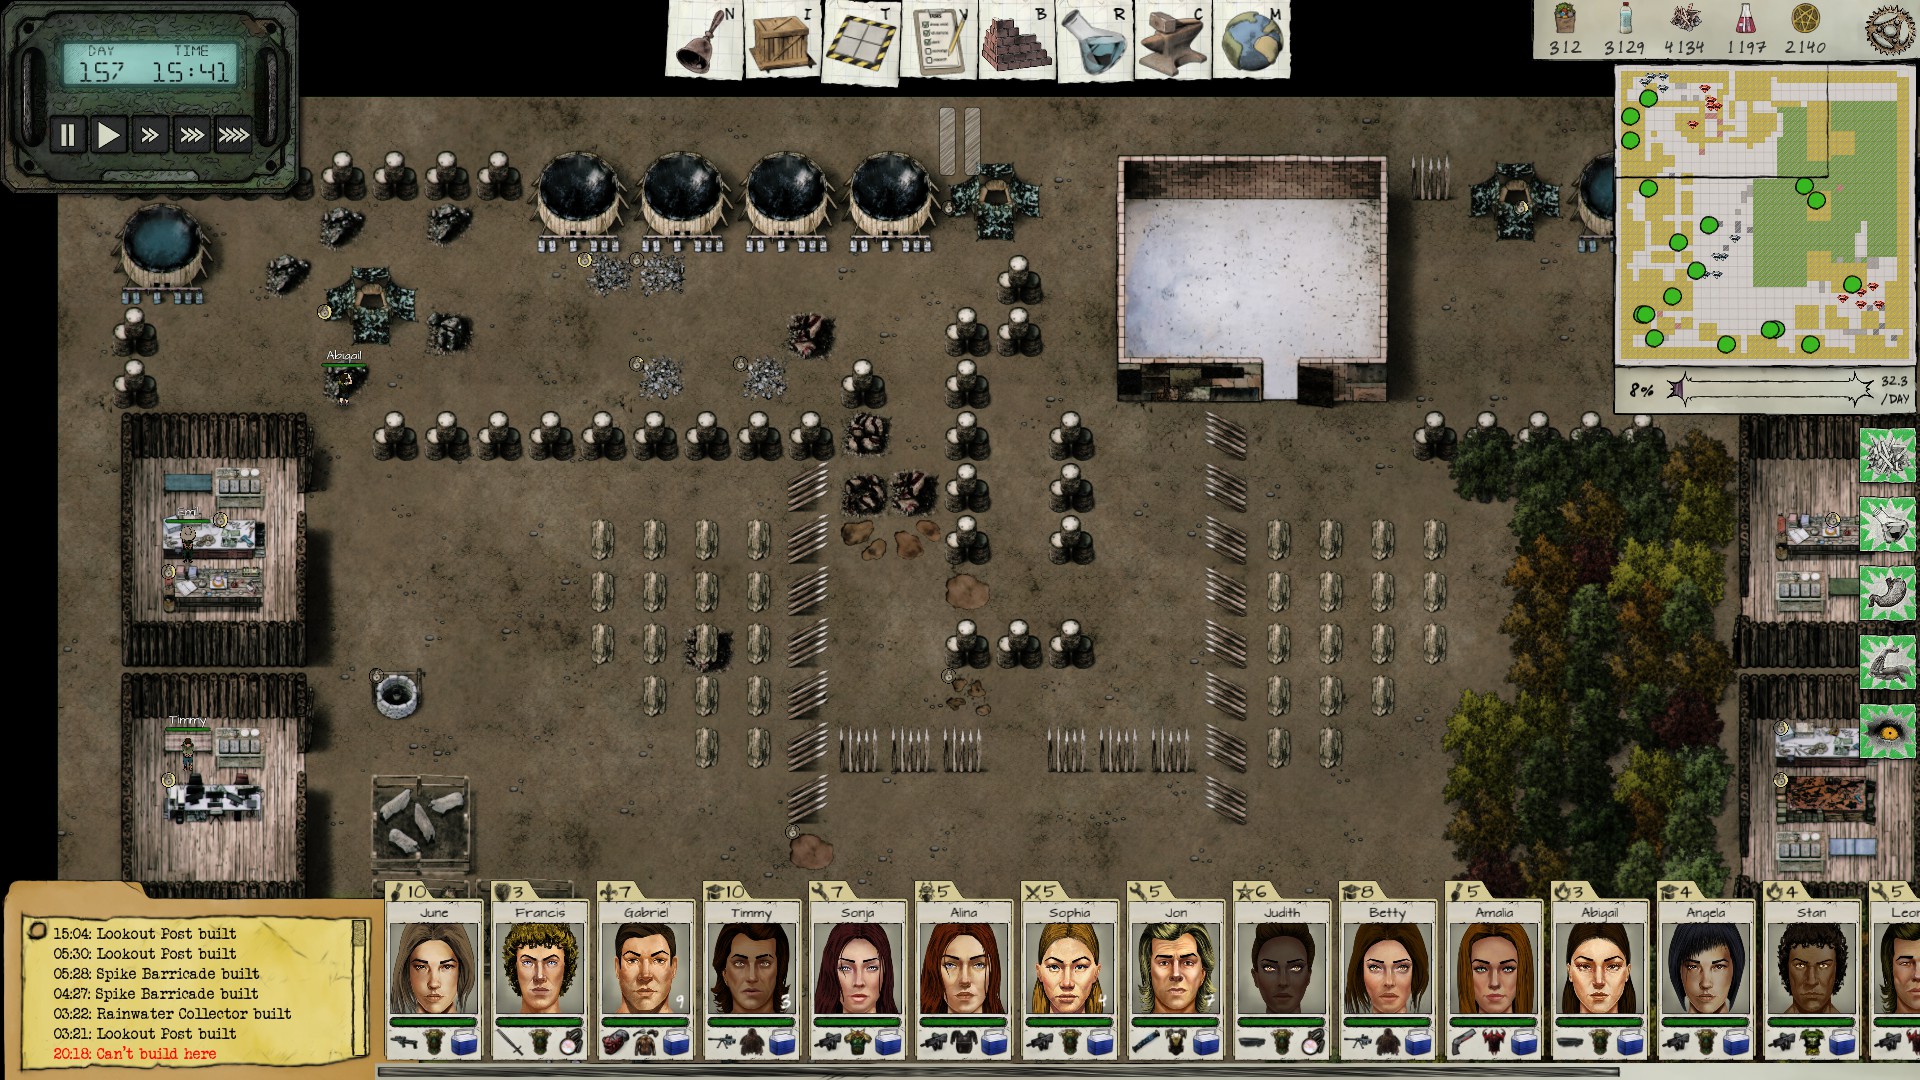
The above is what you eventually want for your kill box. The design below is equally effective, and shows an actual attack.
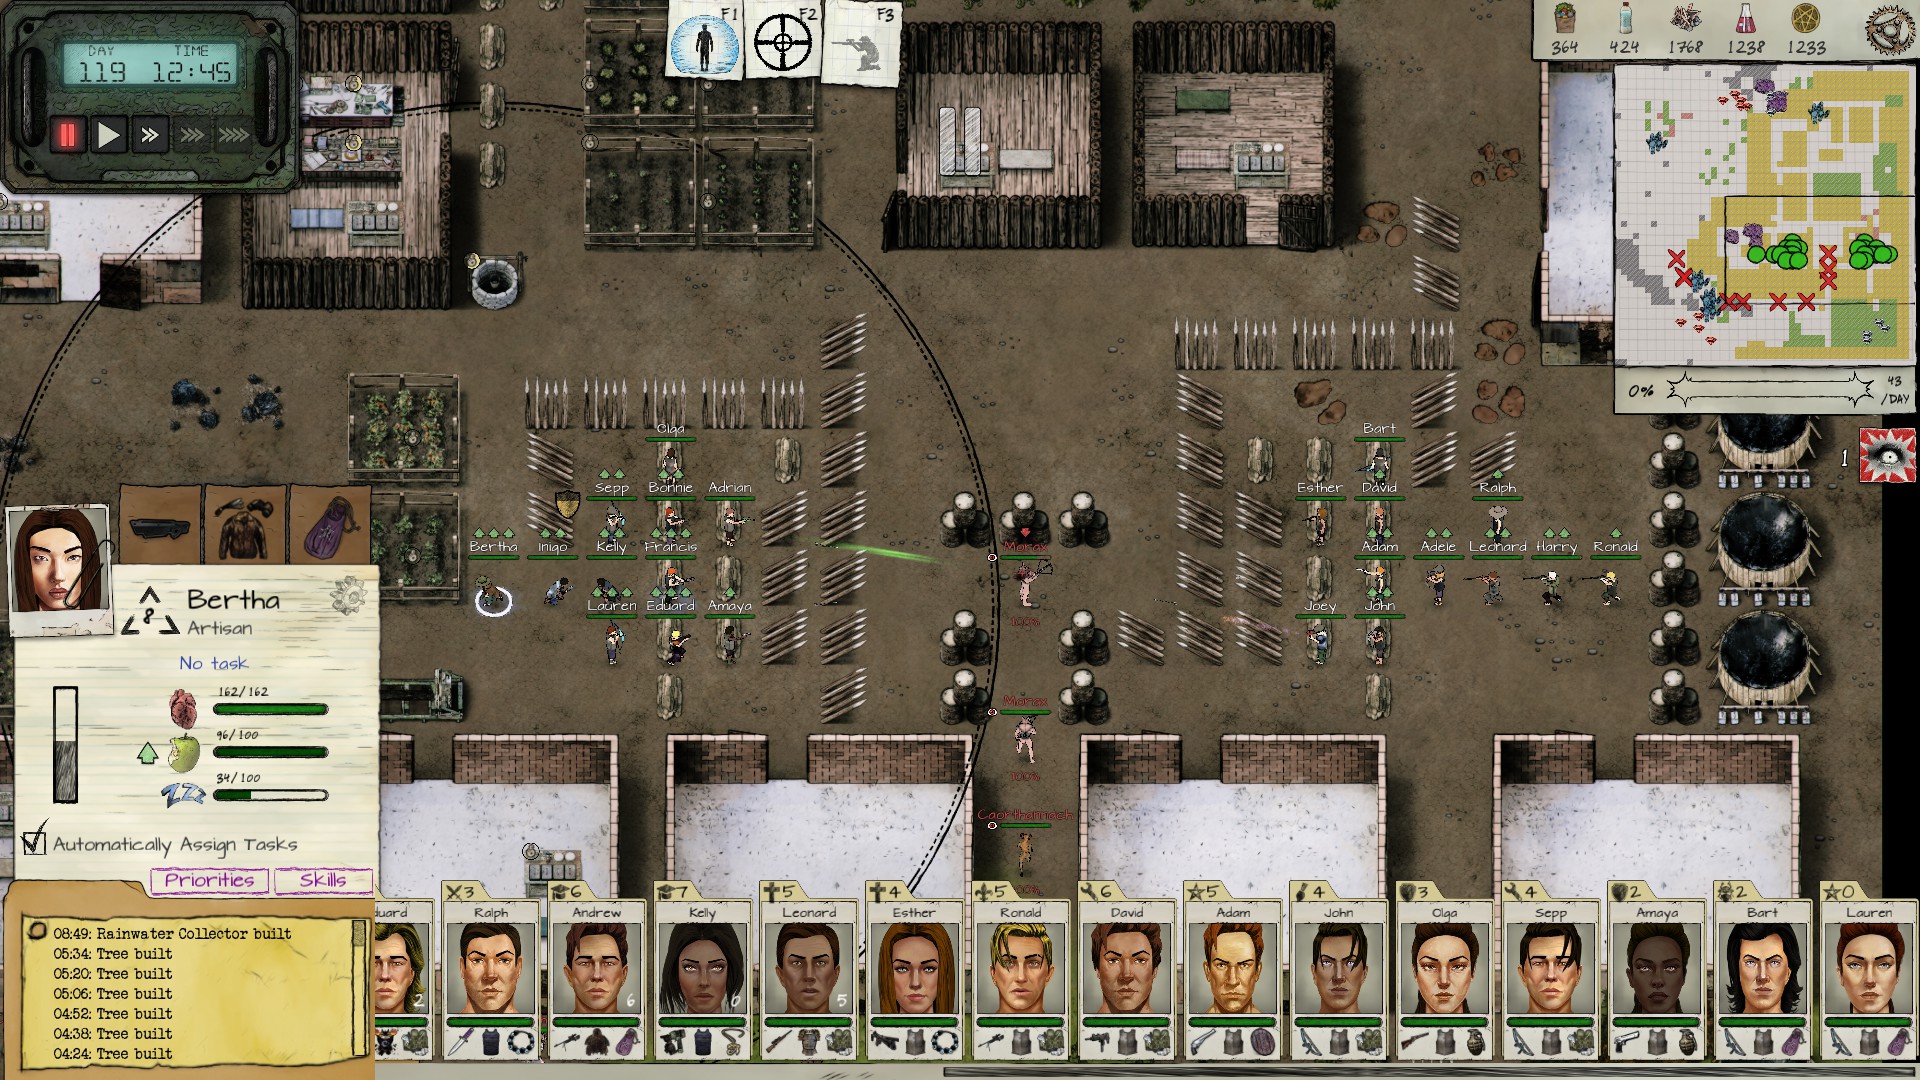
The sandbags are necessary because they give survivors bonus accuracy. The designs funnel attacks into 1 kill box that can be hit by 6 survivors from the front 2 rows on either side of the kill box and many more from the rows farther back – it just depends on the range of their weapons. Since survivors hit attackers from 2 sides simultaneously, the attackers suffer bonus flanked damage. The first row is also far enough from the kill box to force short-range attackers to advance 1 space out of the kill box before they can fire.
Give the 1st row survivors evasion/armor items, most of the 2nd row survivors medpacks and the 3rd row survivors protection spells with a sprinkling of Eye of Horus charms. Use your attack speed and accuracy items on your most deadly survivors.
You must ensure that survivors in their defensive positions cannot be hit by any ranged attacks, except from the kill box. The barrels block ranged attacks as do buildings, but the rain barrels and look-out posts do not. Use rain barrels (1 for each survivor), look-out posts and buildings to circle the entire base so survivors can harvest resources without too much walking. Place beds and food tables in buildings near where you harvest to reduce travel time.
Solo Scavenging
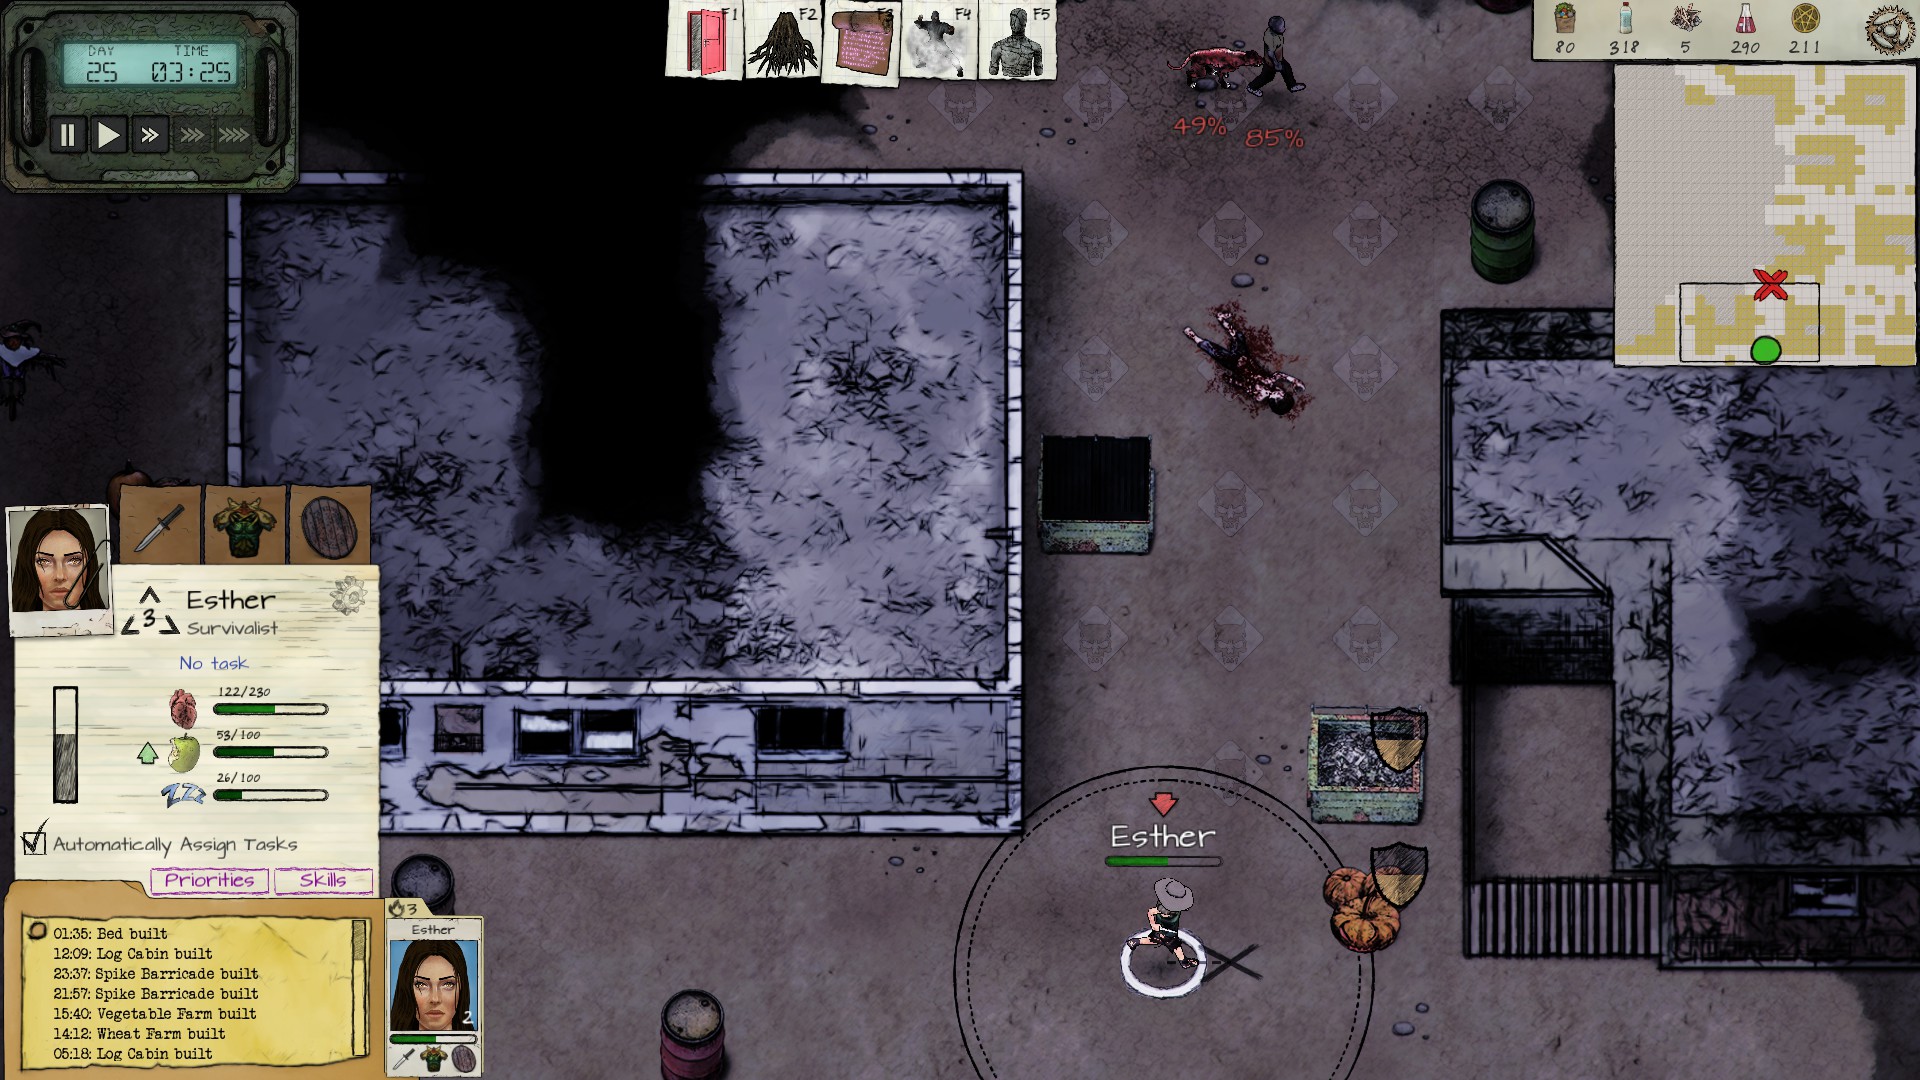
In tough mode it is very important to quickly send your best gatherer to solo scavenge high level gear – the “?” camps. Use the “R” key or the microscope icon to filter the camps. The most important gear for the solo scavenger is a combat knife for the move speed and disappear ability. You must gather enough scraps/sell enough items with the first trader to buy such a knife – or maybe you will get lucky on the first few camps you actually fight and find one. Binoculars can also be useful. However, as you might notice in the below screenshot, my solo scavenger on day 25 already has tier 5, rare armor that I scavenged.
Once you identify a “?” camp “fight” it, but obviously avoid actually fighting the enemies. Circle the edge of the map looking for crates and scouting enemies’ patrol routes. Enemies’ vision range is depicted by the small transparent monster head icons inside diamonds as shown below. Each hex with an icon in it means the enemy has vision on that space. If one spots you, then either save scum or use the disappear to avoid attack and then retreat. You might also need to save scum if you run into an encounter.
Do not be afraid to retreat from a camp and then “fight” the same camp again to find a more favorable map. You might have to save scum a few times until you get the hang of avoiding enemies while you find and open the crates. Try to “fight” the camps at night to reduce the enemies’ vision range. Once you successfully open a crate, consider retreating to secure the loot and then “fight” the camp again to find more crates. The remaining crates will still be there, but the map will change. Taking loot this way will take time and thus it is more useful to “fight” very hard camps without any or with only few fallen angels/morax both of whom have very long vision and are difficult to avoid. The camp disappears when all its crates are gone.
Once you find good armor, the solo scavenger might be able to tank attacks while opening a crate and use the disappear ability to retreat.
Combat
1 tank with the best armor/evasion/health available.
2 snipers
2-4 dps (depending on your research level) & (1 with high gather for rescue missions)
When you are tired of solo scavenging, this is the team for scavenging hard camps. It’s a good idea to put debuff/buff skills on the tank since otherwise there’s not much for him/her to do, except soak damage behind cover. Do your best to give the tank armor a shield or both with the “harden” ability. On the short-range dps put a medpack, eye of horus, a protection spell, and other attack/speed accuracy items. Always give binoculars to the survivor with the longest vision – vision is very very useful in deciding how and when to attack.
Use a sniper to lure attackers into your squad. Send your longest range or fastest survivor out to hit 1 enemy and pull back behind your tank. Arrange your squad so nobody will be hit by ranged attacks except the tank. Pull the enemy (preferably only 1 group) into your squad so your tank has cover for the ranged attacks and your dps is as close as possible. Once your tank has all the attacks focused on him/her, you can move your dps/snipers closer as enemies fall – especially to keep your shorter ranged dps active. It’s good too keep your snipers focused on long-range enemies that your short range dps cannot reach.
You need to adapt the focus of your dps using the pause function to handle situations where your tank is taking too much damage or about to be overrun. Entangle is often very useful to lower enemy dps and prevent melee units from overrunning your tank.
Drop the tank when you want to auto-resolve fights instead manually fighting. The extra dps helps reduce the damage your squad takes in auto-resolve. However, tanky melee units often weigh too heavily in auto-resolve fights, so you will take less damage by manually fighting against legions for instance.
Lastly, note you can assign survivors to control groups by selecting the desired ones and pressing “ctrl + #” (1-9) so those survivors are assigned to that number key.
Other survivor camps
Do not greet other survivor camps. They are difficult to appease, solo scavenging is more lucrative than trading, and rescue missions are frequent enough. The only real benefit to greeting a survivor camp is the possibility of recruiting a high quality survivor. Some high quality survivors only spawn at friendly survivor camps, but when they become unfriendly, their attacks are brutal and tough mode already is tough enough.
Traders are also common enough that you do not need additional traders from other survivor camps.
Conclusion
The key to tough mode is really solo scavenging high level gear and effective base design. The hardest part is surviving the first 20 days or so. Once your tank has high tier gear, attacks will be much easier to handle. The tedious part is constantly retreating with the solo scavenger – often without collecting any loot.
This is all for Judgment: Apocalypse Survival Simulation Hard Mode hope you enjoy the post. If you believe we forget or we should update the post please let us know via comment, we will try our best to fix how fast is possible! Have a great day!
- Check All Judgment: Apocalypse Survival Simulation Posts List


Leave a Reply