A guide on how to create a radar for those of us who prefer to read
Introduction
I had a difficult time finding information about how the radar in StormWorks operates. After finding a lot of incorrect, outdated, or incomplete information, I decided to write this guide to help others. I’m not a fan of downloading example modules or watching youtube tutorials, and figured there may be others looking for written information to help.
The radar I am making in this guide will require work with microprocessors and LUA. Before diving in, I strongly suggest getting familiar with these topics:
- Difference between number, on/off, video, and composite inputs
- Microprocessors
- Basics of LUA
- How to write text to LCD screens
If you’re familiar with those 4 things, you should be prepared to dive into radars! I included writing text because it can be super helpful for debugging.
For our simple guide, we are going to focus on simply displaying targets on a screen.
StormWorks Radar Basics
The basic Radar in StormWorks has:
- An On/Off input for turning the radar on
- A number output for showing the rotation value of the radar (decimal rotation value)
- A composite output with the target information
The composite input contains:
- 8 On/Off values to show whether a target has been detected or not
- 32 values containing target information in groups of 4
The groups of 4 contain number values for:
- Distance to target (m)
- Azimuth of target (-0.5 to +0.5 with 0.5 being 180 degrees)
- Elevation of target
- Time since detection
Having 32 numerical values means that the composite stream leaving the radar is full. You will not be able to attach additional information to the stream without overwriting the data.
The radar unit has some settings too:
Sweep Mode adjusts the movement of the dish:
- Static
- Clockwise
- Anticlockwise
- Sweep
Sweep limit sets the width of the sweep in sweep mode. 0.5 will rotate the dish between -180 and 180, and 0 will limit the dish to the front.
Pitch angle sets the up/down angle of the dish.
FOV X sets the beam width
FOV Y sets the beam height
The FOV setting will impact the effective range. A very small FOV will have a great range, but you will have a difficult time getting returns from targets.
Radars in stormworks have a direction when it is placed, indicated by an arrow, if you turn on direction arrows.
Theory – aka The Math
When we implement the radar, we will be getting the following information from the unit:
- Distance
- Azimuth
- Elevation
- Time since detection
We need to plot that information on a square screen. This will require us to convert these bearings/distances to X and Y coordinates. Before we start creating the radar, let’s understand how to make these conversions.
Conversions
The radar outputs the azimuth in a bearing from -0.5 turns to 0.5, with 0 being straight ahead, and 0.5 being 180 degrees. We need to convert this value to degrees. We can do this by multiplying the turn value by 360 degrees:
0.5 * 360 = 180
But if it’s negative, we should subtract the result from 360 to get the bearing:
-0.25 * 360 = -90
-90 + 360 = 270
The Trig
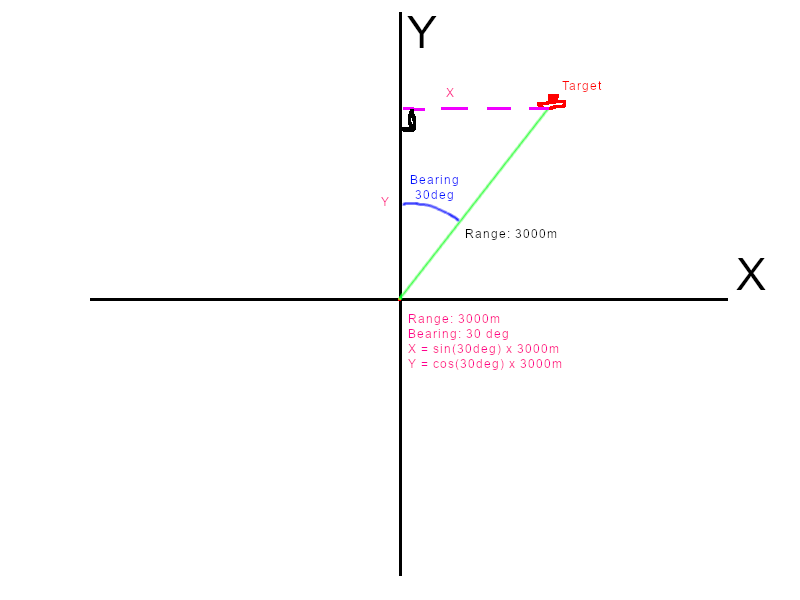
A bearing is an angle from 0 (straight ahead), and the range creates a hypotenuse of a triangle. Knowing the hypotenuse and the angle of a theoretical right triangle, we can find the other legs of the triangle, which turn out to be X and Y locations on a grid.
hyp * sin(bearing) = opposite side (X location)
hyp * cos(bearing) = adjacent side (Y location)
Here is a visualization:
In this example, we are using degrees. But when we use the math functions in the LUA, it will expect radians. We convert degrees to radians by multiplying the degrees by pi/180 .
Now we can find out the X and Y position in meters relative to the radar dish. You can see how knowing this opens the door for more advanced use cases.
Building the Radar
Now, let’s lay down some parts and start making a radar unit!
For this example we will need:
- Basic radar
- 2×2 screen
- Instrument Panel
- A toggle switch
- A battery
Set everything down, connecting the power to the battery. Then connect the toggle switch on/off to the radar on/off and the screen on/off.
On the instrument panel, set the following:
- Instrument 1: None
- Instrument 2: Up Arrow, Channel 1
- Instrument 3: None
- Instrument 4: Down Arrow, Channel 2
This will let us adjust the range of the radar display
On the Radar, set the following:
- Sweep Mode: Clockwise
- Sweep Speed: 50%
- Sweep Limit: Doesn’t matter, we aren’t using sweep mode
- Pitch Angle: 0
- FOV X: 0.07
- FOV Y: 0.07
This will give us a radar unit that rotates in circles, and has a range of 4897m
Create a MicroController with width 2 and length 2. Add the following logic nodes:
- Composite Input (radar in)
- Video out (video out to radar scope)
- Number In (radar rotation value in)
- Composite Input (instrument panel in)
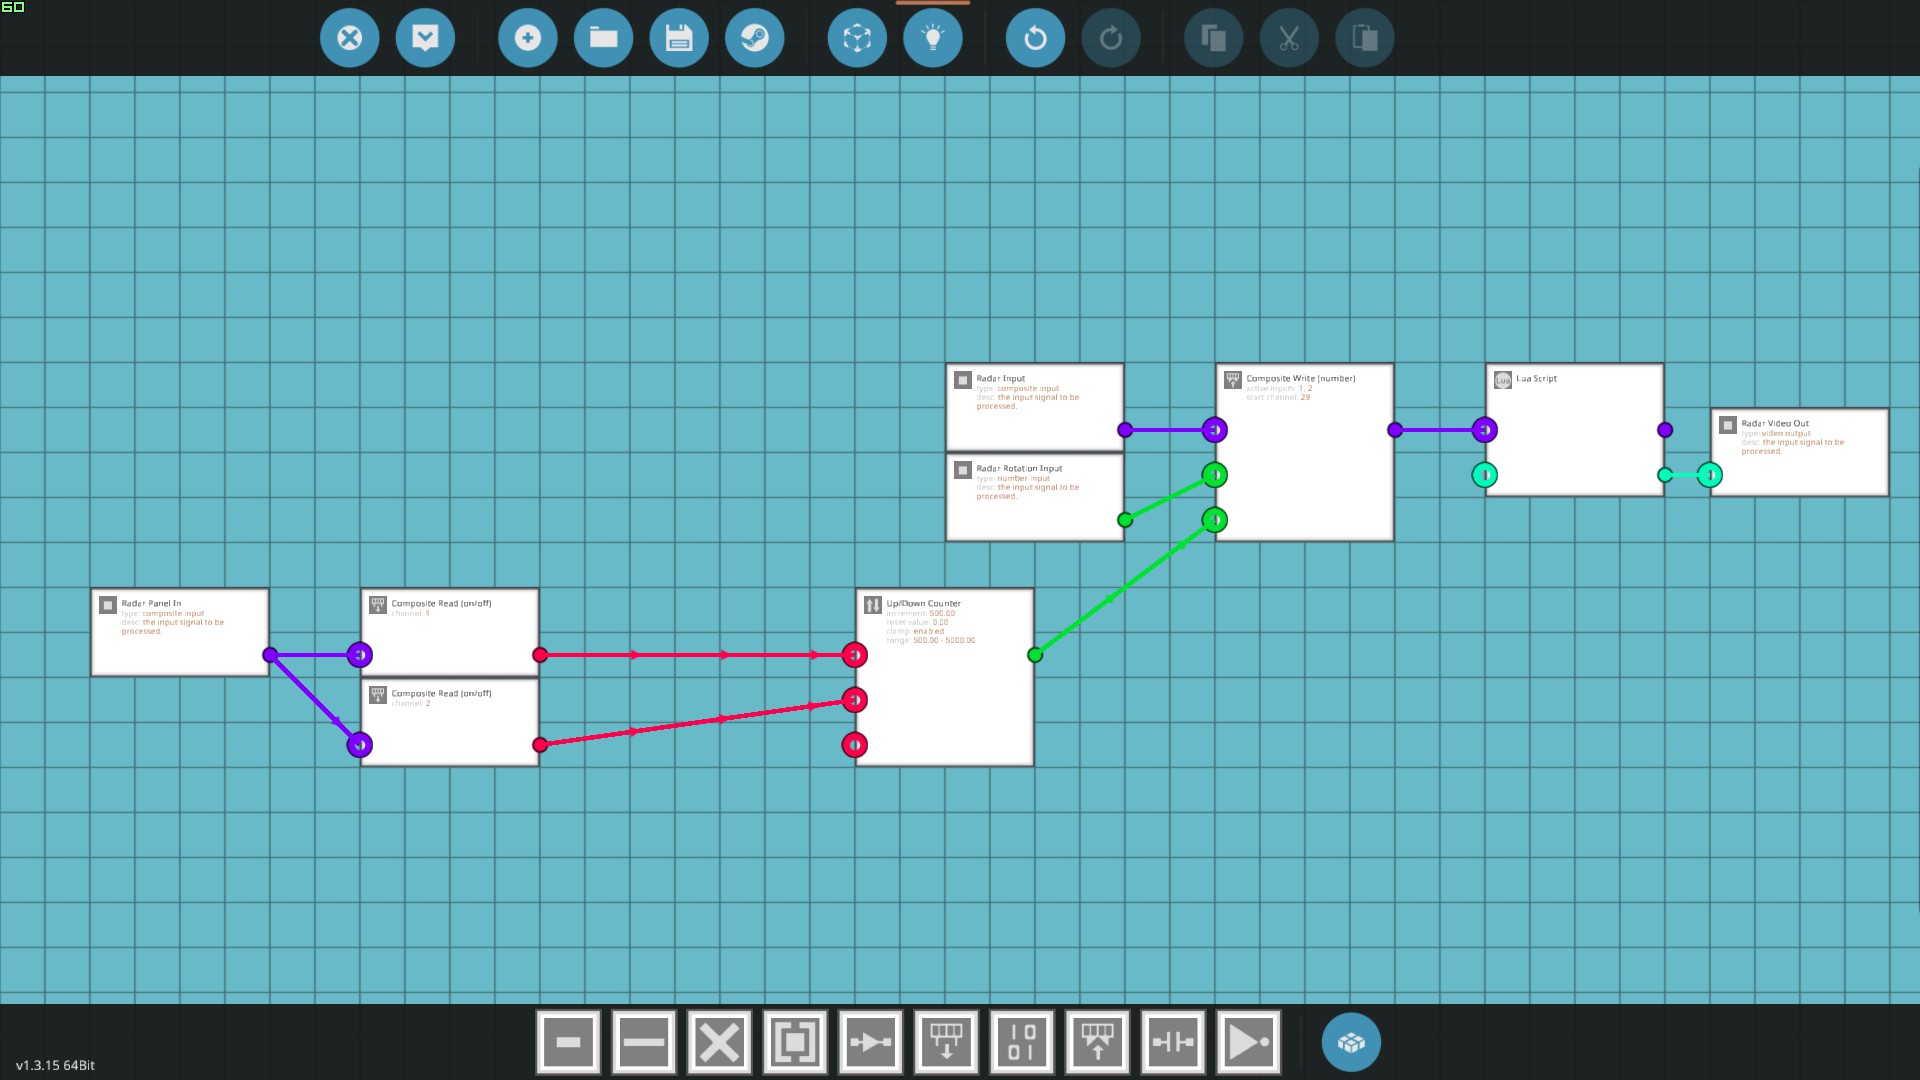
In the logic behavior, set everything up like this:
We are using the instrument panel to increment a range value. We are then inserting the range value and radar rotation values into the composite datastream. Note that in this example, we are starting at composite number 29, overwriting our ability to receive the full 8 targets, but letting us bundle this all in one stream for the LUA. The LUA output goes to the video out.
This will need some improvement. The range buttons will be too sensitive, and we are removing a potential target for simplicity, but this will be enough to get started. Now, let’s dive into the LUA!
LUA
Here is the LUA I have come up with. We are using tables to hold the radar data.
max_tar = 7 -- Maximum target count
lastRange = 0
lastAz = 0

function onTick()
 rad_rot = input.getNumber(29) -- Radar Rotation Value
 range = input.getNumber(30) -- Radar screen range setting

 tar = {}
 for i=1,max_tar do
 table.insert(tar, input.getBool(i)) -- Get the bool target data
 end

 tarD = {} -- Distance
 tarAz = {} -- Azimuth
 tarEl = {} -- Elevation
 tarTm = {} -- Time since return

 j = 0
 for i=1,max_tar do
 table.insert(tarD, input.getNumber(j + 1))
 table.insert(tarAz, input.getNumber(j + 2))
 table.insert(tarEl, input.getNumber(j + 3))
 table.insert(tarTm, input.getNumber(j + 4))
 j = j + 4
 end
end

-- Draw function that will be executed when this script renders to a screen
function onDraw()
 w = screen.getWidth()
 h = screen.getHeight()
 rangeRatio = (h/2) / range -- Ratio to find pixel position relative to the current range setting

 -- Set BG
 screen.setColor(20,20,20)
 screen.drawClear()

 -- Draw Scope
 screen.setColor(0, 0, 0)
 screen.drawCircleF(w / 2, h / 2, h/2 - 1)

 -- Draw Sweep Line
 screen.setColor(200,200,200)
 radRotDeg = (rad_rot * 360) % 360
 radRotRad = radRotDeg * (math.pi/180) - [math.pi]
 sweepX = h/2 + ((h / 2 - 1) * math.sin(radRotRad))
 sweepY = h/2 - ((h/2 - 1) * math.cos(radRotRad))
 screen.drawLine(w/2, h/2, sweepX, sweepY)

 -- Draw Range Circles
 screen.setColor(26,188,200)
 screen.drawCircle(w / 2, h / 2, h/2/3)
 screen.drawCircle(w / 2, h / 2, h/2/3 * 2)

 -- Draw Radar Returns (targets)
 screen.setColor(227,222,93)
 targetCount = 0
 for i=1,max_tar do
 if tar then
 azimuth = (tarAz * 360) % 360
 azRad = azimuth * (180 / math.pi) -- Degree to radians

 tarX = w/2 + (tarD * rangeRatio) * math.sin(azRad)
 tarY = h/2 - (tarD * rangeRatio) * math.cos(azRad) -- We subtract since Y axis is in down direction
 screen.drawCircle(tarX, tarY, 0.5)
 lastRange = tarD
 lastAz = azimuth
 targetCount = targetCount + 1
 end
 end

 -- Draw UI
 screen.setColor(200,200,200)
 screen.drawTextBox(1, h-5, w, 4, string.format("%0.0f", range), -1, 0)
 screen.drawTextBox(1, 1, w, 4, string.format("%0.0f", lastRange), -1, 0)
 screen.drawTextBox(1, 1, w-1, 4, string.format("%0.0f", lastAz), 1, 0)
end[/code]
LUA Overview
We start with some constants to set the max number of targets, and the last target range and azimuth values.
Every game tick, we read the data from the composite stream into tables.
The screen draw has the meat of the code. We get the screen size, then calculate a conversion ratio based on the range the user selects. This converts meters to screen pixels.
We draw the background color, then the black circular scope.
Then we draw the sweep line. It converts the rotation decimal value to degrees, subtracting the complete rotation count. The degree value is then converted to radians.
The X and Y coordinates are calculated using the trig functions we talked about earlier, but we needed the radian value to use the built-in math functions. Then the sweep line is drawn from the center of the screen to the edge of the circle.
We draw some range circles for flair.
Now for the targets. We set the draw color, then loop through the 7 possible targets to see first if something is detected, then plotting it.
We convert the turn based azimuth to degrees, then to radians. Then, in the same manner as the sweep line, we find the X and Y position. But note that we apply the ratio to the range to convert the range from meters to pixels. Finally, the target is plotted. We also store the distance and bearing for displaying on screen.
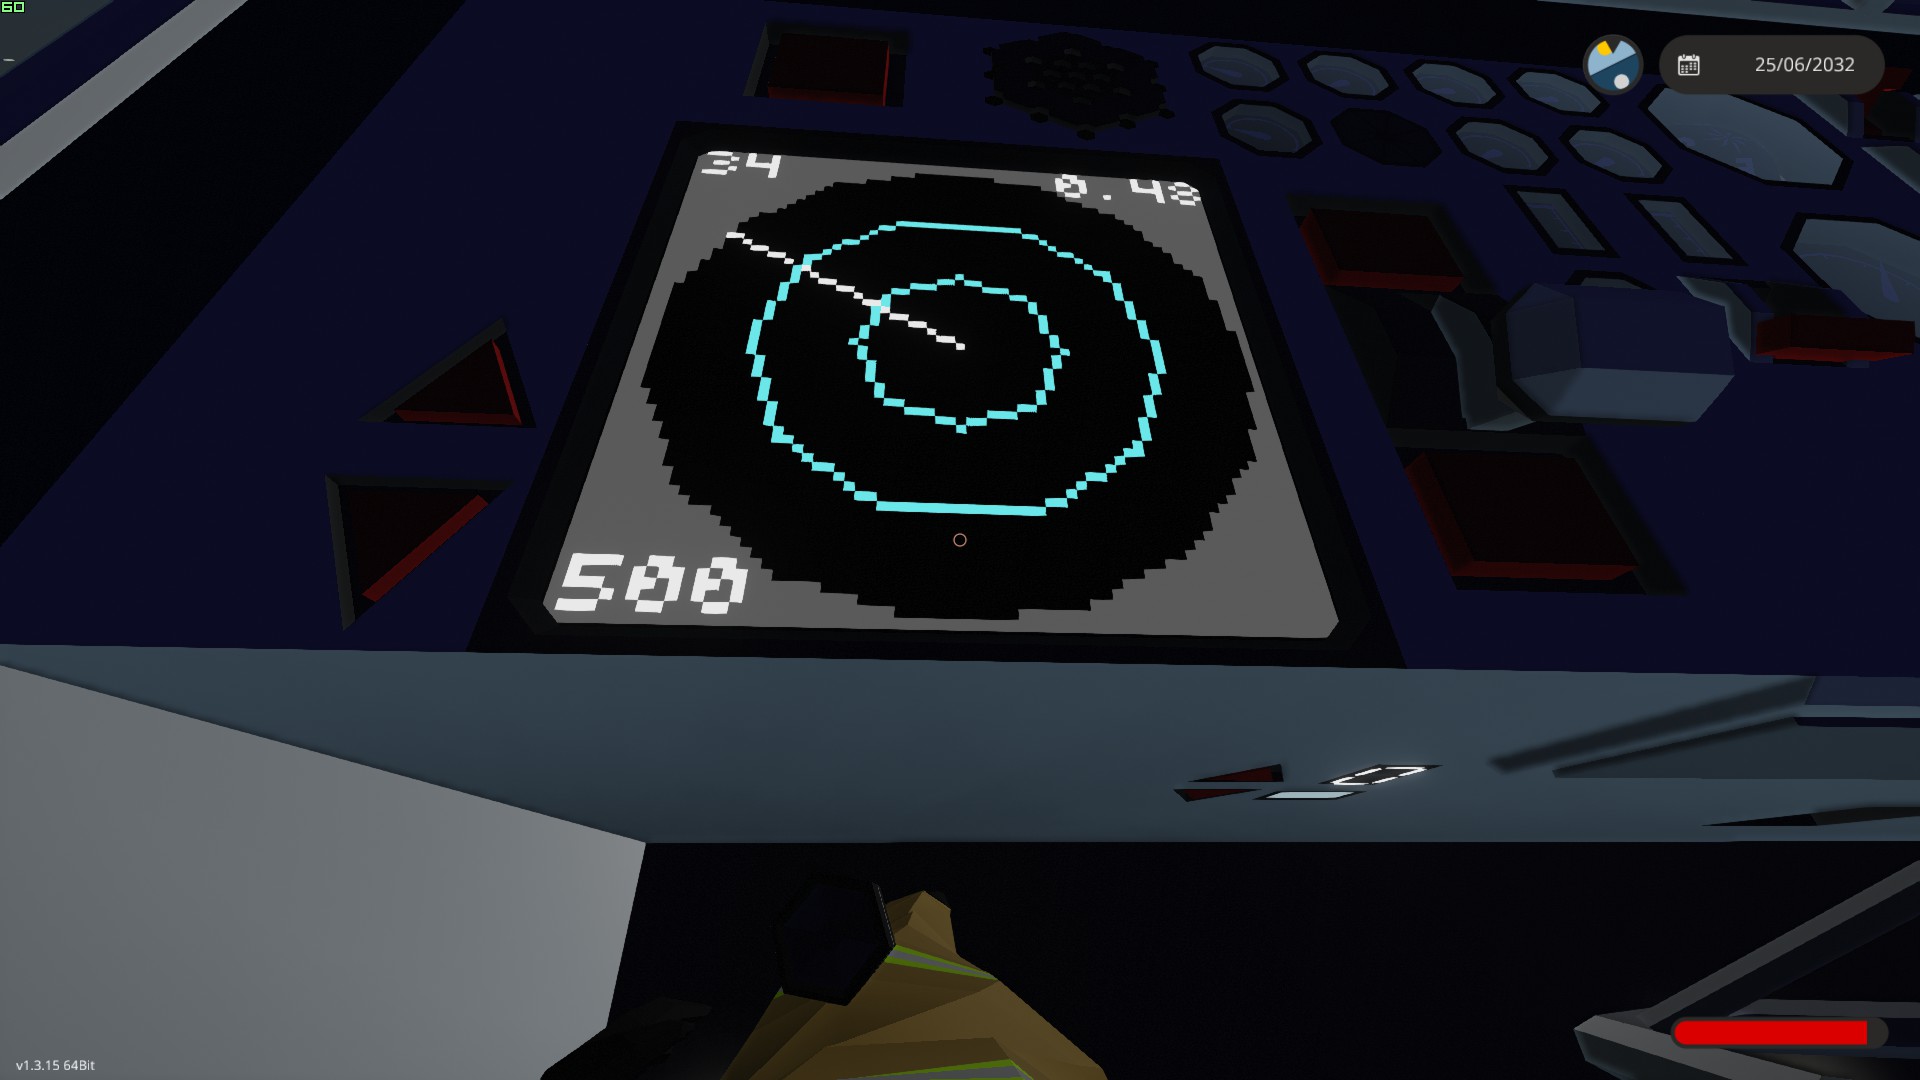
Lastly, we draw some values on screen. In the bottom left is the current range setting. Top left is the range of the last target seen. Top right is the bearing of the last target seen.
Conclusion
Place the final microcontroller, and place the logic connections for it. You should hopefully have a working marine radar now!
I really hope this was helpful. I know that LUA can be difficult on top of the crazy documentation that is out there. Let me know if you find problems or have suggestions for enhancements!
This is all for Stormworks: Build and Rescue Radar Basics for Marine Guide hope you enjoy the post. If you believe we forget or we should update the post please let us know via comment, we will try our best to fix how fast is possible! Have a great day!
- Check All Stormworks: Build and Rescue Posts List


errar in programe