My girlfriend keeps dying in Journey of the Prairie King. You’re probably not my girlfriend but hopefully this helps you die less.
INTRO and BASICS
This guide’s a work in progress, so apologies for the growing pains. If I left anything of note out, drop a comment below and I’ll add it in!
i’m also making a Quick Guide for fast reference as opposed to this horrendously drawn out one
In case you don’t know how JotPK works, here’s the basic rundown:

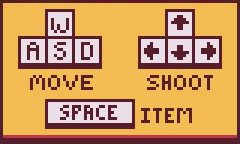
Arrow Keys: Shoot. You can shoot in diagonals. Hold to shoot repeatedly. You have infinite ammo, so go hog wild.
Space Bar: Use stored item.
There’s a box in the upper left that shows what item you have stored. I call this the Item Pouch. You can only store 1 item in your Item Pouch at a time. If you pick up a new item while your Pouch is full, the new item is immediately activated. Old item is saved.
This bar at the top represents how much time remains in the current level. As enemies continue to spawn, the timer slowly trickles down. When the timer runs out, enemies stop spawning, and you must kill the remaining enemies before you can move on. Dying adds time back to the timer, making the stage take longer. This is a bad thing. Better to use an item and survive than die while clutching that Sheriff Badge.
PICKUPS
Currencies
1 Coin – Gives you 1 coin. Used to buy upgrades.
5 Coin – Gives you 5 coins. Pick them up whenever possible!
1UP – Gives you an extra life.
Items
These are stored in your Item Pouch and can be used by pressing Space Bar. If your Item Pouch is full, any items you pick up are immediately used. Many Items stack with each other, leading to some devastating combos. However, they all last a limited amount of time.
Bandolier– Enormous attack speed buff. Great for mowing through enemies in a choke point. Also spelled Bandoleer, but the ier feels cooler.
Bomb– Instantly kill all on-screen enemies. Enemies killed this way don’t drop money or items. Ew. Good as a last LAST resort, if you can’t find anything else. Otherwise, avoid. You need those coins.
Coffee– Moderate movement speed buff. Nice to have, but won’t save you like other items will. Pick it up if you can, but not worth risking yourself.
Shotgun– Fire bullets in a three-way spread, but with a slight fire speed penalty. The trade-off is worth it, this thing shreds.
Smoke Bomb – Easily the worst item in the game. You become temporarily invincible, enemies can’t track you, and you teleport to a random spot on the map. What’s not to love? Well, enemies still spawn while being unable to track you, so every entrance builds up a horrendous supply of baddies while you’re able to pick off maybe a couple of them. When the item wears off, you have more enemies to deal with than before you used it. Could be used to teleport out of a sticky situation, but why use that when you can use Gravestone? Hard avoid.
Gravestone– Temporary immunity, enemies flee from you, deal contact damage, and keep your gun. Interestingly, it bears an inverted Sign of the Vessel – the same as the statue Krobus sells you. Smoke Bomb but better.
Sheriff Badge – The item to blow out all other items. Combines Bandolier, Shotgun, and Coffee to make you into a bullet-firing monster. Pouch this and save it for when you’re in a tight spot.
Wagon Wheel – Fire in all eight directions. The only item that holds a candle to the Sheriff Badge in terms of raw destructive power. Thing is? They STACK. WheelBadge is a combination that makes even the toughest cry.
Upgrades
In stages 1-2, 1-4, 2-1, 2-3, 3-1, and 3-3, the Vendor appears to sell you upgrades in exchange for the Coins you’ve picked up.
Boots increase your movement speed, and are the cheapest.
Guns increase your shooting speed, and cost an average amount.
Bullets increase your bullet damage, and cost the most.
In general, bullets are the best thing to get. Extra damage is not wasted. If you kill a 1 HP Orc with a 2 Damage bullet, the bullet will pierce its corpse and continue to deal another 1 Damage to the next thing it hits. This means that one upgraded bullet can kill two orcs.
AREA 1 – The Prairie
STAGE 1-1
A wide open plain for you to get a feel for the game. You meet your first foes here.
Enemies
Orc – Swarmer, 1 HP. Not fast, but come in large groups. Stay on the move, and don’t let yourself get cornered.
STAGE 1-2
This level has four L-shaped barricades that you can’t shoot through. Enemy AI can get caught on these; use that to your advantage, but don’t get cornered.
Enemies
Orc – Swarmer, 1 HP.
Spikeball – Tank, 2 HP (moving) / 7 HP (deployed). Moves into a random location and deploys as a stationary hazard. Can actually help block choke points if you’re lucky.
STAGE 1-3
Four single posts covering the middle spawn points of each exit. This benefits them more than you.
Enemies
Orc – Swarmer, 1 HP.
Spikeball – Tank, 2 HP (moving) / 7 HP (deployed).
Ogre– Tank, 3 HP. Very slow. You can have these guys clog up choke points while you deal with faster foes.
STAGE 1-4
This level, despite being cramped, can be considered one of the easiest. The 1-wide choke points allow for far fewer enemies to swarm you, and with Wagon Wheel, this area’s a breeze. No new enemies, either.
Enemies
Orc – Swarmer, 1 HP.
Spikeball – Tank, 2 HP (moving) / 7 HP (deployed).
Ogre– Tank, 3 HP.
STAGE 1-BOSS
Your first encounter with the dastardly Outlaw. Don’t bother hiding behind the bushes, bullets pass through them. The least risky way to fight the Outlaw is by waiting for him to run out from cover, then shoot diagonally towards him as opposed to straight down. You can risk getting hit by shooting down, too, but the safest bet is to play the long game.
AREA 2 – The Forest
STAGE 2-1
Very open, with some bushes that your bullets pass through.
Enemies
Ogre – Tank, 3 HP.
Mushroom – Swarmer, 2 HP. Fast. The reason you want to buy an ammo upgrade, and, ideally, a gun upgrade before reaching the forest. This bastard WILL swarm you and WILL outrun you, but gets one-shot by level 2 bullets.
Evil Butterfly – Flier, 1 HP. Spawns anywhere on the border as opposed to the designated spawn points – yet another reason to stay out of corners – and can fly over obstacles. Annoying, but not as deadly as the Mushroom.
STAGE 2-2
Now, tree stumps are added into the mix. You can’t shoot over these, but Evil Butterflies can fly over them. Stick to the upper-center and work with the terrain to clog enemies, not against it to block your fire.
Enemies
Ogre – Tank, 3 HP.
Mushroom – Swarmer, 2 HP.
Evil Butterfly – Flier, 1 HP.
STAGE 2-3
My favorite level in the game. Rivers are impassible, save for fliers, so enemies will be forced to go through the bridge choke points to reach you. Stick to the middle, focus on the left and right, and take out enemies on the top and bottom when you can, or when they start to push through.
Enemies
Ogre – Tank, 3 HP.
Mushroom – Swarmer, 2 HP.
Evil Butterfly – Flier, 1 HP.
STAGE 2-BOSS
Identical to 1-BOSS, down to the placement of terrain. He still can’t shoot through his own sump cover, so stick behind that.
AREA 3 – The Crypt
STAGE 3-1
Lots of gravestones here for enemies – and yourself – to get caught on. At least you can shoot over them.
Enemies
Mummy – Tank Swarmer, 6 HP. Slow. Yes, you read that right. Tank Swarmer. Hope you have upgraded bullets, because even at max you’re killing these in two shots.
Imp – Flier Swarmer, 3 HP. I know you’ve been asking yourself, “what if Ogres could fly over obstacles and spawn in huge swarms and wasn’t distracted by the Gopher and also wasn’t scared by the Gravestone item?” No? You haven’t? Well, Imp is here anyways. And they brought friends.
STAGE 3-2
Thanks to the blood rivers, the stage is smaller. And you still have to deal with those annoying gravestones.
Enemies
Mummy – Tank Swarmer, 6 HP.
Imp – Flier Swarmer, 3 HP.
STAGE 3-3
A wide-open field hearkening back to 1-1. Hope you brought your finest items and upgrades, because 3-3 is relentless. Hordes of mummies and imps will descend upon you. This is where even the best of runs go to die. Watch out for the top and bottom borders – you can actually get cornered between the graves if you hug the wall!
Enemies
Mummy – Tank Swarmer, 6 HP.
Imp – Flier Swarmer, 3 HP.
STAGE 3-BOSS
Finally, you stand face-to-face with Fector the Vampire. There are no obstacles for you to take cover behind, no gimmicks for you to abuse. He moves around the arena, firing bullets – either in a line or in eight directions like the Wagon Wheel. Not only that, as his health decreases, he summons enemies. Play well, play swiftly, and I ♥♥♥♥♥♥♥ hope you brought a Sheriff Badge.
CHEEVOS
Journey of the Prairie King has two achievements tied to it.
PRAIRIE KING – Beat Journey of the Prairie King. As of writing, 1.5% players have this achievement, making it the third rarest achievement in the game.
FECTOR’S CHALLENGE – Beat Journey of the Prairie King without dying. As of writing, 0.8% of players have this achievement, making it the single rarest achievement in the game.
Hope you enjoy the post for Stardew Valley Full Walkthrough + Beginners Gameplay Tips, If you think we should update the post or something is wrong please let us know via comment and we will fix it how fast as possible! Thank you and have a great day!
- Check All Stardew Valley Posts List


Leave a Reply