Introduction and setup
The NSKuber’s Resource Manager is a mod which allows you to obtain/replace/attach/configure certain resources in the game (currently weapons/upgrades/gadgets), both default ones by Croteam and custom ones created by other modders. To avoid repeating, I will just write “weapon” instead of “weapon/upgrade/gadget” going further. Note: if you are a modder and have created a weapon resource which you want others to use via NRM, please follow https://steamcommunity.com/sharedfiles/filedetails/?id=2271947532&preview=true. It’s faster than it may look!
The mod also includes enemy multiplier, different from that by Croteam (same as in the early SS4 Serious Carnage mod, if you have played that).
Installation
To obtain the mod, simply subscribe to the item in the workshop and wait for Steam to download it. Then launch the moddable version of the game and check that the mod is enabled in the Extras->Workshop Packages in the main menu.
The interface for configuring the mod is a custom menu. To invoke the menu, you have to either bind the “Open/Close NSKuber’s Resource Manager” command in the keyboard settings and use that button in the game, or press “Switch Dual Wielding” button while holding the “Weapon Selection Wheel” open (this was added mainly for controllers users). Note that the menu is only useable in the first-person mode, since it is composed of actual 3D models.
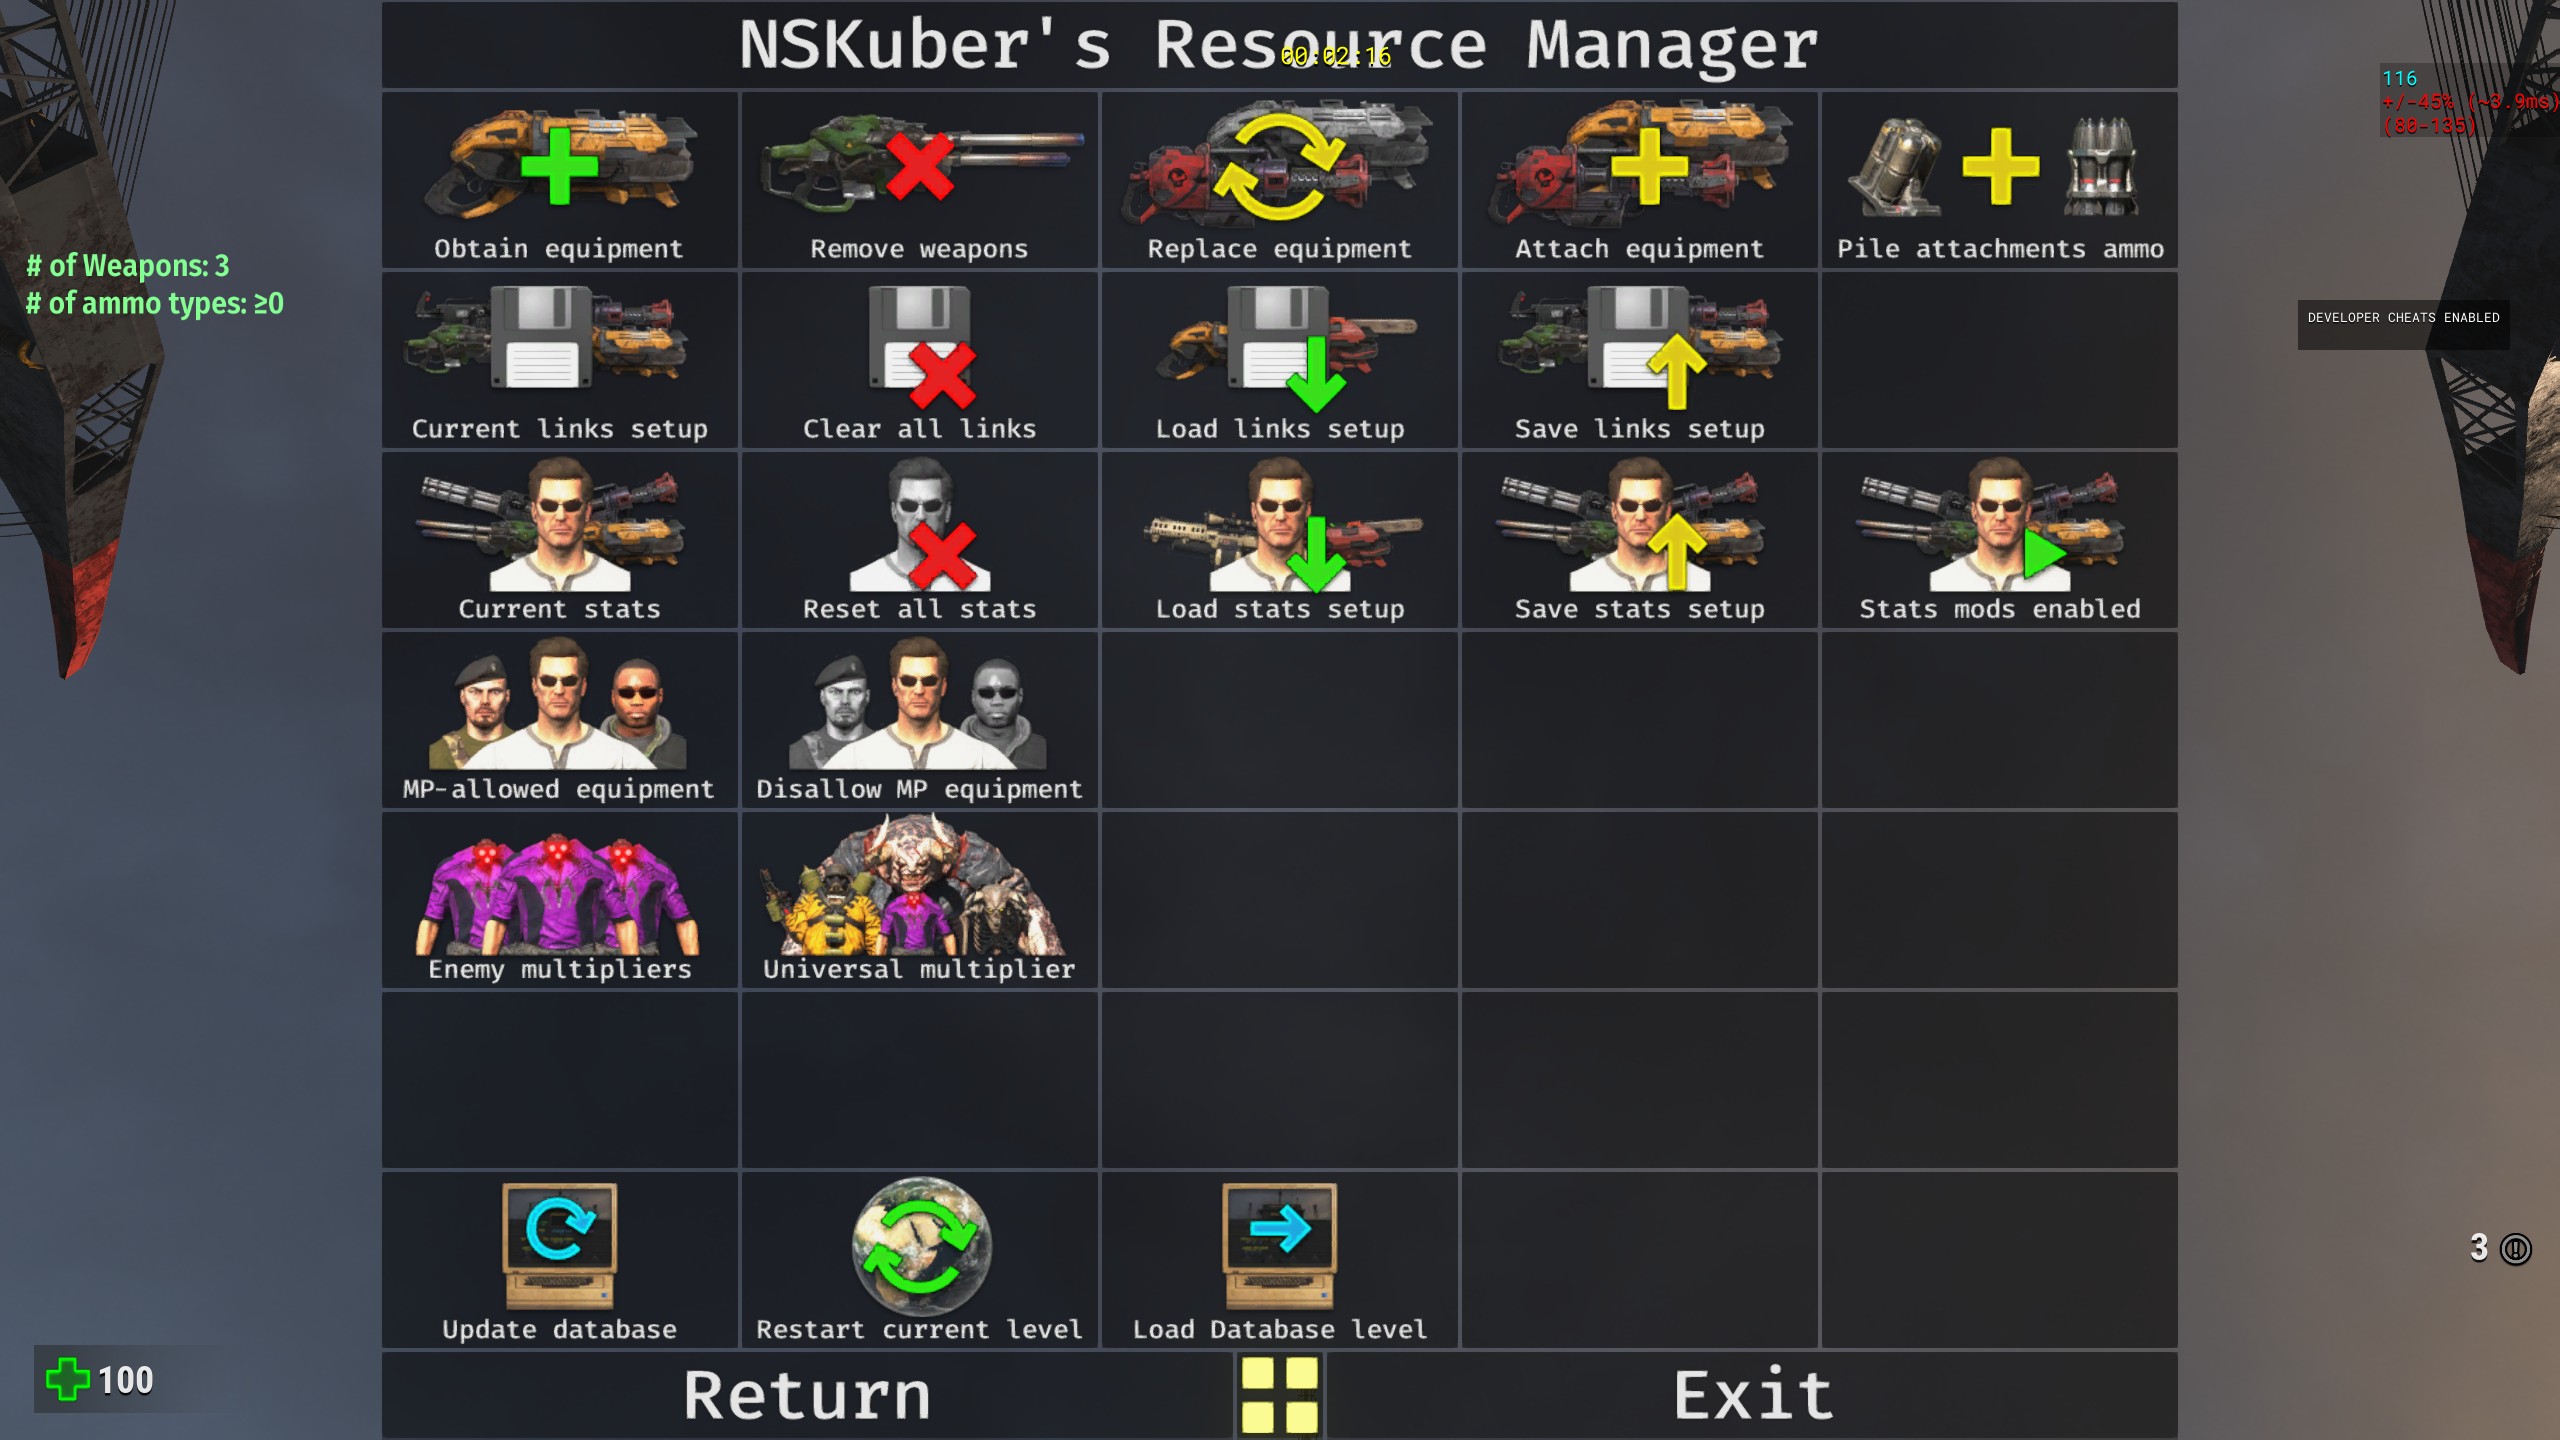
If you installed everything correctly and binded the command to a key, upon pressing that key in a level you should see the following:

Navigation
This mod can be configured only by the host of the game. General navigation is as follows:
- Movement/Arrow keys and Mouse to select a button;
- “Fire” buttons/Enter/Space to enter submenus, select an entry or confirm modification of some stats; “Secondary fire” acts differently from “Fire” in some scenarios;
- Holding Left Shift alters certain functions in some scenarios (spawning weapons, configuring stats);
- “Crouch” button acts as a “Cancel” or “Go back” button;
- Holding Left Alt while a weapon is selected shows its stats.
These are the basics, more clarifications can be found near the corresponding options.
What do these buttons do?

First, let me note that all the configuration you do here is saved in the Steam player profile and thus persists between starting different levels, restarting the game and even launching the game on another PC with same Steam account. Additionally, all configuration can be done only by the host of the game.
Let’s look at the image again.
On the top we have a Header which usually contains useful info and also acts as the “Go to main menu” button.
On the bottom: Return button returns you to previous menu, Exit button closes the menu and the small button between them is the Grouping button, which switches the display of the weapons between grouped and ungrouped modes.
Obtaining/linking equipment
Obtain equipment allows you to obtain a weapon (LMB), spawn it (RMB) or spawn its ammo (Shift+LMB/RMB). In multiplayer, the clients can only obtain the weapons which the host has allowed them to get!
You may notice that your list of weapons is empty upon first use of the mod. This is because you have to use the Update database button on the bottom row first to obtain the list of supported entries.
Remove weapons allows you to remove weapons from your inventory. LMB removes the weapon but keeps the ammo, while RMB removes the weapon and all its ammo.
The next two options require a level restart in order to take effect!
Replace equipment allows you to replaceweapons or gadgets with other weapons/gadgets correspondingly. Due to technical limitations, you cannot replace upgrades. Replacing a weapon with another weapon also replaces the ammo for it, but “smartly” – e.g. if you replace a shotgun with an assault rifle, but you don’t replace the double shotgun (which you own), then not all shells will be replaced, but only half of them, so you will still be able to use the double shotgun.
Attach equipment allows you to attach weapons/upgrades to weapons and gadgets to gadgets. Attaching weapon X to weapon Y means that weapon X will be spawed along with weapon Y, and the same goes for ammunition if the next switch is set to Pile attachments ammo. If it’s set to Cycle attachments ammo, then the ammo of the weapon which you are attaching to will be cyclically replaced by ammo of one of the weapons which are attached to it, thus creating a more balanced scenario where you get more weapons, but the combined amount of ammunition you get for all of them stays the same. Changing ammo attaching system doesn’t require a level restart.
Current links setup shows which replacements/attachments you have configured so far. Clicking on a link removes it.
Clear all links removes all links.
Load links setup/Save links setup does as advertised – saves the setups for replacements/attachments in a separate variable so that you can load them later.
Stats setup
Configure stats allows you to configure weapon stats such as damage, fire rate and ammo consumption. It also allows you to configure player’s Move/Jump speed.
Clicking LMB on a button here enters the “configuration” mode. Using WASD/Arrow buttons you can switch between parameters and change them (holding Left Shift increases the modification step). Clicking LMB again or Space/Enter saves the change, Left Control acts as “Cancel”. Clicking RMB on an entry resets the changes.
If an individual weapon has some parameter changed from 1, then it will override whatever is put in the “All weapons” for that parameter.
Few additional notes here:
- Some weapons are “hardcoded” in some ways so that the modification of damage/fire rate through scripts either doesn’t affect them or affects them weakly. For example, Knife stats aren’t really modifiable, and Pistol firerate changes affect it but very weakly.
- Ammo consumption changes don’t work on in-clip ammo, so weapons which use clips will have the same amount of shots until reload, and “saved” ammo will be put into the general ammo pool for the weapon;
Reset all stats clears all stat changes.
Load stats setup/Save stats setup does, again, as advertised – saves the setups for stat changes in a separate variable so that you can load them later.
Stats mods enabled/disabled switch enables the script which does weapon damage/firerate configuration. The change of this switch requires a level restart to take effect. This is needed because the script in the NRM which changes the stats is very aggressive and if any other script mod will try to use these script functions, NRM will forcefully overwrite their changes, even if all stats are unmodified (set to 1).
Note to other modders: if you’re creating a map/gamemode in which you want to forcefully disable NRM’s stats modification, put a script on your level which contains the following line of code right at the start:
worldGlobals.DisableStatsModifying = true
Multiplayer
MP-allowed equipment gives the host the ability to allow other players on the server to obtain weapons.
Disallow MP equipment disallows all weapons to be obtained by clients.
Enemy multipliers
Enemy multipliers menu allows you to configure script enemy multipliers. This option is separate from Croteam’s gamemode customization option and it’s not compatibe with it! It doesn’t change your max ammo, and it multiplies enemies more “directly” – doesn’t stretch your battles in duration but increases actual enemy count at any given point in time. It’s recommended to use this together with Stats Configuration and without CT’s enemy multiplier.
It’s also possible to change this multiplier during a level – the changes will apply only for those enemies which spawn from the spawners which haven’t started spawing anything yet. This usually means “enemies in the next fight after the current one ends”.
The All enemies button in that menu specifies the multiplier for all enemies if the switch in the main menu is set to “Universal multiplier”. If it is set to “Multiply based on size”, then enemies will be multiplied by one of the five multipliers for a group, depending on their max health.
Top 6 buttons configure “base” enemy multipliers, next 6 buttons configure added enemy multipliers “per player”.
Note that multiplying enemies adds a significant load to your CPU! Even an x3-x4 multiplier can cause serious performance issues, and maximum x20 here is just for lulz.
Extras
Update database button refreshes your weapon database. Use this once in a while to see new additions by modders which you have subscribed to. RMB on this button clears your database, use it if you feel something broke in your database. If this doesn’t work and you are getting an error, please contact me so that I fix the server!
Restart current level does as advertised. Works in Multiplayer now!
Load database level loads Database setup level, included with the NRM mod.
Having troubles?
First of all, check https://steamcommunity.com/sharedfiles/filedetails/?id=1301227682 written for Serious Sam Fusion 2017. All of this should be applicable to SS4.
If the guide didn’t help and the mod still doesn’t work, or works but with issues, it’s best to provide the log file:
- Launch the game, launch a level and reproduce the issue you have (mod not working, some other bug);
- Close or minimize the game. Navigate to the “Steam/steamapps/common/Serious Sam 4/Log/” folder. Right click on the “Sam4_Unrestricted.log” file and open it with any text editor you have (Notepad will do). Press Ctrl+A to select the contents of the log, copy them and insert into a paste on pastebin dot com.
- Save the paste and post the link to it to the comments of this guide or in the comments to the mod on the workshop along with the description of your issue.
Please note: if you post a question which has an answer in this guide or if you troubleshoot “NSKuber HALP!!1! MOD NOT WORKS!!!”, without providing any details and/or log, there is a high chance that I will just ignore or delete your comment.
Here we come to an end for Serious Sam 4 Guide to NSKuber’s Resource Manager hope you enjoy it. If you think we forget something to include or we should make an update to the post let us know via comment, and we will fix it asap! Thanks and have a great day!
- Check All Serious Sam 4 Posts List


Leave a Reply