– you’ll be able to start a variety of processes with RF Transmitters
– even useful for defence
– somewhat cheap
– can be set up quickly
Description
Set each digit by broadcasting on a different frequency.
This way you can send codes to your base triggering certain actions.
This particular setup, with 4 digits can trigger up to 64 different actions.
Note that there could be more scalable designs but this is the best tradeoff
as it’s unlikely you’ll need more than 64 different actions,
otherwise just add another RF receiver, the 1 tech trash is affordable heh.
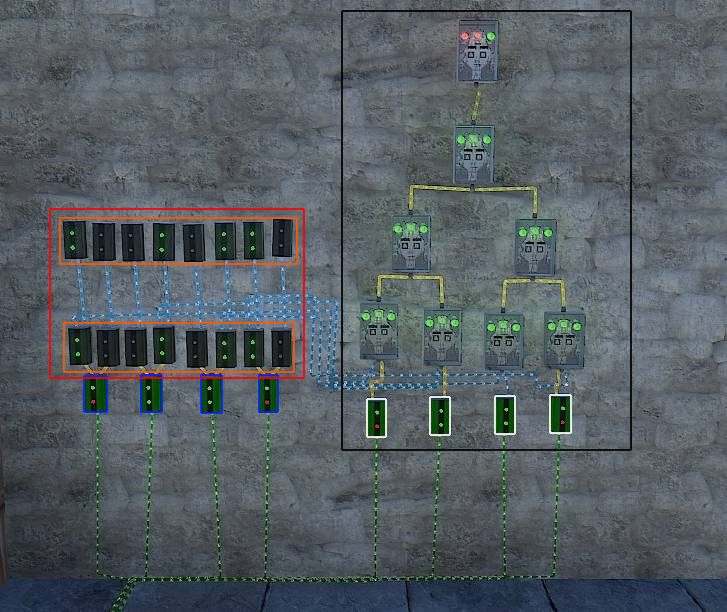
Blueprint Overview
Quick explanation regarding the boxes
– organge box = “group” of branches
– red box = all branches powered by the incoming signal (kind of an unncessary box)
– blue box = the incoming signals
– black box = one ID setup
– white box = binary code for that ID
Setup of RF Receivers
Get 5 RF receivers.
Note that the “set”-input of each digit on the left, the blue boxes should be connected to an RF Receiver with its own frequency, that’ll be adressed in a little.
RF receiver number…
1 : Connect it to digit 1
2 : Connect it to digit 2
3 : Connect it to digit 3
4 : Connect it to digit 4
5 : Connect it to many branches (amount of branches = amount of ID’s you plan to set up)
6 : Connect it to 4 branches, each output leading to the “reset”-input of the digits.
Logic Gates
Each bit of the incoming signal has loads of branches connected to “output” and “inverted output”.
Each of the orange groups is connected to one ID.
When you set an ID as 0110 as in this example, for the digit on the very left you’ll connect the branch that is powered by the inverted output
to the AND switch.
The ID has its bit on the very left connected to that switch too, its inverted output to be more precise.
Long story short that’s gonna check if both are negative.
Vicer versa goes for comparing positive bits.
Digit 2 for instance is positive for the incoming signal. Connect it to bit 2 of every ID and the ones that have a positive bit there too will activate the switch.
Above these 4 AND switches there are 2 more, they check if both are true, if so combine that signal again into an AND switch.
And above that and switch there’s another one – this one is connected to the one of the branches triggered by frequency 5 used to confirm the action.
Otherwise you’d already trigger stuff while setting digits, that would cause unwanted stuff.
The output of that top switch, connect it to a memory cell’s “toggle” input. That cell should be powered 24/7.
The output of that memory cell will be connected to whatever you want to start.
And yup, sorry for not including the memory cell on the image xD
How to use it
– Get an RF Transmitter
– remember the frequencies you assigned each receiver
– initialize each bit with by broadcasting on the according frequency, unless that bit should be 0
– in case you made a “typo”, broadcast on the frequency of RF receiver number 6
– if you’re done setting all the digits,broadcast on frequency of RF receiver number 5
And the process should be started. Next thing to do is clearing the memory, by deleting it, again broadcast on frequency of receiver n 6.
You can stop the process by doing the broadcasting process again, sending the same code.
Cost
Base cost : 1300 metal frags, 6 tech trash.
For each ID : you’ll need an additional 1925 metal frags, this includes what you don’t see on the blueprint overview image.
Note regarding the guide
Gonna polish this guide at some point, so far it’s not the most clear way to explain it lol.
If things don’t work or you don’t understand it, you can comment here !
Hope you enjoy the post for Rust Using RF Transmitters to Control Base – Electricity Guide, If you think we should update the post or something is wrong please let us know via comment and we will fix it how fast as possible! Thank you and have a great day!
- Check All Rust Posts List


Leave a Reply