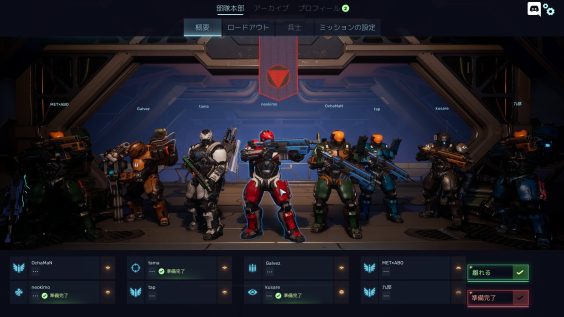
Introduction: The Role of Medic and You!
One of the most basic but important roles, the Medic is the backbone of the team. The difference between a good Medic and a bad one can be the key to evacuating out all 8 team members at wave 16 for a Total Victory, or failing gloriously before you even begin.
This guide will be a comprehensive look at the Medic class, and will include general tactics and strategies, Loadout optimizations, a Tier List of all Medic abilities, and finally a few of my favorite builds (as well as a few interesting theoretical builds).
Disclaimer: This guide was made two days after release. I will try to update it as often as I can, but feel free to comment or message any feedback/input or anything else you may deem worthy to note, include, or change. Under no circumstance do I imply with this Guide that these are the end-all-be-all methods of playing. Every good player should test out each module, system, and component themselves, and ultimately create a Loadout that they enjoy playing as, or works with their squad composition. Thanks for the read and sorry, its a little long.
Let’s Get Started.
Medic Tactics, Strategies, and Your Team
As most of us would expect, the Medic is a pure support role, with various buffs, debuffs, and pure healing capabilities to allow your teammates to survive and thrive wave after wave, often times against heavily out-of-favor odds. A seasoned Medic can often times bring a situation gone FUBAR back from the brink of ruin – to a fully recovered and rocking squadron.
Depending on the overall skill of the team, its easily possible to run a single Medic who is able to manage and oversee all other players, without the need of a backup (although one is ALWAYS appreciated). Here are a few rule sets to keep in mind, some general strategies, and key observations about the Medic class, and how to more effectively help your teammates no matter the situation.
Rule #1: Color, It’s More Important Than You’d Think
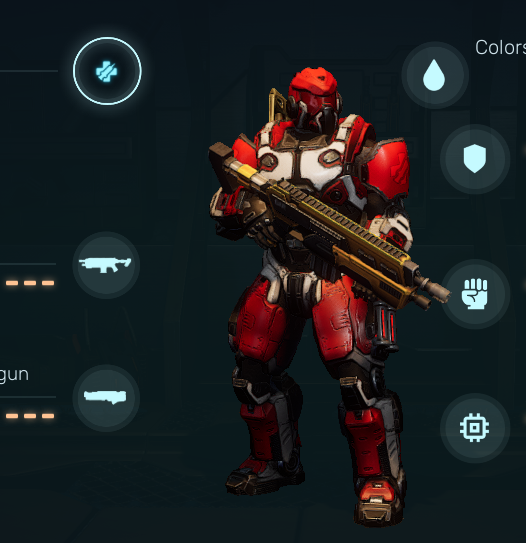
As many of us rank up, more and more colors become available to modify and personalize our characters in game. While this is neat and completely by personal preference, something that people often overlook is how vital visibility of your medic can be amongst the chaos of handling swarms of hideous monsters.
One of my personal rules is to Leave the Default Medic Color Scheme On. It is by far the most visible color scheme of any of the color options, and can be surprisingly helpful for your teammates to easily locate you in order to run over and receive healing they need. It can often mean the difference between a player living and dying, due to you being much more recognizable with the bright red/white contrast. Of course, this isn’t necessary, but it can be quite helpful for your team despite its mechanical insignificance.
Rule #2: Communication, It’s More Than Just Couple’s Therapy

As players gain more skill and move into harder difficulties, communication is everything. I’d heavily advise (if you haven’t already) joining into the Red Solstice Discord to link up with your public lobby teammates and communicate directly with Voice Comms. In the top right corner of The Red Solstice menu there is a Discord icon. Click it and join the Discord (or make your own or something). It’s that simple!
To add to this, there are a few key things to do that will immensely help your teammates out, and provide a nice boost to your overall team cohesion during the intensity of the fight.
To see some examples of good ways to communicate with your teammates, check out the Communication Examples Section below this one.Generally, trying to be helpful and communicative is a good start.
Rule #3: Don’t Overwatch Unnecessarily
If you take a look at the in-game layout I display of my Medic on Overwatch. You will see I highlighted the two bars which indicate my character’s energy.
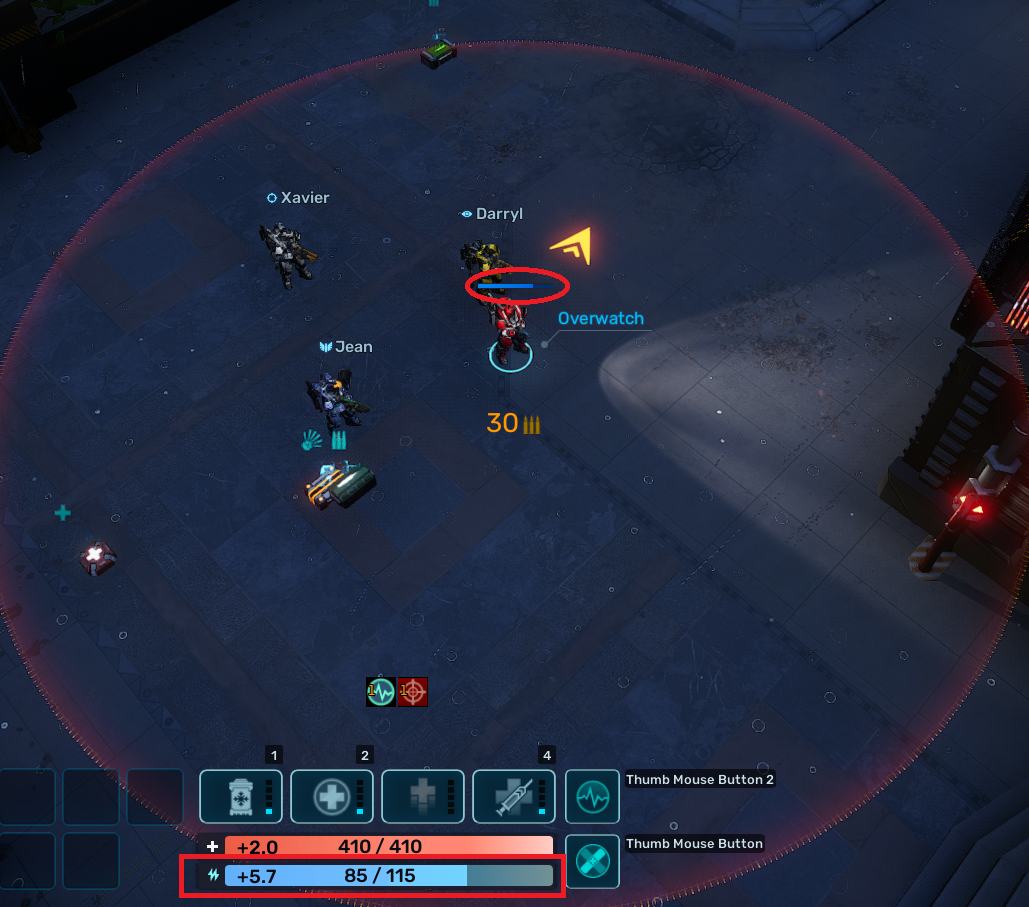
Major Takeaway: Overwatch Reserves Energy Out Of Your Max Energy. This is bad. You want that Energy. You NEED that Energy. Cutting out 30 Energy can easily mean not being able to cast a critical Heal Gun when an ally is about to die, all because you were sitting in Overwatch (for no reason).
Overwatch is definitely useful for downtime, inside tight corridors, or hitting enemies that give you trouble through manual aim (i,e, Moths and fast movers), but where ever possible, stay out of Overwatch to keep your Energy Bar at its maximum for whenever you may need it.
Rule #4: Meatball is Love, Meatball is Life
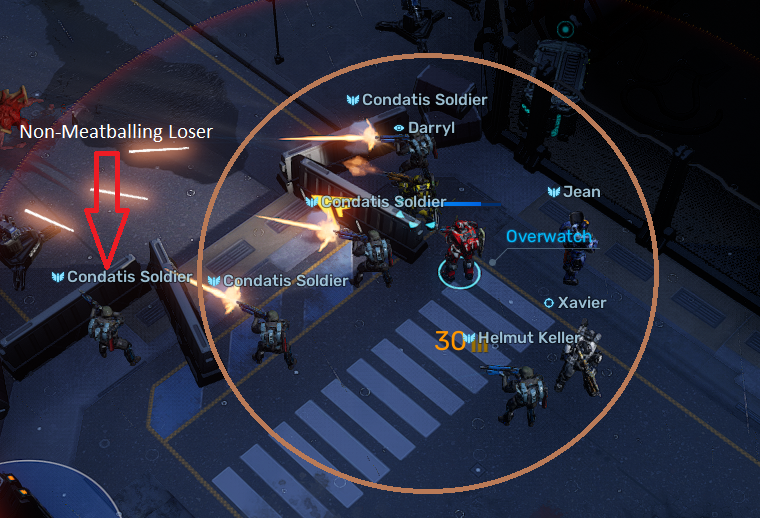
General Rule of Thumb. Stay with the group. Medics should never really be running on their own, and if your team is efficient enough, two groups of 4 players, with a Medic in each, is able to effectively roam the map while completing primary missions, secondary missions, and biomass destruction very quickly. The One Caveat to this Rule: STAY AWAY FROM DEMOLITIONS. It’s just bad news man, no need to risk yourself like that.
*Note: You don’t have to be clumped completely on top of each other at all times, you can run around freely and explore, but make sure you stay as a cohesive unit within visible range of each other (most of the time), and under intense circumstances, grouping up for a Medical Steroids buff or a max rank Heal is extremely useful if everyone is located together. No need to chase people down for a heal or have a straggler bite the dust due to being off-screen/out of range.
If nothing else, roam around in pairs or triplets. The more people together, the greater the chance of survival.
Rule #5: The Final Rule
This is the most important rule:
If there is a situation in which you are not able to save someone without dying yourself. Let Them Die. It simply DOES NOT MATTER if your teammates die. AS LONG AS A MEDIC IS ALIVE, THE GAME IS SAVE-ABLE.
If you are in a FUBAR situation, 3 Fluffys are absolutely tearing your team apart, and one of them sets their sights on you, RUN to your allies and let them get killed. Do everything you can to keep yourself alive so that hopefully, if you can make it out of the situation, you can then revive whoever dies and actually repair the situation. Teammates might complain and say “WTF Medic, HEAL ME WASDWASFESGSDFASD” or “DUDE, WHY DID YOU KITE IT TO ME MEDIC WTF MAN YOU KILLED ME”. Ignore them. Your survival is priority over everything, and as stated before, if any other Medic goes down, get that Revive on them AS SOON AS PHYSICALLY AND MENTALLY POSSIBLE.
Also, don’t grief your teammates like that, only do this in emergency situations to preserve your own life :).
Important Note: There is a general priority to reviving, keep it in mind. Over everything, revive other Medics first. Duh. After that, the roles that can deal heavy single target/AoE damage (Demo, Marksman, Heavy, Recon) are next, because they are able to greatly improve your survival outcome with their abilities and help stabilize the area to allow your team to recover. After that, whoever you like the most > least. (jk)
Alternate Consideration: The Medic’s Inherent Tankiness.
The Medic doesn’t always have to be in the back, out of the combat. As the Role with built in survival skills, you are able to tank quite a bit more damage than many of the other roles (unless they specifically developed a Tanking loadout) **THIS IS NOT SAYING TO RUN IN AND TRY TO TANK FLUFFY**.
What I mean is that if a teammate is in a bind and is having trouble or close to dying, running in to Heal them, or even getting close enough to pull the aggro off of them for a little bit – is quite possible and often easier for you as a Medic to handle. Much more than let’s say, a Marksman. Not only that, but it will relieve the pressure off of them, which allows them to now pump out the heavy hitting damage in order to neutralize the threat that is now on you. Win-Win.
Many of the other aspects to Medic are often intrinsic, and developed naturally, but a great start/general way to improve your team’s survival rate is to take any of these rules into account when you are playing with your squad.
Team Communication Examples and Concepts
Callout 1: “Group Up” (also known as “Meatballing”)
When the going is rough, and people are hurt, poisoned, fractured and bleeding out, a good Medic will keep an eye on the affected teammates, and where possible call out “Everyone meatball real quick”, or “Demoplayer1 and I_Like_Miniguns, stack on me for a Heal”. This lets your team know that you want to provide a group wide heal quickly and efficiently. This is most important for the Cleanse and Heal skills, but is also extremely useful for Harvest, essential for Medical Steroids, and very useful for a myriad of other support items/skills.
Establishing this concept, along with keeping the Default medic colors, allows players to recognize you quickly, group up into one big meatball, and receive the cleanse/heals they desperately need.
Another important note: Run towards them as well. For those with fractures, movement speed makes it hard to escape harder monsters, do your best to intercept your allies and create an ideal radius for them to stack on you with as little movement as possible, that way little to no time is wasted and everyone is caught up to speed to escape and survive.
Callout 2: “Help Revive” and “I’ll Be Back, Hold On”
Pretty self explanatory, as a Medic, you should be the one keeping an eye on the status of your team. When you notice a teammate about to die/already dead. Let your nearby teammates, or the entire team know, and plan a detour to be able to quickly revive them (where possible).
Taking care of a 20-second revive as soon as possible brings your team back to its maximum strength, and it will overall ensure that your squad is able to recover quickly from a death. Attempting to revive solo means 20 seconds of often isolated defense, where you are able to be picked off quickly and easily by a few Atrocities or a Slasher. Even one or two other teammates are all you need to ensure the player is revived and able to recover effectively to regroup with the team.
If that is just not possible at all, the area is completely overrun or you have Fluffy chomping at your heels, let the player know you will clear the area and head back for them ASAP. That way they understand they are your top priority and where safe, your team will reroute back over to the fallen ally to pick them up.
Callout 3: “Here, Use This”. Stimulants, Medpacks, Antivenoms, Fibrin Bandages.
Cooldowns are a Medic’s worst enemy, excluding Hunters. Depending on your difficulty, Loadout, and ally’s ability to not get killed, you might find yourself in a situation where everything is completely on cooldown, or you just don’t have enough energy to cast that Heal yet. Do not worry!
A thoughtful Medic with some foresight could carry a few Antivenoms, Stimulants, Medpacks, or Bandages in their inventory, so that if a teammate is on the verge of dying and there is no other option available, you can say “Hey SHIVA_Daddy_69420, drop something real quick and use this Stimulant” (Right click to drop items out of your inventory onto the ground, and press F1 over it to ping it for players to see.) If they react quickly enough, they can run over, pick it up, and save themselves! What a concept!
General Loadouts & Important Information (Components)
That last section was a doozy. I will keep this as short as possible.
Very Useful Loadout Options for the Medic: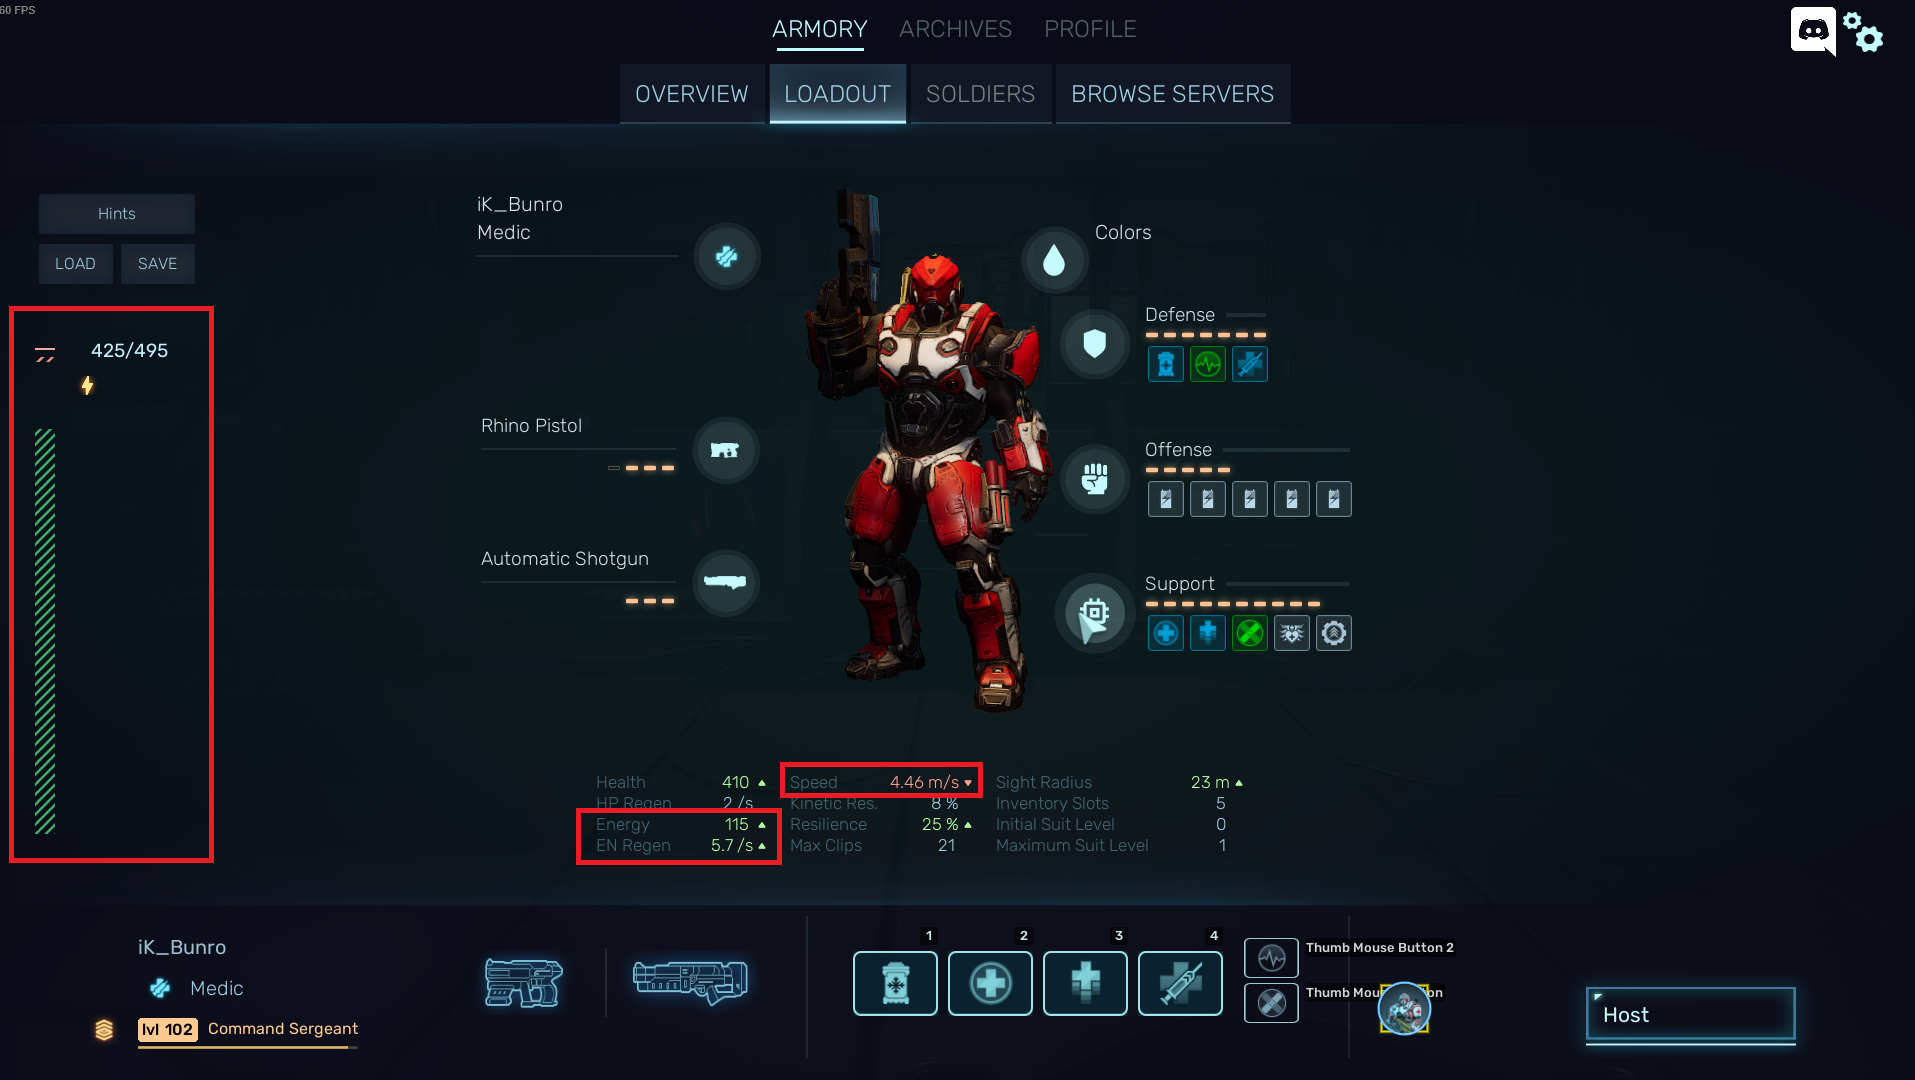
The Three Most Important Stats for Medic: Energy, EN Regen, and Speed
Shown in the red squares, adjusting your Medic loadout to favor those key stats will, above everything else, improve your abilities as a Medic drastically.
One of the most important concepts to understand about the Suit Power bar (the green bar). The greater the gap between your Total Suit Power and your used Power amount, the higher your EN Regen is.
That is extremely useful. The more energy regen you have, the less time you are out of energy. This means more abilities can be cast, and thus more healing. Very good stuff.
When it comes to Speed. Well, Speed is everything. Speed is by far the most important stat of any of the stats in this game. The faster you and your team are able to move, the more you are able to avoid, dodge, and defeat. We will cover this in the Skills section.
My General Recommendations for these attributes:
Total Suit Power: 550+
Energy: 100+
**EN Regen: ~5.5+ /s
Speed: As high as possible (but it doesn’t have to be too high, you’ll see why).
Everything else is personal preference/subjective.
**After discussing with another excellent Medic, he brought to my attention that with his preference, he runs around 5.2 EN/s on average, and often likes to input Agility modules, Perception modules, or other modules over Power Cores. This is all very interpretive, and according to him, there isn’t much noticeable difference between 5.2 and 6.3 EN/s (yet, he’s currently testing my builds). I personally prefer these heavy energy-focused builds, but as always, feel free to experiment and see what levels of these stats and the module Loadouts work for you.
Let’s move onto the Important Upgrade Components you should prioritize:
#1: The ALL TIME GOAT Upgrade Component: Power Core
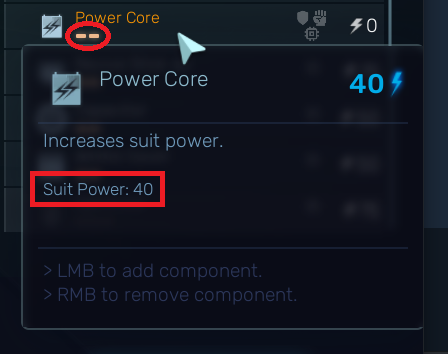
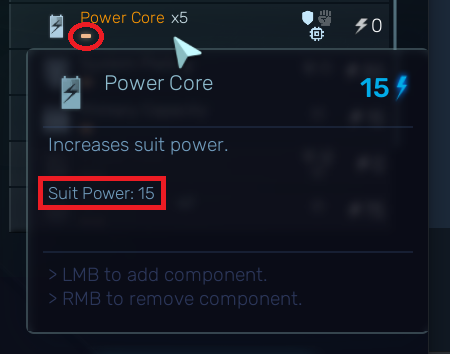
Power Core, you beautiful, beautiful component you. This is the key to Medic Loadouts. Where ever you have an extra suit slot not being used, put in Power Core. Getting that 1 skill point level into the two slot “Max”Power Core, vs. the already known one slot “Mini” Power Core, is vital. Heres why:
Shown in red circles. The Mini costs 1 slot for 15 suit power, thus 2 mini cores = 30 suit power, quick mafs. The Max costs 2 power slots, for a total of 40 suit power, 10 more than the two 1 slot mini cores. I LOVE EFFICIENCY. Stacking as many Max Power Cores as possbile increases your total Suit Power significantly, and allows for tons more room for loadout adjustments, and improving your EN Regen. You will see what I mean in the Loadout builds I post down below.
#2: Capacitor, It’s Pretty Good I Guess…
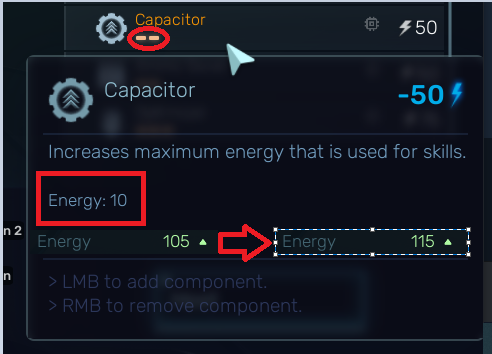
This upgrade component can be useful for certain Loadouts, but isn’t always necessary. A Capacitor increases your in-game energy bar, or your “mana bar” so to speak, when playing in game during a Skirmish. That means it increases your total energy, which allows you to potentially cast more abilities at once than you might be able to at 100 energy.
It’s only downsides are that it only increases it by 10, for two suit slots. The best way to determine if you need this component is to take a look at your 4 selected modules (blue skills) and see how much each ability costs. Medical Steroids costs a consistent 80 energy, and if you pair this ability with 3 other high energy cost skills, it may be worth it to fit a capacitor into your suit in order to help your overall cast options on the fly.
#3: Optimizer, It’s Okay Sometimes….
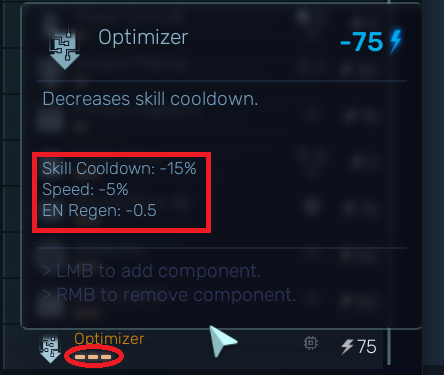
While no where nearly as good as Power Core, Optimizer can be useful for very niche Loadouts, where longer cooldowns for abilities like Medical Steroids and Heal allow for some excellent sustain by a single Medic.
However it comes at a cost. Shown in the highlighted areas, it costs 3 suit slots, which can take up vital power core slots, and also reduces your EN Regen and movement speed. Depending on your Loadout, the negatives can easily outweight the positives. *I currently do not use it in any of my loadouts, but maybe for some experimental builds I’ll try it out.*
Other Good Components to Use:
Primary & Secondary Extenders – Good for adjusting your weapons to whatever you prefer, which is up to you.
System Plating – Damage resistance never hurts, but you can generally heal yourself through most damage so it isn’t required.
Revive Stick – Extremely useful for Solo medic team compositions, unecessary for groups with more than 1 medic, unless you don’t trust the other medic to revive you. Costly to your suit slots and energy otherwise.
Perception – The more radius your vision is, the better you can see allies and enemies, not a bad option
Agility– Speed is king, if you want to be hyper-fast, put some in.
Inventory Extender – More Items, More Utility, sure go for it.
Life Support – More health means harder to kill, dead Medics are a no-no.
BAD Components to Use:
Resilience – In my opinion, completely useless for Medic, not only can you completely out heal the temporary debuffs you get, you have 2 abilities that instantly clear debuffs off of yourself, always. No point in slotting for reduce debuff chance imo.
NanoPlate – increased Armor at the cost of EN Regen, no thanks, unless you are playing Tank Medic (see Experiment Loadouts 🙂 )
Overwatch Upgrade – You shouldn’t be using Overwatch very much, so you shouldn’t really be slotting this either.
Overcharge – Gaining an extra level at start for the cost of -10% Energy, not worth it.
Everything else is personal preference and subjective.
This section was too long too. Oh well, Next Section.
Medic Modules Tier List: Core Skills, Pros & Cons
Editor’s Note: When referring to Skills, I mean Modules, which are indicated by the 4 Blue modules you can select as active abilities. Systems, the 2 Green abilities that are selectable, will come after this Tier breakdown in a similar layout/design.
The Medic Skill Tree Tier List:
I changed the format a tiny bit to emphasize my personal opinions on the usefulness of the Medic skill tree (as of 6/19/21). Feel free to comment theories or opinions if you disagree.
Green: Excellent/Core Skills
Yellow: Niche Skills
Red: Completely Useless, Do Not Use.
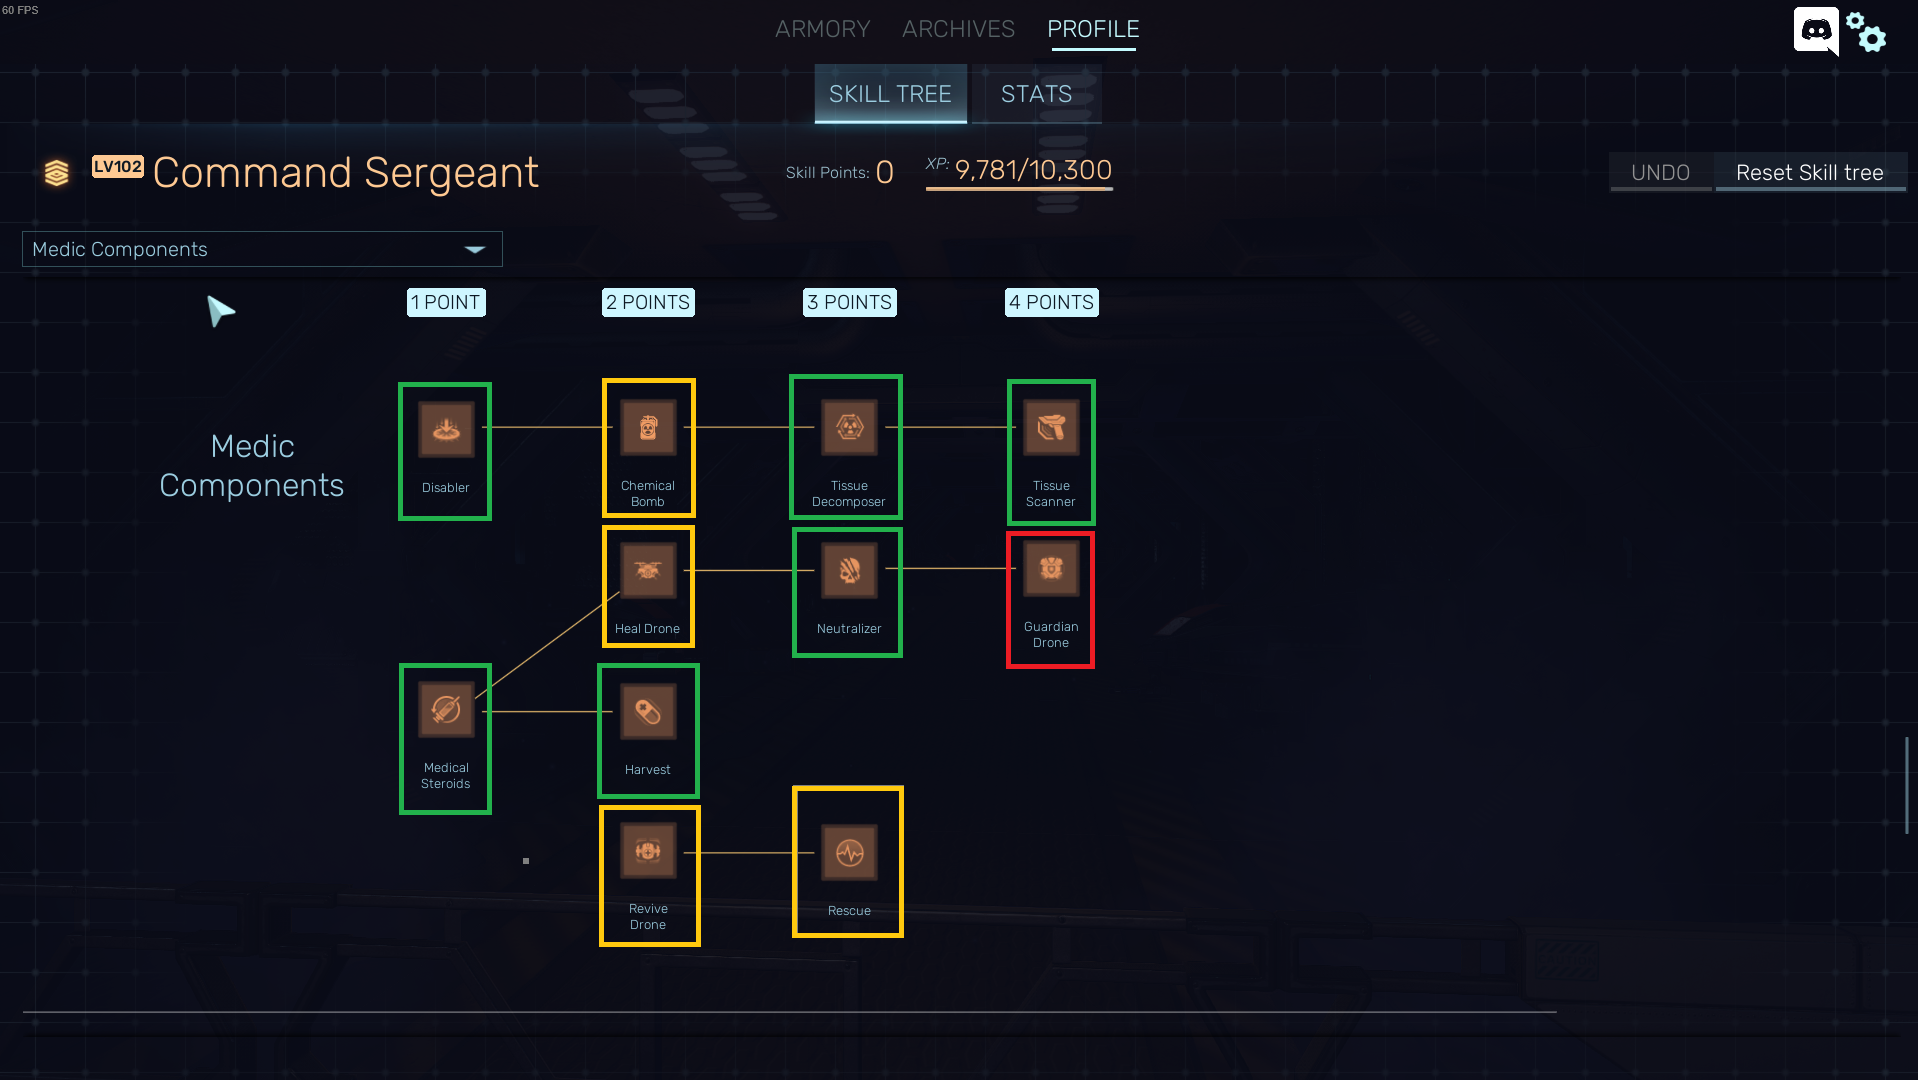
“Core” Medic Skills:
The base level Medic skills you start with, as well as certain learned skills within the Medic skill tree, make up what I like to call “Core” skills. These skills are, in my opinion, a necessary skill to bring with you for nearly every Loadout, unless you have more than 2 medics and you are trying some experimental stuff.
Heal:
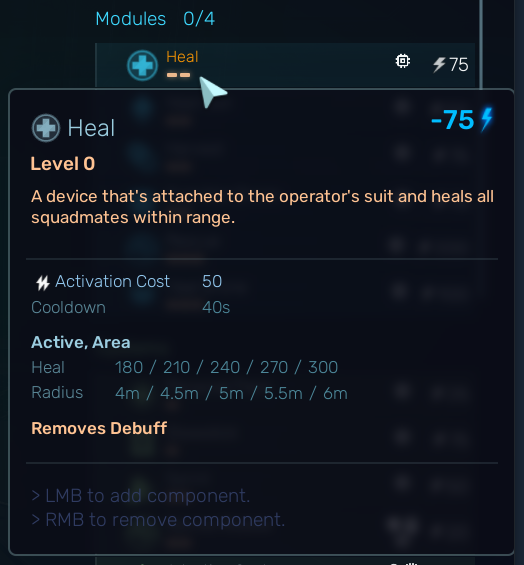
The big boy. Your main heal over everything. Yes, this heals in a radius centered around your character. Yes, its a little small, at first.
The most important thing about this ability: It also Cleanses ALL Debuffs. At Level 5, thats a 6m Cleanse that also heals for 300 health. Absolutely a powerhouse in tight situations where the entire group is dying, debilitated, and generally needs some help.
This is the essence of the Meatball, it is the Egg that binds the Meatball together and keeps it moist as it rolls along. Use this in almost every build you can.
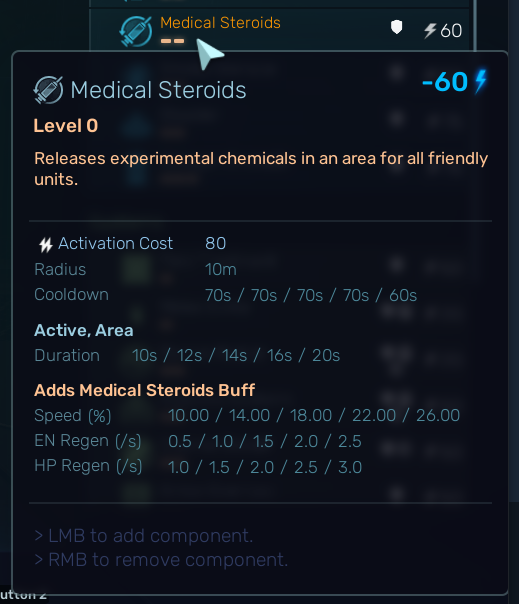
Medical Steroids:
Okay, it costs 80 energy to use, that is a lot. But… BUT… 10m radius, 20 second duration, 3.0 Hp Regen per second. 2.5 EN Regen per second, and a whopping 26% speed boost. For 20 seconds. Absolutely Insane.
I would ABSOLUTELY recommend this skill be slotted ALWAYS, even more so than Heal. Movement Speed is King in this game, and this ability just is too excellent not to use.
Is your Meatball about to be eaten by a swarm of Behemoths? Are you getting overrun? Tell your squad to meatball on you, pop this bad boy on everyone in 10 meters – a quick and easy escape.
On top of this, the EN Regen synergizes extremely well with other classes who utilize energy, or weapons which cost Energy per shot (cough Viking cough). Overall, absolutely amazing skill.
It is understandable to not use it due to the high energy cost, but by using a Capacitor in your Loadout, you can negate that negative with little downside to your overall performance.
Other Excellent Skills to Consider:
Heal Gun – A great skill. A teammate is not in your meatball? Just out of reach and slowly bleeding out? Someone got pounded by a Behemoth and is 1 second away from becoming a pancake? Here is your instant ranged heal. It will absolutely save your teammates from a distance when they are on the brink of death. It’s also short CD, relatively low energy cost, and an AoE.
Nitrogen Grenade – Supression is an excellent mechanic against higher tier monsters, and this thing grants quite a chunk of suppression/freezing on throw. Very useful for stopping Fluffy in her tracks. Depending on if you are Utility or even Control Medic (2nd or 3rd Medic in group, etc), feel free to take this for more crowd control utility.
Smoke Grenade – Similar concept as the Nitrogen Grenade, but in my opinion, even better. It doesn’t have the quick reaction freeze and suppression that Nitrogen Grenade does, but the-20% Max Suppression on enemies means they will get Suppressed 20% quicker, really just as good if not better at suppressing/stunning Fluffy. On top of that, it also significantly slows, has a large radius at max rank, and it reduces vision (Atrocities and hostile PMCs can’t shoot back, amazing).
Harvest – When your team composition heavily favors the Heavy, Assault, and Marksman roles, this ability is an absolute powerhouse. It provides a solid buff to Crit and for every kill an auto-tracking heal orb returns to the player who killed any monster.
At max rank, this is one of the best team sustain abilities in the game. Your Assault and Heavy will be mowing down hordes of zombies, healing through any damage they may take in the process. Just make sure you let your teammates know to start blasting when you use this ability on your squad, because the more they kill the more they will heal.
Neutralizer– The ultimate control skill. Have you ever wanted to create a Cage Deathmatch Arena? Want to see which would win, a Fluffy or a Hunter? This is the skill for you!
When things are just about to go FUBAR, using this skill correctly can completely save your squad from certain death. Pitting the most powerful foes against each other, while hordes of zombies gang up on them, is excellent for crowd control and escaping very dangerous spots, while allowing your squad to mow them down.
Also, this ability works on Biomass Tumors!Wow! Lure a strong enemy to a Biomass tumor and hit the tumor, it’ll start pounding away, along with every other monster that spawns nearby.
[uTwo Notes: If there are no other monsters nearby, the Neutralized monster will still attack your squad, make sure that there are mobs nearby to aggro it. Also, charmed mobs take 0 shot damage, fyi.
Tissue Decomposer/Scanner – Both of these skills are solid skills for a Debuff Medic Loadout. The Tissue Scanner provides a low power suit, no energy passive 15% damage increase against all monsters nearby, really nice for a passive. Tissue Decomposer is potentially even better, the ability to prevent respawning monsters can go unnoticed, but is actually very useful. at 20 stacks a whopping 60% damage increase debuff on any monster of your choice (Fluffy).
Disabler – A solid debuff skill, goes decent damage to small monster hordes, and provides a 30% decrease in enemy damage to those in radius. Works great with a dedicated tank Loadout.
Niche/Situational Skills:
Heal Drone: A low energy cost big heal /s ability that lasts a long time. Can be re-targetted to multiple players. I think it will work really well as a sustained heal on tank Loadouts, or managing sustained healing for the entire squad, but other healing abilities seem to be just as good/if not better.
Chemical Bomb – I don’t generally use this skill, the DoT isn’t terrible, could be good for clearing incoming hordes of small monsters, but not much else imo
Rescue – Haven’t used this to be honest, not going to give an accurate analysis, but the movement speed debuff looks sketchy and not worth the instant revive to me.
Stimulants – A good ability, but not really a support ability. I would use this ability for very specific experimental Loadouts, especially with a focus on the 30% damage buff at max rank. Otherwise other skills are better suited than this one.
Bad Skills:
Guardian Drone – To be completely frank, absolutely ♥♥♥♥♥♥♥ terrible ability. Needs a rework/major buff by the developers.
The concept is solid, I could imagine at very high difficulty, having a Biomass clearing bot with health/s regen sounds great on paper. It moves so unbelievably slow, its actually slower moving than a player running on creep. Not only that, but it also DOESN’T MOVE unless you are standing in its radius.
*Maybe if it actually applied a debuff to the tumors in the directional pathing you set it to move, and it moves quickly in front of your group – without you having to stand in it – to clear a path while your team runs through creep, then it might be a niche/mediocre skill.
Any other skill is better than this one at this point in time.
Jesus this section needs to end.
Medic Systems Tier List: Core Systems, Pros & Cons
I will keep this section as short as possible.
“Core” Systems:
Revive Module: You should always have this. If you don’t, play another class. 20 second revive countdown.
Good Systems To Use:
Personal Flare –A Low Threat taunt, has a much larger radius, very good at distracting a horde of smaller monsters. Useful for escape, or pulling off a sneaky revive when someone gets devoured by a horde.
Glowstick –A High Threat taunt, should taunt larger monsters within a small radius for 6 seconds. Useful as a emergency distraction, but I personally haven’t had much luck in seeing its effectiveness (sometimes it taunted, sometimes it didn’t? Let me know if it works for you).
Sprint –A solid choice, use this in an emergency to escape out of a potentially deadly situation, or as a quick burst to get into range of an ally on the verge of death. Great all-around choice.
Dash –A less energy efficient movement buff, it can be useful for very small bursts of speed, or potentially timed bursts, but by costing 100 energy to get to 30% increased movement speed, I would just take Sprint instead.
Melee Strike – A solid option in case you get surrounded by a horde of zombies, a good way to escape situations like that, but try not to get into those situations in the first place.
Niche/Mediocre Systems:
Cleanse Debuff – A smaller radius Heal, without the Healing. ONLY TAKE THIS IF YOU AREN’T RUNNING HEAL. Use one or the other, not both.
Revive Drone– The unlimited revive range is nice, but the robot moves very slow. It would take quite awhile for the robot to reach another player across the map, and also its a 100 second revive countdown. That is Looonng. This can be used in niche situations where your team is running laps around the map dodging Fluffy and you can passively revive others while taking a very long kiting route around the map.
Field Treatment –Essentially the same thing as the Medpack in-game item. Very small use radius around you for a mediocre 8.0 HP/s regeneration. It’s okay if you have little to no healing abilities as a Debuff Medic and have a free System slot.
Armor Overload – Honestly I think this could be an excellent system, I am testing this ability out in an Experimental Tank Medic build, might work in some instances, but generally you should take other systems.
Not Relevant Systems –
Adaptive Systems:Haven’t seen the need to use this, doesn’t really apply to Medic imo, maybe the movement speed and damage could be useful in EXTREMELY niche circumstances, but i wouldn’t recommend.
Alright, Finally. Onto the Loadouts Section.
Poyo’s Current Loadouts: Base and Experimental
Just gonna include an image of the general loadout and stats, if you’d like more information on each individual loadout and the thought process behind them, feel free to comment or message me, I will be happy to discuss Loadout Theory.
Note: Weapons are mostly personal preference, certain weapons like the Frostbite are excellent in most situations, especially in the Control Medic build. Otherwise pick whichever you like, just keep in mind how it affects your movement speed.
Second, More Important Note: As far as I can tell, the maximum EN regen stat for Medic is 6.3, no matter the Power Suit Energy gap. So that means, to some degree, you can fit TOO many Power Cores into your Loadout. Pay attention to your energy regen, when you cap it, add other components in between Power Cores to balance your Loadout as best you can for overall suit slot efficiency.
The Loadouts I will be including in this section are as follows:
1. The Solo Medic
2. The “Pure” Medic
3. The Debuff Medic
My “Experimental” Loadout:
4. The Control Medic
1. The Solo Medic:
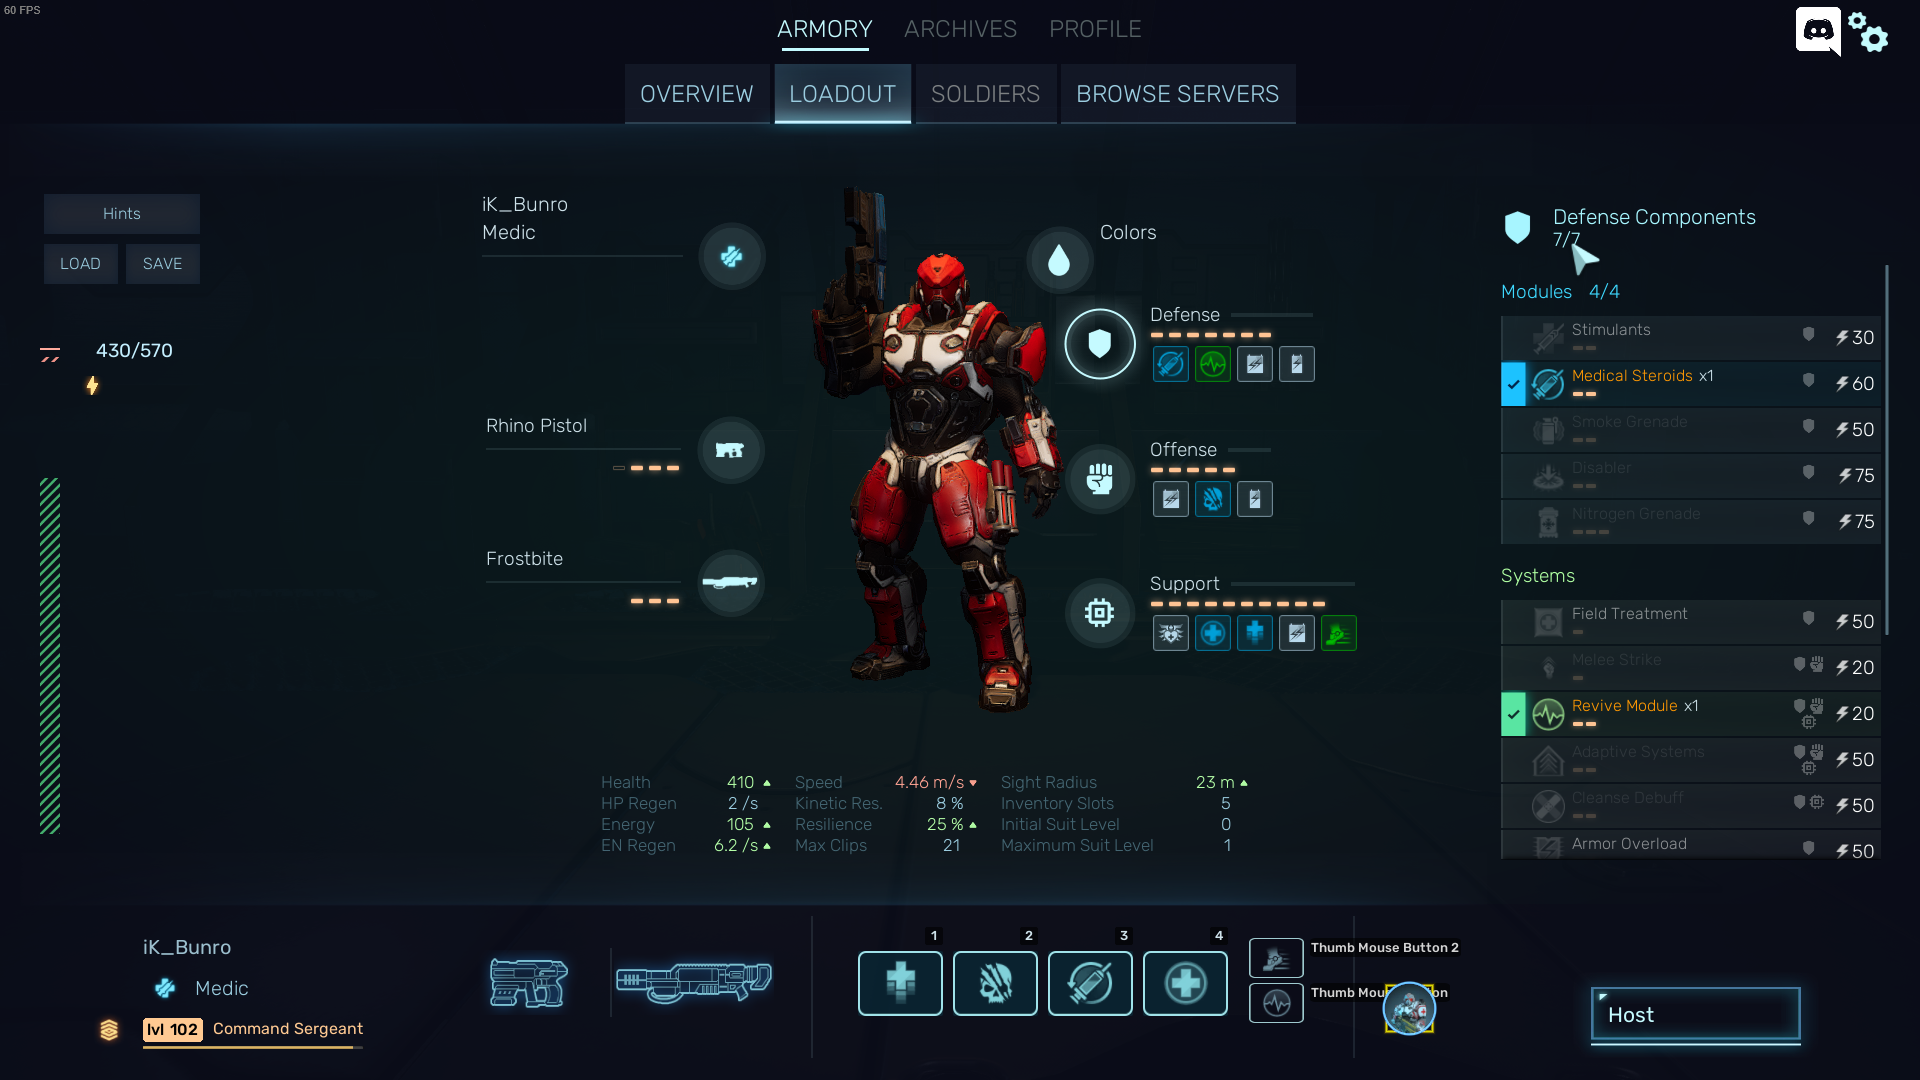
My Go-To Medic Loadout when I am the only medic in the game. Having a single Revive Stick is necessary just in case some freak accident (that totally isn’t your own fault) happens to kill your only medic. With a competent squad, you shouldn’t need more than 1 Revive Stick. You could remove one Power Core and add in a Capacitor, since Medical Steroids + Neutralizer is demanding, or replace Neutralizer with another support module instead of a control module.
2. The “Pure” Medic:
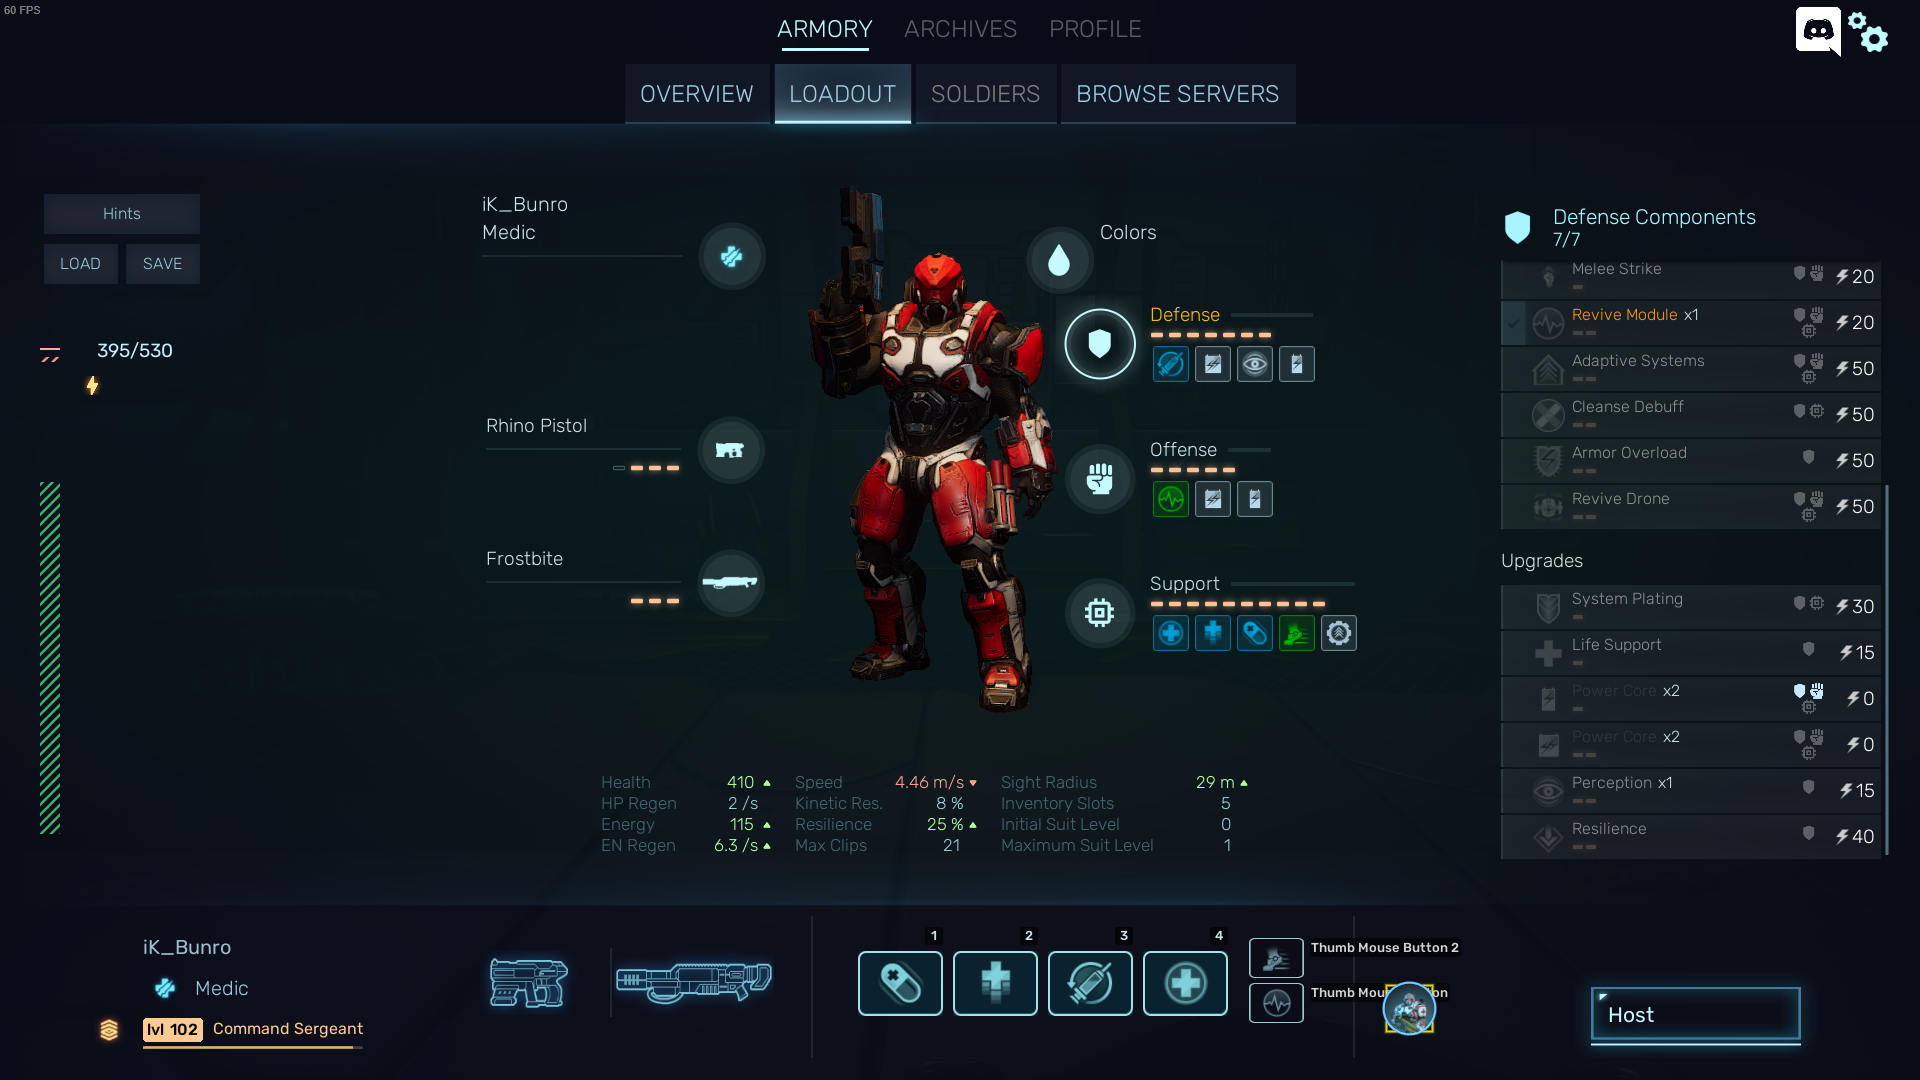
This is your Main Healer Loadout. When you have two or more Medics in your squad, designating roles to each Healer allows for tons of utility and versatility in the mission. A main Healer Medic, paired with Control or Debuff/Utility Medics, can do wonderful things. This is the go-to multiple medic Loadout.
3. The Debuff Medic:
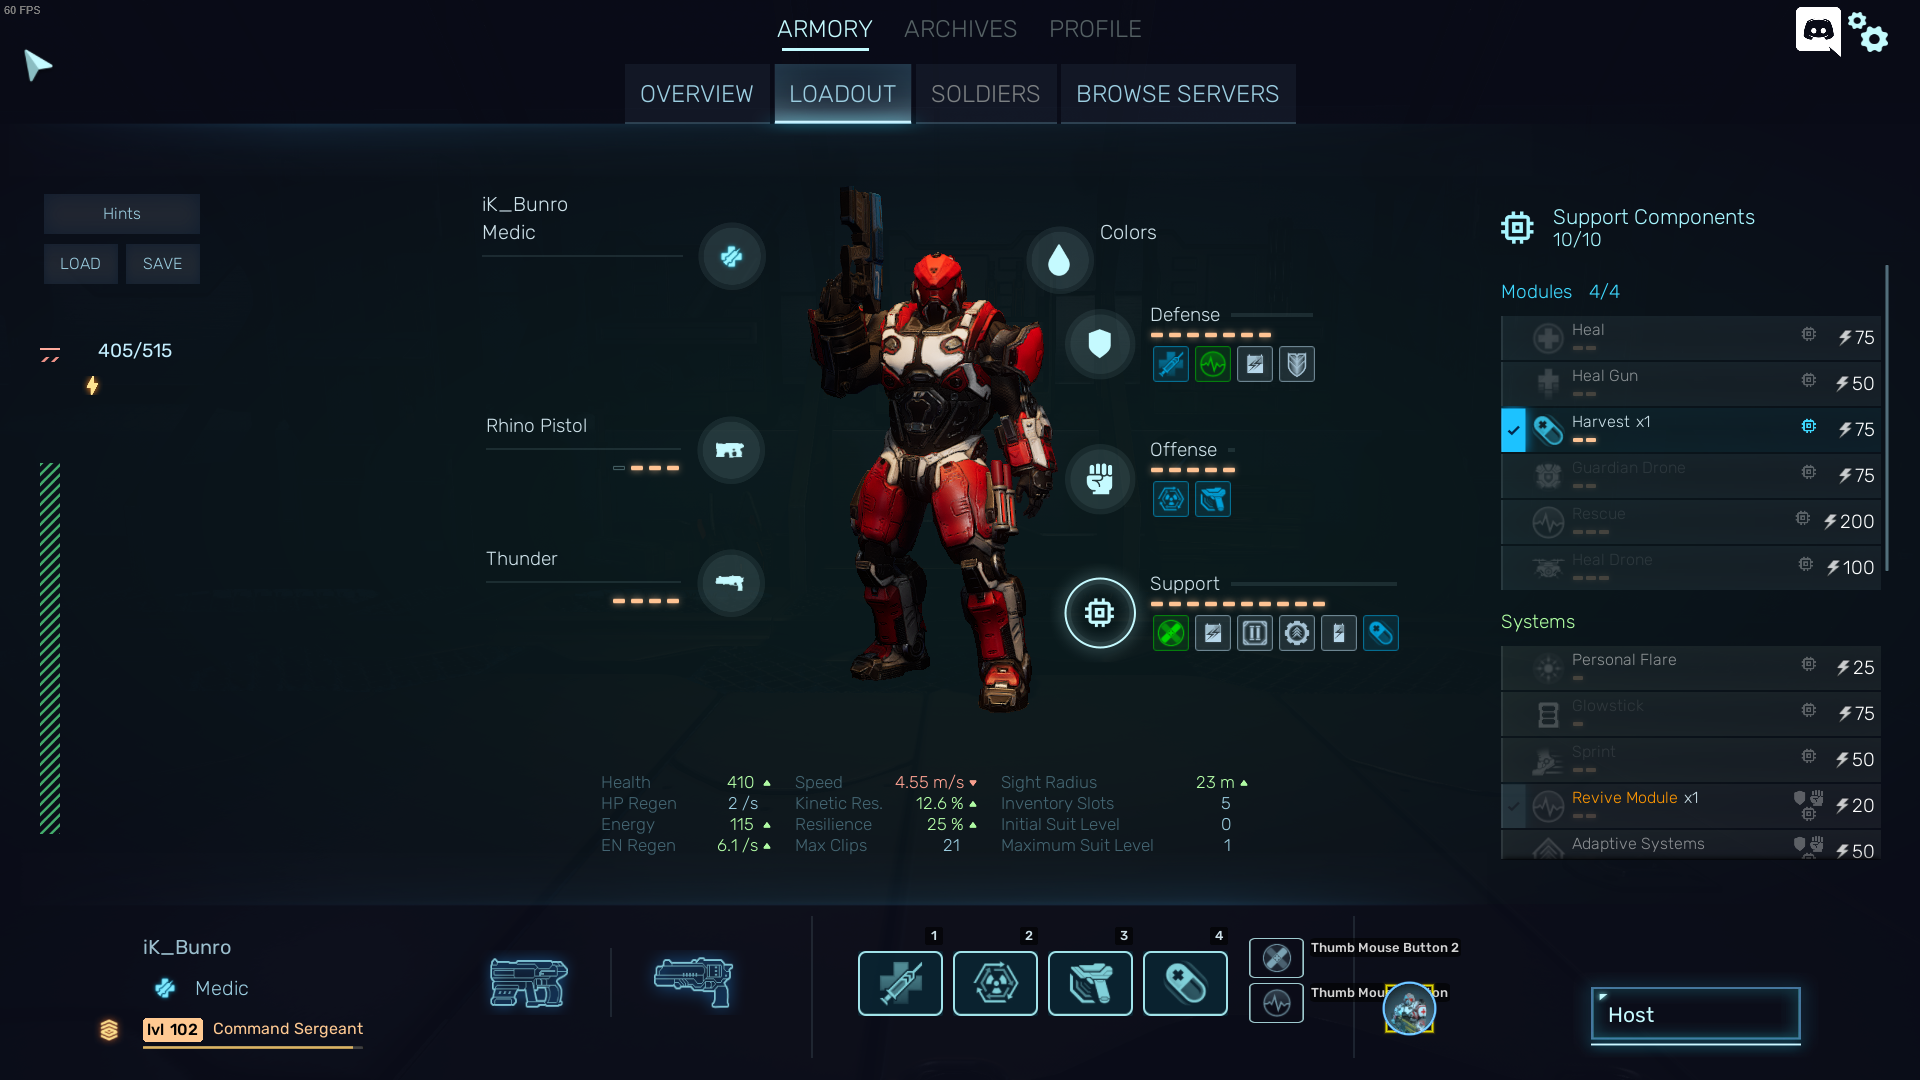
This is an interesting build I tested out with another excellent Medic buddy running most of the healing skills. Note since I do not have Heal I went with Cleanse Debuff to help allies in a tight spot. The combination of Tissue Decomposer (60% at 20 stacks) and Tissue Scanner (15% passive debuff) has a (assumed) damage taken increase on select monsters of up to 75% when activated on a target. That is a huge debuff and can bring down Fluffys in seconds with a full squad. Really excellent. Also Harvest for the crit buffs, and Medical Steroids, of course.
4. The Control Medic:
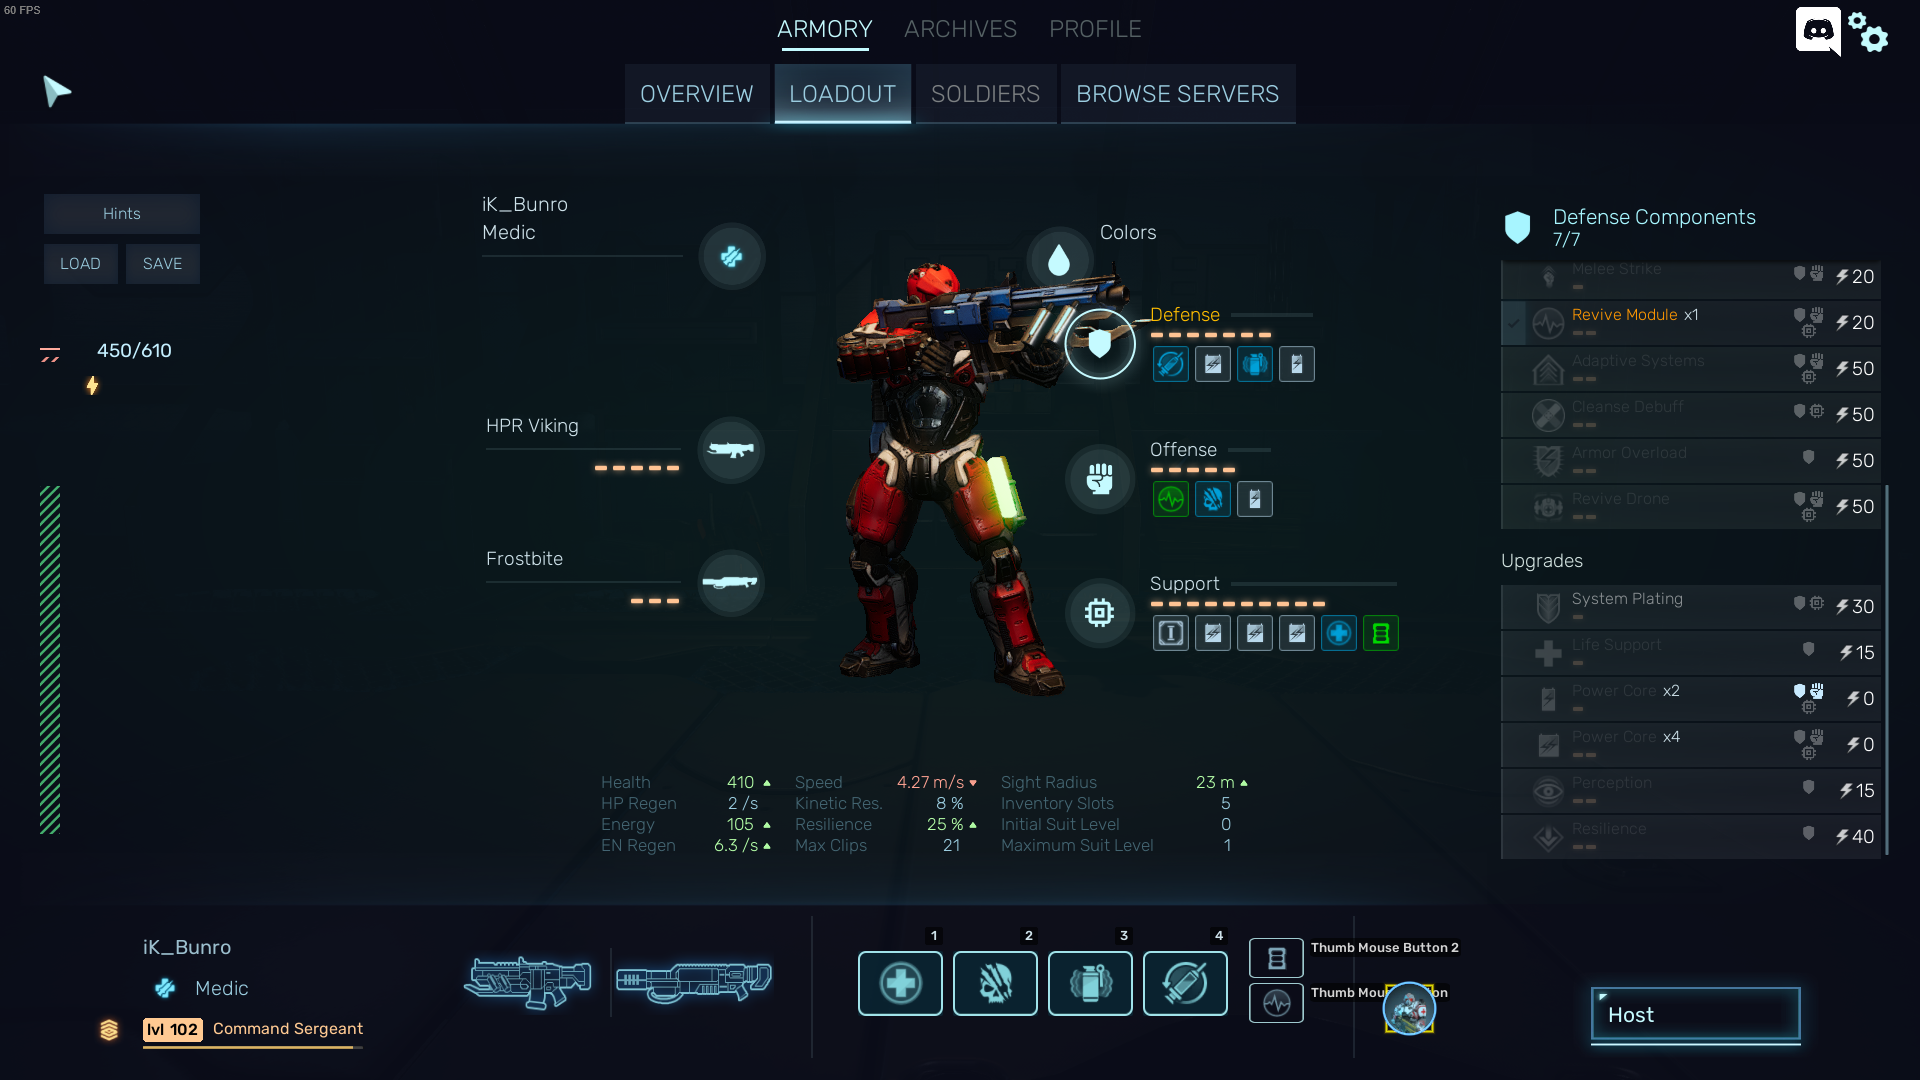
I would consider this more of an experimental Loadout for sure, but it was surprisingly effective. The main concepts here are utilizing your primary and secondary weapons, the HPR Viking, and the Frostbite, alongside your Smoke/Nitrogen Grenade.
You might be wondering, why not use the Nitrogen Grenade over the Smoke? Good question, and if you prefer the Nitrogen its a solid choice for that needed burst in suppression. The reason I went with Smoke is due to the HPR Vikings energy use per shot. Every shot uses 3 energy, so if you aren’t careful you can use up your energy and not have skills to cast! Aim and fire carefully!
By using a Smoke Grenade instead of the Nitrogen Grenade in the Defense slot, that frees up one suit slot for an extra Mini power core, which brings up my EN Regen from 6.1 to 6.3 EN /s. It’s a small boost, but every bit of energy counts for this Loadout.
Using the Smoke to initiate the Suppression and slow them down, followed by the Frostbite to suppress and freeze your target quickly, you can finish with the Viking for that sweet, sweet Stun and extra damage on fully Suppressed targets. This is the 1-2 – KO punch combo against all higher tier monsters, Fluffy and beyond. Worst case scenario and the target is still rampaging, hit it with a max level Neutralizer to get it to fight other Fluffys while you finish it off. Heal is brought along for decent Medic support as well.
Finally, I have another Experimental Loadout in the works, I will update once I have the skill points for it and test it a bit to check its viability. If anyone else has any interesting comments or changes to these Loadouts, feel free to comment your changes. Keep in mind that many of these skills are easily interchangeable based on your team composition and personal preference, I change these myself all the time. Experiment away!
Conclusion

Well ♥♥♥♥♥♥♥♥♥, you made it this far. What is wrong with you. Why would you read this entire thing through. I honestly cannot imagine anyone would actually go through this guide in any length.
Also, I can’t even begin to fathom how I might try to make a TL:DR shortened version of this. Maybe just look at the Loadout Section?
Either way, whether you read this guide or not. Thank you for viewing my guide. I hope even just a single sentence in this guide has helped you to understand the Medic class a little more, and maybe give you some insight on what modifications you can/want to make to your own Loadouts. Or maybe I am just completely wrong and doing everything incorrectly. I don’t really know.
Any other comments or critiques, as stated in the Disclaimer in the Introduction, feel free to message me or write a comment with whatever your completely valid and equally researched statement may be.
My hands hurt.
Thanks again everyone, Good Luck and Revive A-Plenty,
iK_Bunro (Poyo)
Hope you enjoy the post for Red Solstice 2: Survivors Poyo’s Comprehensive Guide to Medic, If you think we should update the post or something is wrong please let us know via comment and we will fix it how fast as possible! Thank you and have a great day!
- Check All Red Solstice 2: Survivors Posts List


Leave a Reply