Introduction
Have you bought the game on Steam and want to play multiplayer with friends or random players? Then this guide is for you. I will tell you how to go all the way from buying the game to meeting other players online.
IMPORTANT: Before you read this guide make sure you DO NOT have any mods!
With the first experimental test release of MP we ask for your understanding that we can’t provide support for making mods work on your server.
First try host/connect to server without mods. If something not work – read this and related guides. If all work fine – then try add mods/connect to server with mods.
If you have problems only with modded servers – read guide: [QnA] Mod Helper – build 41 MP – [steamcommunity.com]
You want to play on server
Installation
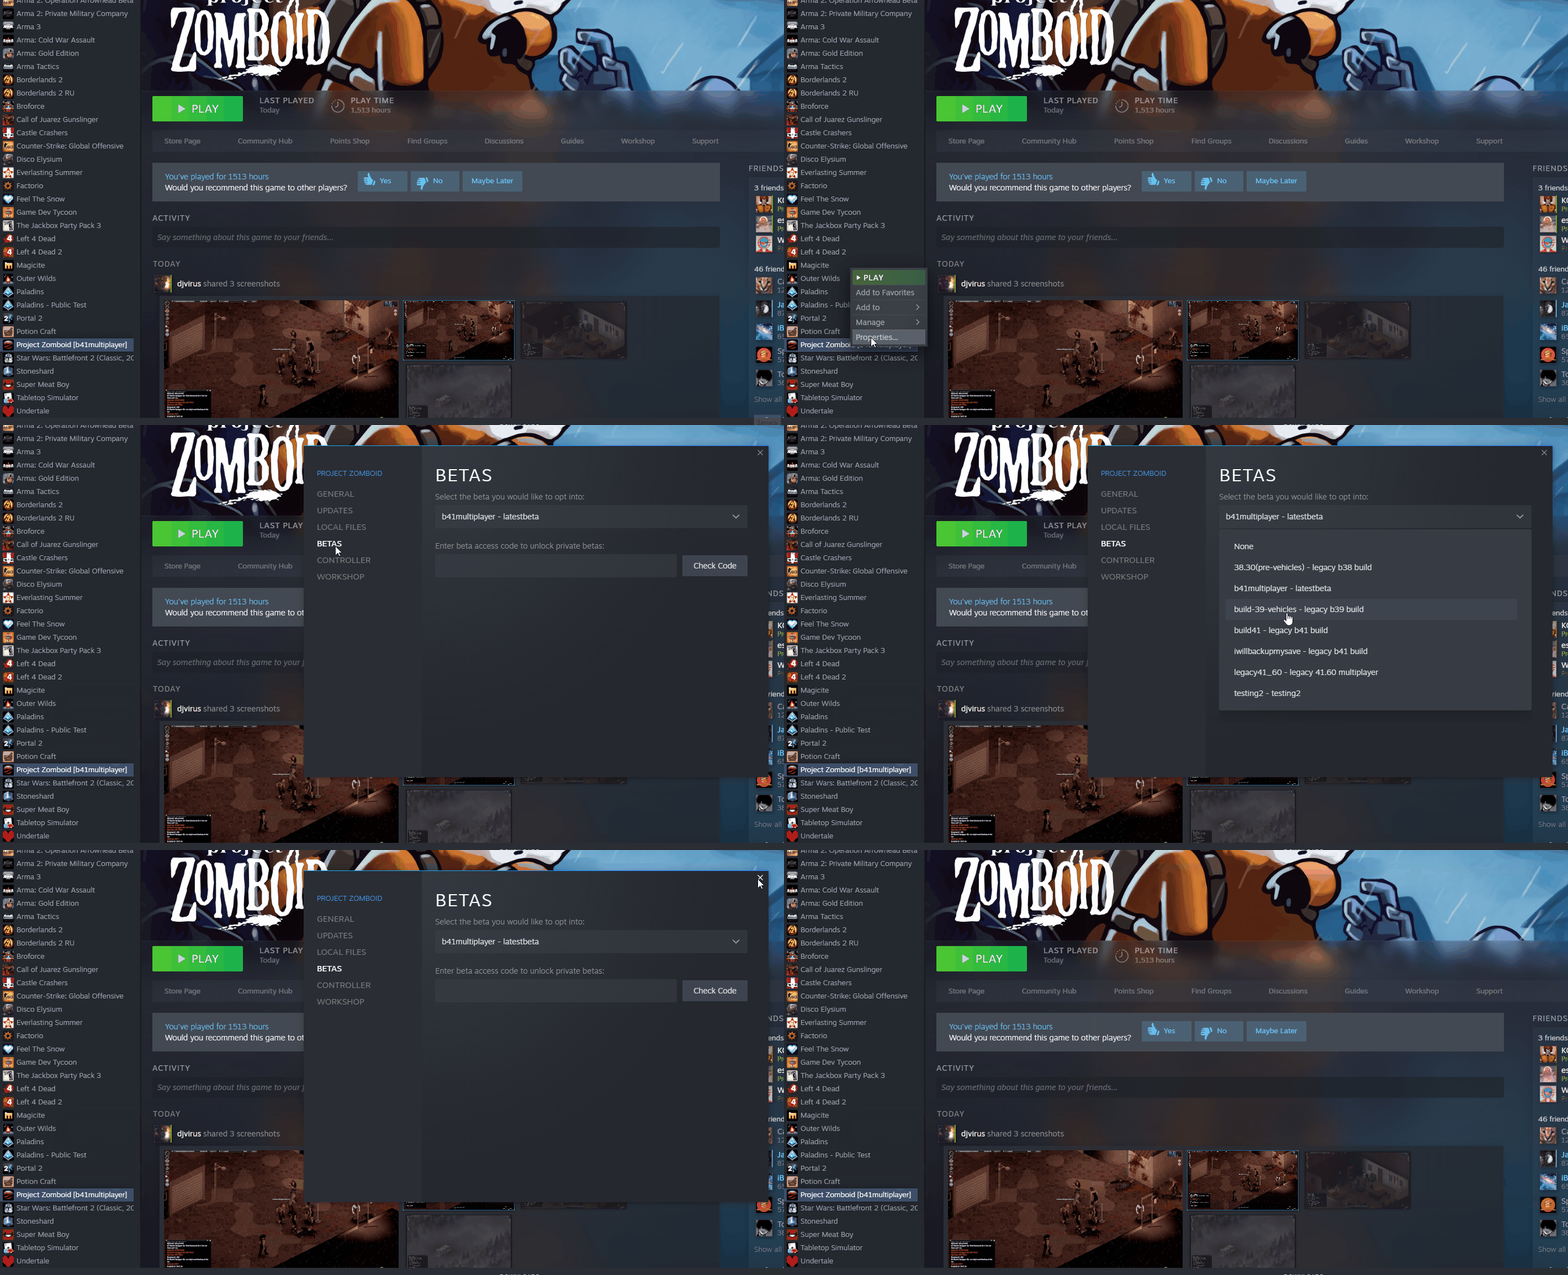
1. Open Steam library and find Project Zomboid in the list.
2. RMC (Right mouse click) the game, and open properties.
3. Choose BETAS and select b41multiplayer from OPT.
4. Install (or update) the game.
5. Start the game.
Multiplayer options:
- “Host” server – You can run a coop game. To join an existing one, you have to be invited by a Steam friend.
- “Dedicated” server – Search in the “Internet” tab by its name or IP.
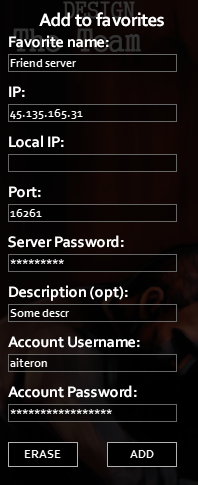
Filling the description.
- Server name: Server name.
- IP: Server IP if you are joining by one.
- Local IP: Skip here.
- Port: 16261 (Is a default port)
- Server password: Password of server (If it’s whitelisted)
- Description: Not necessary.
- Account Username: Your nickname.
- Account Password: PW for your account.
How to find a public server:
Main menu > Join, click the “Internet” tab and choose server you like. Or you can find region-based servers and PZ mates in our Discord. TIS Discord – [discord.gg] in LFG chats!
7. Have fun!
How to run a “Host” server.
1. Start the game
2. Main menu > Host
3. Manage settings > Create new settings > Tune your server > Save
4. Back > Start
5. To invite your friends: Esc > Invite. Or invite them via Steam
Server Memory Advice:
For a bare minimum, have 2Gb set as your memory for the server, for a better experience have at least 4Gb, aditionally, add ~200Mb per any planned player that will be on the server.
Example: 5Gb for 5 players (4Gb Starting + 5*200mb = 5Gb)
Remember!
Coop server is pretty demanding. You may need an SSD, a stable internet connection and players from your region.
– If you have issues with host server (for example Friends can’t connect to server) – check this guide: [QnA] Admin Helper – build 41 MP – [steamcommunity.com]
– For admin tools read this Admin tools – build 41 MP – [steamcommunity.com]
How to create a Steam dedicated server.
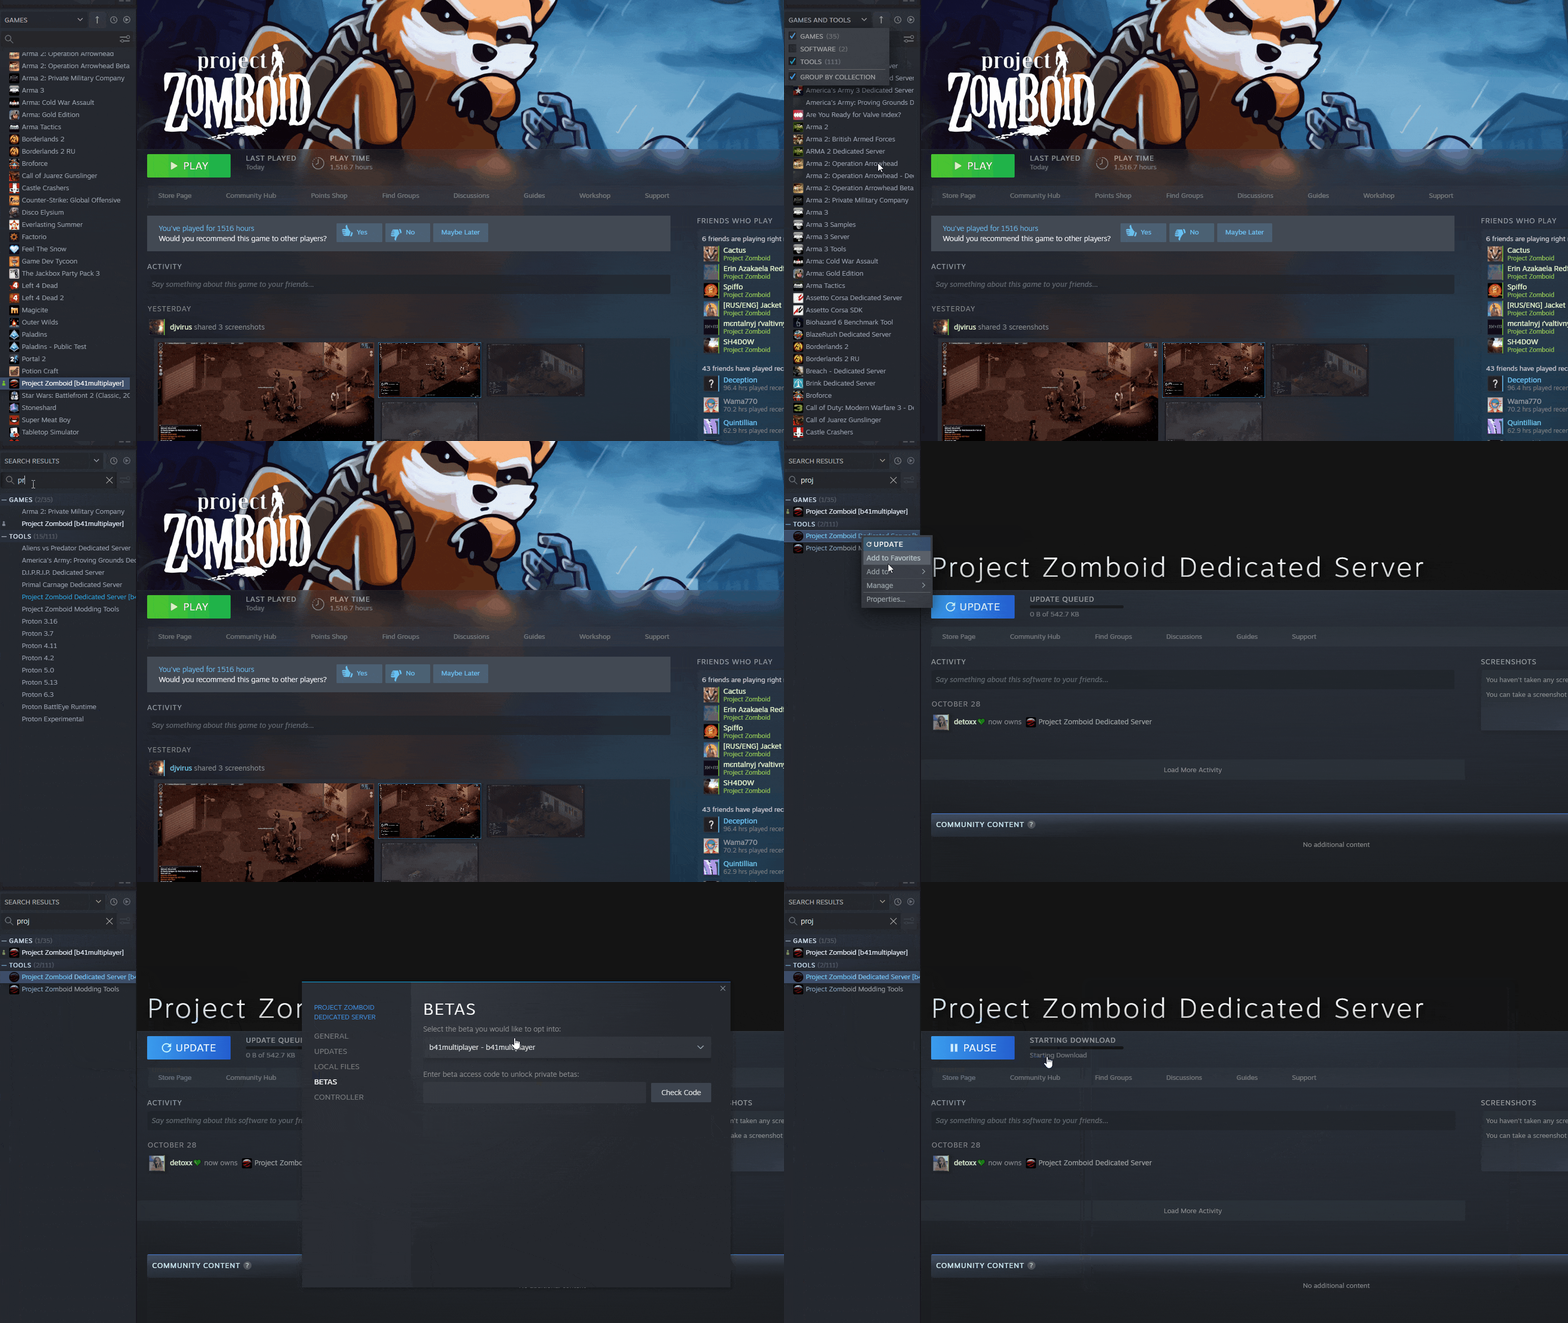
1. Navigate to your steam library and choose “Tools”.
2. Find “Project Zomboid Dedicated Server”.
3. Right click on it and choose properties.
4. Choose BETAS and select b41multiplayer in opt.
5. Install (or update) this tool.
6. Configure you server settings – [steamcommunity.com] (For these who don’t quite understand the INI file settings: Guide: Configure server – build 41 MP – [steamcommunity.com] )
7. Port forwarding:
NOTE: Make sure you don’t have any Antivirus programs running in the background!
Open said ports in your firewall and router (if you have router):
TCP: 16261 – 16300
UDP: 16261 – 16300, 8766, 8767
Also allow ‘StartServer64.bat’ file in your firewall (start-server.sh on Linux)
This file located in *STEAMFOLDER*\steamapps\common\Project Zomboid Dedicated Server\
8. Configure startSever64.bat script
Set “-Xms16g -Xmx16g” where 16 – is how much RAM you set for your server.
9. Then run StartServer64.bat (IGNORE StartServer64MP.bat! This file is only for GOG players)
10. If everything has been done correctly, the Console window will appear and load up a bunch of lines.
Create your Admin account.
– Once “Enter new administrator password:” pops up – create a password for your admin account.
DO NOT LOSE THIS PASSWORD!
It will pause for a minute or so at the “If the server hangs here, set UPnP=false” keep waiting and the rest of the server should finish loading.
When you see “RCON: listening on port #####” , CONGRATULATIONS ! The server is up and running.
Do not close the Console !
10. Now you can connect to server.
(Can be found by name or IP)
– Guide how to configure server: Configure server – build 41 MP – [steamcommunity.com] )
– If you have issues with host server (for example friends don’t see your server) – check this guide: [QnA] Admin Helper – build 41 MP – [steamcommunity.com]
– For admin tools read this Admin tools – build 41 MP – [steamcommunity.com]
How to configure a dedicated ‘rented’ server (Linux)
1. Rent a PZ server (dedicated server or VPS).
2. Install linux (for example Ubuntu 20).
3. Configure firewall for rent server.
4. Check IP and password (of the server) to connect by SSH.
5. Connect to server by SSH.
5*. An advice: install remote desktop on linux and configure remote access to desktop (Ubuntu desktop and x2GO for Ubuntu for example).
6. Update the system.
7. Create new user in system.
8. Reboot the system.
8. Connect to server by SSH (or remote desktop) as a new user.
9. Install Project Zomboid dedicated server by steamCMD.
10. Configure your server (Guide: Configure server – build 41 MP – [steamcommunity.com] )
11. Configure start-server.sh script
Set “-Xms16g -Xmx16g” where 16 – is how much RAM for your server
12. Start server through that script.
How to configure a dedicated ‘rented’ server (Windows)
1. Rent a server (dedicated server or VPS).
2. Install Windows server 2019.
3. Check IP and password (of your rented server) to connect by RDP.
4. Connect to server by RDP (if you connect from windows – use Remote Desktop Connection app).
5. Update system and reboot.
6. Reconnect to server by RDP.
9. Install Project Zomboid dedicated server in steamCMD.
10. Configure your server (Guide: Configure server – build 41 MP – [steamcommunity.com] )
11. Configure startSever64.bat script (IMPORTANT – don’t use startServer64MP.bat).
Set “-Xms16g -Xmx16g” where 16 – is how much RAM for your server
12. Start server through startSever64.bat file.
This is all for Project Zomboid Multiplayer Guide/Host Server hope you enjoy the post. If you believe we forget or we should update the post please let us know via comment, we will try our best to fix how fast is possible! Have a great day!
- Check All Project Zomboid Posts List


Leave a Reply