README
So first of all, this guide isn’t that great… in fact it’s pretty horrible right now. It’s a big work in progress, but I’ve held back this information from here for long enough now. I’m not a great guide writer, i’m really sorry about that. If you have some knowledge in using udk, or can help improve the descriptions in the guide, then put what you want to change in the comments, and i’ll add it. Don’t worry, i’ll also give you credit.
Everyone who helps out will get full credit, no matter how small or large their contribution is.
If you contribute enough, I’ll add you as an contributor so you don’t have to go through me to add it, but only if I really trust you.
Also, I haven’t been able to get things like AI working, which is a shame, but if you ever figure it out please tell me.
When distributing maps, do not include any asset from the game embedded in them, instead use the dummy asset method. (You can read more about that here, https://rocketleaguemoddingwiki.github.io/pages/tutorials/How_to_use_any_in-game_assets.html. Even though the article is for rocket league, the principle still applies here since they run in the same engine.)
Here is a list of credits thus far:
Obviously I’d like to thank Red Barrels for creating this awesome game.
I’d like to thank @Snake4life, if it weren’t for their discussion post about getting multiplayer into this game I probably wouldn’t have even attempted this.
I’d like to thank the Outlast Speedrunning Discord for the support they’ve given me, everyone there has been really supportive.
Requirements
Alright, so first you’ll need the game. If you don’t have the whistleblower dlc I recommend you get that as well, so you don’t have to reconstruct your tools if you get it in the future.
Now you need a version of UDK, I recommend downloading a version from 2013. You can find a list of versions here, www.gildor.org – https://forums.unrealengine.com/t/all-udk-downloads/52939 from eliotvu.com – https://www.gildor.org/downloads, from https://eliotvu.com/portfolio/view/21/ue-explorer. This is what you will be using to decompile scripts from the game.
Optional:
I recommend you download the level launcher script i’ve created, though it isn’t required to launch levels, it just makes it a helleva lot easier, and way more convenient. Make sure to place it in the root directory of outlast, (The directory that contains OutlastLauncher.exe) https://www.dropbox.com/s/jd0q9f3mc74jxmv/Level_Launcher.Bat
Setting up the editor
Go through the installation of udk, I recommend starting with ut content, though it’s your choice. Now you need to navigate to the content folder, and make a folder named OLGame. The directory you need to make it in should be *UDKInstallDirectory*\UDKGame\Content. This will allow you to use dummy meshes, and textures. I’ll explain more on that at a later time.
Now you need to navigate to where you installed outlast, and go into the folder named OLGame. Inside you should find another folder named CookedPCConsole, now you must copy the file inside named OLGame.upk to somewhere safe. Now navigate to where you copied it, and drag the file into the exe you got from extracting the Unreal Package Decompressor. Now in the same directory there should be a folder called Unpacked, inside should be the now ready to be decompiled upk file.
Now you must open up UE Explorer, when you open it you should be greeted by a screen like this.
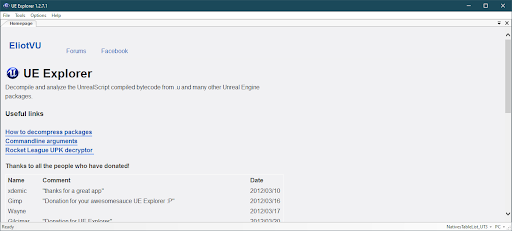
Now you need to click file, then open file. Then navigate to where the decompressed upk file is, and open it. Now you should have access to all the scripts in the game. Note: You will need to fix up a bunch of these scripts. I’ll leave details onto how in a moment.
This is what you should see now,
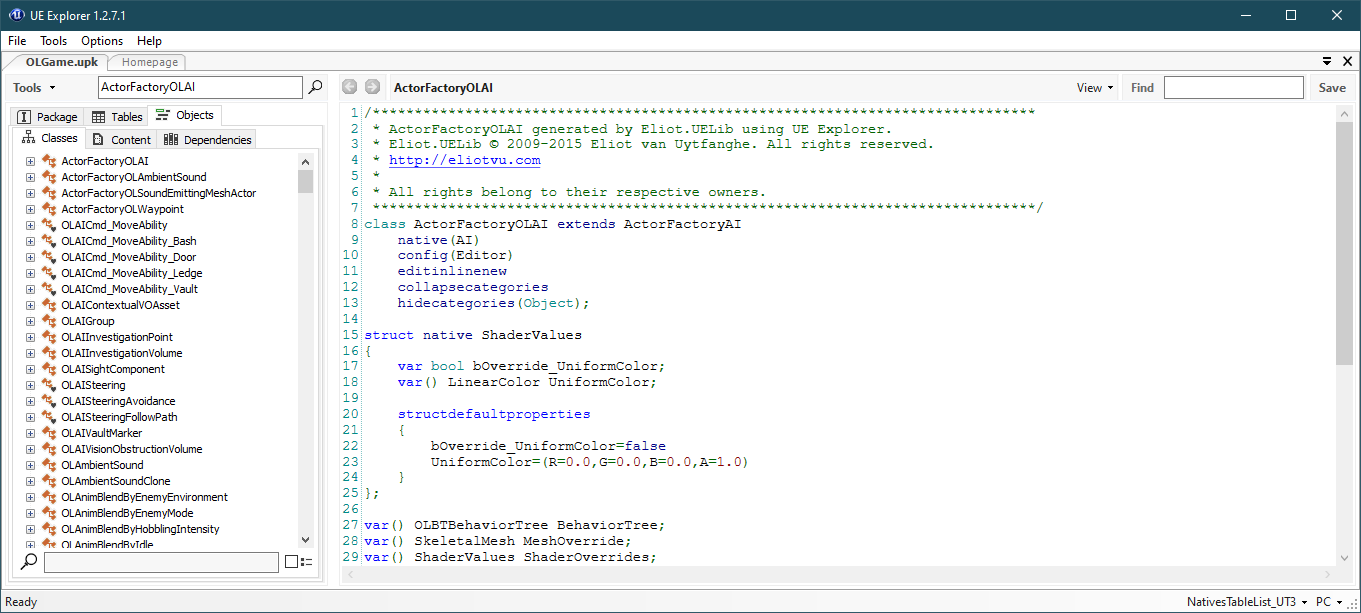
All you have to do is click onto tools, then hover over exporting, and click export scripts.

Then it should ask if you want to go to where it exported the scripts. Click yes, and now you should find yourself in this folder. Now you need to copy the folder, and navigate to *UDKInstallLocation*\Development\Src and paste the folder. Now you need to go to *UDKInstallLocation*\UDKGame\Config and open the ini file named DefaultEngine.ini. Now you need to scroll down until you reach
[UnrealEd.EditorEngine]
+EditPackages=UTGame
+EditPackages=UTGameContent
Then add +ModEditPackages=OLGame to the bottom. It should now look like this
[UnrealEd.EditorEngine]
+EditPackages=UTGame
+EditPackages=UTGameContent
+ModEditPackages=OLGame
Now you need to navigate to the binaries folder (*UDKInstall*\Binaries) and open the file named unrealfrontend.exe.
At this point you should see
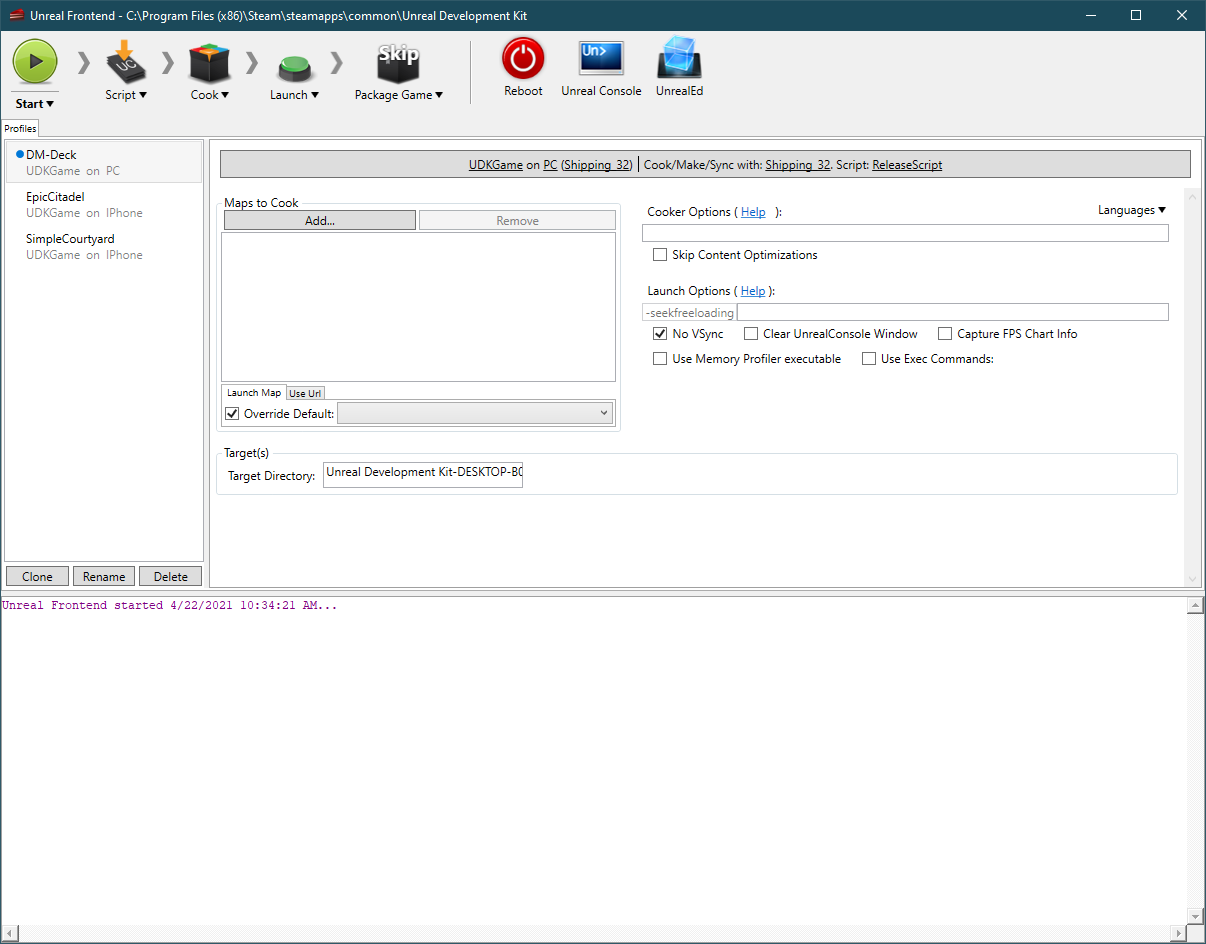
Now you need to hover over script, and press compile scripts. You WILL get a bunch of errors, especially for the default properties of a bunch of scripts. If it gives a line number, make note of it. Heres how you fix those, navigate back to the development folder, and go into src again. Then go into the OLGame folder and into the conflicting script, then scroll until you find the conflicting line using the line number given. Now you need to fix the object end issues, simply begin a replace operation, and set it’s settings to this. For this I recommend using notepad++.
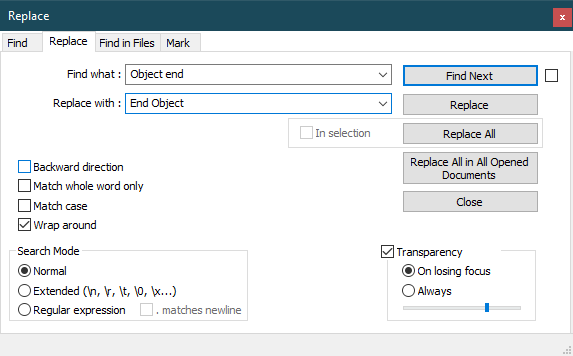
You WILL run into issues with duplicated and overwriting object defaults. Now what you need to do is look for duplicates of a certain object in the default properties. For example
begin object name=WPawnSkeletalMeshComponent class=SkeletalMeshComponent
SkeletalMesh=SkeletalMesh’02_Generic_Patient.Pawn.Generic_Patient’
AnimTreeTemplate=AnimTree’02_Behaviors.Enemy.Enemy_AnimTree’
PhysicsAsset=PhysicsAsset’02_Generic_Patient.Meshes.Patient_2_Physics’
AnimSets(0)=AnimSet’03_NPCMedium_Generic.NpcMediumGeneric-01_AS’
MinDistFactorForKinematicUpdate=0.20
bHasPhysicsAssetInstance=true
bOverrideAttachmentOwnerVisibility=true
bChartDistanceFactor=true
bCacheAnimSequenceNodes=false
ReplacementPrimitive=none
LightEnvironment=DynamicLightEnvironmentComponent’Default__OLEnemyPawn.MyLightEnvironment’
MotionBlurInstanceScale=0.0
RBChannel=ERBCollisionChannel.RBCC_Untitled3
RBDominanceGroup=20
bOwnerNoSee=true
bUseOnePassLightingOnTranslucency=true
BlockRigidBody=true
RBCollideWithChannels=(Untitled3=true)
Translation=(X=0.0,Y=0.0,Z=1.0)
end object
Might be defined a couple times, delete all those definitions but one. You must leave one, then if the editor still complains about the script, delete the class definition so that it looks like this.
begin object name=WPawnSkeletalMeshComponent
SkeletalMesh=SkeletalMesh’02_Generic_Patient.Pawn.Generic_Patient’
AnimTreeTemplate=AnimTree’02_Behaviors.Enemy.Enemy_AnimTree’
PhysicsAsset=PhysicsAsset’02_Generic_Patient.Meshes.Patient_2_Physics’
AnimSets(0)=AnimSet’03_NPCMedium_Generic.NpcMediumGeneric-01_AS’
MinDistFactorForKinematicUpdate=0.20
bHasPhysicsAssetInstance=true
bOverrideAttachmentOwnerVisibility=true
bChartDistanceFactor=true
bCacheAnimSequenceNodes=false
ReplacementPrimitive=none
LightEnvironment=DynamicLightEnvironmentComponent’Default__OLEnemyPawn.MyLightEnvironment’
MotionBlurInstanceScale=0.0
RBChannel=ERBCollisionChannel.RBCC_Untitled3
RBDominanceGroup=20
bOwnerNoSee=true
bUseOnePassLightingOnTranslucency=true
BlockRigidBody=true
RBCollideWithChannels=(Untitled3=true)
Translation=(X=0.0,Y=0.0,Z=1.0)
end object
Now repeat that with the rest of the files. If you run into issues with things like AKEvents just delete the line of code, or the whole function encompassing the line of code. You may even have to delete a couple of variables, trust me. It will be fine, I promise. The scripts you are placing in editor will not be the ones used in game, they will simply act as variable holders.
This process will take awhile, so be ready for that. If you need help with this process feel free to ask for help in the comments, just make sure to paste the error you need help fixing in the comments.
Quality of Life Script Fixes
(Please note, this section is a WIP and will be updated more in the future. Including some pre set up visualizer meshes.)
At the current moment, you won’t be able to see the classes you place in editor. There are multiple ways to fix this, but currently I will only be showing the sprite method. If you want to fix this navigate to the script you want to add a sprite to, and paste this in the defaultproperties.
Begin Object Class=SpriteComponent Name=Sprite44
Sprite=Texture2D’EditorResources.Crowd.T_Crowd_Destination’
HiddenGame=true
HiddenEditor=false
AlwaysLoadOnClient=False
AlwaysLoadOnServer=False
SpriteCategoryName=”GSD”
Scale=.5
End Object
Components.Add(Sprite44)
After doing so make sure to recompile your scripts.
I’ve created a couple of visualizer meshes, to help you know where your placing something in editor. I’ll show you how to set it up for the doors. So first you’ll need to download the mesh I made, https://drive.google.com/drive/folders/1PR15dDtoo8AYbKkAd3O36HaBUyx2go1t?usp=sharing. Make sure to download the door mesh, i’ll make a tutorial for using the pushable object one later. Now that you’ve downloaded it, navigate into the projects content folder (\UDKInstallation\UDKGame\Content), and make a new folder named EditorMeshes. Then place the downloaded mesh into the new folder. Now you need to launch your editor so you can import the mesh, open the content browser, then click import, and navigate to where you saved your mesh. Then select it, and another dialog window should appear. Set the package to EditorMeshes, and the name to door.
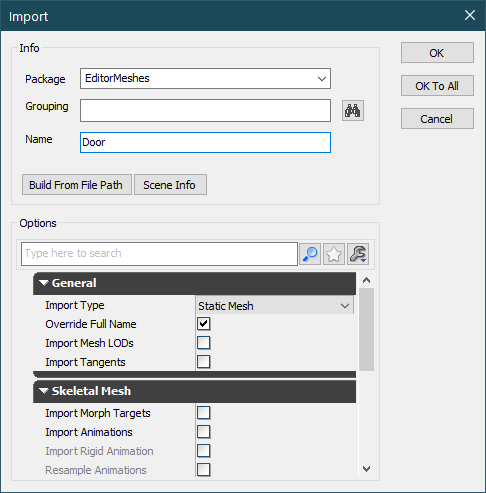
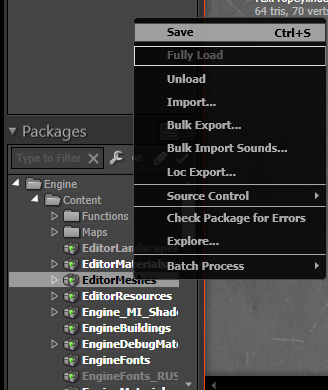
Then save the package, by right clicking on it, and then pressing save.
Now close the editor, and navigate to your developement source folder, and navigate into OLGame, classes (Unreal Development Kit\Development\Src\OLGame\Classes). Then find the file named OLDoor.uc, and open it. Then scroll down until you find default properties, and paste this inbetween the brackets.
begin object name=EditorDoor class=StaticMeshComponent
StaticMesh=StaticMesh’EditorMeshes.door’
ReplacementPrimitive=none
bUsePrecomputedShadows=true
LightingChannels=(Static=true)
Translation=(X=-7.60,Y=50.0,Z=107.50)
HiddenEditor=False
End Object
Components.add(EditorDoor)
As long as you’ve set up everything correctly, you will be able to see the doors when you place them in the editor, and don’t worry, these meshes won’t show up in game. Don’t forget to compile your scripts, or else the door won’t show up in editor.
Using the Editor
So first of all, to launch the editor you need to click the button labeled UnrealEd in the unreal front end.
This will launch the editor, and when it finishes delete everything in the current map. Yes everything except the light, even the background. Afterward it should look something like this
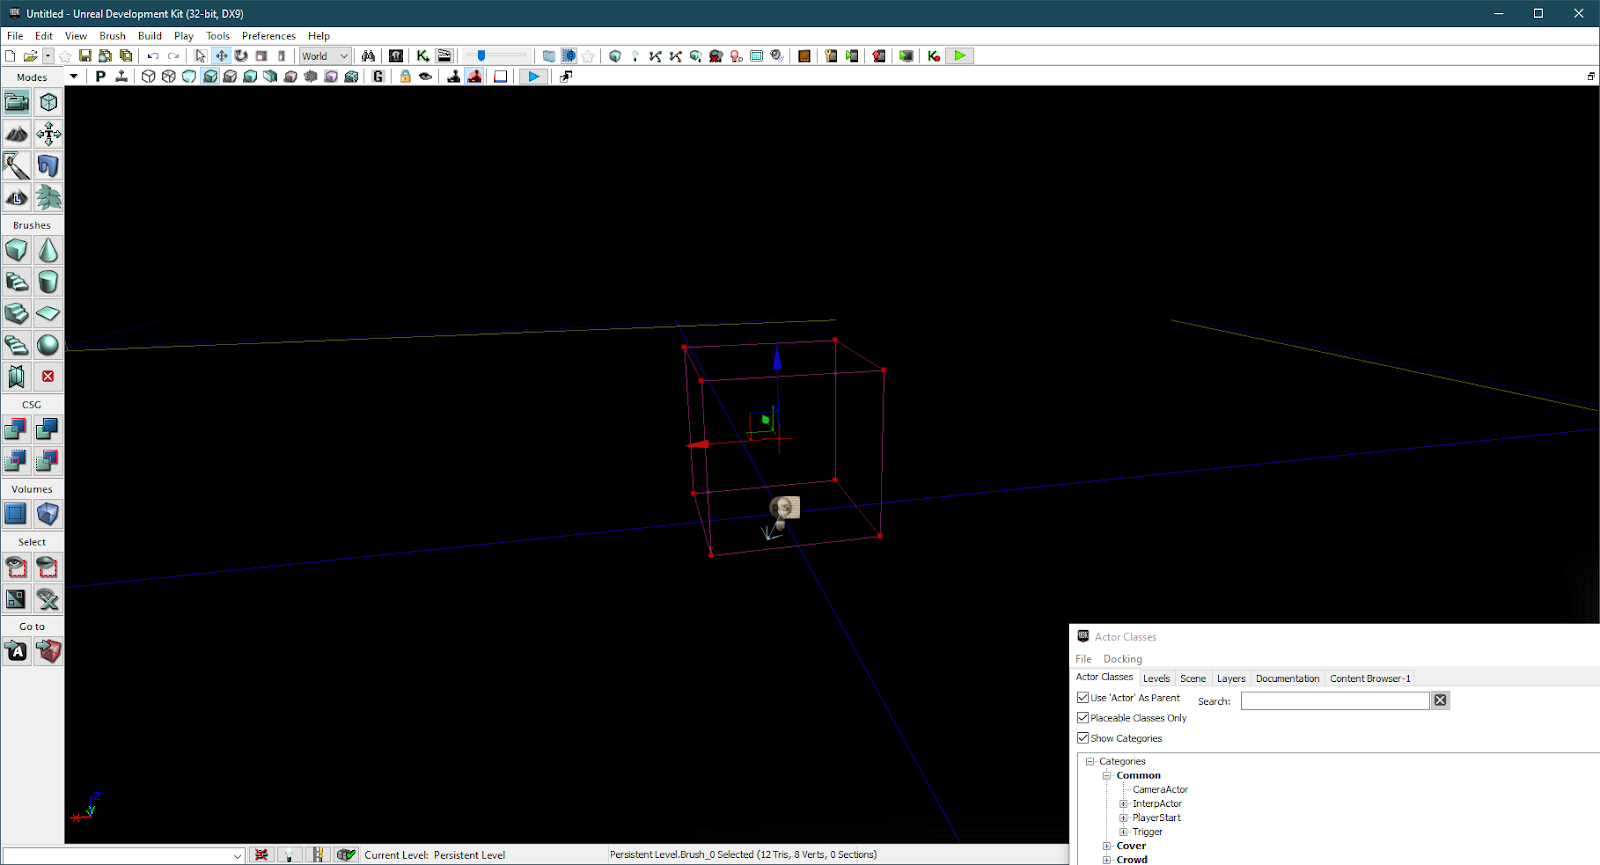
Now select the brush placement tool, (I have it selected in the screenshot) and drag it up to just above the lightmap volume. Then go into the brush editing mode, and drag out each face until its big enough to be a floor. Then go onto the side panel and click the button with the tooltip CSG Add. This will make the placement tool a brush you can stand on. Now you need to right click over the brush, hover over add actor, then click add playerstart.
Your map should now look like this (Without the weird clipping at the back, not sure why it’s doing that. But I’m too lazy to figure out why at this current moment. It shouldn’t be happening to you)
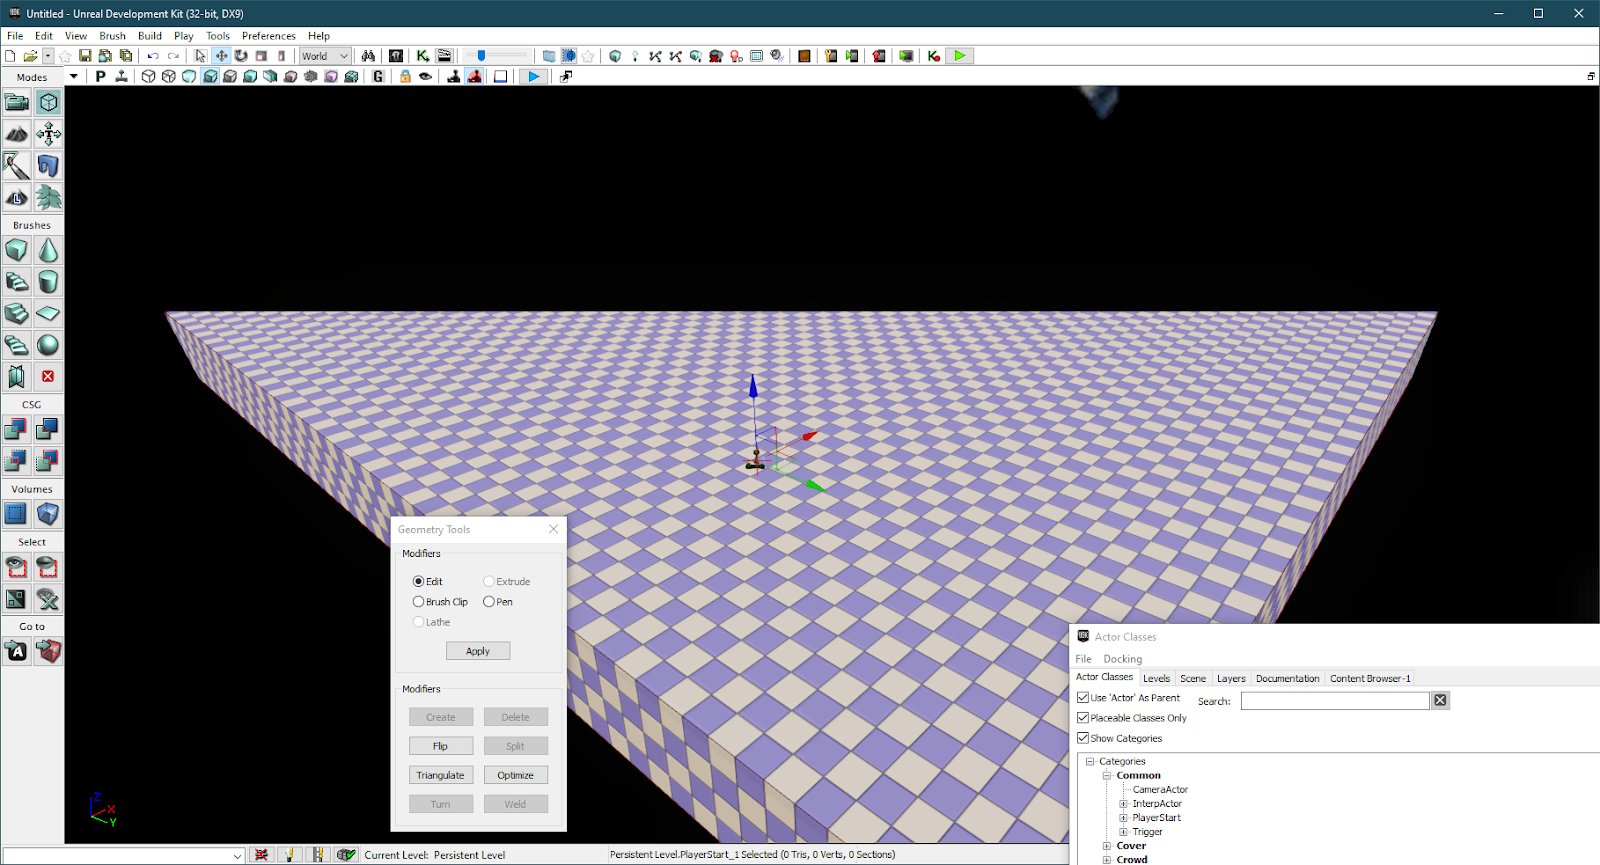
Now you need to build everything, so in the toolbar click build, then build all.
Once it finishes you’ll need to save the map, I recommend saving it as something short like test.udk or something.
If you don’t want to do this everytime you make a new map, I have created a template map. Which you can download from here, https://drive.google.com/file/d/13Arb_SL5mrA4cUF0HVxl7j9rJ1hPv3hH/view?usp=sharing. I recommend you add it as a template to UDK, you can find out how to do so using the guide linked below.
https://www.worldofleveldesign.com/categories/udk/udk-custom-map-template.php
Importing your map into Outlast
Now there are two ways we can continue from here. We can use a script to launch our map, or use a method that requires editing the games config files.
For method one, I have created script just for this. The script is pretty basic, but in the future i’ll be improving it. Don’t worry, you won’t have to worry about downloading it from here everytime you want to update, the script has the ability to update itself if you decide to do so.
You must navigate to where you saved your map, and copy the file. Then navigate to where you found OLGame.upk in Outlast’s files. Which should be *OutlastInstallation*\OLGame\CookedPCConsole, and create a folder named Custom. This is where the script will search for maps. Then in the new folder you just created, you must paste the map you just copied. Now navigate to the root directory of outlast. From here you will need to download the script.
You can download it here, https://www.dropbox.com/s/jd0q9f3mc74jxmv/Level_Launcher.Bat?dl=0. The reason it’s a dropbox link, is because this is the same link the batch file uses to update, and I couldn’t get google drive to work with it. Place the downloaded script into the root folder of outlast, and run it. Then type Open [Your Maps Name] into the script. Don’t include the .udk file extension in the command, as the script is supposed to add it for you. This will open your map.
For method two,
You must navigate to where you saved your map, and copy the file into the folder you found OLGame.upk in Outlast. Which should be *OutlastInstallation*\OLGame\CookedPCConsole.
Now you must navigate to *OutlastInstallation*\OLGame\Config, and open the file named DefaultInput.ini.
Now scroll down until you find
;- Keyboard and mouse
Then above
;- Gamepad (default)
Make a new line, and paste this.
.Bindings=(Name=”F3″,Command=”Open <MapName>”)
And replace <MapName> with what you named your map, (Do not include the .udk extension in the command)
Now save the config file, and open outlast. Then load a save, and press F3, then it should now load into your map. If all goes right, you should be able to move around and such. Except there’s nothing to interact with.
Using Doors
In the editor, use the asset classes menu, and search for OLDoor. (If you don’t understand, there are a bunch of tutorials that can help you) Then drag the class into the editor.
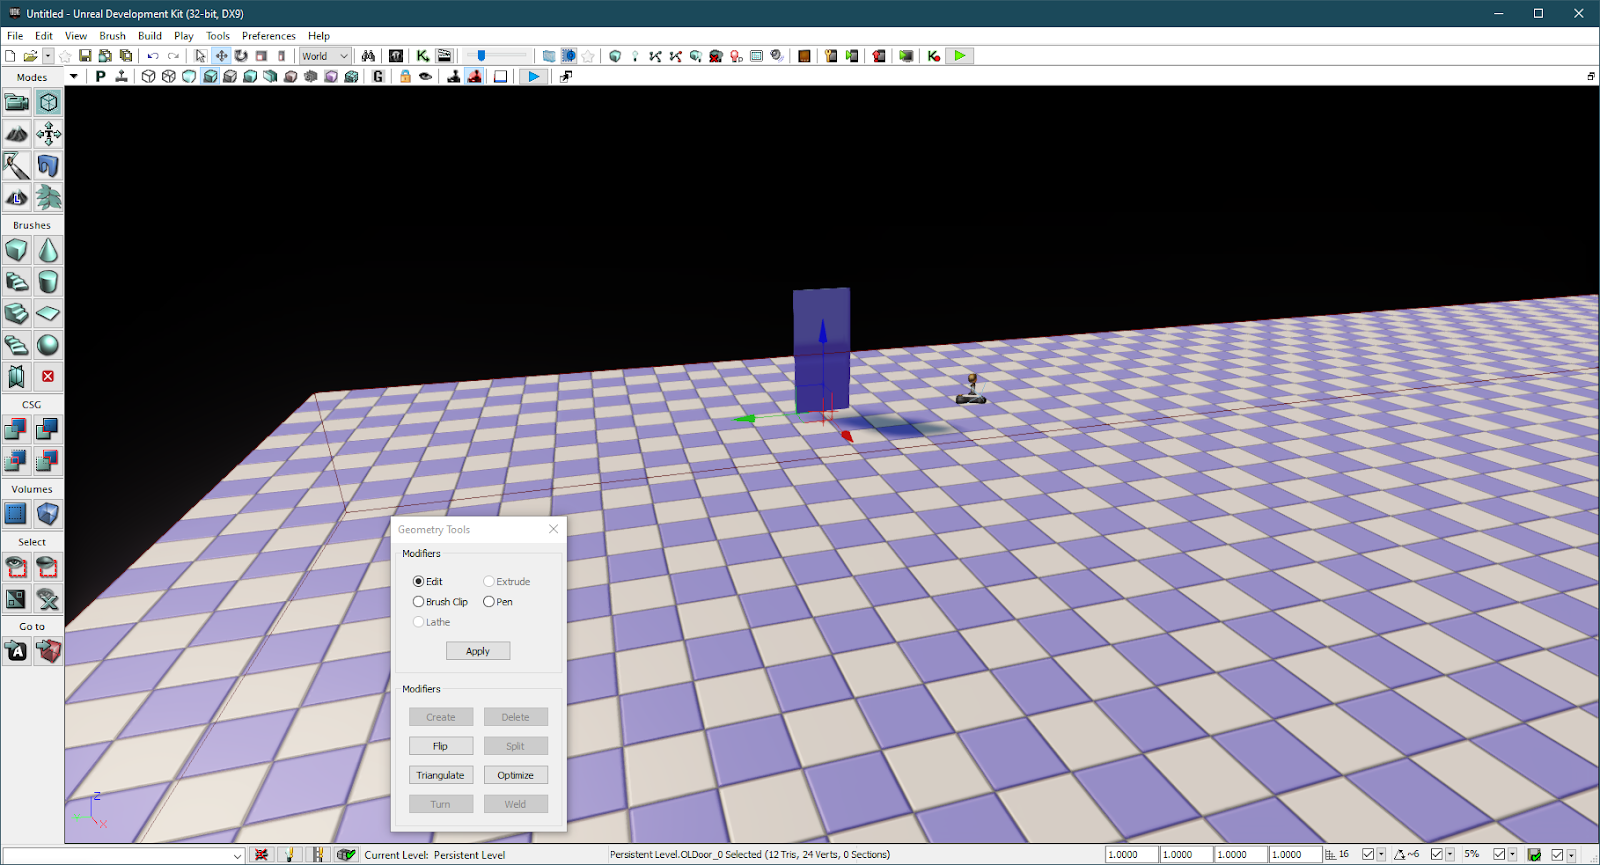
You’ve probably noticed how yours doesn’t have any kind of visualizer like in the screenshot shown above. I’ve left details on how to do so in the section titled Quality of Life Script Fixes.
If you double click on the door it should open a window with a list of options, if you have not added a mesh or sprite, then you’ll need to select the door you just placed in the scene menu. This will you give you the same list of options.
Climbing
So first of all, this section assumes you’ve added a sprite to the script named OLGameplayMarker, without it you won’t be able to see the climbing markers. You can find details on how to do so in the section named Quality of Life Script Fixes.
Now, first I recommend you load the template map I gave you, or set up a map using the tutorial given in the section titled Using the Editor. Then place another brush, and move it up, so it’s something like the screenshot below.
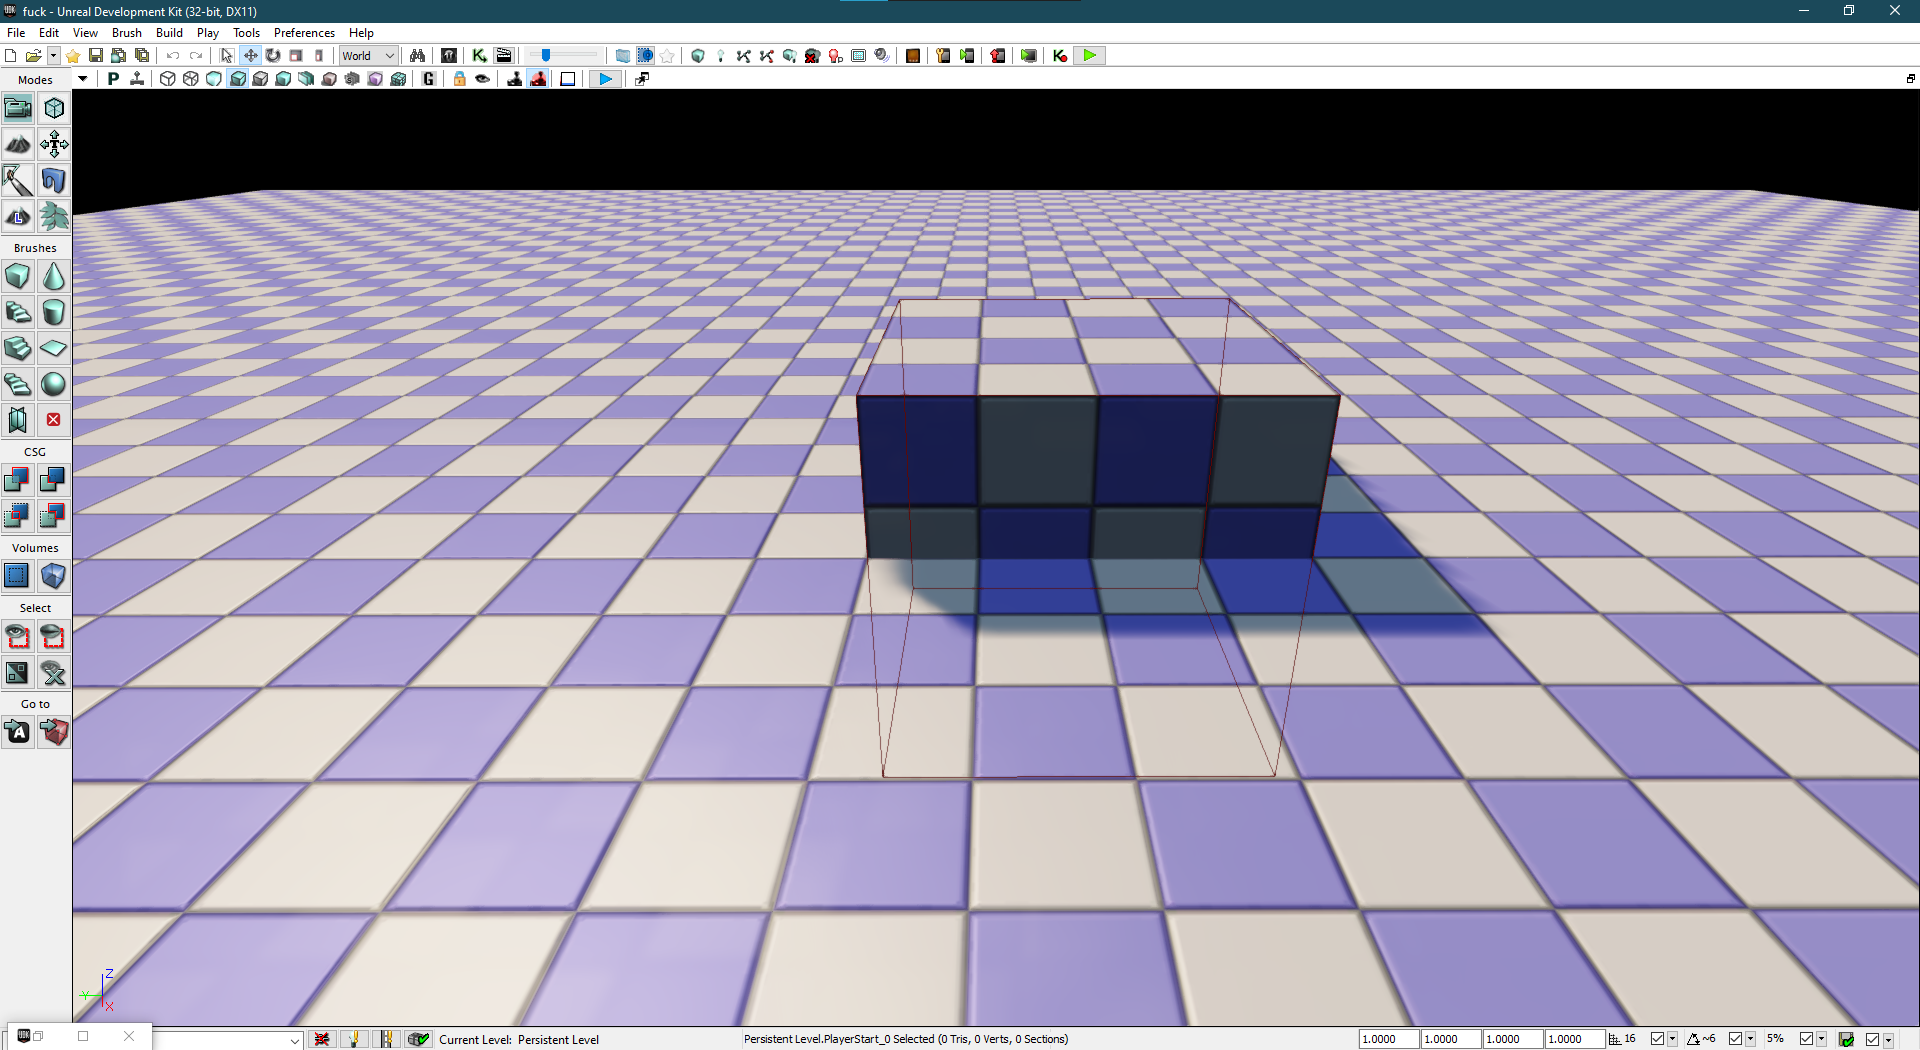
Now go into the actor classes window, and search for OLLedgeMarker and drag it into one of the top corners of the brush you just placed. Repeat this, until each corner of the top of brush has an OLLedgeMarker on it. Like in the screenshot below,
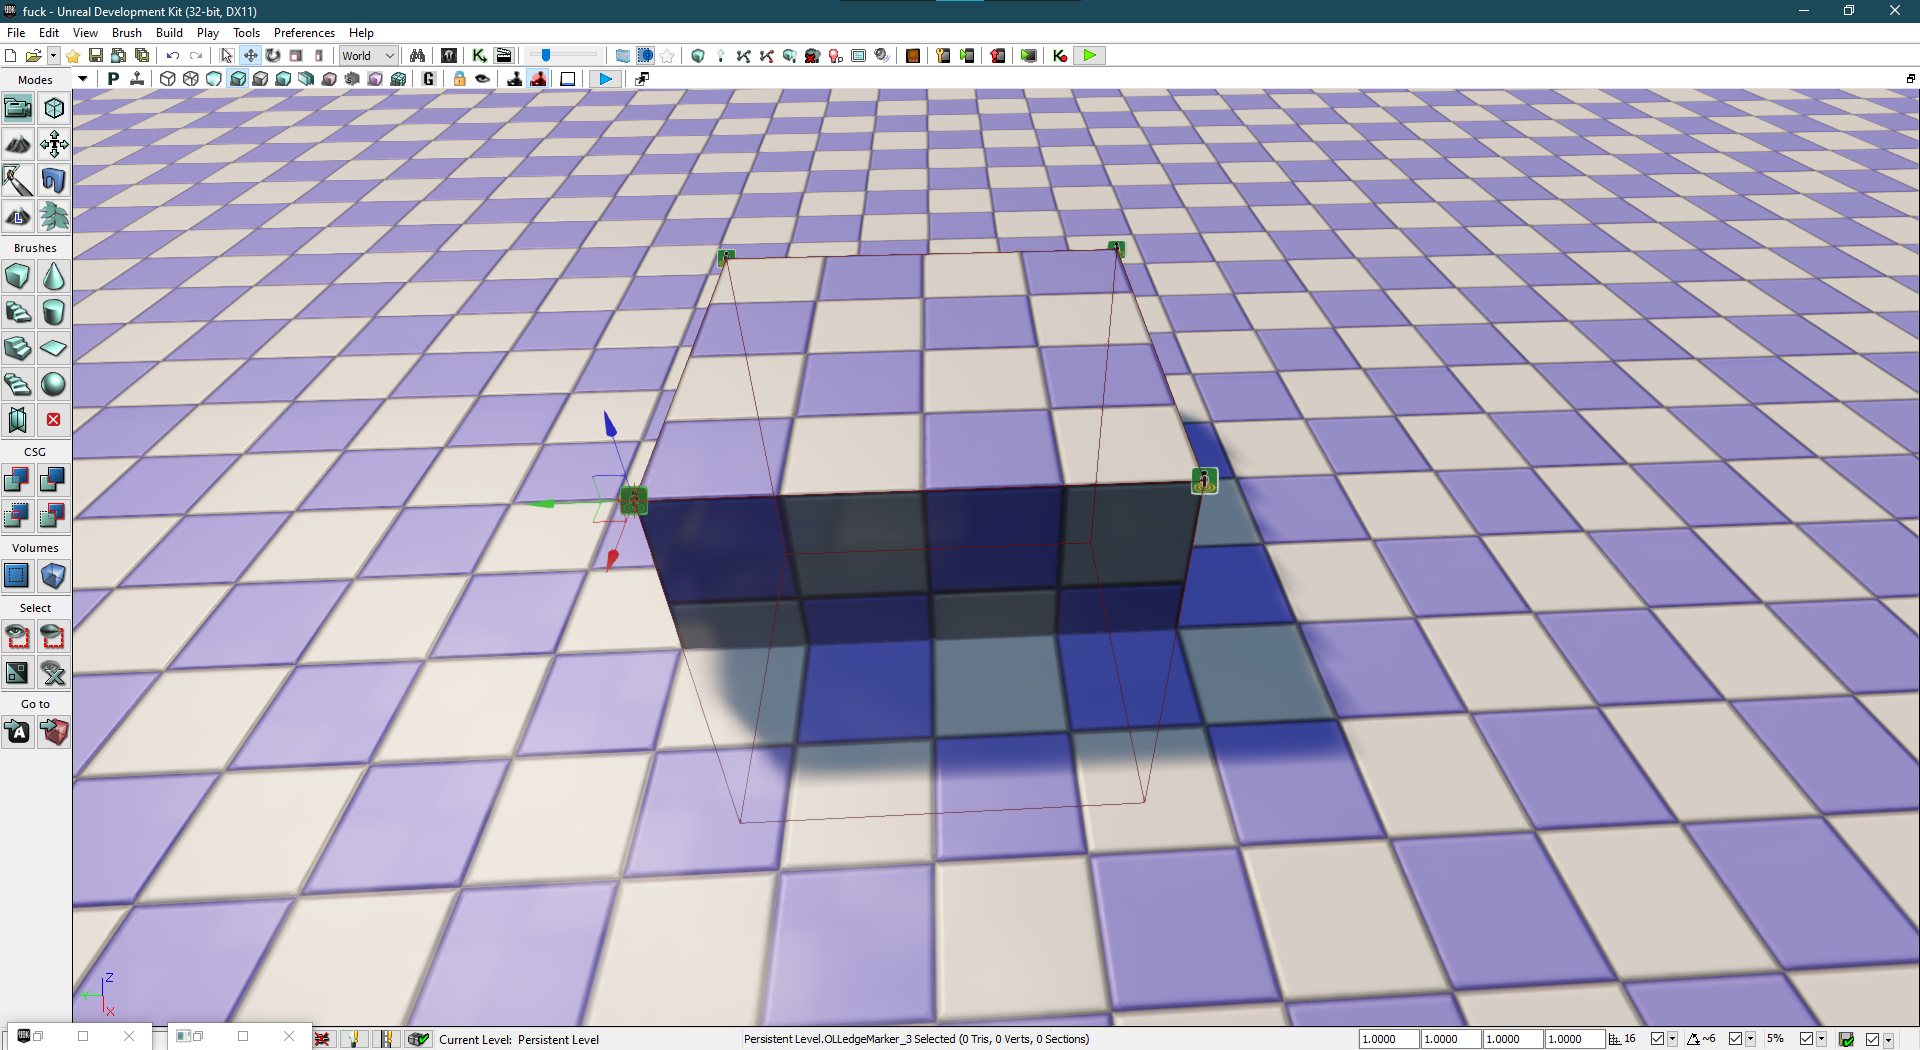
Now, we need to tell the game, which ledge marker is connected to which. This step can be a little confusing, though once you get the hang of it, it’s pretty easy to understand. Now I need you to open the scene menu, and select the Ledge marker you want to start the connection with. Then in the viewport, select the next ledge marker. The object you selected in the scene window should remain the same. In the scene menu, you should find a variable under the object options Named Next, and next to text box should be an arrow. Click the green arrow, and it will input the object you have selected in the viewport. Repeat this, until the four ledge markers are connected in a loop. Below is a video showcasing this strategy.

If you wish to download the map made in the tutorial, you can download it from here, https://drive.google.com/file/d/1tdVAu9UBiMK3GaQ9HWo89GVPA4i6b9Xk/view?usp=sharing. If you wish to download a map that utilizes most, if not all forms of climbing then you can download this one. https://drive.google.com/file/d/1xvNuxa5eLcZYQ0v0kqDqaTmUvBu9qvfs/view?usp=sharing
Using the launch script
Alright, so first things first, you need to download the script if you haven’t already done so. https://www.dropbox.com/s/jd0q9f3mc74jxmv/Level_Launcher.Bat
Then move the downloaded script into the root folder of outlast. If you launch the script, and a message appears saying Script is not installed in the correct directory it means you haven’t installed it correctly. Make sure to place it in the directory with the file named OutlastLauncher.exe. Sometimes while launching, the script may say an update is available, in order to update you need to type Update into the script. Updates are not required to use the script, though I recommend you update it, since I will be adding more functionality to the script later.
For a list of commands you should type Help.
For a list of installed maps you should type List
To open a map type Open <MapName>, while replacing <mapname> with the map you wish to open.
Also make sure to place your custom maps in the custom folder in the CookedPCConsole folder, if you don’t have a custom folder then make it. This will allow the script to find them. Later I will program a way for the program to find maps in sub folders.
Hope you enjoy the post for Outlast How to set up a custom level editor (WIP), If you think we should update the post or something is wrong please let us know via comment and we will fix it how fast as possible! Thank you and have a great day!
- Check All Outlast Posts List


Leave a Reply