
1.0 GENERAL BASICS
The very first thing you need to acknowledge is that you are a Bull Shark, which explains your ability to adapt and survive in various water conditions presented in the game. Realistically, female Bull Sharks can grow up to 3.3 meters, but mutation could be the reason of your rapid growth in this game!
If you feeling lost during the game, always remember three “E”, EXPLORE, EAT and EVOLVE. With that out of the way, lets dive into the main topics.
1.) Resource Pool
2.) Evolution Stages
3.) Attributes
1.1 Resource Pool (Nutrients)
There are currently 4 types of nutrients that can be obtain by either consuming, opening Nutrient Crates, hitting Landmarks, getting License Plates or by completing Quests. Each nutrient is identify by their unique icon and color scheme, sharks can check your current amount in the evolution menu, or by consuming a target to trigger the pop up nutrient icon at bottom right corner screen.

Protein (Red)
Found in Aggressive species, Humans, Crates, Landmarks or License Plates
This is the most common nutrient as sharks will constantly battle against aggressors in the wild and munching on any unsuspecting humans. Apex quests and Hunters will also rack up the amount pretty easily.
Fats (Yellow)
Found in Passive docile species, Crates, Landmarks or License Plates.
This is the second most common nutrient because of how easy it is to 1-2 bite kill, sharks will likely also make tons of quick bites to recover health during heat of battle against bosses or human hunters. Fun fact, Scaly Pete’s hands is worth 30 fats.
Minerals (Blue)
Found primarily in Turtles, Crates, Landmarks or License Plates.
This nutrient is likely the third most scarce due to limited options to farm them. In the first three regions, wild Turtles is the only recurring source of farm, so you want to be careful on how you spend it on upgrade.
Mutagens (Green)
Found only in “Albino” species or Crates.
Albinos are randomly spawned white skin versions of species in the wild, and can also be found in specific Hunted quest targets. This makes Mutagens the rarest nutrient, and therefore should be consume immediately when found.
1.2 Evolution Stages
There are currently 5 evolution in the base game, reaching specific levels (4/10/20) allow sharks to evolve into next stage. Each level up grants fixed minor stats boost, but more importantly increase in shark size and mass (More details in 1.3 Attributes). Attaining each stage also grants access to certain “Gated” areas, so sharks should backtrack to previously locked area in order to achieve 100% completion.
Level 1 to 3 = Pup Shark
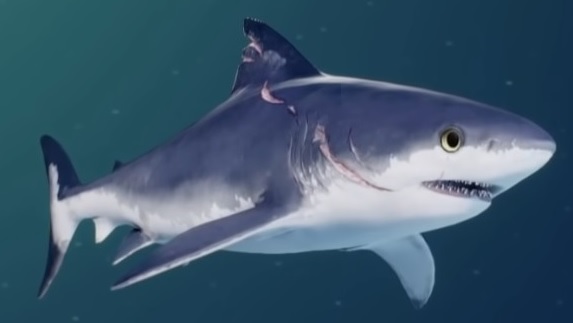
This is your most vulnerable state, anything that is aggressive can easily kill you, so it its imperative that sharks level up as soon as possible. Recommended diet, Grouper, Catfish, or Turtles.
Level 4 to 9 = Teen Shark
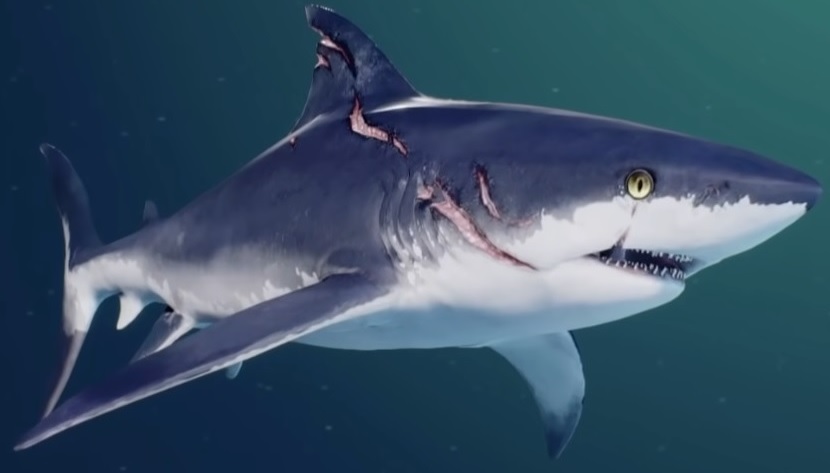
You will gain access to new ability “Tail-whip” to stun enemies and some confidence to take on tougher foes. Level 8 Alligators at this point is doable, but do caution against their “Tail-whip” and trash attacks. You will also be able to lunge into air and stay much longer on land, this will help in getting those License Plates much easier.
Level 10 to 19 = Adult Shark
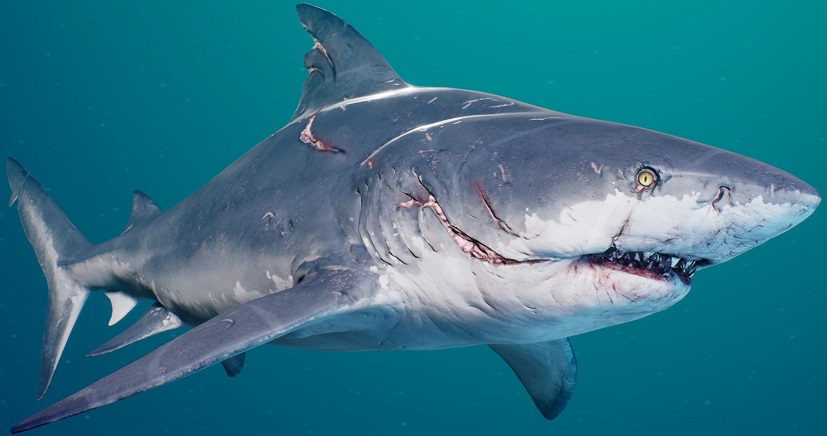
At this stage, your lunge, speed and ability to stay on dry lands will drastically improve. Therefore you should make use of this advantage and start reaching to those previously unreachable Licenses Plates.
Level 20 to 30 = Elder Shark
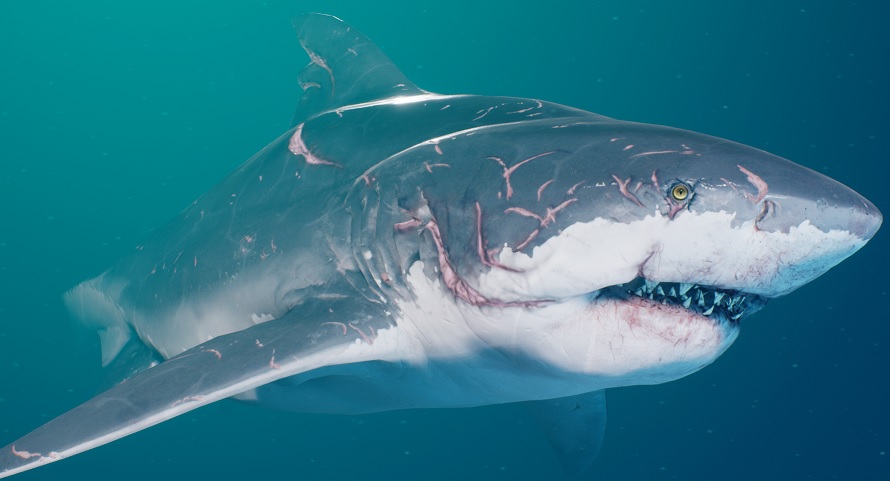
To become Elder, you need to fight Scaly Pete in the story mission at Sapphire Bay. Even if you had reach or exceed level 20, you cannot evolve into Elder until the story mission is completed. With the improved lunge and size, you should had no issues reaching most of the collectibles, except for some very few where you may need firing tail projectiles to reach.
Level 30 = Mega Shark
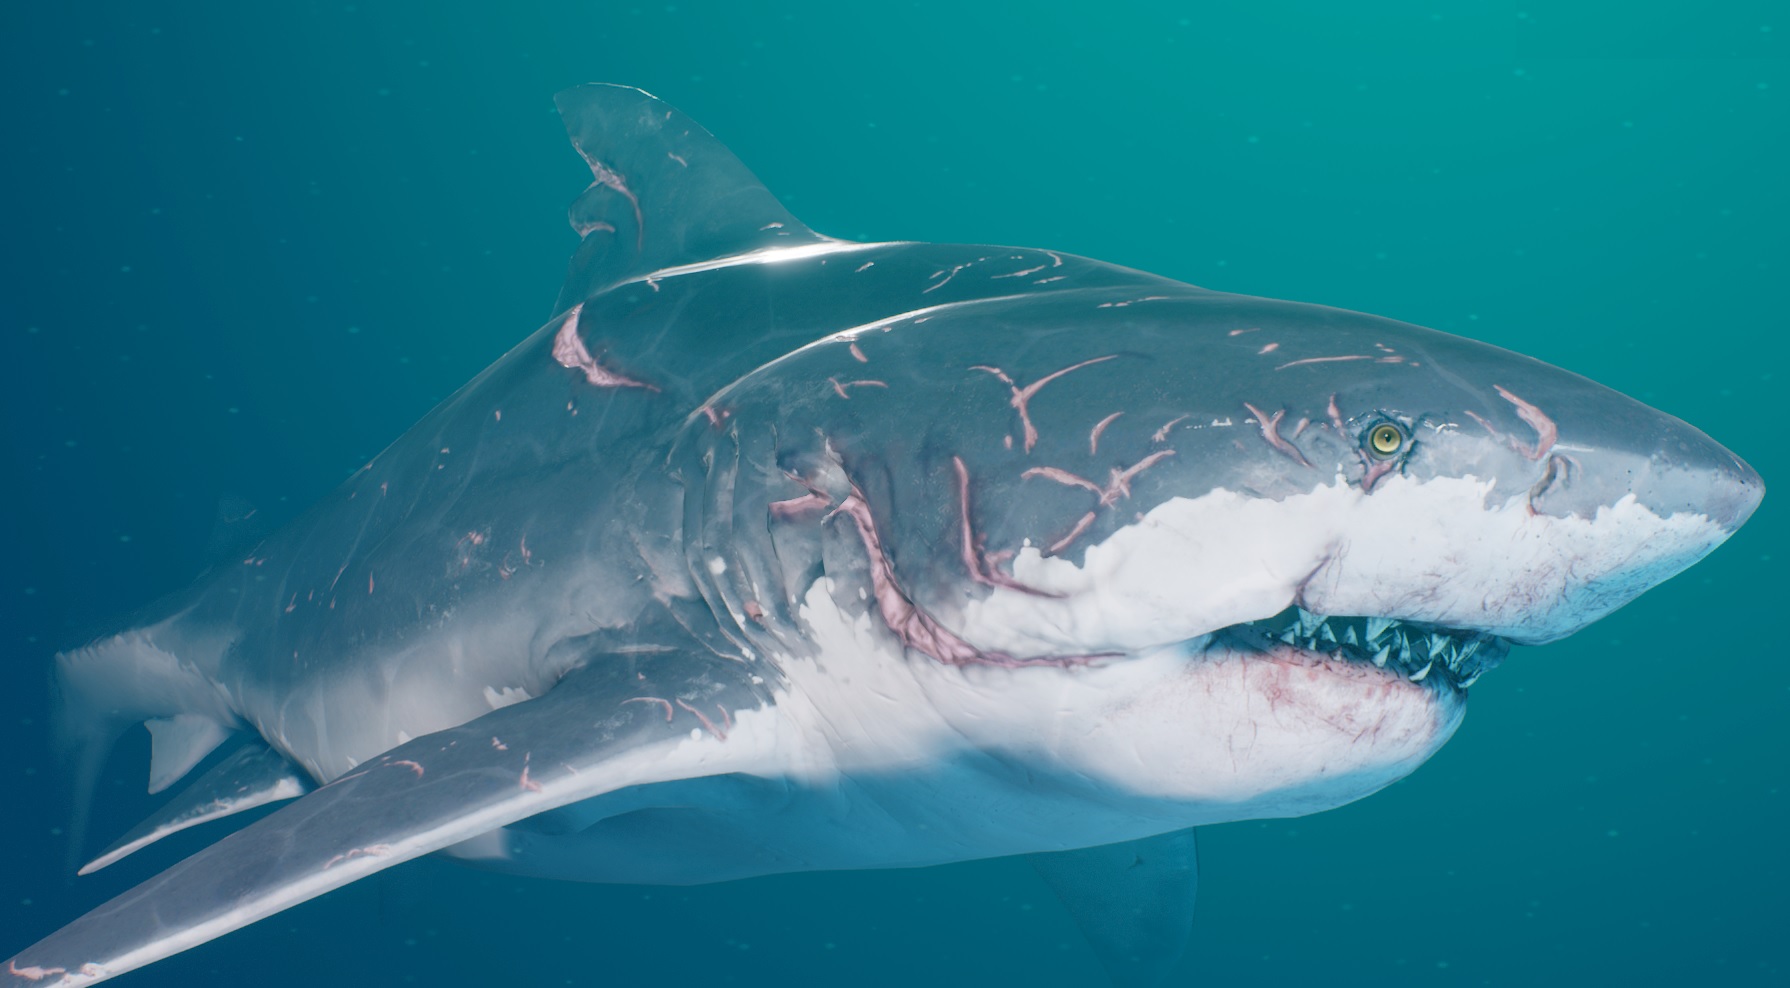
Congratulations, this is your final shark evolution as of base game. From this point onward, there really isn’t much challenge left in the open waters.
1.3 Attributes
Mass Rating
To be updated..
Health Rating
To be updated..
Defense Rating
To be updated..
Damage Rating
To be updated..
Speed Rating
To be updated..
2.0 QUICK TIPS
Before going deep into the progression and route, new Sharks should take note of these tips which will go long way to improve your game-play experience.
Tiger Shark Skin
Right after Shark hits level 4, you should visit a Grotto and evolve into a Teen Shark. The first item slot will be unlocked and you should immediately equip the free “Tiger Shark” body part. This item give +5% gain on all nutrients consumed from preys, which will reduce the farming overtime.
Consume Anything Green
Mutagens can only be obtain through Crates or drop from randomly spawn Albino species. This make Mutagens the rarest nutrient of all, therefore you should consume these Albinos whenever you spot one.
Sonar All The Time
The first item Sharks should upgrade is the Sonar, as it not only improves vision in combat, but the extended range will make it super easy to detect points of interest as you swim across places. Upgrades also reduce the Cool Down, so there really isn’t any reason for Sharks not to spam Sonar as much as possible.
Backtracking
There are many points of interest in the game, but not all are accessible at start depending on your current evolution stage. If you found certain gates that required specific evolution (Adult/Elder/Mega), always come back later when you are ready. Similarly on the collectibles, some of them are located on tall heights, which seems impossible for Pup Shark, but easily reach for Adult Shark.
Double Jump
Yes, it is possible to double jump as a shark right after you lunge out of the waters at least from Adult stage onward. The ability to do so will gradually improve as you level up, evolve and increase in length. For those hard to reach collectibles, do attempt them after becoming Adult Shark and you will find much easier than before.
Using Projectiles On Collectibles
Continuing on the topic of collectibles, set items like Shadow or Bio-Electric which can fire projectiles or AoE attack can actually be use to extend your reach to trigger the collectibles. And there are certainly some points you need to do this because double jump may not even reach.
Fight Or Flee
It is totally okay to flee a fight if you are being overwhelmed or underestimate a foe putting you on brink of death. In fact enemies like hunted targets or Apex predators will not regenerate health if you flee within range to get heals from quick bites. Or you can simply just died because there is no penalty at all, if Shark pride is not a concern.
Trash When Yellow
If you current mass is same or higher than the target, is it possible to perform a trash attack. During combat, there will be times when the target is light up in YELLOW, that is actually a signal for the trash attack. Sharks should definitely make use of this, as foes cannot attack you while being trashed.
Bounty Hunters Quest
You can actually trigger the quest anytime throughout the game by leveling your infamy. The game won’t prompt you when to, but if you are feeling confident, don’t be afraid to challenge the quest as it is the only way to collect some of the Shark items.
3.0 ROUTE & REGIONS
If you have not noticed, the main story quest revolves around TV production crew and Scaly Pete’s life. In order to advance the story, you will need to defeat the Apex Predator of each region then proceed to check on Scaly Pete as indicated on the map.
Here’s the overview of recommended route and level progression:
- Crawfish Bay, Tutorial Area
- Fawtick Bayou, Pup to Teen (Levels 1~6)
- Dead Horse Lake, Teen to Adult (Levels 6~10)
- Golden Shore, Adult (Levels 10~16)
- Water Sapphire Bay, Adult to Elder (Levels 16~20)
- Prosperity Sands, Elder (Levels 20~24)
- Caviar Key, Elder (Levels 24~28)
- The Gulf, Elder to Mega (Levels 28~30)
Since there is no penalty for death and defeat, it is definitely possible to progress the game in any preferred shark way. My recommended route is just one way to do it, and focus a lot more on exploration than grinding, while still maintaining decent Shark development to tackle quests.
3.1 CRAWFISH BAY (Tutorial)
Beach Side
Nutrient Crates 10 / License Plates 10
Lifeforms: Turtles, Seals, Humans, Human Hunters
The only purpose of this area is to serve as tutorial, try to get accustom to the controls and camera angles. The nutrients consume in this tutorial area will not carry over once main story-line starts, so do not bother grinding.
You can however backtrack to this region later when you evolved into Elder Shark.
3.2 FAWTICK BAYOU (Levels 1~6)
Swam & Lake
Apex Predator: Rosie The American Alligator (Level 20)
Landmarks 10 / Nutrient Crates 17 / License Plates 10
Lifeforms: Turtles, Groupers, Catfishes, Muskellunge, Alligators
At the start, grab quick kills (Turtles, Groupers and Catfishes) as you explore but focus mainly on findings landmarks, crates and license plates for free exp and resources. Among the latter, landmarks and crates are the best farming options as most are easily accessible even at low levels. Spam your Sonar as much as the cool-down allows, so you won’t miss out on “?” places of interest. If done consistently, it takes less than 30 minutes to grow into Teen shark with minimum grinding.
The only real threat in this region are the level 8 wild Alligators, so don’t bother them until your shark level is at least 5 and above. But again the time is better spent exploring “?” points for landmarks and crates than messing with gators.
There are two hunted Muskellunge quest, which is easily dispose of even if you are just a pup shark, so definitely clear them along the way. Do not waste time on hunted Alligators as their levels is way too high at the moment.
Although the game directs you to Dead Horse Lake quite early, you can easily complete 70% of Fawtick Bayou exploration and hit level 5~6 before you leave (you can check exploration % in the map menu), so make sure to do that before crossing over next region.
3.3 DEAD HORSE LAKE (Levels 6~10)
Trash & Sewage
Apex Predator: The Barracuda (Level 10)
Landmarks 10 / Nutrient Crates 14 / License Plates 10
Lifeforms: Turtles, Groupers, Catfishes, Barracudas, Alligators, Humans, Human Hunters
Upon entering, you will notice the area are much more wide open compared to Fatwick Bayou which is good as you can roam freely without obstacles. However do caution that sometimes aggressive species can target you easily from all angles. Although the game prompts you to increase your infamy, instead you should really continue to focus on spamming sonar to discover point of interest and getting collectibles for free exp and nutrients.
Once you hit level 7~8, you can try to tackle the 4 hunt quests in this region, two are Alligators (Level 15) and the latter two Human Hunters. Try to do the Human Hunters quest first because they are easier and hopefully can help you level up more. Just keep lunge and grab one hunter each time, swim away to devour, then rinse and repeat until all is dead.
The two Alligators are slightly difficult because they will be likely twice your level at this point, but it is still doable with technique. Always attack like real a Shark, zoom in and take 2 quick bites then swim away to avoid their trash or tail-whip attacks, then rinse and repeat until they are dead. There will be times where you sustain damage, so don’t hesitate to heal up from nearby docile species, the return to battle.
Around 74% of completion, excluding two Adult gates, one Elder gate and the few Licenses which is too tall for you to collect, its time for the Bounty Hunters Quest. You can start to level up your infamy by chomping up humans in the area. You will need to create enough havoc to first trigger the hunters and continue killing them. After killing a few waves, the bounty hunter himself/herself will then show up in combat after a brief cut scene. Only one bounty hunter will appear at each specific infamy level, so you will need to repeat the whole process for each hunter. You can check the bounty hunters list in your Shark menu and the rewards they drop upon death.
The first two bounty hunters Bayou Willy and Bobbie Bojangles don’t really have much difference in their combat, all you need to do is lunge and grab them off their boats and its game over. If you are having difficulties, try to level to adult Shark and use the evade move frequently. Always do a hit and run tactic, try to grab a hunter then swim away while chomping it. Then repeat until the Boss hunter is dead, literally you only need to kill the Boss and you can end the battle by swimming or hiding away.
Will highly recommend Sharks to finish at least first two bounty hunter quest in this region due to huge open space and deep water is very advantageous during combat. Devouring Bobbie Bojangles will also grant access to “Hearty” item which boosts your Health Points significantly. Nothing is more important than staying alive long enough to finish off your foes. You should definitely upgrade Hearty and Sonar as soon as possible for max benefits.
Once you had done with all possible collectibles and hunted quests, you will be likely around level 9. You want to take this chance to return to Fawtick Bayuo to take on the remaining hunted Alligators and collectibles, this trip should be enough to make you an Adult Shark.
3.4 GOLDEN SHORES (Levels 10~16)
Urban River Canals
Landmarks 8/ Nutrient Crates 17 / License Plates 10
Apex Predator: The Mako (Level 15)
Lifeforms: Grouper, Turtles, Parrot Fish, King Mackerel, Seals, Mako Shark, Humans, Human Hunters
This is actually one of the most beautiful region in the game for humans living in luxury waterfront area and lots of golf spots. The main threats in this region are level 10 Mako Sharks, if you are same level or below, they can trash you in attacks. So it is highly recommend that you evolve to at least Adult Shark.
Being Adult Shark is also advantages because a lot of the collectibles in this region requires you to lunge out of water and possibly travel some distance on land. Take this opportunity to practice staying on land and lunging out to grab those hard to reach collectibles.
3.5 SAPPHIRE BAY (Levels 16~20)
Sea Bay Area
Landmarks 9 / Nutrient Crates 19 / License Plates 10
Apex Predator: The Hammerhead (Level 21)
Lifeforms: Grouper, Turtles, Parrot Fish, King Mackerel, Seals, Mahi-Mahi, Barracuda, Swordfish, Marlin, Mako Shark, Hammer Head, Humans, Human Hunters.
To be updated..
3.6 PROSPERITY SANDS (Levels 20~24)
Landmarks 10 / Nutrient Crates 12 / License Plates 10
Apex Predator: The Great White (Level 29)
To be updated..
3.7 CAVIAR KEY (Levels 24~28)
Landmarks 8 / Nutrient Crates 13 / License Plates 10
Apex Predator: The Orca (Level 40)
To be updated..
3.8 THE GULF (Levels 28~30)
Landmarks 9 / Nutrient Crates 21 / License Plates 10
Apex Predator: The Sperm Whale (Level 60)
To be updated..
4.0 BOUNTY HUNTERS
Bounty Hunters are like mini-bosses of the game that can be trigger anytime the Shark is ready to wreck havoc. Each bounty hunter is tied specific Infamy Level from 1 to 10, meaning Sharks has to hunt them down one at a time per Infamy Level.
You can check your Shark menu for that bio description, infamy level and the specific item they drop once consumed. In order to trigger Bounty Hunter Quest, you must first consume enough humans to trigger spawning of regular hunters. After which you need to continuously consumed enough hunters to raise your infamy alert level, which is represented by the red circle icon at the top right corner of screen.
Infamy 1 – Bayou Willy

Equipment: Jetski
Rewards: Bio-Electric Teeth (Set Item)
Nutrients: 350 Protein, Fats and Minerals
This guy is literally a tutorial, because he is riding on Jet Ski, you can actually lunge and grab him off in one bite and the battle is over. Take this opportunity to practice your precision lunge and grab bite technique. Recommended to tackle at levels 8~9 onwards.
Infamy 2 – Bobbie Bojangles

Equipment: Hunter Skiff
Rewards: Hearty (Organs)
Nutrients: 700 Protein, Fats and Minerals
Another easy battle considering you had just devoured Bayuo Willy. Again because she is riding on a unprotected Hunter Skiff, you may once again lunge and grab her in one bite. Don’t forget to equip the Bio-Electric Teeth gained from previous Bounty quest, that mini-stun will be very useful in this battle. Recommended to tackle at levels 9 onwards.
Infamy 3 – Pookie Paul

Rewards: Mineral Digestion (Organs)
Nutrients: 1,000 Protein, Fats and Minerals
To be updated..
Infamy 4 – Candyman Curtis

Bounty Hunters Level 20
Weapons Sea Bombs
Rewards: Adrenal Glands (Organs)
Nutrients: 1,350 Protein, Fats and Minerals
To be updated..
Infamy 5 – Ens. Tyler Dixon

Rewards: Bio-Electric Fins (Set Item)
Nutrients: 1,700 Protein, Fats and Minerals
To be updated..
Infamy 6 – Butcherboy Brady

Rewards: Bio-Electric Body (Set Item)
Nutrients: 2,000 Protein, Fats and Minerals
To be updated..
Infamy 7 – LT. Shannon Sims

Rewards: Mutagen Digestion (Organ)
Nutrients: 2,350 Protein, Fats and Minerals
To be updated..
Infamy 8 – MaMa Maybelle

Rewards: Bio-Electric Tail (Set Item)
Nutrients: 2,750 Protein, Fats and Minerals
To be updated..
Infamy 9 – CDR. Mercy Metcalf

Rewards: Bio-Electric Head (Set Item)
Nutrients: 3,000 Protein, Fats and Minerals
To be updated..
Infamy 10 – CAPT. Robert Brunlett

Rewards: Brutal Muscles (Organ)
Nutrients: 3,350 Protein, Fats and Minerals
To be updated..
5.0 APEX PREDATORS
To be updated..
Hope you enjoy the post for Maneater In-Depth Guide + Gameplay Tips and General Info, If you think we should update the post or something is wrong please let us know via comment and we will fix it how fast as possible! Thank you and have a great day!
- Check All Maneater Posts List


Leave a Reply