
Clueless to Einstein
Intro
This guide will show you how to import .MDL files into Blender, and export them to .OBJ. It will also go over the process of retrieving the custom textures of the object so you can port them into PAC3.
Required Progams/Downloads
Crowbar – [steamcommunity.com]
Blender Source Tools – [valvesoftware.com]
Finding a Model
All games within the Source Engine primarily uses .MDL files for their models. This means you can retrieve models created for Team Fortress 2, Source Filmmaker, Garry’s Mod, etc., and port them for use in PAC3.
Garry’s Mod
Fair warning for the Garry’s Mod Workshop method, most all addon creators don’t want you ripping their content and redistributing it as another Workshop addon, even if it’s PAC3. Definitely something to think over if you plan on releasing something into the wild.
If you feel so inclined to use this Workshop method, read on.
You must first retrieve the files from a Workshop addon, you can use this handy tool – [steamworkshopdownloader.io] to do so. Your download should include paths similar to this, but as far as this tutorial goes you will only need /materials and /models.
Continue reading in the “Convert/Decompile” section.
Source Filmmaker
Often times it’s much easier to get TF2 model files from SFM than it is from TF2 itself. The Workshop page has just about everything, even custom models that don’t come from other Source games.
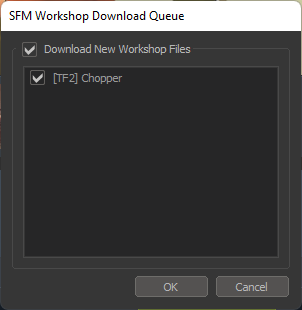
With this vast array of content available on the Workshop, subscribe to whatever you want to port. Launch SFM if you haven’t already, and download whatever appears in this menu:
In your Filmmaker files, your desired content should now appear in your /workshop directory. This tutorial will only use the /models and /materials paths.
steamapps\common\SourceFilmmaker\game\workshop
Continue reading in the “Convert/Decompile” section.
Convert/Decompile
Converting .MDL to .SMD
Model Files
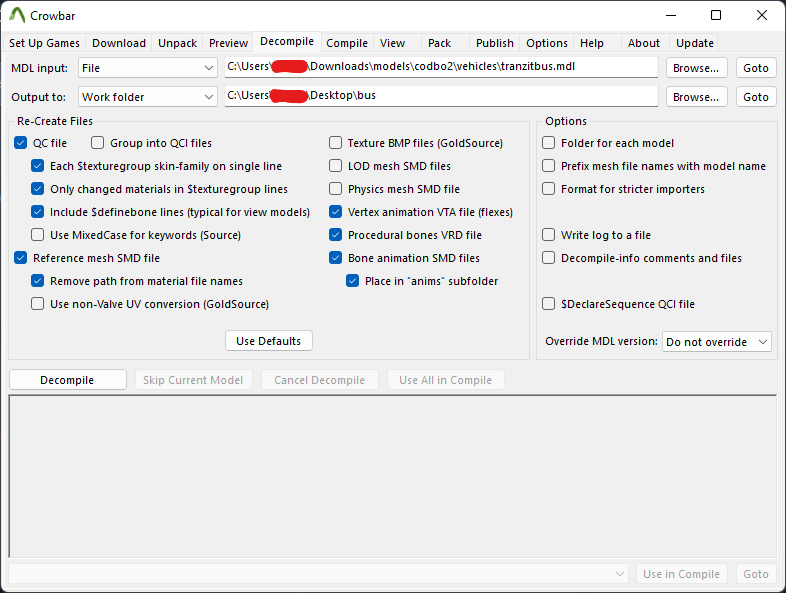
Locate the .MDL file you wish to convert. Usually there is only one included in the /models directory. Launch Crowbar and navigate to the Decompile tab. These are the settings and boxes that should be ticked when decompiling.
Change the MDL input to wherever your file is located, and change the output directory to wherever you please. Once you get your settings adjusted, hit decompile! You will now have a select few files in your output folder, however you will only need the .SMD and .QC files. Larger addons may output multiple .SMD files, though there is typically only one .QC file that includes every part of the model.
Converting .VTF to .PNG
Texture Files
You most likely want textures on your models. For this portion, you only need the .VTF files within the /materials directory of your selected addon. Confused which ones you need? I’ll show you a super easy way in the Blender section of the tutorial.
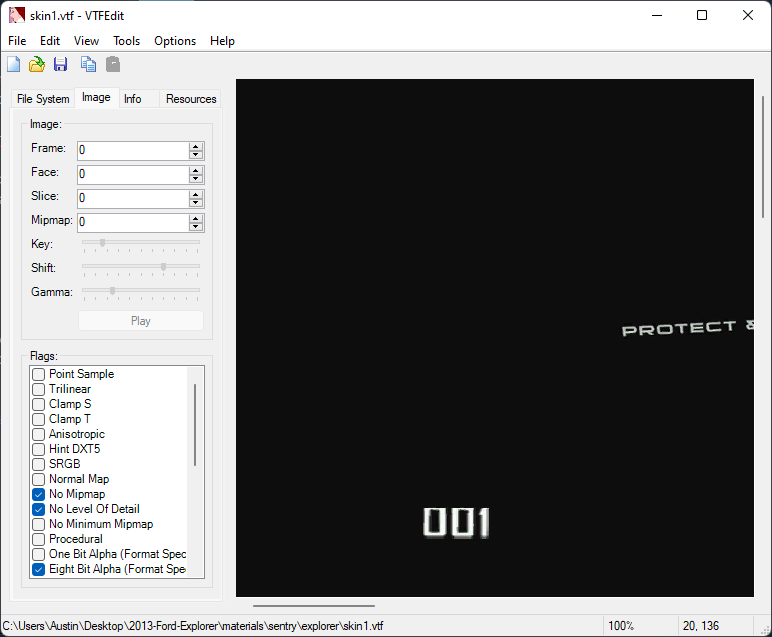
Navigate to the .VTF file that you would like to convert. After you install it, VTFEdit should be automatically associated with the .VTF filetype, so you can simply double click the file and view it from there.
Now that it’s open, click File > Export. This should bring up the file explorer. Change “save as type” to .PNG, as this is what PAC3 will read. Export it to a directory of your choosing, and you’re done!
Blender
Importing
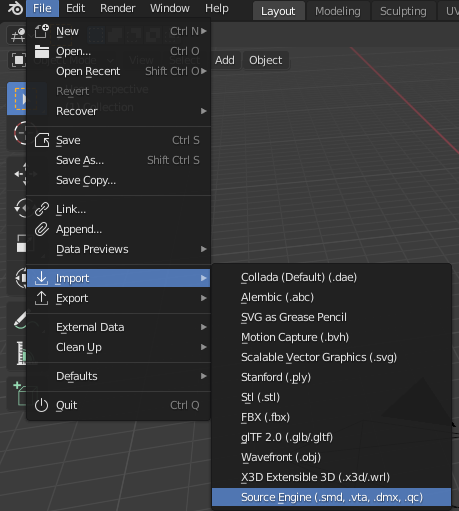
Provided you installed the Source Tools Addon (installation instructions are included in the above linked wiki page), you should see this import option. Use it to import the .QC file which contains every part of the vehicle.
Textures/Part Splitting
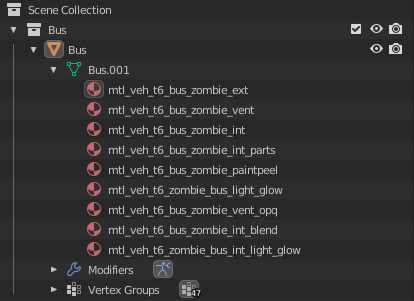
Now is when we find out what .VTF files we need to convert. In the Scene Collection in the upper right screen, it should contain all the parts of the model you imported. Expand the part until you see textures underneath it, such as here:
See how these names are identical to the .VTF files? That’s what you need to convert. Get those and you’re set.
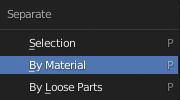
Now that the texture names are sorted out, you now need to separate the different parts so you can import them to PAC3 and apply the proper textures. You can do this by first highlighting the part that has multiple materials listed. Next you must enter Edit Mode by pressing Tab, and then pressing P to bring up the Separate menu. Now hit By Material. That’s it!
Exporting
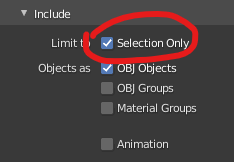
Now that all your parts are separated, you’re clear to export them as .OBJ. Ensure that “Selection Only” is checked in the export menu, so you don’t have the entire scene being exported into one file. When exporting, make sure a different part is selected every time.
Putting in PAC3
Now that you have the .OBJ and .PNG products, upload them to your Dropbox or other file hosting service. Note that you must use Legacy Model in PAC3 unless you plan on compressing the files, which entirely removes the freedom of applying the ported textures we previously went over.
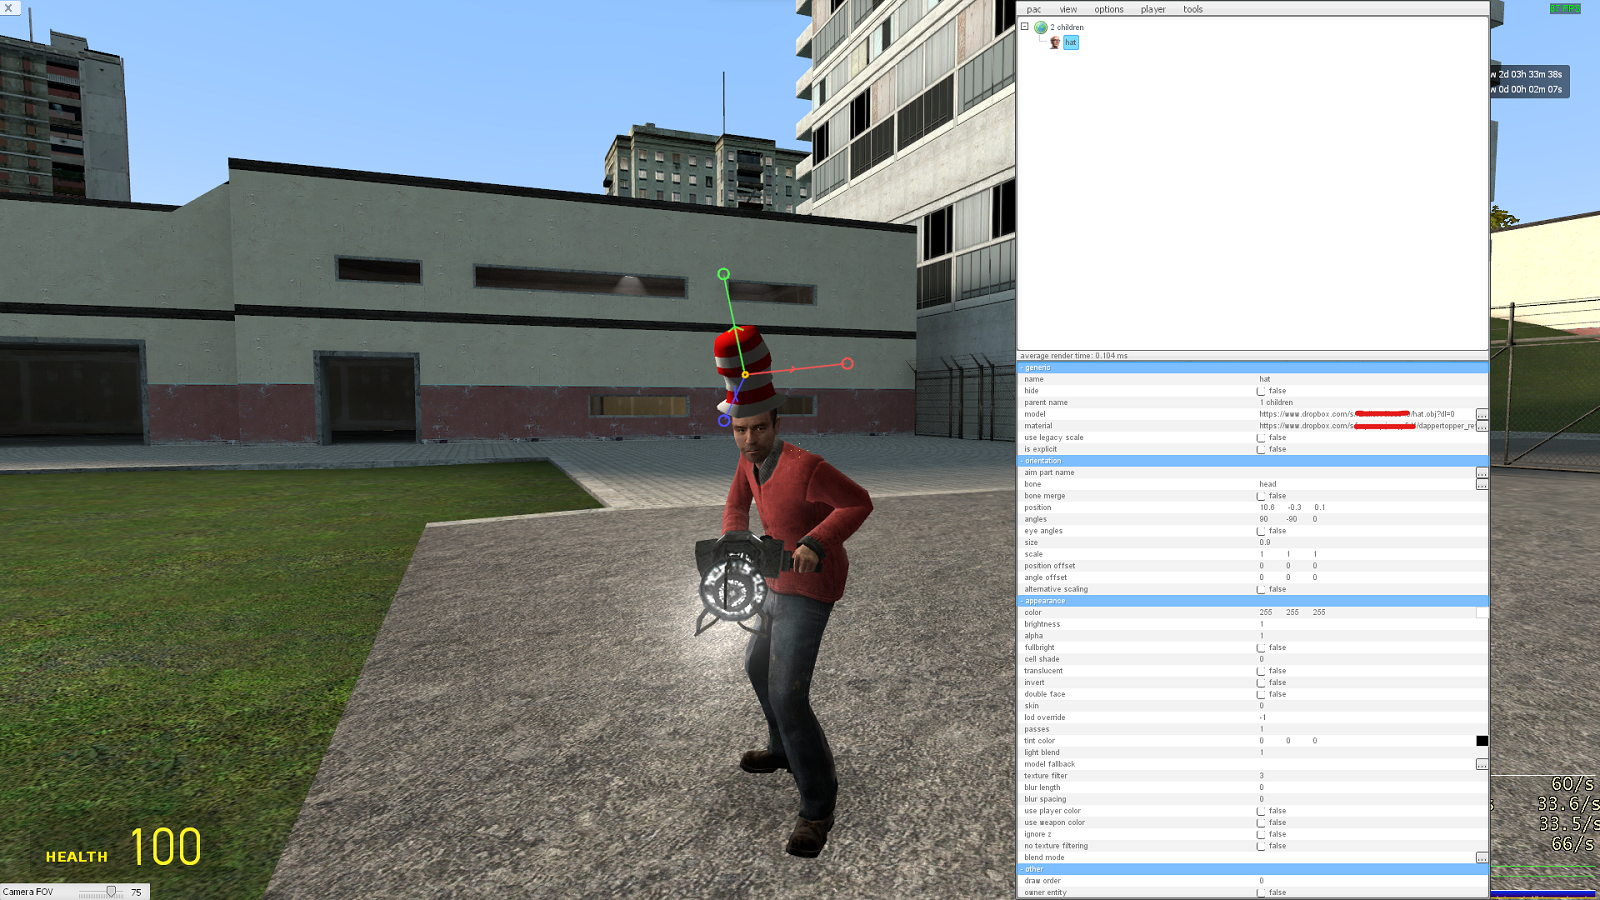
This is what the end product should look like, the .OBJ link going into the Model field, and the .PNG link going into the Material field.
Everything should work out perfect! If you’ve successfully followed and completed these steps, you’ve mastered the most difficult type of porting. Congrats.
For a more simple way of porting .MDL files (with many tradeoffs), view the below section for Commander Dixie’s compression method. Use what works best for you.
Guide End
The Dixie Method (Compression)
Requirements:
Garry’s Mod (obviously)
Dropbox Account
Addon of Choice
7-Zip (or winrar)
Through the use of Garry’s Mod built in GMad and the PAC3 editor, it is possible to port any model so that you can use it on any server, even if other users don’t have the addon itself.
1. Activating GMad
To get started, you need to activate GMad. It is normally located in Steam>steamapps>common>GarrysMod>bin. Upon opening it, a prompt will appear then disappear. This simply means that GMad has been activated and can now be used to export the contents of your addon.
2. Getting Addon Contents
It is important to note that your addon could be in one of two locations, with older addons being in the former and newer addons being in the latter option.
Option A
While still in your GarrysMod folder, navigate to GarrysMod>garrysmod>addons. From here, simply search for the name of your addon.
Option B
If you can not locate your addon in the addons folder, try searching in the next location. Newer addons tend to be located in Steam>steamapps>workshop>content>4000. Upon opening this folder, you will see a list of numbers. The easiest way to quickly find your addon is by, again, searching. If your addon does not appear, some addons tend to just be named “temp”. If there are multiple temp addons, you will either have to find a new addon or do process of elimination.
Once you find your addon, there should be a GMA file. You want to click on this file and, when your computer asks how you want to open it, you want to find GMad. Upon opening it, GMad will begin extracting the addon’s contents. Upon refreshing the page, you should see a folder under the same name as your addon.
3. Compressing
Before continuing, make a folder on your desktop and name it whatever you like, but it is easier to name it after the addon you are porting for ease of access later.
Upon clicking on the folder, there should be more folders. All we care about are the model and material folders. Upon going into the model folder, you should be greeted with a small number of files (assuming there is only one model in your addon, if there is more follow the steps but only with the file names matching the model you wish to port). You want to copy all of these files and put them in your desktop folder. The same can also be done with the materials folder, but make sure to only copy the actual material files instead of the thumbnail. After this, go to your desktop folder and hover over everything. Right click, then go to 7-Zip, then add to archive. Then copy the settings as shown:
Archive Format: zip
Compression Level: Store
Compression Method: N/A
Dictionary Size: N/A
Word Size: N/A
Solid Block Size: N/A
Then click OK, which will zip the files and put the zipped file into your folder.
4. Dropboxing/Adding to Garry’s Mod
Then you want to open dropbox and sign in or make an account. You simply want to drag and drop the zipped file into dropbox and wait for it to finish. After it’s finished, you want to go over to the file and click share, then copy the link provided. This will be the link you copy into your game. Then you want to go into your PAC3 editor and right click on the my outfit next to the globe icon on the left side, then click on model. You want to replace the model link with the dropbox link you copied before. Then after a second your model should load, textures and all.
Written by Commander Dixie
Hope you enjoy the post for Garry’s Mod How to Import MDL Files to PAC3 + All Programs Requirements, If you think we should update the post or something is wrong please let us know via comment and we will fix it how fast as possible! Thank you and have a great day!
- Check All Garry's Mod Posts List



Leave a Reply