A beginner & visual learner friendly guide on how to mod Fallout: New Vegas in a safe and clean way for it to run as smoothly as possible by modern standards.
Foreword
I love Fallout: New Vegas, and I especially love modding it. However, whenever I try to recommend this game (and modding it) to others, I can’t really find a satisfactory way of showing them how.
Viva New Vegas – [github.io] is always my personal go-to, but I find it a little too daunting for new players and some of the author’s mod tastes are questionable.
(With all due respect to Qolore, some of the mods he’s included in his guide are inconsistent in quality or style.)
So here’s my guide, I’ll try to keep the steps as clear as possible with images and such.
And yes I know my guide is very similar to Viva New Vegas, It’s kinda inevitable when this is the best way to mod Fallout: New Vegas. VNV is a fantastic guide, you should check it out if you wanna go more in depth with modding.
By the end of this guide you should have;
- A stable game that runs smoothly and rarely/never crashes
- Knowledge on how to mod Fallout: New Vegas on a basic level
Prerequisites
By following this guide, I am assuming that you;
- Are using Windows 7 (64bit) or higher
- Own Fallout: New Vegas Ultimate Edition – [steampowered.com]
- Have a Nexus Mods – [nexusmods.com] account
Have all those? Great! Next you’ll need to install the following;
- DirectX End-User Runtimes – [microsoft.com]
- Microsoft VC++ 2013 – [microsoft.com] (Download the x86 version)
- Microsoft VC++ 2015 – 2022 – [microsoft.com] (Download the x86 and x64 versions)
- A text editing software (I recommend Notepad++ – [notepad-plus-plus.org] )
- A file archiving tool (I recommend 7-Zip – [7-zip.org] )
- Optional: Nexus Mods got an update awhile ago that just made the download process more tedious, for some peace of mind, this userscript counters it – [github.com] just follow the instructions on the page if you’re interested
Setup
Creating a clean setup
(If Fallout: New Vegas isn’t installed, you can skip this part, Though I still highly recommend doing the second step if any files are left over)
To keep potential headaches to a minimum, We’re going to completely uninstall the game and delete the rest of the files the game leaves on your PC.
Uninstalling the game
- Open your Library
- Right click on Fallout: New Vegas
- Mouse over Manage and click Browse local files
- Navigate back by clicking on Steam\steamapps\common in the address bar
- Delete the Fallout: New Vegas Folder
- Go back to your Library
- Right click on Fallout: New Vegas
- Mouse over Manage and click Uninstall
- Click Uninstall when the prompt pops up
Deleting your saves and data
- Go to Documents\My Games and delete the FalloutNV folder (THIS DELETES YOUR SAVE FILES. BACK THIS UP IF YOU WANT TO KEEP THEM)
- Press the Windows key + R
- Type %appdata% and press Enter
- Navigate back by clicking on Users\(your name)\AppData
- Open Local
- Delete FalloutNV
Installing the game
- Open your Library
- Right click on Fallout: New Vegas
- Click Install
- Click Next and wait for the game to download and install
- I highly recommend you install Fallout: New Vegas in a folder that isn’t in any of the default Windows programs folders, Program Files, Program FIles (x86), etc.
Generating fresh .INI files
- Run Fallout: New Vegas via your Library OR FalloutNVLauncher.exe from the Root folder (Steam\steamapps\common\Fallout New Vegas)
- You will get pop-ups stating Fallout New Vegas will now detect your video hardware and set video options accordingly. and Video settings have been set for X quality. Click OK for both of these and navigate to OPTIONS
- It’s always Ultra by default for me but it could be lower for you, feel free to pick different presets depending on your hardware. (Fallout: New Vegas is an old game so I’d be surprised if you have trouble running it on Ultra, especially since the mods we’re about to install will make your game run MUCH better.)
- Assuming you picked Ultra, the Resolution and Anti-Aliasing settings will be incorrect. I set my Resolution to 1920×1080 and Anti-Aliasing to 8 Samples (Make sure Anisotropic Filtering is set to 15 Samples for good measure)
- Click OK and then EXIT.
Mod Organizer 2
Setup
- Download Mod Organizer 2 here. – [nexusmods.com]
- Run the installer
- Pick an installation location when prompted
- Avoid installing it in the default Windows program folders as mentioned before
- DO NOT install it to the Root Fallout: New Vegas folder. (I use C:\Games\Modding\Tools\Mod Organizer 2)
- Keep clicking Next and then click Install and wait until it’s finished
Setup Pt. 2
- Navigate to the folder you installed Mod Organizer 2 in
- Right click on ModOrganizer.exe
- Open Properties
- Click the Compatibility tab
- Tick Run this program as administrator under Priviledge Level
- Click OK
Setup Pt. 3
- Run ModOrganizer.exe
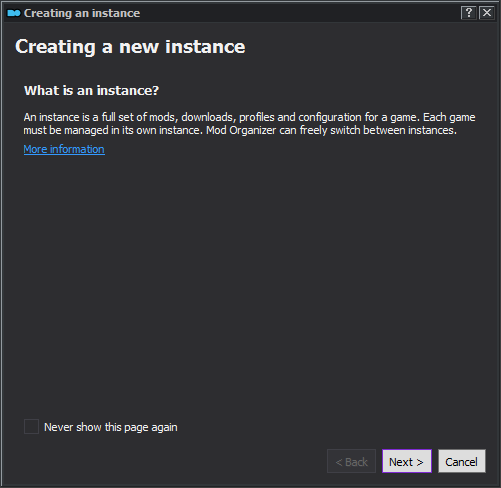
- A pop-up will appear called Creating an instance
- Click Next
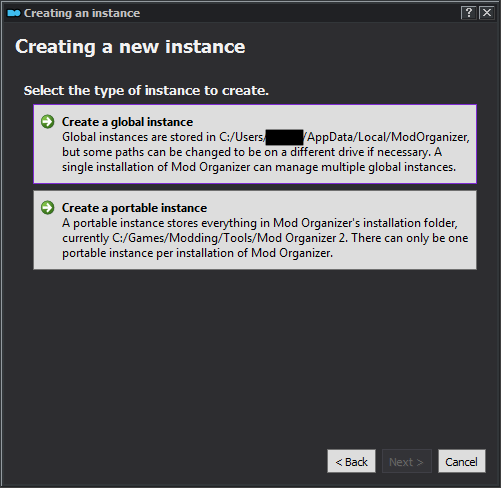
- On the next page, select Create a portable instance
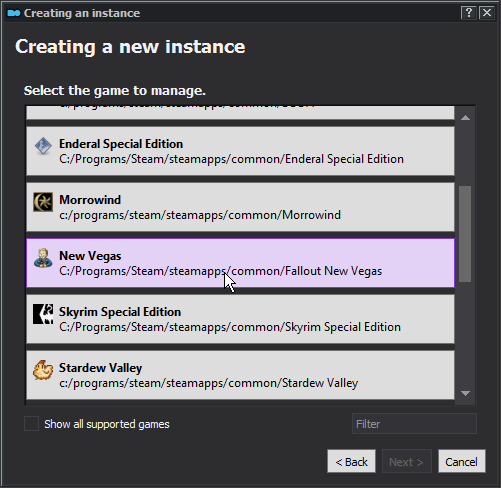
- On the next page, select New Vegas
- Keep the location path default
- Click Finish
- If prompted with Show Tutorial? click No
- If prompted with Register? click Yes
- If prompted with INI file is read-only select Remember my choice and then click Clear the read-only flag
User Interface Setup
These are my personal tastes, Feel free to skip or use different options
- Right click the top bar, Untick Menu, Tick Medium Icons
- Open Settings (The screwdriver & wrench icon)
- Under Download List, tick Show meta information and Compact list
- Under Miscellaneous, untick Show menubar when pressing Alt
- Open the Theme tab
- Under Style, Open the drop-down list and select a theme
- I personally love vs15 Dark-Purple
- Click OK
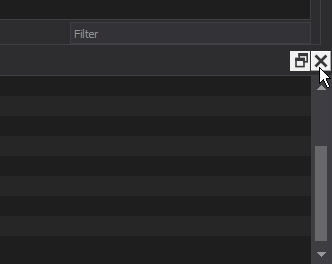
- Click the X on the lower right to close the Console
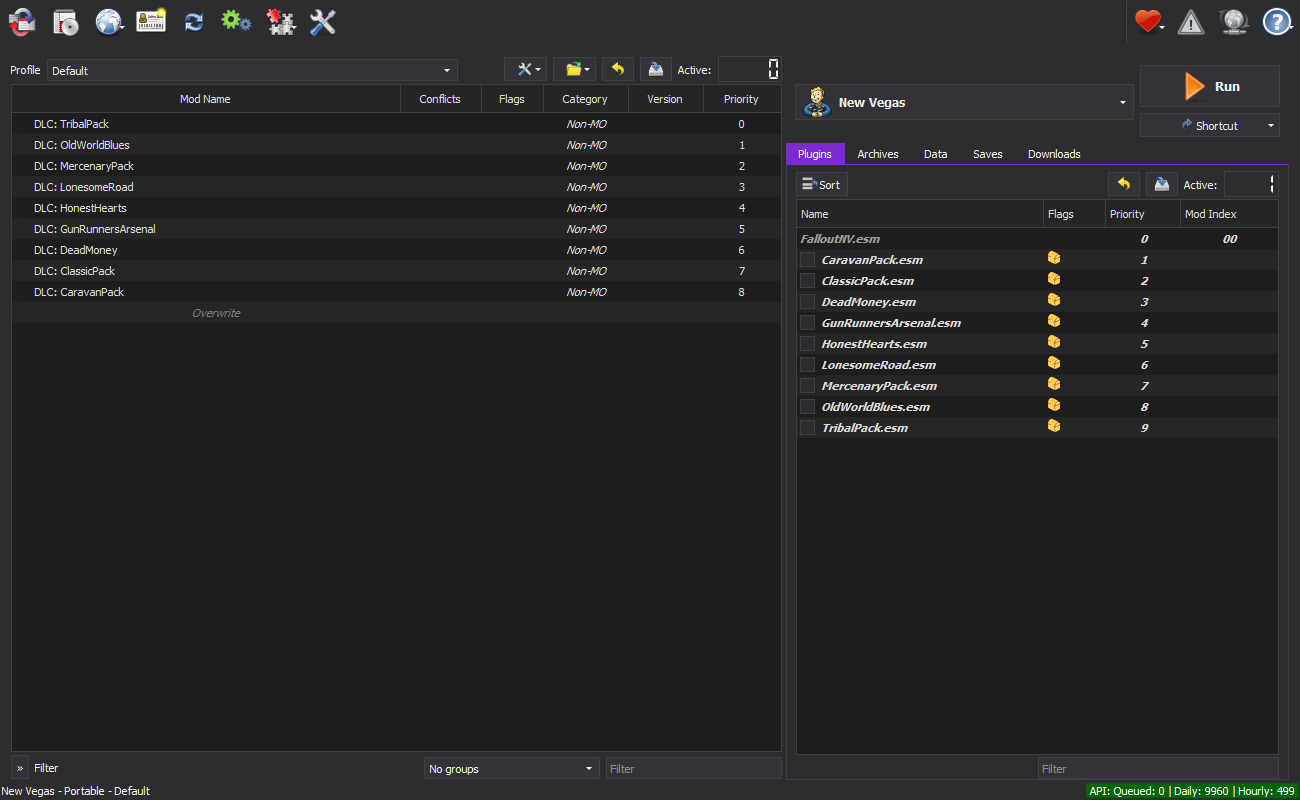
Your Mod Organizer 2 should now look something like this;
Profile Setup
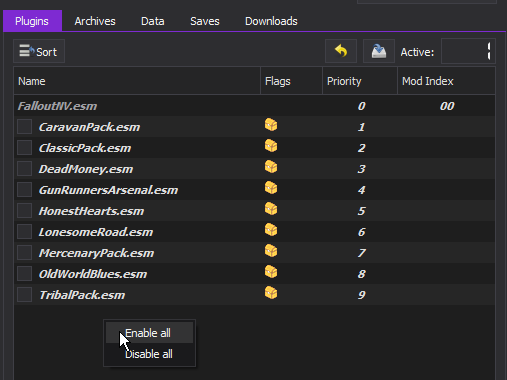
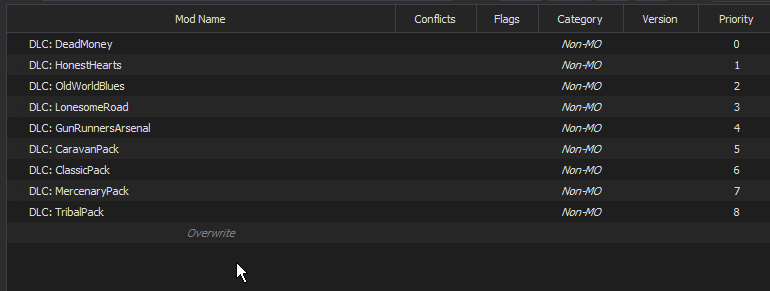
The DLC is out of order, we’re going to fix that
- In the right panel, right click and click Select all
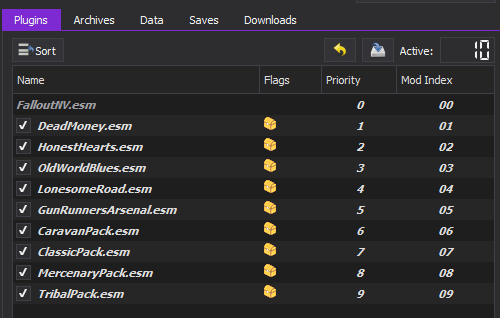
- Next, order them by dragging them like so;
- Do the same for the left panel
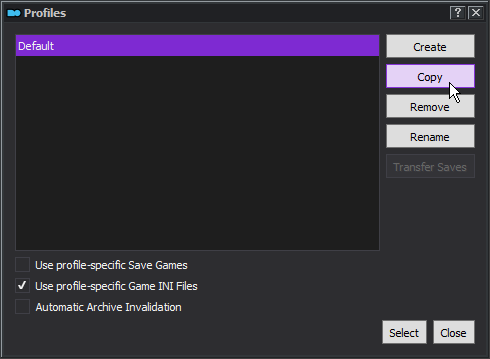
- Open Profiles (The ID Card icon)
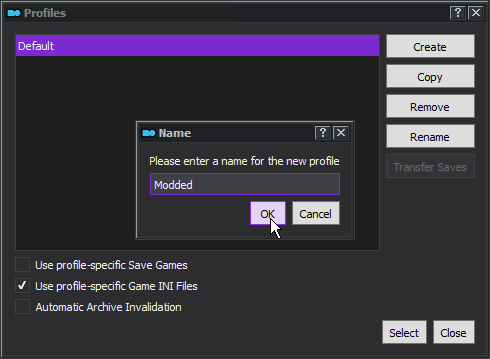
- Make sure Default is selected and click Copy
- Name your new profile Modded
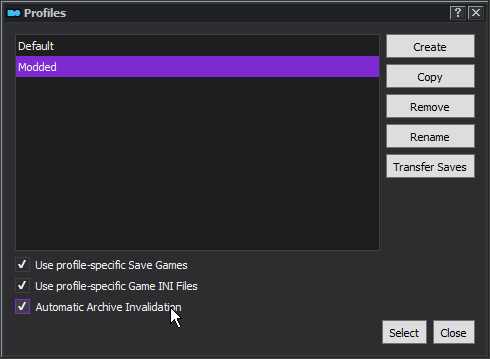
- Tick Use profile-specific Save Games & Automatic Archive Invalidation
- Select Modded under the Profile drop-down
INI Tweaks
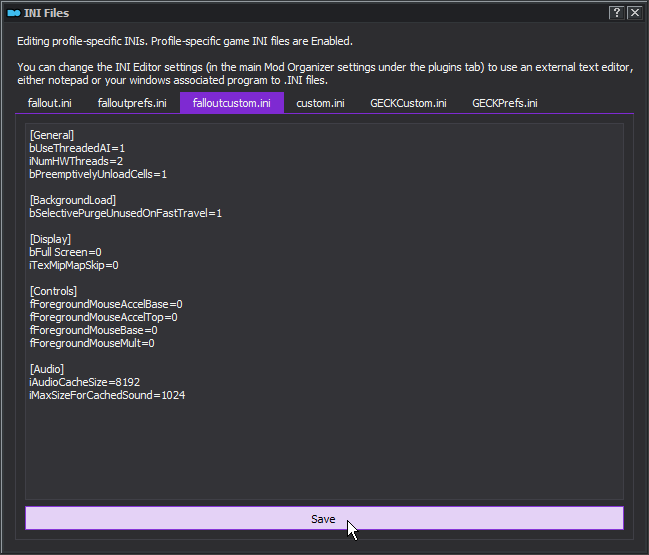
Every .ini tweak we make will be in FalloutCustom.ini, a fantastic feature of JIP LN NVSE which we will be installing shortly, It goes without saying that none of these tweaks will come into effect until we install it.
- Open Tools (The puzzle pieces icon)
- Click INI Editor
- If prompted with INI file is read-only select Remember my choice and then click Clear the read-only flag
- Select the falloutcustom.ini tab
- Avoid making any edits to fallout.ini or falloutprefs.ini, falloutcustom.ini takes priority over both of these, so put any .ini tweaks you have into it instead
- Copy and paste the following into the text box;
[General]
bUseThreadedAI=1
iNumHWThreads=2
bPreemptivelyUnloadCells=1

[BackgroundLoad]
bSelectivePurgeUnusedOnFastTravel=1

[Display]
bFull Screen=0
iTexMipMapSkip=0

[Controls]
fForegroundMouseAccelBase=0
fForegroundMouseAccelTop=0
fForegroundMouseBase=0
fForegroundMouseMult=0

[Audio]
iAudioCacheSize=8192
iMaxSizeForCachedSound=1024
- bFull Screen=0 disables fullscreen because we’re going to be using OneTweak shortly which enables borderless fullscreen
- Click Save
- Close INI Editor
You’ve successfully set up Mod Organizer 2 and are now past the hardest part of the guide. Congratulations! Now let’s get started!
Mods – Root Folder
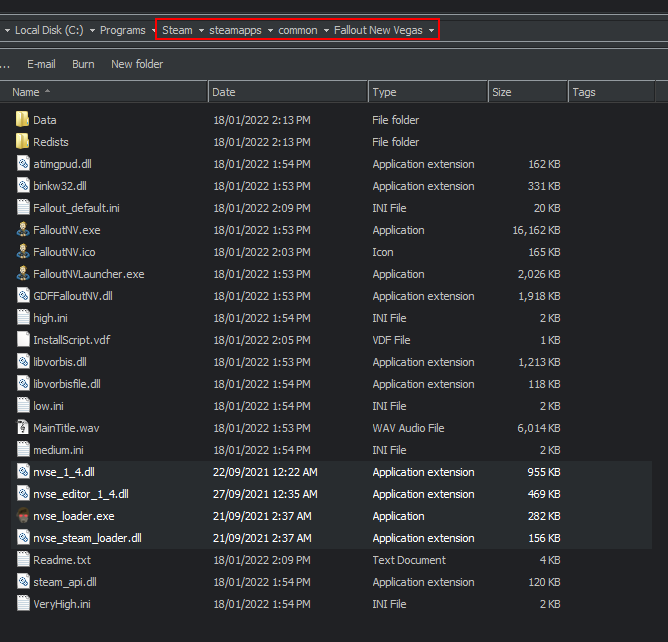
Reminder: the Root folder is NOT the Data folder, it is the base folder of Fallout: New Vegas where FalloutNV.exe and FalloutNVLauncher.exe are located. You can access this folder by going into your Steam Library, Right clicking Fallout: New Vegas, Selecting Manage and clicking Browse local files.
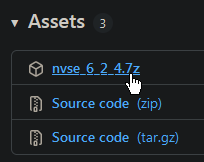
xNVSE – [github.com]
- Click nvse_6_2_4.7z (or whatever the latest version is) to download it
- Unzip the archive and open it
- Select and copy nvse_1_4.dll, nvse_editor_1_4.dll, nvse_loader.exe and nvse_steam_loader.dll into the Root folder
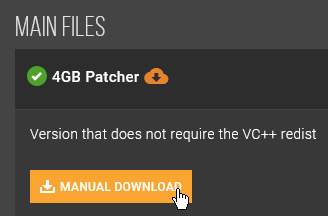
FNV 4GB Patcher – [nexusmods.com]
- Click Manual Download
- Unzip the archive and open it
- Move FNVpatch.exe into the Root folder
- Right click FNVpatch.exe and click Run as administrator
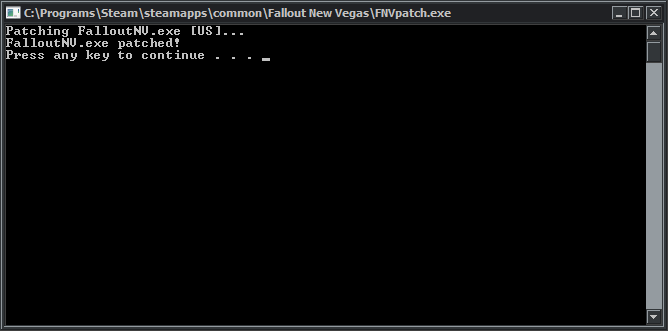
- A prompt should pop up and say FalloutNV.exe patched! Press any key to continue
- Press any key to close the prompt
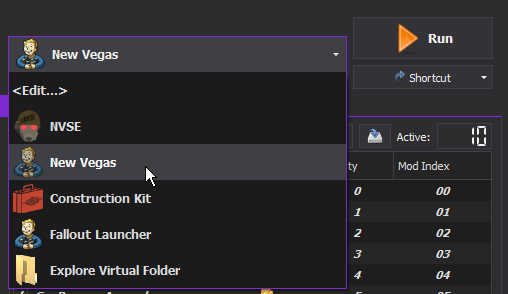
- Note: from here on out you should only start Fallout: New Vegas via New Vegas in Mod Organizer 2, NOT with NVSE or Fallout Launcher
New Vegas Heap Replacer – [nexusmods.com]
- Click Manual Download
- Unzip the archive and open it
- Run cpu_info.exe
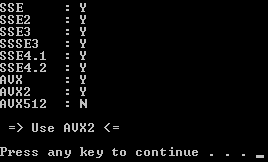
- A prompt should pop up and it should say in between => Use <= which version you should be using
- For me it’s AVX2, but for you it could be different
- Press any key to close the prompt and go to the folder it mentioned under => Use <= (For example, AVX2)
- Move d3dx9_38.dll into the Root folder
And that’s it for all the Root folder related mods! The rest wont be as much as a hassle, I promise.
Mods – NVSE Utilities
IMPORTANT: Make sure you have the Modding profile selected!
From now on we’re gonna be installing mods in Mod Organizer 2.
In the left panel, Right click the blank space and select Create separator
In the Create Separator prompt, type NVSE Utilities and press OK
JIP LN NVSE Plugin – [nexusmods.com]
- Click on the Files tab
- Please read the Description page of every mod you download, You never know what could go wrong when installing or using the mod!
- Click Mod Manager Download under Main Files
- Note: You should never use the download buttons on the top right part of the page, It often leads to you downloading the wrong file. Always use the files tab!
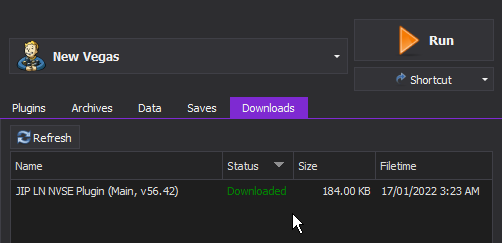
- Go to the right paneland click on the Downloads tab
- This is where all of your mods you downloaded via Mod Manager Download will show up
- Right click JIP LN NVSE Plugin and click Install (Double click works too)
- Quick Install will pop up
- Click Manual
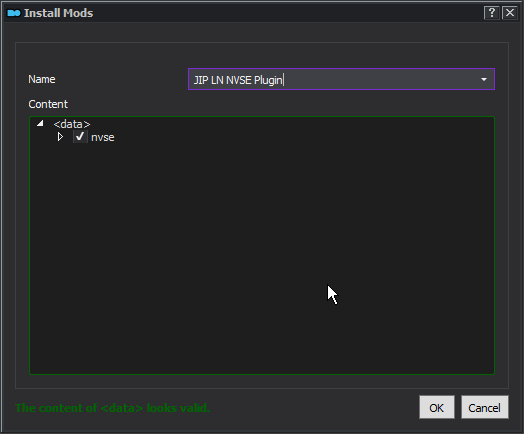
- Install Mods will pop up, Click OK
- You may get a little tutorial explaining how file structures work, it’s worth reading
- JIP LN NVSE Plugin should now be in the left panel, Tick the box next to it to enable it
- In the left panel, Double click on JIP LN NVSE Plugin
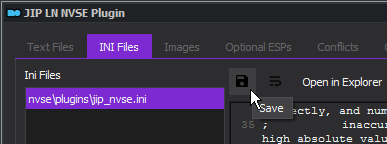
- In the menu that pops up, Click on the INI Files tab
- Under Ini Files, select nvse\plugins\jip_nvse.ini
- Go to line 49, and set bVoiceModulationFix=1 to bVoiceModulationFix=0
- Press the Save icon and close the menu
JohnnyGuitar NVSE – [nexusmods.com]
- Download the mod normally (as shown above)
- I like to sort my downloads by most recently downloaded
- Install the mod normally (as shown above)
NVAC – New Vegas Anti Crash – [nexusmods.com]
- Download the mod normally
- Install the mod normally
NVTF – New Vegas Tick Fix – [nexusmods.com]
- Download the mod normally
- Install the mod normally
- In the left panel, Double click on NVTF – New Vegas Tick Fix
- In the menu that pops up, Click on the INI Files tab
- Under Ini Files, select NVSE\Plugins\NVTF.ini
- Go to line 19, and set bModifyDirectXBehavior=0 to bModifyDirectXBehavior=1
- Press the Save icon and close the menu
FNV Mod Limit Fix – [nexusmods.com]
- Download the mod normally
- Install the mod normally
OneTweak for FNV – [nexusmods.com]
- Download the mod normally
- Install the mod normally
Console Paste Support – [nexusmods.com]
- Download the mod normally
- Install the mod normally
Improved Lighting Shaders – [nexusmods.com]
- Download the mod normally
- Install the mod normally
- In the left panel, Double click on Improved Lighting Shaders
- In the menu that pops up, Click on the INI Files tab
- Under Ini Files, select NVSE\Plugins\ImprovedLightingShaders.ini
- Go to line 8, and set iMaxLightCount = 8 to iMaxLightCount = 13
- Go to line 22, and set bIncreaseLightBuffers = 0 to bIncreaseLightBuffers = 1
- Press the Save icon and close the menu
lStewieAl’s Tweaks – [nexusmods.com]
- Download the mod normally
- Install the mod normally
lStewieAl’s Tweaks Custom INI – [catbox.moe]
My pre-made .ini file which has all bugfixes enabled, a huge assortment of quality of life changes and tweaks, and a few minor gameplay tweaks (nothing major, don’t worry)
- Download the .7z file
- In Mod Organizer 2, click Install a new mod from an archive (the disc icon)
- Select evee38.7z (the file host I’m using unfortunately renames the files uploaded, I might look for a different one later)
- Name it lStewieAl’s Tweaks Custom INI in the Quick Installmenu
- Enable the mod right below lStewieAl’s Tweaks
UIO – User Interface Organizer – [nexusmods.com]
- Download the mod normally
- Install the mod normally
kNVSE Animation Plugin – [nexusmods.com]
- Download the mod normally
- Install the mod normally
Mods – Bug Fixes
In the left panel, Right click the blank space and select Create separator
In the Create Separator prompt, type Bug Fixes and press OK
Yukichigai Unofficial Patch – YUP – [nexusmods.com]
- Download the mod normally
- Install the mod normally
Unofficial Patch NVSE Plus – [nexusmods.com]
- Download the mod normally
- Install the mod normally
- In the left panel, Double click on Unofficial Patch NVSE Plus
- In the menu that pops up, Click on the INI Files tab
- Under Ini Files, select config\Unofficial Patch NVSE Plus.ini
- Go to line 6, and set bPyromaniacBurningDamageFix=0 to bPyromaniacBurningDamageFix=1
New Vegas Mesh Improvement Mod – NVMIM – [nexusmods.com]
- Download the mod normally
- Install the mod normally
Weapon Mesh Improvement Mod – [nexusmods.com]
- Download the mod normally
- Install the mod normally
Weapon Mesh Improvement Mod ESP Replacer – [github.com]
- Download the .7z file
- In Mod Organizer 2, click Install a new mod from an archive (the disc icon)
- Select WMIM ESP Replacer.7z
- Name it Weapon Mesh Improvement Mod ESP Replacer in the Quick Installmenu
- Enable the mod right below Weapon Mesh Improvement Mod
Mods – Quality of Life
In the left panel, Right click the blank space and select Create separator
In the Create Separator prompt, type Quality of Life and press OK
Delayed Downloadable Content – [nexusmods.com]
- Download the mod normally
- The default main file relocates Courier’s Stash (the preorder DLC items) to certain areas that make sense. I personally find these items too much to begin with and prefer to start without them.
However, if this bothers you, feel free to download Delayed DLCs – No Courier’s Stash instead.
- The default main file relocates Courier’s Stash (the preorder DLC items) to certain areas that make sense. I personally find these items too much to begin with and prefer to start without them.
- Install the mod normally
Tutorial Killer – [nexusmods.com]
- Download the mod normally
- Install the mod normally
- Click No.Traps.Popup.v1.2.7z to download it
- In Mod Organizer 2, click Install a new mod from an archive (the disc icon)
- Select No.Traps.Popup.v1.2.7z
- Name it No Traps Popup in the Quick Installmenu
Faster Pip-Boy Animation – [nexusmods.com]
- Download the main file Faster Pip-Boy Animation (2x) normally
- Make sure you’re NOT downloading the hand-held version
- Install the mod normally
Mods – User Interface
The Mod Configuration Menu – [nexusmods.com]
- Download Main Files – The Mod Configuration Menu
- Install the mod normally
- Download Update Files – MCM BugFix 2
- In Mod Organizer 2, click Install a new mod from an archive (the disc icon)
- Select MCM BugFix 2-42507-.7z
- Name it MCM BugFix 2 in the Quick Installmenu
- Enable the mod right below The Mod Configuration Menu
JIP Improved Recipe Menu – [nexusmods.com]
- Download the mod normally
- Install the mod normally
yUI – User Ynterface – [nexusmods.com]
- Download the mod normally
- Install the mod normally
- In the left panel, Double click on JIP LN NVSE Plugin
- In the menu that pops up, Click on the INI Files tab
- Under Ini Files, select nvse\plugins\yUI.ini
- Go to line 7, and set bSortingIcons = 0 to bSortingIcons = 1
- Press the Save icon and close the menu
ySI – Sorting Ycons – [nexusmods.com]
- Download the mod normally
- Install the mod normally
Cursor Unilaterally Matched (NVSE) – [nexusmods.com]
- Download the main file Cursor Unilaterally Matched (NVSE) – Vanilla normally
- Install the mod normally
- Download the mod normally
- Install the mod normally
- Click the red Download Now! button
- In Mod Organizer 2, click Install a new mod from an archive (the disc icon)
- Select Vanilla_UI_Plus_New_Vegas_8.85.7z
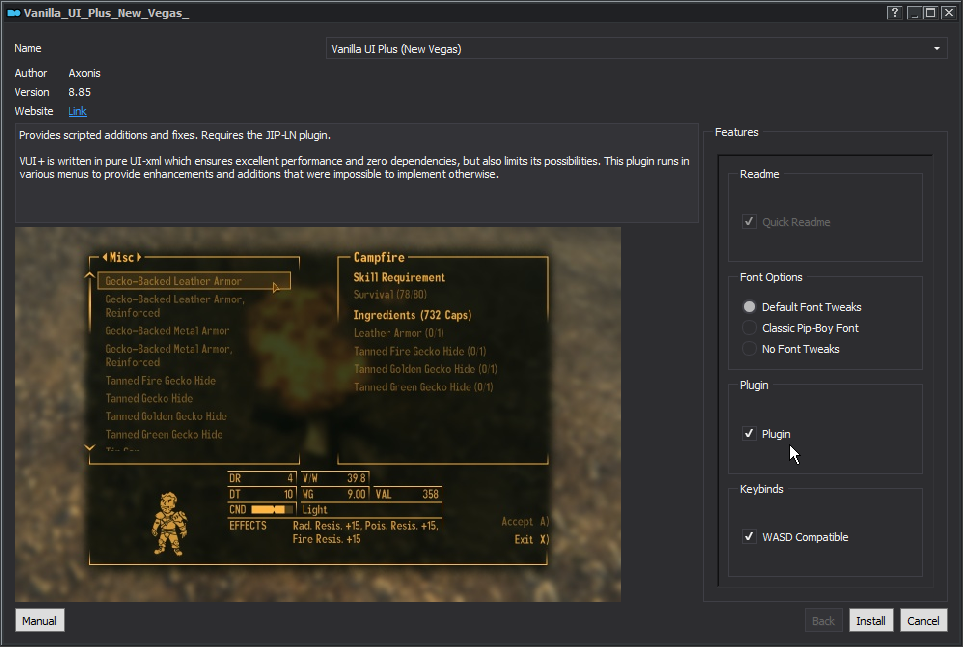
- A FOMOD installer will open up
- On the right panel, under Font Options, make sure Default Font Tweaks is selected
- Under Plugin, tick Plugin
- Under Keybinds, tick WASD Compatible
- This step is optional if you are left handed or don’t like the new keybinds this setting introduces
- Click Install
- In the left panel, Double click on Vanilla UI Plus
- In the folder that pops up, navigate to Menus\Prefabs\VUI+
- Right click on settings.xml and click Edit with notepad++ (or with whatever other text editing software you have)
- Go to line 35, and set <_VUI+StatusInfo> 1 </_VUI+StatusInfo> to <_VUI+StatusInfo> 2 </_VUI+StatusInfo>
- Go to line 43, and set <_VUI+HUDPrompt> 1 </_VUI+HUDPrompt> to <_VUI+HUDPrompt> 0 </_VUI+HUDPrompt>
- Go to line 80, and set <_VUI+noMODSlabel> 0 </_VUI+noMODSlabel> to <_VUI+noMODSlabel> 1 </_VUI+noMODSlabel>
Vanilla Hud Cleaned – [nexusmods.com]
- Download the mod normally
- Install the mod normally
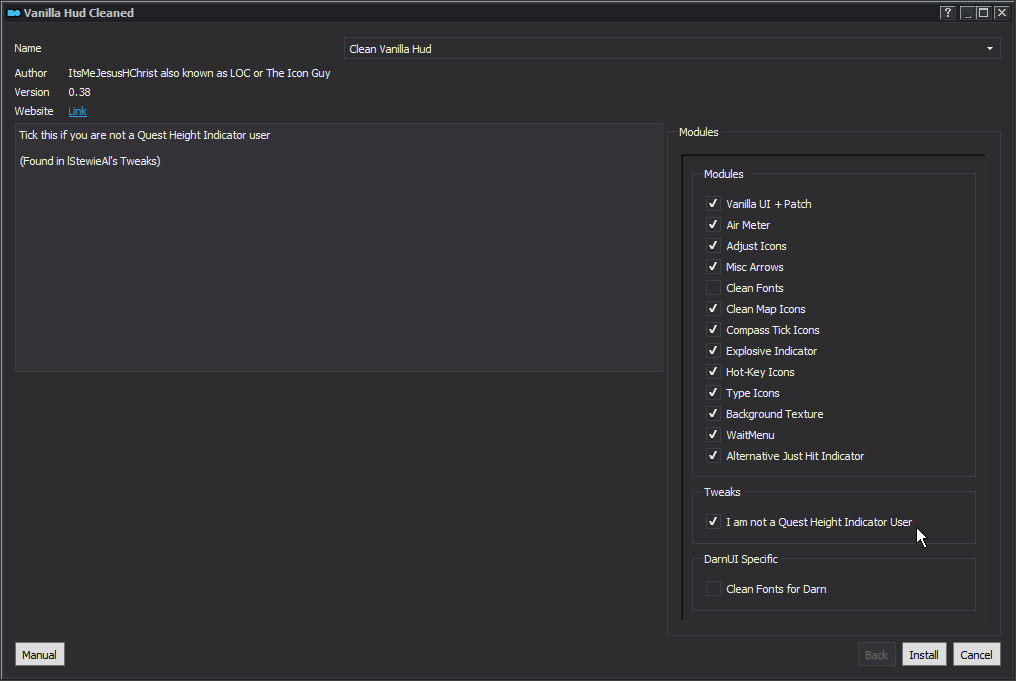
- A FOMOD installer will open up
- On the right panel, under Font Options, make sure Default Font Tweaks is selected
- Under Modules, untick Clean Fonts and tick Wait Menu and Alternative Just Hit Indicator
- Under Tweaks, tick I am not a Quest Height Indicator User
- Click Install
Afterword
Game Tips
JIP LN NVSE Plugin has an excellent feature which enables the use of Shift and Ctrl clicking item stacks, this works in any menu related to item transfers. use Shift to transfer entire stacks and Ctrl to transfer one item from a stack at a time, No more constant transfer prompts!
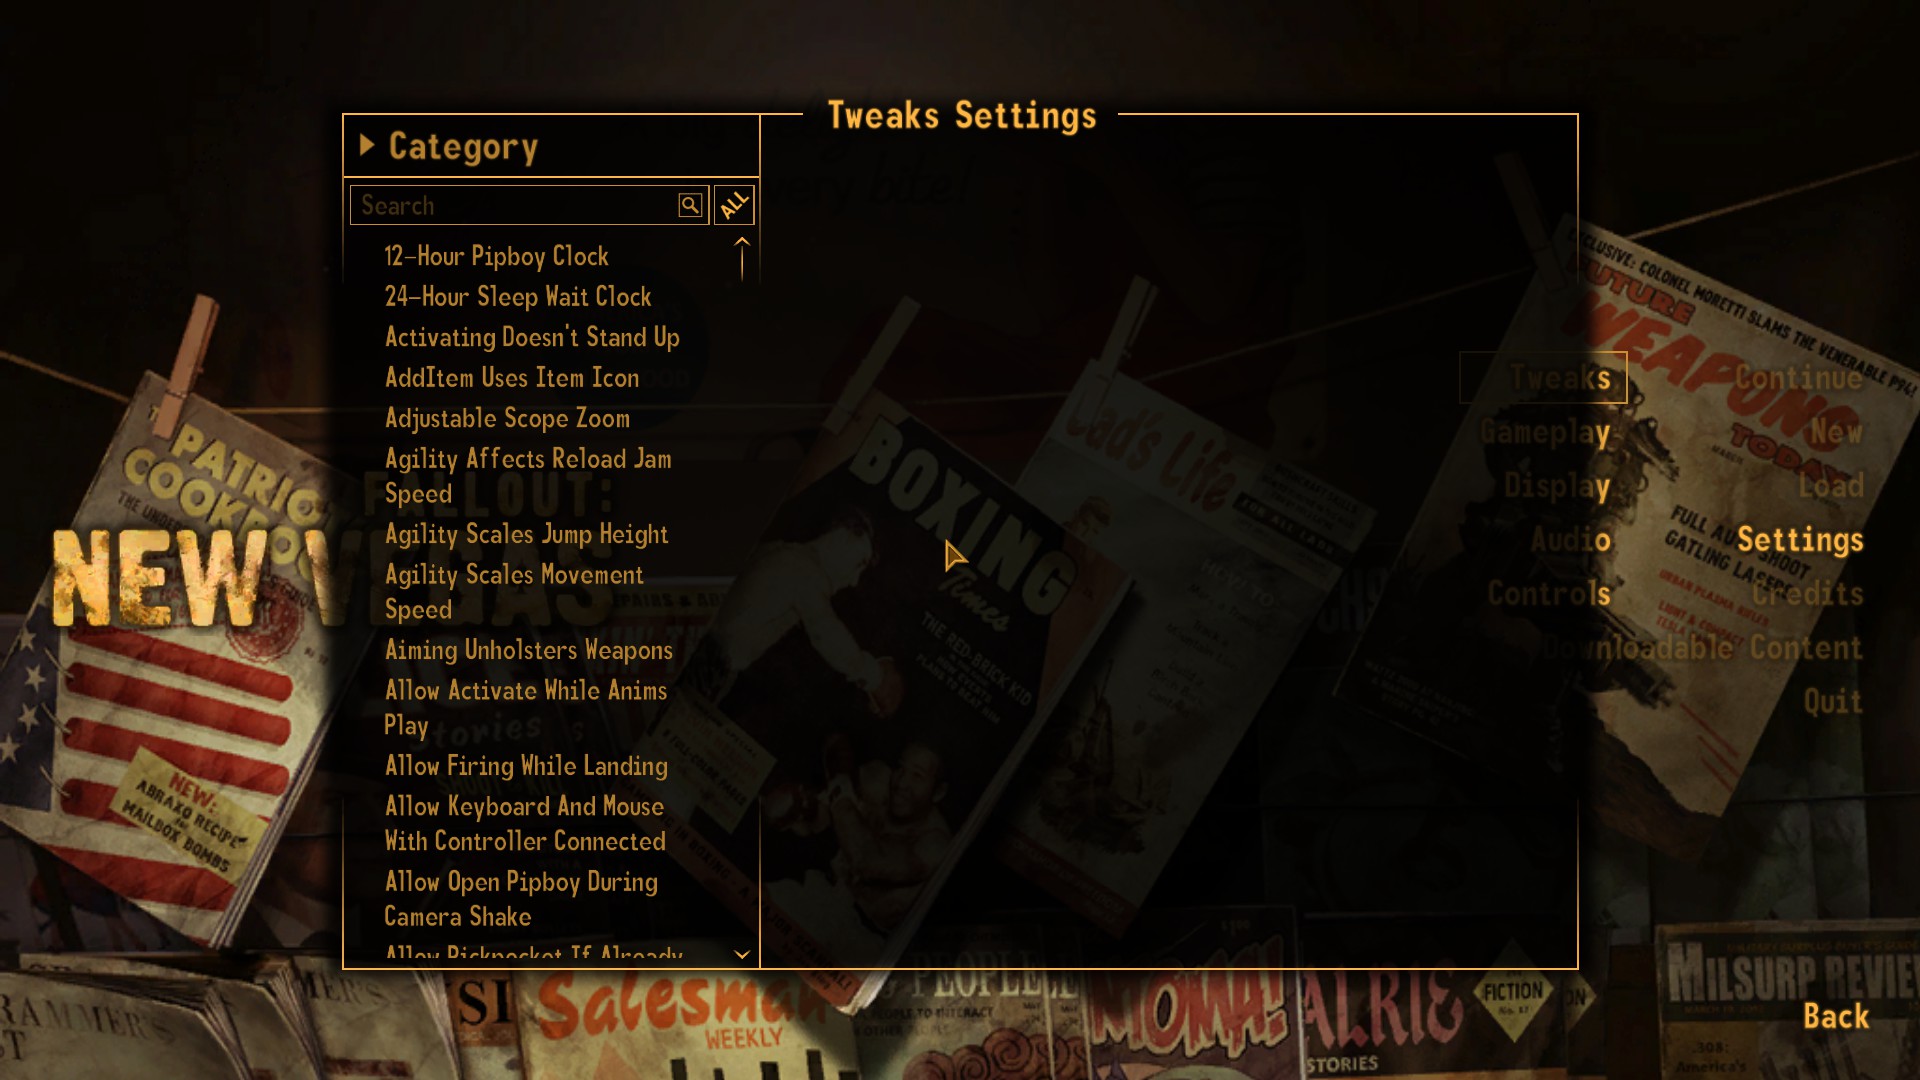
The lStewieAl’s Tweaks Custom INI I provided enables so many features that I can’t even cover them all here, So I’ll explain the most important ones;
- (You can hotkey any item in the game to numbers on your keyboard by holding one of them and clicking said item if you didn’t know)
You can check all the tweaks out (and disable and enable anything you want) if you go to Settings > Tweaks (Please keep in mind any tweaks you enable or disable will only take effect AFTER restarting your game)
How to start the DLCs
Dead Money
- The Sierra Madre Broadcast transmission range begins around the middle of the Novac bridge. Listen to the entire broadcast for the quest to start.
Honest Hearts
- The Happy Trails Expedition Broadcast transmission range begins around the Durable Dunn caravan wreckage. Listen to the entire broadcast for the quest to start.
Old World Blues
- the Mysterious broadcast transmission range begins around the south of Nipton if the player is below level 12, and just to the western side of Nipton Road Pit Stop if the player is over level 12.
Lonesome Road
- Go near the playground near Primm at level 25 or above, or complete all of the remaining DLCs.
Courier’s Stash Locations (Spoilers)
Caravan Pack: Hell’s Motel
Classic Pack: Wrecked Highwayman
Mercenary Pack: Bradley’s Shack
Tribal Pack: Lucky Jim Mine House
Final Notes
You now have a fully playable game, Congratulations!
This guide isn’t done yet, but now that you’ve laid out the foundations you can come back to this guide later if you like. Stay tuned!
IMPORTANT: Remember to always start the game via New Vegas in Mod Organizer 2, otherwise your mods wont work! And especially DO NOT run it through Steam.
You’ll still get overlay, game time tracking and achievements, don’t worry!
Hope you enjoy the post for Fallout: New Vegas A Vanilla Plus Modding Tutorial + Installation Guide, If you think we should update the post or something is wrong please let us know via comment and we will fix it how fast as possible! Thank you and have a great day!
- Check All Fallout: New Vegas Posts List











Leave a Reply