
A guide on squashing as many bugs in Fallout 4 while keeping the game as vanilla as possible! For the first time player wanting the vanilla experience with the least amount of bugs or for someone looking for a stable base to make a modded load order.
Introduction
Hello!
Welcome to my guide for Fallout 4 and how to fix various bugs for the best vanilla experience possible and stable modding foundation. Every step that I have listed are the steps I personally use to make my game run much more smoother and with less bugs on my PC system.
If you have any questions feel free to ask in the comments below and I will be sure to assist in any way that I can! Constructive feedback is also welcome!

This guide is intended to be used with game version Patch 1.34, this guide was not made to be used with the game version Patch 1.33 and under. Edit at your own risk if using game version Patch 1.33 and under.
LIKE ANY TYPE OF GAME GUIDE THAT MAKES YOU EDIT THE GAME FILES ALWAYS, ALWAYS BACK-UP YOUR FILES BEFORE STARTING!
⠀
⠀
⠀⠀⠀⠀⠀⠀⠀⠀⠀⠀⠀⠀⠀⠀⠀⠀⠀⠀⠀⠀⠀⠀⠀⠀⠀⠀Alright Lets Get Fixing
⠀⠀⠀⠀⠀⠀⠀⠀⠀⠀⠀⠀⠀⠀⠀⠀⠀⠀
Step 1 – Mod Manager
Basic knowledge of how to use a mod manager is required for this guide and for this guide we are going to be using “Mod Organizer 2”. If you do not know how to use Mod Organizer 2 any mod manager I’d recommend that you refer to the video below.
You can download Mod Organizer 2 from either Nexus Mods – [nexusmods.com] or Github – [github.com]

And also this video by GamerPoets – [youtube.com]

GamerPoets – [youtube.com] has really great tutorials on how to get started for modding any Bethesda game they are short sweet and to the point.
Step 2 – bInvalidateOlderFiles and sResourceDataDirsFinal
Once you have set up MO2 (Mod Organizer 2) you will need to made the game recognise installed mods, to do this you will need to
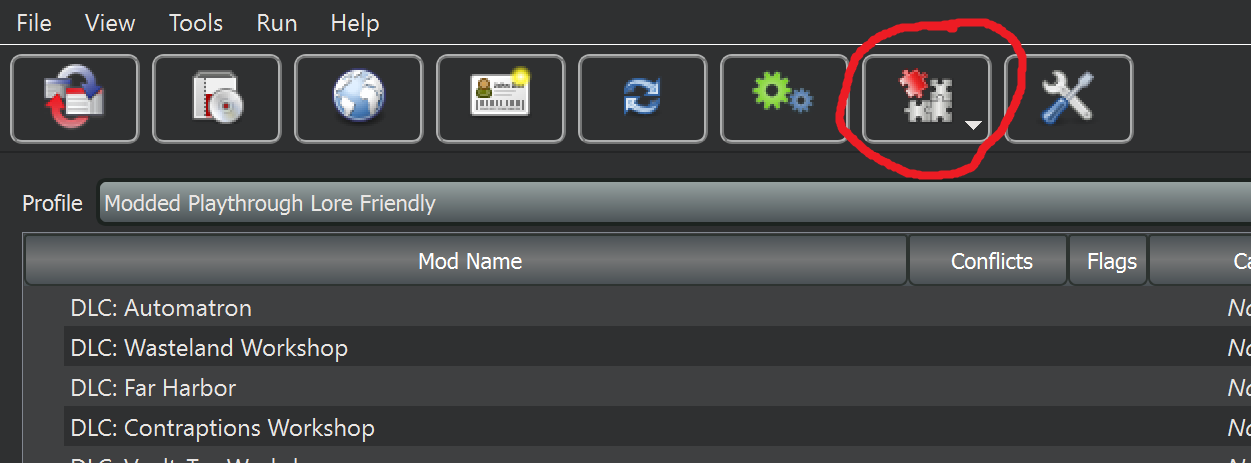
Step 1: At the top of the window on the bar there should be a jigsaw puzzle icon click this.
⠀
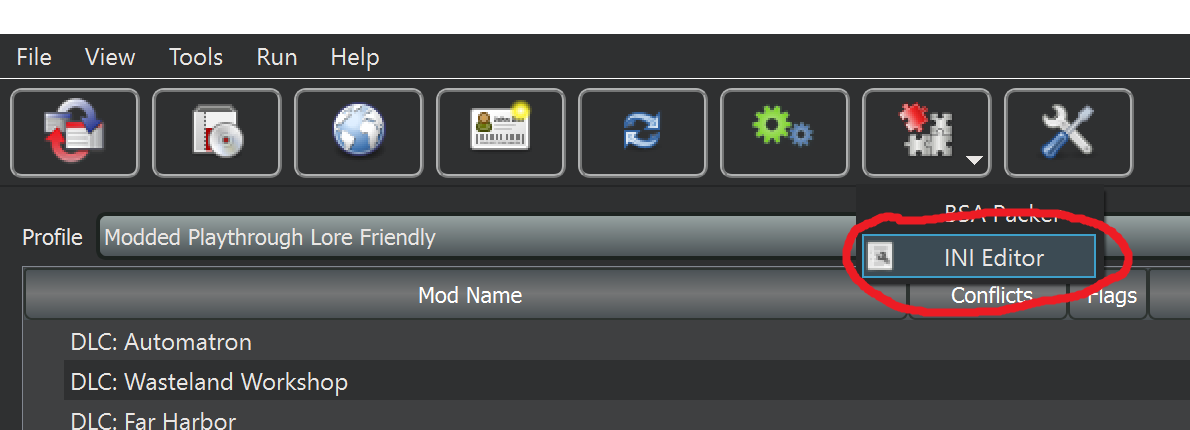
then select edit “INI Editor”
⠀
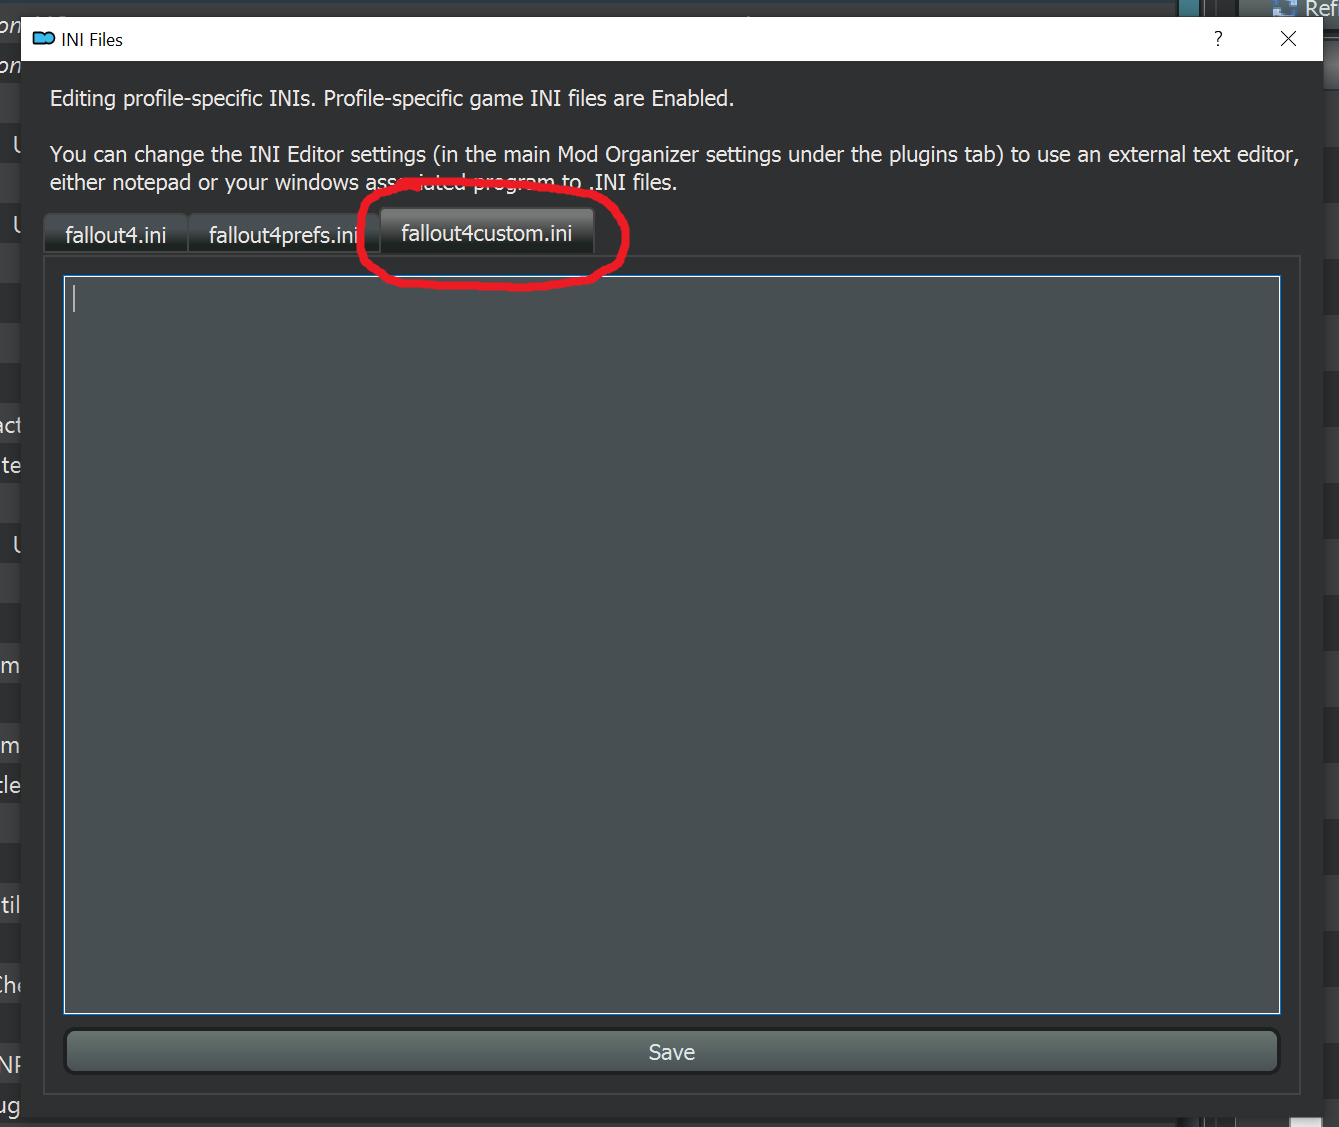
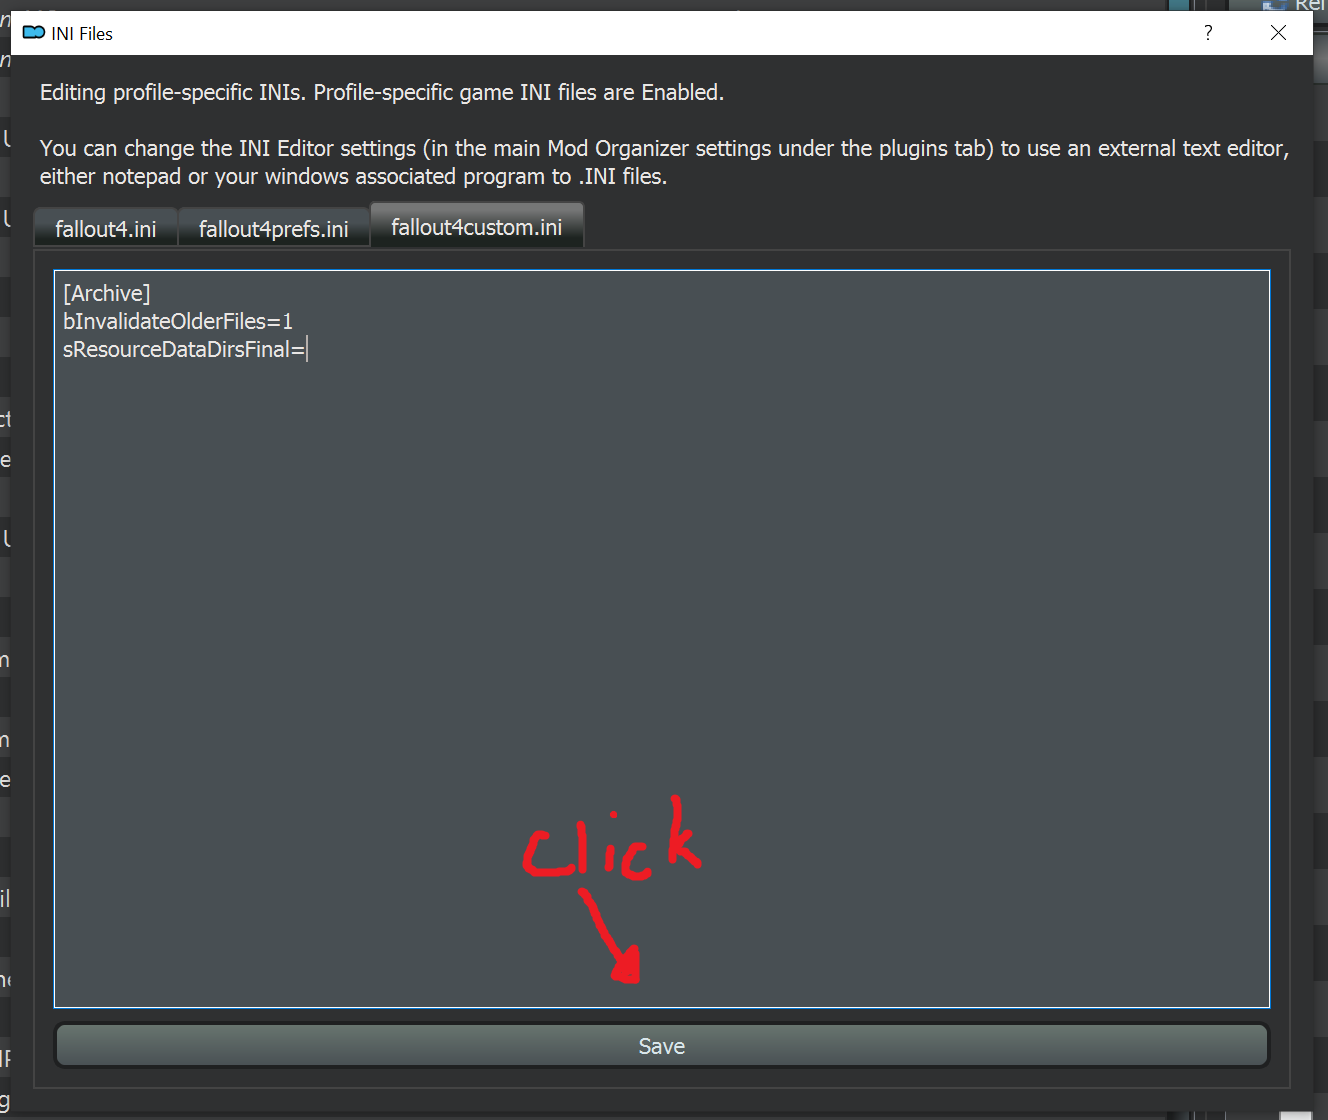
Step 2: After a window will open called “INI files” select the tab called Fallout4Custom.ini it should be blank.
⠀
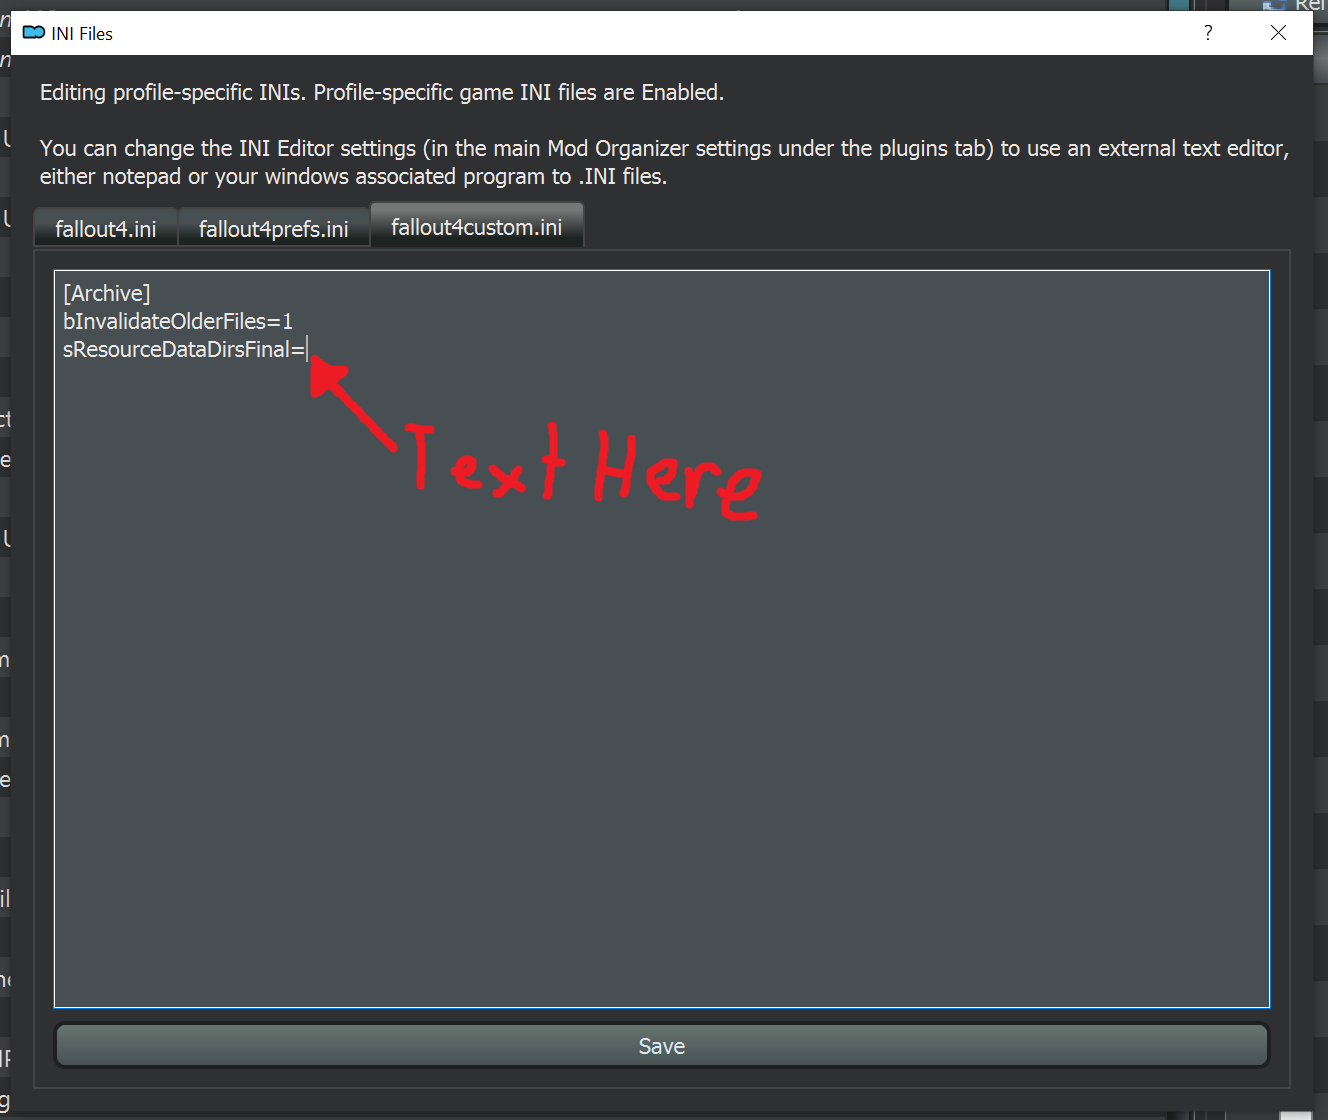
Step 3: once in the tab paste the text
[Archive]
bInvalidateOlderFiles=1
sResourceDataDirsFinal=
It should look like this
⠀
Step 4: once done click the save button and close the window.
⠀
Step 5: Time to install some mods.
⠀
⠀
Step 3 – Fixing Ultra God Ray Performance
The vanilla setting for ultra god rays is very un-optimised and can be very fps heavy but with a few simple tweaks you can have ultra god god rays at no visual loss or extra performance cost!
⠀
Step 1: Again at the top of the window on the bar there should be a jigsaw puzzle icon click this.
⠀
Then Again Click “INI Editor”
⠀
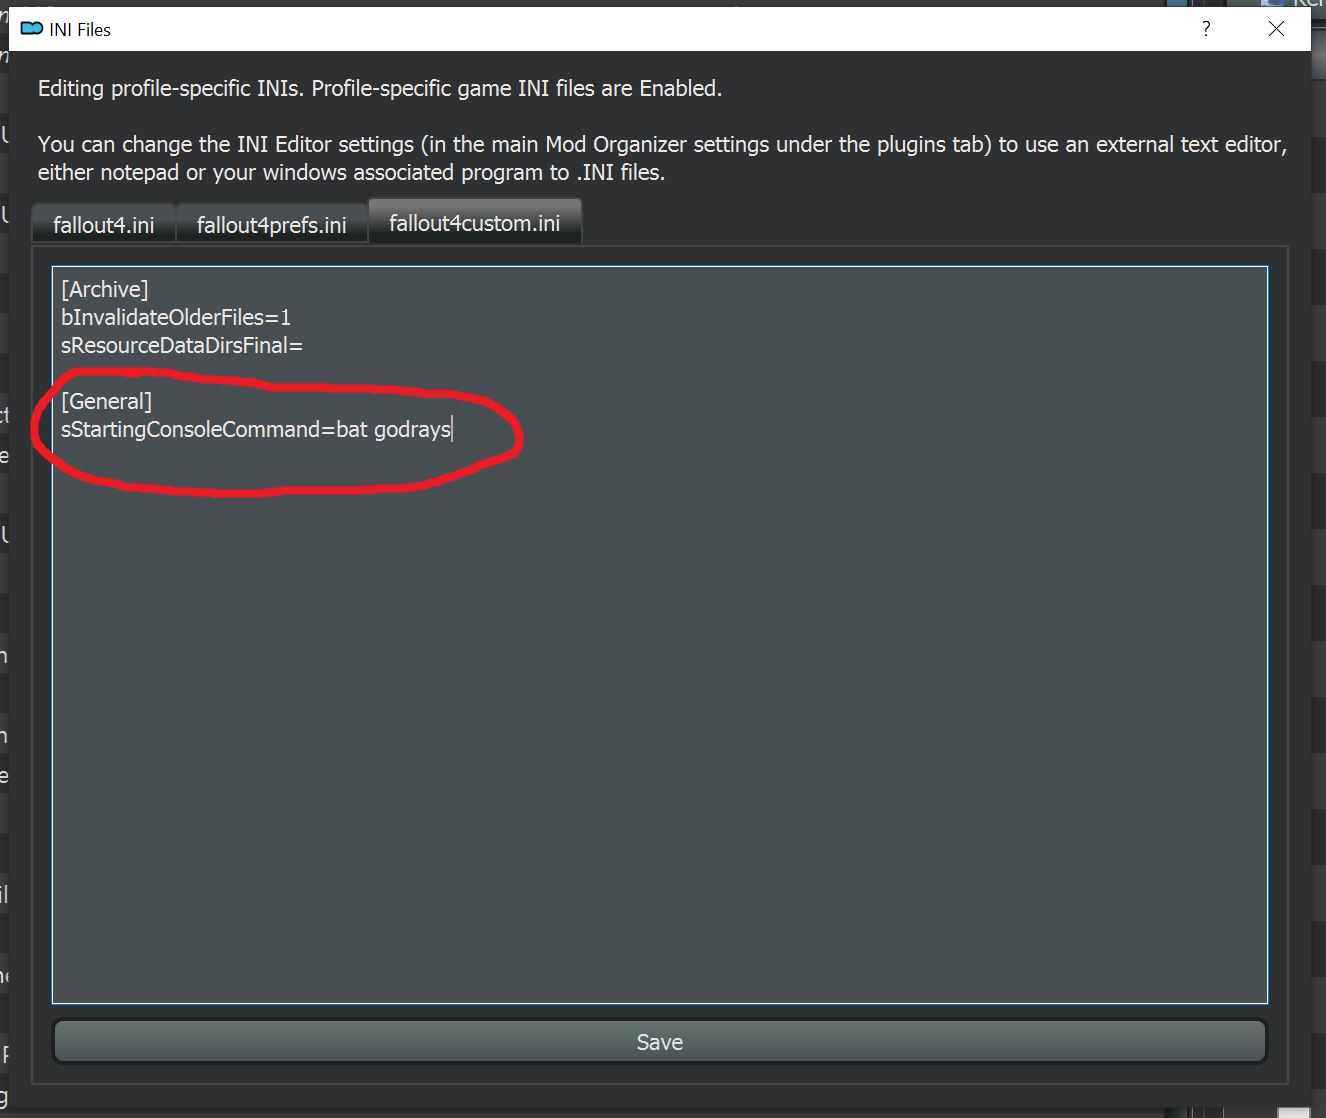
Step 2: Once again open Fallout4custom.ini tab and put the following text under the already existing text.
[General]
sStartingConsoleCommand=bat godrays
⠀
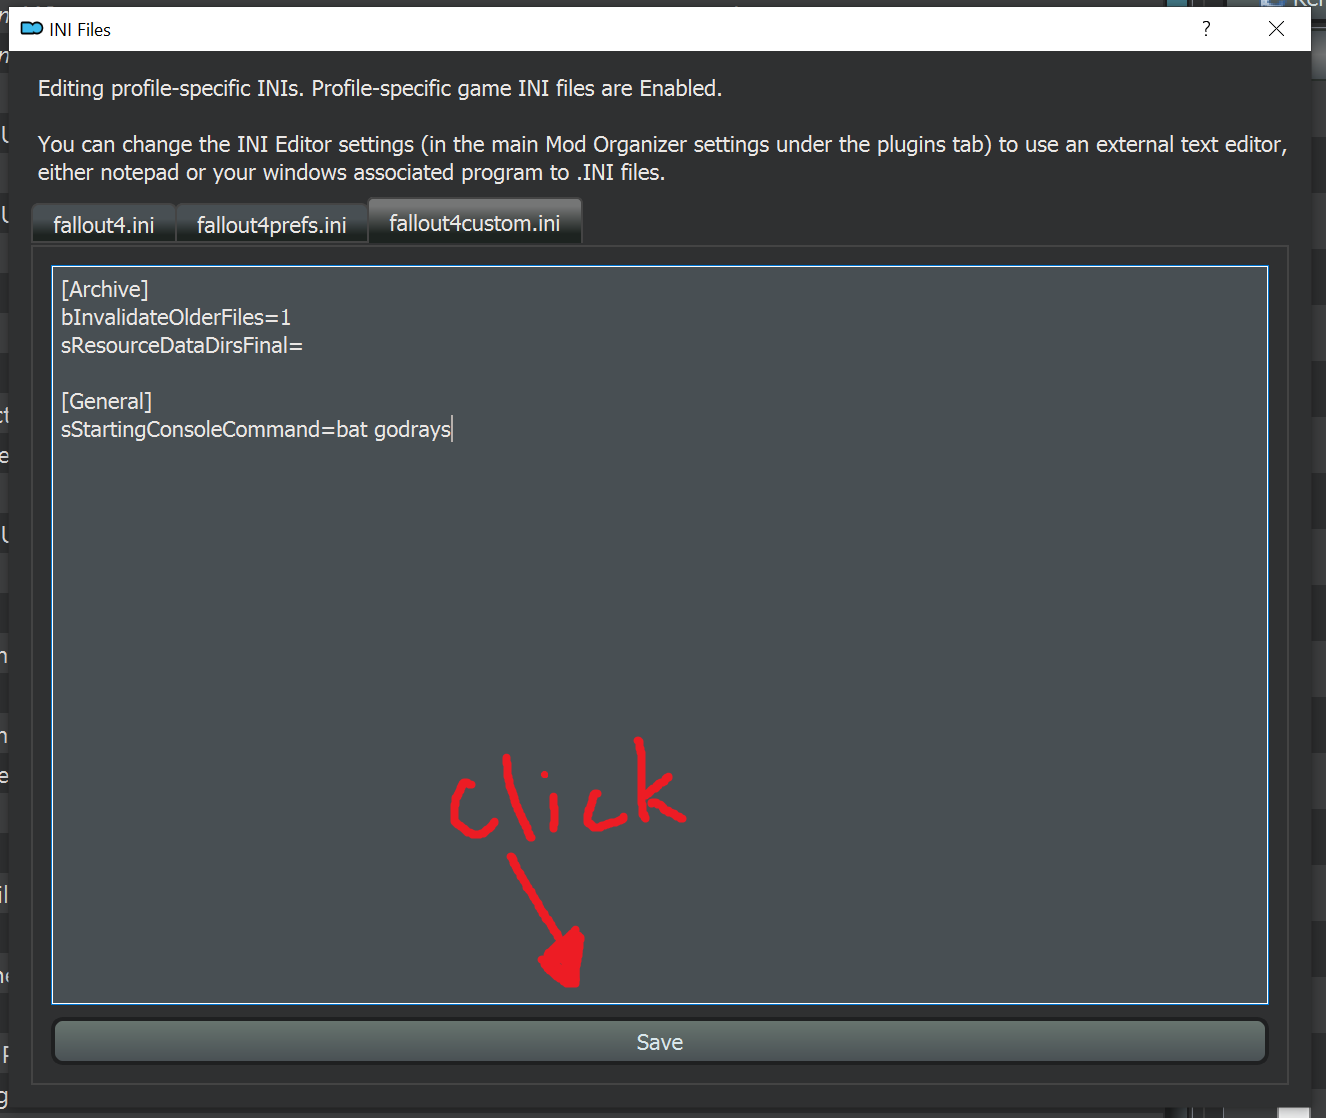
Then press save.
⠀
Step 3: After saving and closing the “INI editor” go to you games directory and create a new text document called “godrays”
⠀
Step 4: open up the newly created text document called “godrays” and paste in the following text within the text document and save it.
gr grid 12
gr scale .8
gr maxcascade 1
⠀
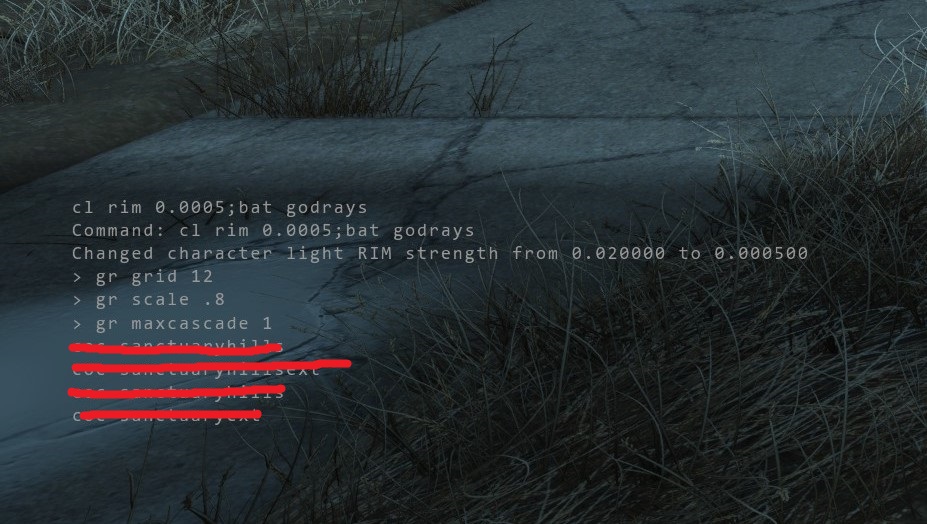
Step 5: To see if its working open up the console in game with the “~” key in the console it should look like this.
⠀
Step 6: This means that it is working and the performance edit is working!
⠀
⠀
Step 4 – Bug Fixing Mods
Below Are all the bug fixing mods that fix various things from engine related bugs to game-play and scripting bugs.
Mods that are listed as “Essential” are recommended to be used for the best possible outcome and mods that are listed as “Optional” are optional if you want to use them or not but its still recommended to use them.
Some of the mods require you to have F4SE to be installed if you do not know how to install F4SE please refer to the video below

You can download F4SE HERE – [silverlock.org]
Make sure to read any mods requirements before trying to install all mods information can be found on each mods respective modding pages on the link provided!
Fallout Priority – f4se plugin (Essential)
Fallout Priority – f4se plugin Makes the game priority always set to high in the task manager for the best performance possible.
Fallout Priority – f4se plugin can be downloaded HERE – [nexusmods.com]
Mod Configuration Menu (Essential)
Mod Configuration Menu allows the user to edit mod values and mod key binding in game if a mod supports Mod Configuration Menu functionality (which most do!)
Mod Configuration Menu can be downloaded HERE – [nexusmods.com]
Address Library for F4SE Plugins (Essential)
Address Library for F4SE Plugins is basically essential at this point it makes it so mods that use it will be compatible with newer game versions if Bethesda decides to update the game without the mod author needing to update the mods to be compatible.
Address Library for F4SE Plugins can be downloaded HERE – [nexusmods.com]
XSE PluginPreloader F4 (Essential)
xSE PluginPreloader F4 Allows F4SE mods to load before the game fully initialises, some mods require this to be fully functional such as “buffout 4”.
xSE PluginPreloader F4 can be downloaded HERE – [nexusmods.com]
This mod also needs to be installed in the games DIRECTORY folder more info on the mods download page!
Buffout 4 (Essential)
Buffout 4 is an engine level bug fixing mod similar to the popular mod from Skyrim called “Skyrim Engine Fixes”
Some of the things it fixes are “Fixes encounter zones resetting immediately once you leave them on foot”, “General rendering performance improvements” and also “Enables achievements on modded saves” and many more!
Buffout 4 even create a crash log located in “Documents/My games/Fallout 4/f4se”
Buffout 4 can be downloaded HERE – [nexusmods.com]
Better Console – F4SE (optional)
Better Console – F4SE Makes the in game console more easy to understand and use also fixes an issue in the vanilla game not properly showing what item reference was clicked on in console. It will proper display the items name and item code and will also let you know what plugin in game objects are from too!
Better Console – F4SE can be downloaded HERE – [nexusmods.com]
Unofficial Fallout 4 Patch (Essential)
Unofficial Fallout 4 Patch fixes hundreds of bugs, scripting quest errors, broken meshes, misplaces objects, missing dialogue, spelling errors and much more!
Unofficial Fallout 4 Patch can be downloaded HERE – [nexusmods.com]
A full list of fixes the mod applies can be found on the mods page.
Fixed Gobo Effects (Optional)
Fixed Gobo Effects fixes various issues with the lighting effects textures having artefacts, pixelation and colour banding.
Fixed Gobo Effects can be downloaded HERE – [nexusmods.com]
Wetness Shader Fix (Optional)
Wetness Shader Fix fixes the exaggerated shine of specific objects while it’s raining basically making the game not look like its been rubbed in vaseline when its starts to rain.
Wetness Shader Fix can be downloaded HERE – [nexusmods.com]
Flicker Fixer (Optional)
Flicker Fixer fixes flickering on a lot of buildings and world objects.
Flicker Fixer can be downloaded HERE – [nexusmods.com]
Sprint Stuttering Fix (Essential)
Sprint Stuttering Fix fixes and engine level bug that would cause the game to stutter while running no matter were you are on the map.
Sprint Stuttering Fix can be downloaded HERE – [nexusmods.com]
Fixed Alpha Maps (optional)
Fixed Alpha Maps fixes many objects not having proper alpha normal maps being applied correctly.
Fixed Alpha Maps can be downloaded HERE – [nexusmods.com]
Weapon Debris Crash Fix (essential) RTX Cards Only
Weapon Debris Crash Fix Fixes issues with RTX cards crashing when Weapon Debris are enabled in the graphics settings.
Weapon Debris Crash Fix can be downloaded HERE – [nexusmods.com]
High FPS Physics Fix (optional)
High FPS Physics Fix fixes issues with game physics messing up at frame rates higher than 60fps also fixes long loading screen bug.
High FPS Physics Fix can be download HERE – [nexusmods.com]
CCCleaner (optional)
CCCleaner is a mod that disables anything to do with the god awful creation club.
CCCleaner can be downloaded HERE – [nexusmods.com]
Hope you enjoy the post for Fallout 4 How to Fix Game Bugs + Installing Mod Guide, If you think we should update the post or something is wrong please let us know via comment and we will fix it how fast as possible! Thank you and have a great day!
- Check All Fallout 4 Posts List


Leave a Reply