November 25:
I have finished the game. I explored all regions, installed all Deadly Transmitters, lit all Campfires, secured all Shelters, solved all the Tombs, discovered all Myth Tablets, finished all Obelisks, and completed all Side Quests. I also upgraded all equipment to the maximum level. The rest (such as Wishing Wells, Fishing, Timed Crates, and Mana Rifts) I didn’t care so much to finish off.
I probably won’t be investing much more time into Dysmantle now, so I am removing the request not to share anything that isn’t on the guide and am now encouraging that you please share any tips and tricks you have discovered, and fill in any information that may be missing from the guide. Anything is welcome.
Update 9 includes the final mech boss, new entries to various sections, more information relating to hostile turrets, and some quality of life enhancements such as mentioning how recipes are important to increasing max health and that Knockback and Damage Deflect values are in percentages.
—-
A basic guide featuring a bit of everything not covered by other guides under the ‘Gameplay Basics’ tag. It is being actively updated while I play, including new information, entries, sections, revisions, etc. based on my progression.
A lot of the guide is geared towards beginners to Dysmantle. You will notice this most when reading the Hunting for Beginners and First Encounters sections.
I’ve had Dysmantle since just before v0.6.6 and played consistently. I took my time and destroyed everything. Collected everything. Murdered everything. Do I regret it? Naw. I reached the end of the content available at the time and wrote a positive review which was very well received.
Please post any tips, tricks, advice, info, missing content, etc. in the comments. Now that I’m finished with Dysmantle until farther game updates, I will be keeping the guide up-to-date based on other players’ information.
Update Log will be at the bottom.
General Tips
Below is a list of general tips to help you throughout the game with a bit of information. The list is organized based on the order of sections.
- You can have up to 4 weapons/tools equipped at a time, but having only 2 quickens swap speed. You only really need your best Blunt and Slashing weapons. Personally, I equip a 3rd only when I need it.
- When entering Cold or Hot biomes, you should equip the Fur Hat (-10°C) or Cowboy Hat (+5°C) first, followed by the Hot Water Bottle (-5°C) or Ice Brick (+5°C) before choosing the Winter Coat (-15°C) or Safari Outfit (+15°C). If the temperature exceeds your Hat and Trinket, unequip the Trinket and equip the Outfit.
- The above Tip factors mostly into my preferred playstyle, having always equipped the Lumberjack Outfit which provides an outstanding +10% to Attack Speed. Having an increased attack speed makes everything easier.
- Destroying ‘Searchable’ objects, harvestable Berry Bushes, and all crop types will still give experience, benefit from passive bonuses/skills, and is faster. ‘Searchable’ objects will still benefit from ‘Search Efficiency’ while destroying Berry Bushes will be both faster and benefit from ‘Double Gather Chance.’ Likewise, simply slashing or clubbing all your freshly grown produce is faster and still yields a full harvest.
- In most cases, all stacked items can be destroyed by getting rid of the bottom object. It’s helpful for quickly destroying several objects, objects you can’t damage yet, or to avoid swapping weapons. In rare cases, clutter and wall objects will remain floating.
- If you equip the Hunting Rifle or a Special Item with limited uses at a Campfire, you can unequip them whenever you want and still retain the uses when reequipping later on. Resting at a Campfire will reset everything back to 0.
- When doing Obelisks, enemies don’t seem to become alert until a second or two after you are able to move. This means you have a second or two to quickly run behind the enemies without alerting them, allowing you to scope out the situation.
- Likewise to above, enemies don’t seem to be triggered by anything but sight which means you could kill enemies one by one without alerting even those standing right next to them.
- Recipes apply permanent bonuses to your character, but only upon first consumption. Afterwards they only provide healing. This is crucial to increasing your maximum health.
- The first level of the Culinary skill allows you to eat food directly out of your inventory, including veggies, berries, eggs, and mushrooms.(?)
- The Sickle is extremely effective for quickly harvesting crops and destroying grouped objects, such as vines on walls or fences, furniture indoors, and any other weak but grouped objects. Later on this is replaced with the Khopesh.
- The Katana is great for Shelter Defense and Obelisks, allowing you to deal damage to several enemies at once. Pair with Motorcycle Helmet. Later on this is replaced with the Khopesh.
- The Motorcycle Helmet increases all Slashing damage by +10%, allowing you to destroy objects and kill enemies faster.
Personal Loadout
In this section I will share my personal loadout and why.
- Weapons:
Now that I have finished the game, my weapons of choice are the Khopesh and Power Fist. - Tools:
I don’t equip any Tools until I actually need them, unequipping them afterwards. Swapping between fewer items is best. - Special Items:
Currently my 4 Special Items are:
Throwing Knives: I used these primarily early game for killing fleeing Deer and Caribou.
Frag Grenades: I primarily used these for quickly destroying large amounts of objects in structures, but now I use them to destroy Turrets quickly.
Material Transporter: This is my most used item, emptying my inventory quickly to avoid running back and forth a lot.
Bandages: For the odd chance I get my butt kicked and need healing. - Outfit and Hat:
I prefer to always have these equipped:
Lumberjack Outfit: Increases your attack speed by a good amount and significantly increases damage to trees, which I do cut down a lot of. I prefer to always equip this.
Motorcycle Helmet: Increasing your Slashing damage by quite a bit, it benefits from having the Lumberjack Outfit equipped as well. - Trinkets:
Material Magnet: Increasing the range at which you pick stuff up is especially helpful when you destroy a lot of objects.
Counterweight: Having a high Critical Hit Damage modifier is helpful for dealing massive amounts of damage to objects. Enemies are easy enough to kill.
Berserker Charm: Increases damage against enemies but reduces the damage you block. It helps a lot, just don’t get hit.
Dice: Having a higher Critical Hit Chance significantly makes destruction faster.
Digital Wrist Watch: The speed increase is absolutely amazing for quickly destroying everything around you and travelling faster, but also increases the speed of everything else around you including enemies. - Obelisk:
My preferred Obelisk is the Obelisk of War which provides +10% Attack Speed. Paired with the Lumberjack Outfit you get +20% Attack Speed.
Hunting for Beginners
Hunting Tips/Notes:
- Animal Friend is a skill with 3 levels, increasing ‘Animal Friendliness’ and finally allowing animals that are following you to assist in combat. Animal Friendliness reduces the chance that they will run away.
- Animal Friendliness can also be increased with Animal Treats, unlockable by investing into the first level of Animal Friend.
- Animal Treats allow animals to start following you.
- Baby Deer are slower and weaker than adult Deer.
- Petting animals will heal them.
Deer
Deer are mostly found in warm areas. They’re easily spooked and fast. They have a wide vision arc so approaching slowly from behind and charging a Power Attack is best. Having Throwing Knives on hand in case you don’t kill it is a good idea.
Baby Deer have lower health and are slower, but drop only a single resource.
Possible Drops (x2): Meat, Hide, Bones
Caribou
You’ll discover Caribou only in cold areas. They’re essentially Deer but with more health.
Depending on your progress, a well-placed Power Attack from behind and a single well-thrown Throwing Knife immediately afterwards should kill Caribou.
Possible Drops (x2): Meat, Hide, Bones
First Encounters
This section is specifically for encountering the enemies for the first time. Once you progress and develop your character and invent new tools you’ll easily dispatch of your foes.
- Some basic notes for early combat:
- Attacking from behind always causes extra damage to enemies. Combine this with a Power Attack for insane damage!
- Power Attacks have farther reach than standard attacks.
- Throwing Knives can cause bonus damage if they are thrown at an enemy from behind. I am uncertain if Shiv Trio benefits from this as well.
- Most enemies need to be stationary to attack. You can easily exploit this by moving out of the way at the last second (or dodging) and performing a quick counterattack.
- On the flip side, some enemies can attack while moving. They only do this, however, if you’re moving. To counter enemies that can move and attack simultaneously, stop moving when they get near and move/dodge out of the way just as they perform a standard attack, countering immediately after.
- Observations:
- The damage dealt by the toxic puddles seems to be determined both by where you run through it and how long. For example, just tagging the edge of a puddle seems to always do 1 Damage. However, running through seems to cause anywhere between 5-25 Damage.
- Spikeballs and Mortar Pods don’t seem to respawn when installing Ascension Transmitters.
Scrapper
Most common enemy, found everywhere. Easy to kill with a Power Attack or two.
Possible Drops (x1): Scrap Metal, Scrap Fabric
Hurler
Common ranged enemy. Hurls toxic goo immediately injuring you or leaving a puddle if it missed. Always moving and attacking is a good counter, or Throwing Knives. Has a wide arc melee attack.
Possible Drops (x1): Scrap Metal, Plastic
Mutated Hurler
Instead of toxic goo, throws 3 dangerous explosive projectiles capable of exploding immediately on contact with the player or a couple seconds after landing on the ground. The Mutated Hurler is capable of tracking the player’s movement and throwing his projectiles where the player will be.
Possible Drops (x1): Scrap Electronics, Rubber
Chaser
Quick enemies capable outrunning the player and attacking while moving. These enemies are best dealt with while remaining stationary and dodging just as it attacks you.
Possible Drops (x1): Ceramic, Scrap Fabric
Puker
Durable enemies that vomit in an arc in front of it, leaving puddles of toxic goo. Relatively easy to kill, just remain behind it.
Possible Drops (x1): Iron, Rubber
Wolf
Fast, deadly, and can attack while moving. A Throwing Knife in the back followed by immediately charging a Power Attack should easily down a Wolf early on.
Possible Drops (x1): Hide, Bones
Stalker
Fast, durable, and deadly. Able to attack while moving you shouldn’t let them get near you or you’ll probably be dead. Performing a Power Attack from behind should deal at least a quarter to half of its health in damage during the early game. Treat them like a much more dangerous Chaser.
Possible Drops (x1): Scrap Electronics, Iron
Leaper
Durable enemies capable of leaping towards you, inflicting small area damage when landing. They’re just a much more durable Scrapper able to close the distance.
Possible Drops (x1): Ceramic, Iron
Dweller
Only encountered during Shelter Defenses. If you don’t get too close while attacking they will ignore you entirely. Power Attacks to their backs are the best way to kill them.
Possible Drops (x0): None
Spikeball
Not really a threat, as long as you don’t try to hug it. You should be able to destroy it with a Power Attack without getting close enough for it to attack you.
Guaranteed Drops: Plant Matter (x4), Bones (x2)
Mortar Pod
A stationary Hurler. Capable of tracking the player’s movement, shoots globs of toxic goo upwards. Has a barrage ability, quickly firing 5 globs in rapid succession.
Guaranteed Drops: Plant Matter (x8)
Tomb Guard
The Tomb Guard is an undead enemy with a melee weapon. They can both attack while moving and dodge your attacks. They’re fairly easy to kill.
Possible Drops (x1): Iron, Steel
Hostile Turrets
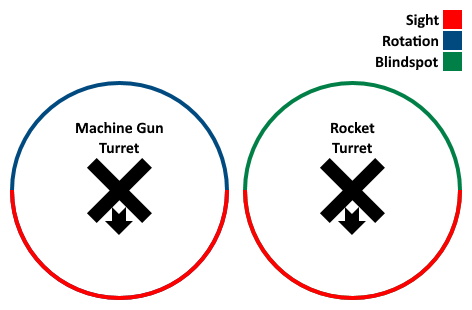
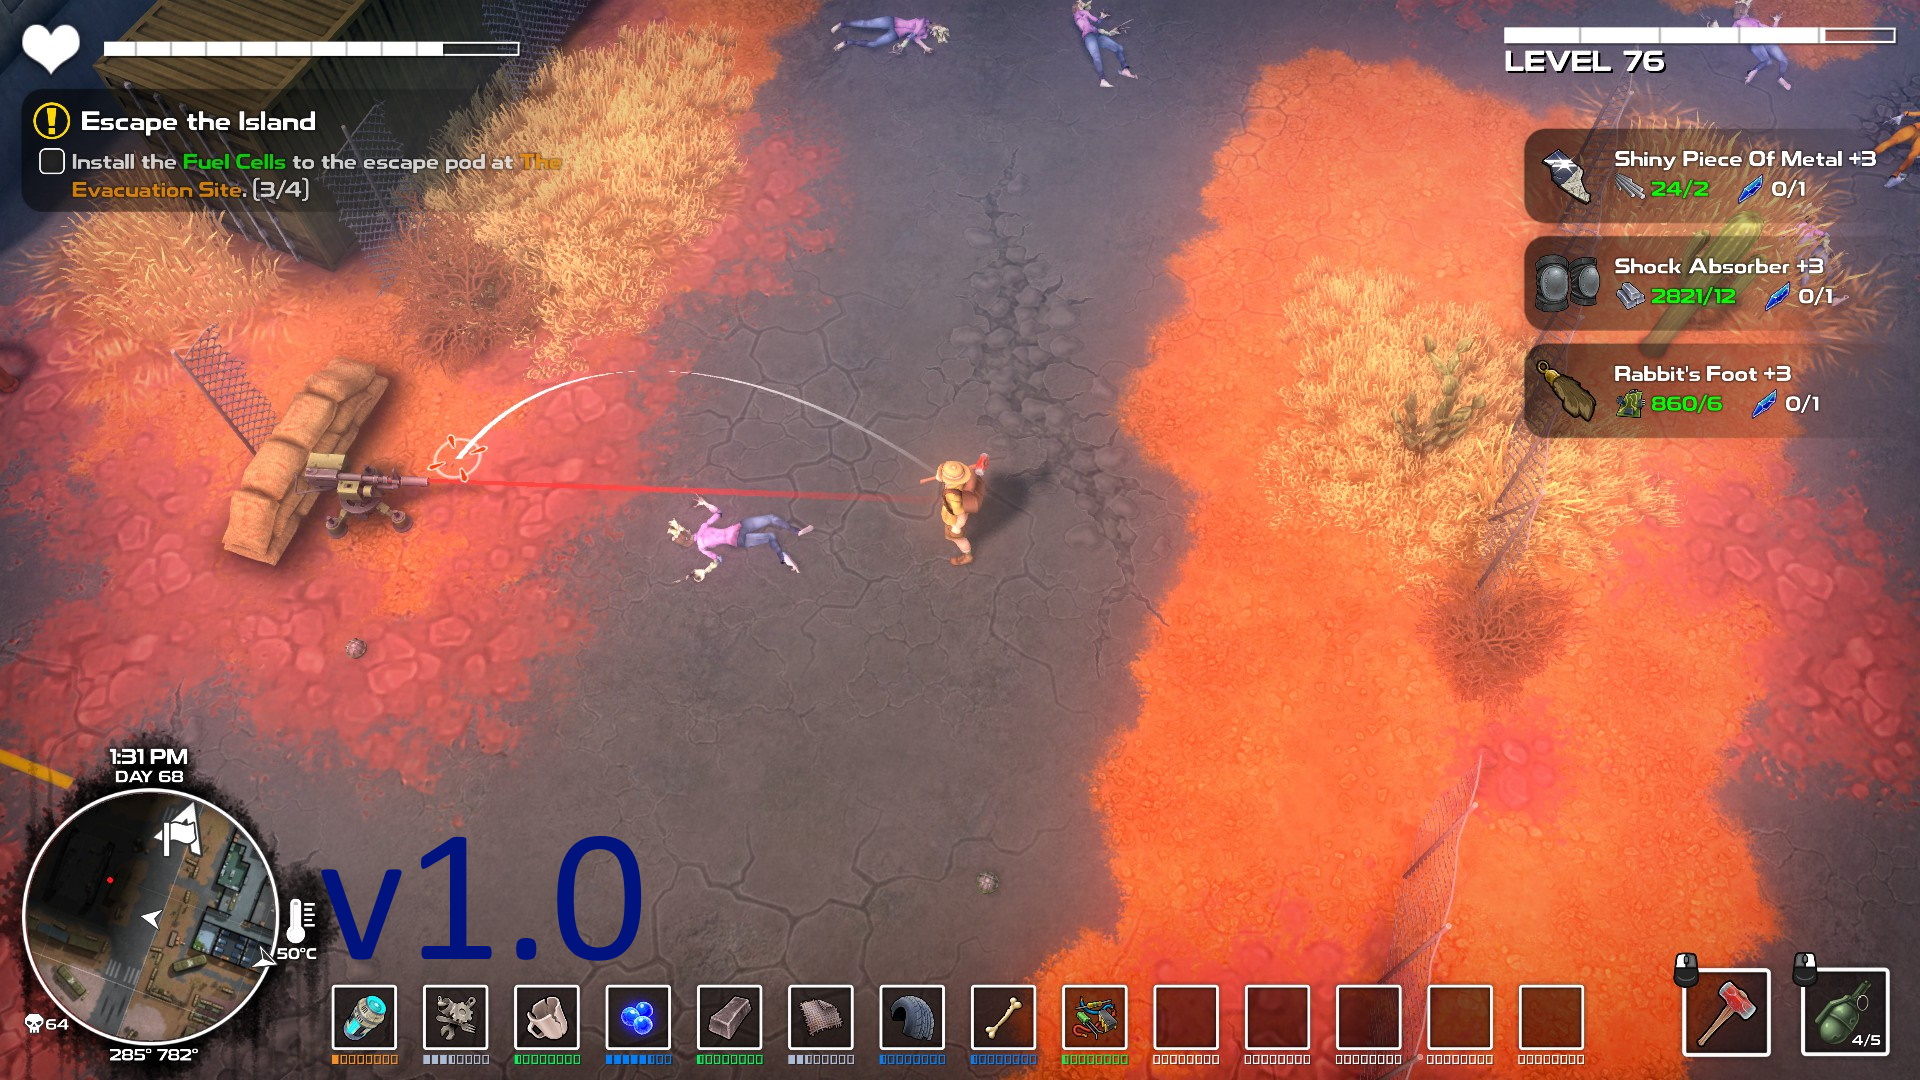
Hostile turrets are extremely dangerous to the survivor, almost instantly killing them regardless of health. When approaching a machine gun turret, a red laser will follow you but will not fire at you unless you get too close. A rocket turret, on the other hand, has long range and will usually attack immediately.
- Some observations:
- Turrets don’t respawn, even if you haven’t installed a Deadly Transmitter.
- Machine Gun and Rocket Turrets have different rotation.
- Rockets have slight homing capabilities.
- If able to approach from behind, you can easily destroy a turret without it turning around on you.
- Frag Grenades or the Hunting Rifle are both good counters for turrets. Frag Grenades do more damage if you aim as close to the base of it as possible, as opposed to direct hits.
Guaranteed Drops: Iron (x2), Rubber (x1)
Possible Drops (x1): Scrap Electronics, Electronics
Fuel Cell Bosses
There are four large mechs you will need to fight during your quest to gather enough Fuel Cells to power up the escape pod and leave the island. Below will explain their attacks and strategy.
The Law
The first mech you will encounter when locating all four Fuel Cells for the escape pod.
- Phase 1:
- Stream of Bullets
- Small AoE Stomp
- Phase 2:
- Stream of Bullets
- Small AoE Stomp
- Rocket Mortar Attack
- Phase 3:
- Stream of Bullets
- Small AoE Stomp
- Rocket Mortar Attack
- Crouch, Spray Bullets 360°
Strategy:
Orbs will appear around The Law when activating the boss fight. They replenish 1 Use on your Special Items. I recommend lobbing grenades at The Law to easily kill it.
The Reaper
The second mech you will encounter when locating all four Fuel Cells for the escape pod.
- Phase 1:
- Stream of Bullets
- Small AoE Stomp
- Phase 2:
- Stream of Bullets
- Small AoE Stomp
- Barrage of Homing Rockets
- Phase 3:
- Stream of Bullets
- Small AoE Stomp
- Barrage of Homing Rockets
- Crouch, Spray Bullets 360° and Homing Rockets
Strategy:
Orbs will appear around The Reaper when activating the boss fight. They replenish 1 Use on your Special Items. I recommend lobbing grenades at The Reaper to easily kill it.
The Crown
The third mech you will encounter when locating all four Fuel Cells for the escape pod.
- Phase 1:
- Burst of Bullets, Wave
- Small AoE Stomp
- Phase 2:
- Burst of Bullets, Wave
- Small AoE Stomp
- Rocket Mortar Attack
- Phase 3:
- Burst of Bullets, Wave
- Small AoE Stomp
- Rocket Mortar Attack
- Crouch, Spray Bullets 360° and Rocket Mortars
Strategy:
This boss fight doesn’t have any Special Item recharge orbs. The Crown’s bullet attack will not hit you if you hug the mech’s legs, meaning you can easily engage in melee without worrying about taking damage. Just be careful for its stomp attack. Recommend Power Attacks in close range.
The Sword
The final mech you will encounter when locating all four Fuel Cells for the escape pod.
- Phase 1:
- Stream of Bullets w/ Slight Spread
- Small AoE Stomp
- Barrage of Homing Rockets
- Short Range Duel Flamethrowers
- Phase 2:
- Stream of Bullets w/ Slight Spread
- Small AoE Stomp
- Rocket Mortar Attack
- Short Range Duel Flamethrowers
- Phase 3:
- Stream of Bullets w/ Slight Spread
- Small AoE Stomp
- Rocket Mortar Attack
- Short Range Duel Flamethrowers
- Crouch, Duel Flamethrower and Arc Bullet Spray
Strategy:
This boss fight doesn’t have any Special Item recharge orbs. The boss may appear difficult but if you take your time and attack from behind and avoid the flamethrowers, the boss is relatively easy. Having Bandages equipped will help significantly if you run to the other side of the drained lake and apply.
Minibosses
Throughout the world you will encounter many minibosses, which are just enhanced and often reskinned versions of regular enemies. They will have modified health, damage, and speed values.
The False Gatekeeper
A Puker miniboss. Its primary attack is to vomit toxic puddles in an arc in front of it. When losing enough health, it appears to have a mortar attack, spewing toxic globs upwards around it. Keep attacking from behind to easily defeat it.
The Vicious Twins
Two Chaser minibosses. They’re just enhanced Chasers with more health and faster movement speed.(?) Isolate and deal with one at a time for easier combat.
The Alpha Wolf
A Wolf miniboss. Quicker, deadlier, beefier. The Alpha Wolf’s bite really hurts. A lot of dodging at the right time to avoid its moving attacks is crucial. If you have Frag Grenades, a Hunting Rifle, or even Throwing Knives then I recommend using them.
The Ruthless Pitcher
A Hurler miniboss. Accompanied by 3 Scrappers, this is just an enhanced version of a Hurler.
Sanctuary Farm Boss
A Chaser miniboss. I don’t have any information on this boss as I killed it without paying attention, unaware it was a miniboss. Provide information if you can.
Location: O-25, 996° 592°, Sanctuary Farm.
The Old Loyal Champion
A Tomb Guard miniboss. Larger than a Tomb Guard and has a shield. Can attack while moving and dodge.
The Skinless Skulkers
Two Stalker minibosses. A small and large skulker, both with different attributes.
- Small Skulker:
- Increased movement and attack speed, lower damage and health.
- Large Skulker:
- Decreased movement and attack speed, higher damage and health.
Best way to deal with them is to kill the Small Skulker first, by throwing a Throwing Knife from a distance and running away far enough to not attract the Large Skulker. After, sneak up behind the Large Skulker and perform a Power Attack.
The Toxic Destroyer
A Mutated Hurler miniboss. Faster and able to throw an additional projectile, all with increased radius, the Toxic Destroyer is deadly if you’re not careful. Take your time and try to close the distance, or use a Hunting Rifle if you’re struggling.
Weapons
The most important among the equipment categories are weapons, whose primary focuses are to destroy the world around you and kill anything that gets in your way. As you level up and collect resources, you will be able to improve your weapons to increase their destructive power allowing you to gather more advanced materials and clear obstacles, or simply kill enemies faster.
Note: All Damage and Bonus values are when the item in question is fully levelled, and before modifiers.
- Observations:
- Basically a Sledgehammer and Sickle hybrid.
Tools
Searching for buried treasure, fishing, and farming are some of the features you gain access to by inventing Tools.
- The Shovel is used to dig up the ground almost anywhere.
Its primary focus is dig up treasure but can sometimes unearth some basic, buried resource. Treasure seems to be cleverly indicated by environmental hints. The quality and quantity of resources found when unearthing treasure appears to depend on your progress from the starting zone. - The Seed Bag is used to plant seeds into tilled soil. Farming is essential to multiply your veggies and ultimately craft delicious food recipes. Required to unlock the Hoe.
- The Hoe is used to till soil in farms, allowing you to plant more seeds.
- The Fishing Rod is used to fish in indicated spots found all around the island. There’s a whole guide about fishing found here – [steamcommunity.com] .
- Animal Treats allow you to tame animals, making them follow and even fight for you with the 3rd level of Animal Friend.
- The Builder’s Kit allows you to construct various contraptions which I will cover in a later section. It also increases your Build Limit by 30.
Special Items
Consumables whose charges replenish when resting at a Campfire.
Note: All values are when the item in question is fully levelled, and before modifiers.
- Amber Pills allow you to respawn at the last Campfire you rested at in exchange for dropping all currently held materials. Holding the button respawns you at your Home Shelter
Uses: Unlimited - Throwing Knives are basic throwables whose purpose are mostly used for catching fleeing Deer and Caribou, or performing ranged backstabs on unsuspecting enemies.
Uses: 6 - The Shiv Trio is a ranged attack where you throw three knives in a cone in front of you. Uncertain if it benefits from backstabs.
Uses: 5 - Pain Killers are fast acting pills capable of quick but small healing.
Restores 10 HP
Uses: 5 - Banages are capable of healing a lot of health over the course of a few seconds, leaving you exposed.
Restores up to 50% HP over time. Can be interrupted.
Uses: 5 - Monster Lures are used to lure or distract enemies nearby.
Uses: 3 - Frag Grenades are thrown explosives, capable of dealing immense damage toward enemies on a direct hit. Frag Grenades explode after a couple seconds or immediately on impact with an enemy.
+200% Damage vs. Enemies
Uses: 5 - Proximity Mines are thrown explosives that detonate on contact with an enemy or when they approach one laid down.
+200% Damage vs. Enemies
Uses: 5 - Amber Mana Pills are mana-infused Amber Pills, allowing you to respawn without losing your inventory.
Replaces Amber Pills
Uses: Unlimited - The Material Transporter allows you to deposit all carried materials into your Storage from anywhere.
Uses: 4
Outfits and Hats
Dysmantle has a bunch of outfits and hats that provide protection from damage, temperature, or other bonuses.
- The Jeans and Jersey are the basic clothes you begin the game with.
10% Damage Reduction - The first hat you unlock is the Baseball Cap which provide additional protection and damage with throwable weapons.
5% Damage Reduction
+15% Damage with Throwables - The Outdoorsman outfit provides damage reduction, cold protection, and provides additional pockets.
15% Damage Reduction
-5°C Cold Protection
+1 Material Carry Slot - When you first discover and enter a winter zone, you’ll unlock the Hot Water Bottle Trinket and the Winter Coat. The Winter Coat reduces damage taken and provides protection from the cold.
15% Damage Reduction
-15°C Cold Protection - The Fur Hat provides protection against damage and the harsh cold.
5% Damage Reduction
-10°C Cold Protection - The Cowboy Hat is the equivalent to the Fur Hat, providing temperature resistance.
5% Damage Reduction
+5°C Heat Protection
Note: I didn’t unlock the hat when first entering the hot biome to the south. If this is an issue, try heading to the Roadside House (Q-32, 1266° 668°). - The Safari Outfit protects you from damage and the harsh desert heat.
10% Damage Reduction
+15°C Heat Protection - The Desert Helmet is a direct upgrade of the Cowboy Hat.
8% Damage Reduction
+10° Heat Protection - The Booney Hat reduces the range at which enemies (and animals) see you as well as providing protection from damage.
7% Damage Reduction
-25% Enemy Detection Range - The Lumberjack Outfit is great for aspiring deforesters. Provides a significant increase to damage against trees and increases your attack speed.
+30% Damage to Trees
+10% Attack Speed - The Roadwarrior provides an extreme amount of protection from damage while increasing your movement speed.
22.5% Damage Reduction
+5% Movement Speed - The Motorcycle Helmet reduces damage taken and increases all Slashing damage.
10% Damage Reduction
+10% Slashing Damage - The Hard Hat decreases your damage taken by a significant amount while increasing your maximum Build Limit.
15% Damage Reduction
+10 Build Limit - The Soldier Outfit provides good protection, grants additional throwables, and increases all Piercing damage.
15% Damage Reduction
+2 Throwables
+80% Piercing Damage - The Soldier Helmet provides good protection and significant damage deflection.
18% Damage Reduction
+100% Damage Deflect - The Gas Mask is unlocked through the main storyline much later into the game. It allows you to enter toxic areas and pass toxic barriers.
4% Damage Reduction
Trinkets
Trinkets provide passive bonuses to any number of things, from increasing your temperature resistances to increasing your damage or enhancing your searching/gathering abilities.
- The Bag of Blood incrementally increases your Maximum Health up to +20.
- The Shock Absorber incrementally increases Dodge Roll Speed up to +15%.
- Camo Netting incrementally reduces the range at which enemies sight you up to -35%.
- Sweatbands increase your Running Speed by +10%.
- The Rabbit’s Foot incrementally increases Evade Chance up to +13%.
- The Gyroscope incrementally increases your Strafing Speed up to +30%.
- The Shiny Piece of Metal incrementally increases your Damage Deflect up to +300%.
- The Hot Water Bottle increases Cold Protection by -5°C.
- The Ice Brick increases Heat Protection by +5°C.
- Dice incrementally increase Critical Hit Chance up to +3%.
- The Baseball Card incrementally increases Knockback up to +550%.
- Dentured Fangs decrease your Maximum Health by -75% but allow you to heal +2 health per hit.
- The Counterweight incrementally increases Critical Hit Damage up to +40%.
- Hand Wraps incrementally increase Power Attack Damage up to +35%.
- The Berserker Charm decreases your Damage Reduction by -30% but increases your Damage vs. Enemies by +20%.
- The Lightning Rod provides an +8.5% chance to stun enemies.
- The Bandolier incrementally increases maximum Throwables up to +4.
- Tackle incrementally increases Fishing Speed up to +80%.
- The Flashlight illuminates your surroundings.
- The Magnifying Glass incrementally increases both your Search Efficiency and Double Gathering Chance for berries, eggs, and mushrooms, up to +50% and +35% respectively.
- Laces provide an additional +1 Material Slot.
- The Material Magnet incrementally increases the range at which you collect materials up to +60%.
- The Old Pocket Watch slows time by -25% while equipped.
- The Digital Wrist Watch increases time by +30% while equipped.
Features
Some of the things you can unlock and invent are persistent features, such as upgrades to your Storage Box or Campfire. Below I will list such things.
- Starting with the most obvious, your Backpack is what holds all your materials. Each upgrade increases your maximum Material Slots by +1, and adds an additional unit per slot.
- The Cooking Pot allows you to cook in the world, on stoves. Upgrading the Cooking Pot unlocks additional ingredient slots allowing you to cook more advanced recipes.
- The Cooking Stand allows you to cook at your Campfire.
- The Compass allows you to Fast Travel from a Link Tower to other Link Towers.
- The Sleeping Bag allows you to sleep at a Campfire, providing +20 Maximum Health for 5 Hours. Upgrading the Sleeping Bag allows you to sleep longer, up to 12 Hours. Note: Unsure if time slept affects bonus, or it’s a static +20.
- The Storage Box Upgrade allows you to withdraw materials from your storage at the cost of XP.
- The Storage Box Discount halves the cost of withdrawing materials from storage.
- The Link Tower Toolkit allows you to build and install various types of transmitters and scanners to Link Towers.
- The Basic Lockpick allows picking basic locks.
- The Expert Lockpick allows picking expert locks.
- The Master Lockpick allows picking master locks.
- The Rope and Hook allows descending into Tombs.
- The Common Compressor doubles slot capacity for Common materials.
- The Uncommon Compressor doubles slot capacity for Uncommon materials.
- The Rare Compressor doubles slot capacity for Rare materials.
- Teardown Efficiency allows you to recover all resources when deconstructing built objects with the Builder’s Kit.
- The Turret Ammo Expansion I increases Ammo Capacity for all Turrets by +50%.
- The Turret Ammo Expansion II increases Ammo Capacity for all Turrets by +60%.
- Defensive Sandbags slow down enemies approaching Shelter Defense Towers.
- The Rocket Turret invention allows the construction of Rocket Turrets.
- The Rift Toolkit allows you to open Mana Rifts using Mana Chunks and enter them.
Builder’s Kit
Eventually you’ll come to unlock the Builder’s Kit Tool, enabling you to build certain contraptions which I will list below along with their resource costs. The Teardown Efficiency Feature will allow you to get all of your spent resources back when deconstructing contraptions you built, or when enemies destroy them [haven’t tested on v0.9.0 yet!].
Suggestion: All material contraptions (Sawmill, Smelter, etc.) should be built near your Home Shelter, where you start the game. You can easily consume Amber (Mana) Pills to get back to your contraptions quickly and there’s a Link Tower not far to quickly return to your previous area.
- Machine Gun Turret
Unlocked automatically when discovering and hacking a Shelter Tower.
Resources: Iron (x25), CPU (x1) - Rocket Turret
Unlocked by inventing it.
Resources: Steel (x15), CPU (x2) - Sandbag Barrier
Unlocked by inventing it.
Resources: Fabric (x5) - Sawmill
Unlocked when first discovering Krebb’s Wood and Timber, the Sawmill allows you to turn Scrap Wood into Wood, and Wood into Timber.
Resources: Iron (x30), Rubber (x10), Electronics (x5) - Smelter
Unlocked when first discovering Pike’s Steel Manufacturing, the Smelter allows you to turn Scrap Metal into Iron, Iron into Steel, and Steel into Titanium. It also allows you to turn Mana Beads into Mana Chunks.
Resources: Titanium (x1), Ceramics (x20), Electronics (x5)
Update History
Update 7: November 14-16
- Completely dysmantled, restructured, and rewrote Personal Playstyle and Advice. Separated the section into two, creating a new section and rewriting the original. Renamed the section to Personal Loadout.
- Added preferred Obelisk in Personal Loadout section.
- Added new section: General Tips.
- Removed the entry regarding Frag Grenades helping destroy furniture, as the Sickle is an exellent and unlimited-use replacement.
- Added a small note to the bottom of the Deer entry in Hunting for Beginners to mention Baby Deer drop a single resource now.
- Adjusted the drops for Caribou, which was reduced in update v0.9.0.
- Adjusted the drops for the Spikeball and Mortar Pod, which were changed in update v0.9.0.
- Added new entry to First Encounters: Leaper.
- Removed the observation notes from Hurler and Mortar Pod (forgot to put it on Puker anyways) and instead put it once underneath the basic notes at the top of First Encounters.
- Added observation tips for encountering hostile turrets in First Encounters.
- Adjusted the Katana entry in Weapons.
- Added new entry to Trinkets: Old Pocket Watch.
End Note:
v.0.9.0 added and changed a lot of things, so it’s been a bit of a chore collecting everything but I’m more or less on track now. This update to the guide should fix almost everything missing from the previous update, and it should be relevant to v1.0 of Dysmantle.
I’m still progressing slowly and finding new things and writing them here, and fixing the structure and organization of everything where I can. I may remove obsolete information and sections later on.
The following update should finalize on what this update worked on and might include new entries and modifications. The hardest chore was and still is going through everything I already have and adjusting it for a major update like v0.9.0, but I’m nearly done.
Update 8: November 20
- Adjusted the Basics section.
- Added two entries to General Tips on dealing with Obelisks.
- Added two entries to General Tips on recipes and food.
- Modified the Sickle and Katana entries in General Tips, merging them together.
- Removed the tip in Hunting for Beginners about reduced enemy sight range stacking with Animal Friendliness, as I keep questioning whether it’s true or not. Animals don’t seem to be afraid most of the time when I sprint at them.
- Shortened the entries in Hunting for Beginners.
- Forgot to remove the Caribou entry in Hunting for Beginners that mentions they drop an additional resource compared to Deer.
- Added drops to Turrets.
- Rewrote the entirety of First Encounters, shortening it.
- Completely redid the Bosses section, separating it into two sections and rewriting both Fuel Cell Bosses and Minibosses.
- Renamed Bosses to Fuel Cell Bosses.
- New section: Minibosses.
- Removed the Dietary Information section. It’s irrelevant. Added bits to General Tips instead.
- Removed the Equipment Introduction. It’s irrelevant. Necessary information moved to corresponding section.
- New entry to Weapons: Riot Shield.
- Adjusted the value for the Builder’s Kit in Tools from 5 to 30, to display the max upgrade value.
- New entry to Outfits and Hats: Desert Helmet.
Update 9: November 25
- Added a new paragraph to the Basics section encouraging the sharing of information to help grow and maintain the guide.
- Adjusted various entries, specifying they’re a percentage. Such as Knockback and Damage Deflect.
- Added additional information to the Sickle and Katana entries in General Tips.
- Modified the recipe entry in General Tips to clarify that they are crucial to increasing your maximum health.
- Updated my chosen weapons in Personal Loadout. Also replaced my fifth Trinket from Laces to Digital Wrist Watch.
- Removed the turrets entries from First Encounters and gave them their own section.
- Adjusted the values about toxic puddles and added a new observation to First Encounters.
- Created new section: Hostile Turrets.
- Reworded and fixed a typo in Hostile Turrets.
- Added photos to Hostile Turrets.
- Additional entries to the observation of turrets in Hostile Turrets
- Added the final boss to Fuel Cell Bosses.
- Adjusted all phase entries in Fuel Cell Bosses to clarify any differences between phases.
- New entry to Minibosses: The Toxic Destroyer.
- New entries to Weapons: Khopesh, Power Fist
- New entry to Trinkets: Digital Wrist Watch.
- New entry to Features: Rift Toolkit.
Here we come to an end for DYSMANTLE Gameplay Tips & Loadout for Beginners hope you enjoy it. If you think we forget something to include or we should make an update to the post let us know via comment, and we will fix it asap! Thanks and have a great day!
- Check All DYSMANTLE Posts List


Excellent work! Well done mate.
Hey,
I’m the creator of this guide and wanted to let whomever posted this know that it was updated on November 25th. I had also reached out via Email in hopes of collaborating together on updating the guide.
Hope this guide helps people!
Cheers,
Aaron