In this guide, I am going to show and teach you how to increase the performance of your computer as well as the performance of various games, in this case it will be mainly Counter-Strike: Global Offensive. You are going to get a lot more FPS than before !
INTRODUCTION
INTRODUCTION
This guide aims to efficiently optimize your computer in order to have better performance when playing CS:GO and fully and fully enjoy the game. However, some of the operations you will do during the guide may be RISKY! Therefore, it is very important and strongly advised to create a restore point in EVERY chapter (I will show you how to do this a little further down in the guide, see “Chapter 0 – Information”).
Above all, if you have any questions, please do not hesitate to ask them in the comments, I will be happy to answer them.
How do you plan to optimize the performance of my computer?
In order to optimize your computer and increase its performance, I will then modify some parameters of Windows, NVIDIA (Intel / AMD also), but also change the graphics of your game, update your drivers, download some additional software, change some small in-game settings (= in-game) and modify game files.
Is it risking?
As quoted above: yes, it is. Some manipulations may be more than others and that is why it is imperative to create restore points in each chapter of the guide for the proper functioning of your computer.
I have followed the guide, however I see no or little improvement in my FPS in-game, is this normal?
This is totally normal. Your computer may not improve your FPS, however your game will be fine and more stable and will now run much smoother than before.
I followed the guide, however I have less FPS than before, what should I do?
If you actually have less FPS than before, and your game is less stable / smooth than before, you should load the first restore point created at the start of the guide. If you have not done a restore point you must reverse all the operations in the guide.
I followed the guide, however my microphone (or other) no longer works, what should I do?
Delete your autoexec and your config file. If nothing works, load the first restore point.
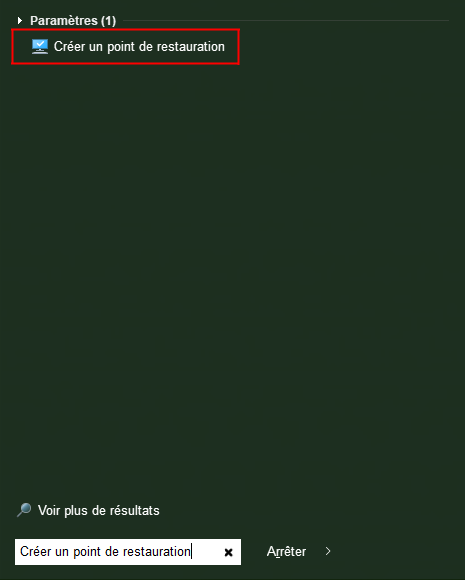
How to make a restore point?
STEP 1 :
Write, in the Windows menu (by pressing the Windows key on your keyboard or at the bottom left of your screen) “Create a restore point” then click on the text that has proposed to you.
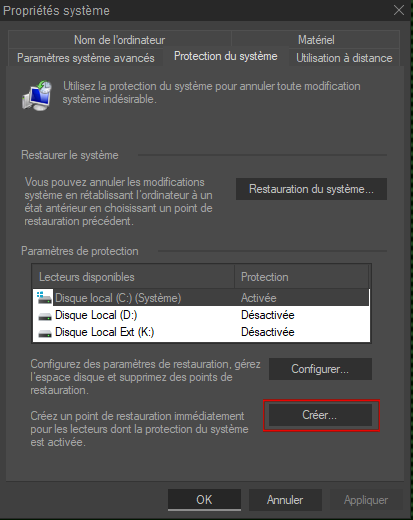
STEP 2 :
A window will then appear, and you will have to click on “Create…”.
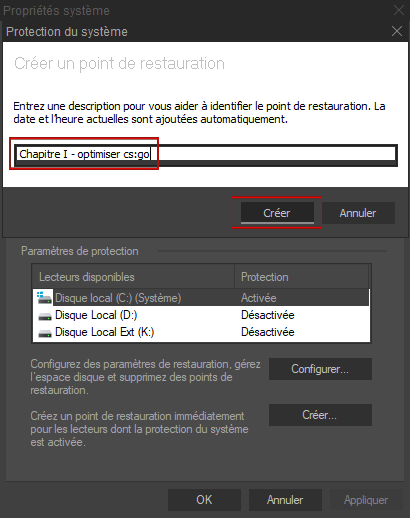
STEP 3:
Write “Chapter 1 – Steam” in the dialogue box that you have proposed and press “Create“.
CHAPTER 0 – INFORMATION
CHAPTER 0 – INFORMATION
Here is some important information to know:
- All tips were produced on an up-to-date, fully legal 1903 version of Windows 10.
- The guide was originally created for CS: GO but is fully reproducible for most games.
- The software presented is completely safe and is in no way viruses.
- I currently have a graphics card from NVIDIA, a 1050Ti. So I’m not familiar with AMD / Intel.
- I am currently running CS: GO at 200 ~ 250 FPS constant with an AMD processor.
- The tips are sure.
- You are strongly advised to follow this guide through your browser in order to more easily open the links provided in your browser.
- Some of the operations performed in this guide may make your Windows unstable, disable updates and disable certain features.
CHAPTER 1 – STEAM
CHAPTER 1 – STEAM
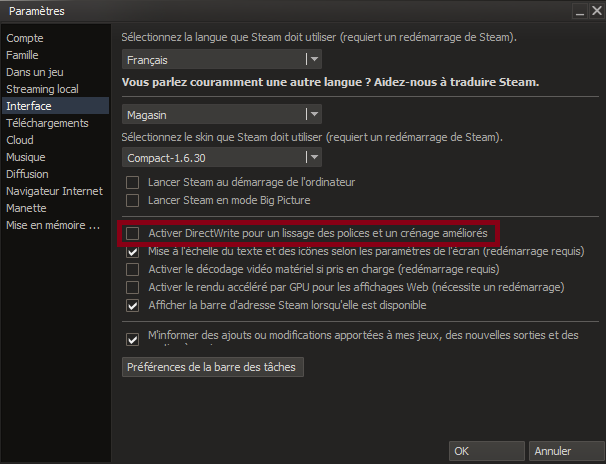
DirectWrite settings
What is DirectWrite?
DirectWrite is a setting offered by Steam to smooth menu fonts. Therefore, the smoothing is also done on the Steam overlay in game (if you want to keep it) which reflects the number of FPS in game, so it is important to disable it.
It is therefore advisable to deactivate it.
Launch options
What are the launch options?
This is a dialog where you can add commands that will take place in-game.
Is it allowed to change the launch options?
Of course it does, totally. To be able to change these launch options, please follow these screenshots:
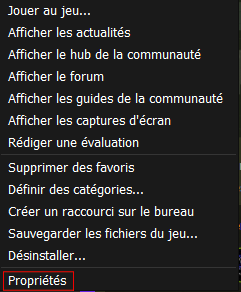
STEP 1 :
Go to your Steam library, then right-click on Counter-Strike: Global Offensive and click on “Properties“.
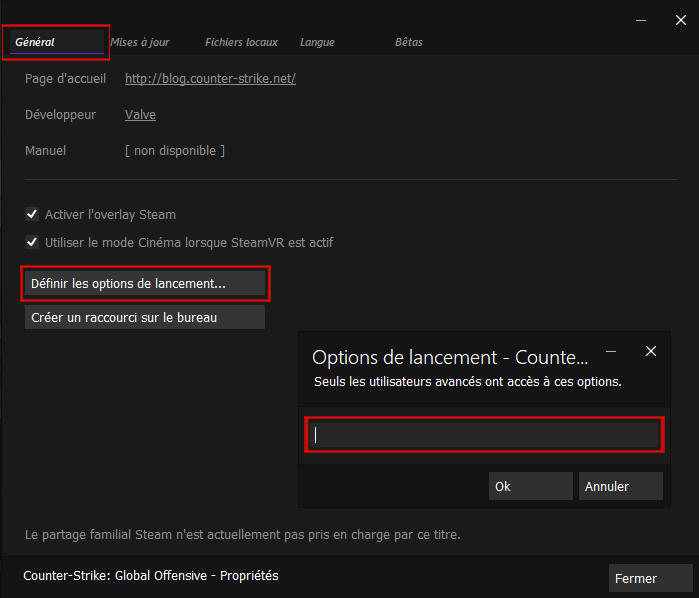
2ND STEP :
Select the “General” category, if it is not already done, then click on “Define launch options …” where we will write the commands that interest us.
ALL THE CONTROLS IN THIS GUIDE ARE INTENDED TO OPTIMIZE YOUR GAME, HOWEVER SOME OF THESE CONTROLS ARE HARMFUL FOR YOUR GAME, DO NOT HESITATE TO REMOVE THEM FROM THE LAUNCH OPTIONS
-novid
Disable intro at game launch to start the game faster.
-nojoy
Disable controller controls.
-freq 144 & -refresh 144
Allows you to set the refresh rate to 144Hz (you can change this value to that of the number of Hz of your screen).
-threads 4
Force the game to start with a number of hearts predefined by the number given (in this case, it will be “4”).
-tickrate 128
Allows you to create an offline server with 128 ticks when you are the host.
-language bananagaming
Change the game’s default language to whatever you want.
-high
Launches the game in high priority
+exec autoexec.cfg
Launch your autoexec each time the game is launched
I highly recommend that you click on this link which will allow you to download my autoexec – [settings.gg] , my config and video file. In addition, I also recommend these plugins / add-ons which will add a few more things to your game:
- Colored Loading Screen(► Colored Loading Screen)
- Custom Font(► Custom font)
- Simple Radar(► Best Radar)
- Text Color Mod (4.1)(► Improved in-game text)
In addition, I recommend that you copy these commands into these folders:
Windows (C:)> Program (x86)> Steam> userdata> STEAMID> 730> local> cfg
CHAPTER 2 – GRAPHICS
CHAPTER 2 – GRAPHICS
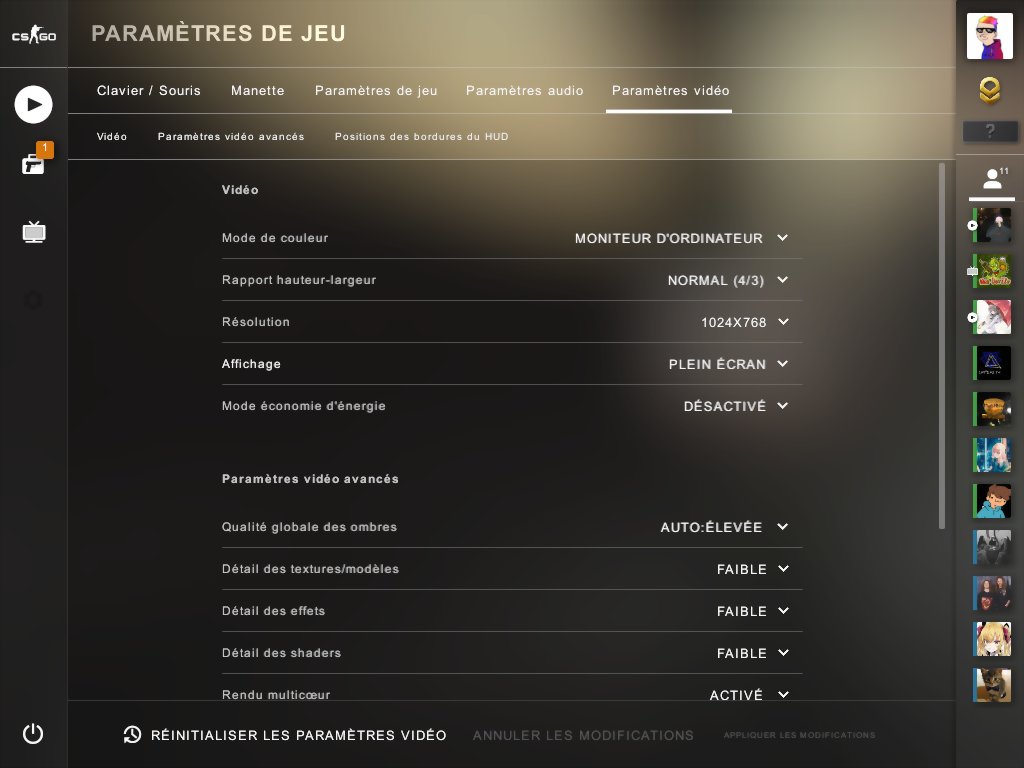
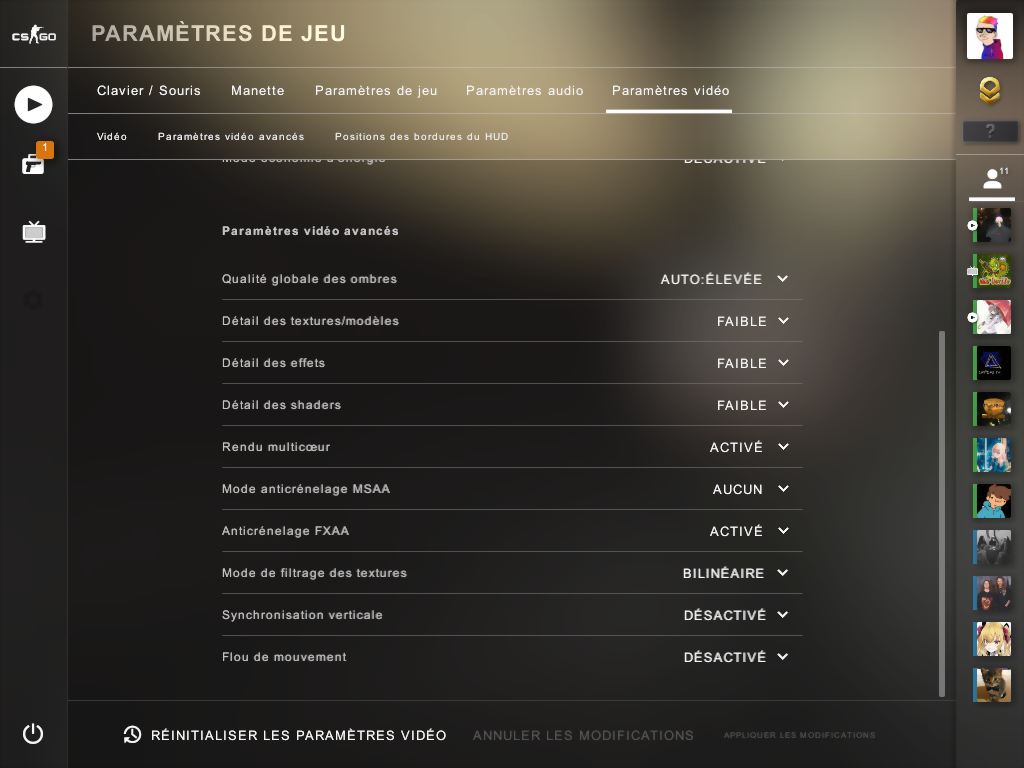
The graphics in your game are surely one of the most important things in order to get more FPS. Therefore, reproduce the same settings as in these pictures:
Also, if you are playing in 16:9 it is highly recommended to play in 4/3 to get a much bigger FPS boost.
CHAPTER 3 – DRIVERS
CHAPTER 3 – DRIVERS
Before starting anything, it’s important to remember what a driver is, so Jamie, tell us, what’s a driver?
According to Google, a driver is a small program that manages automatically between a computer and a device in order to keep the device constantly up to date.
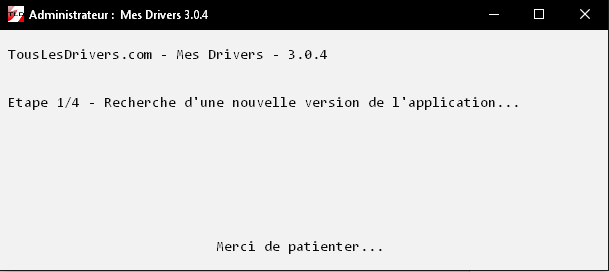
So as said just above in the definition offered. A driver is used to continuously update a device, so that’s what we’re going to do. In order to update these we will use a website called “TousLesDrivers“, of course there are alternatives such as other sites or software, but in this case we will use that site. It presents itself by offering us software to download, install and then launch so that it can analyze the components / peripherals of our computer to identify those that are up to date and those that are not. At the end of the analysis, the software will automatically launch a web page on which the list of your non-updated components will be listed, in short, quite blah!
Here are two screenshots, on the first is the software in question which analyzes your computer and on the second the famous components to be updated. When I want to download one, I just have to click on the blue arrow just to the right, then when I am redirected to a new page I go down to the bottom of this last one then press on the floppy disk and write “Download“, I will be enough install the ZIP file and here I am!
CHAPTER 4 – NVIDIA
CHAPTER 4 – NVIDIA
This chapter is about NVIDIA, and primarily the Control Panel. If unfortunately you do not have a graphics card from NVIDIA there is chapter “4c” which concerns AMD and chapter “4d” which concerns Intel, good continuation!
To be able to launch the control panel, all you have to do is right-click on your desktop and then click on “NVIDIA Control Panel” which will open it.
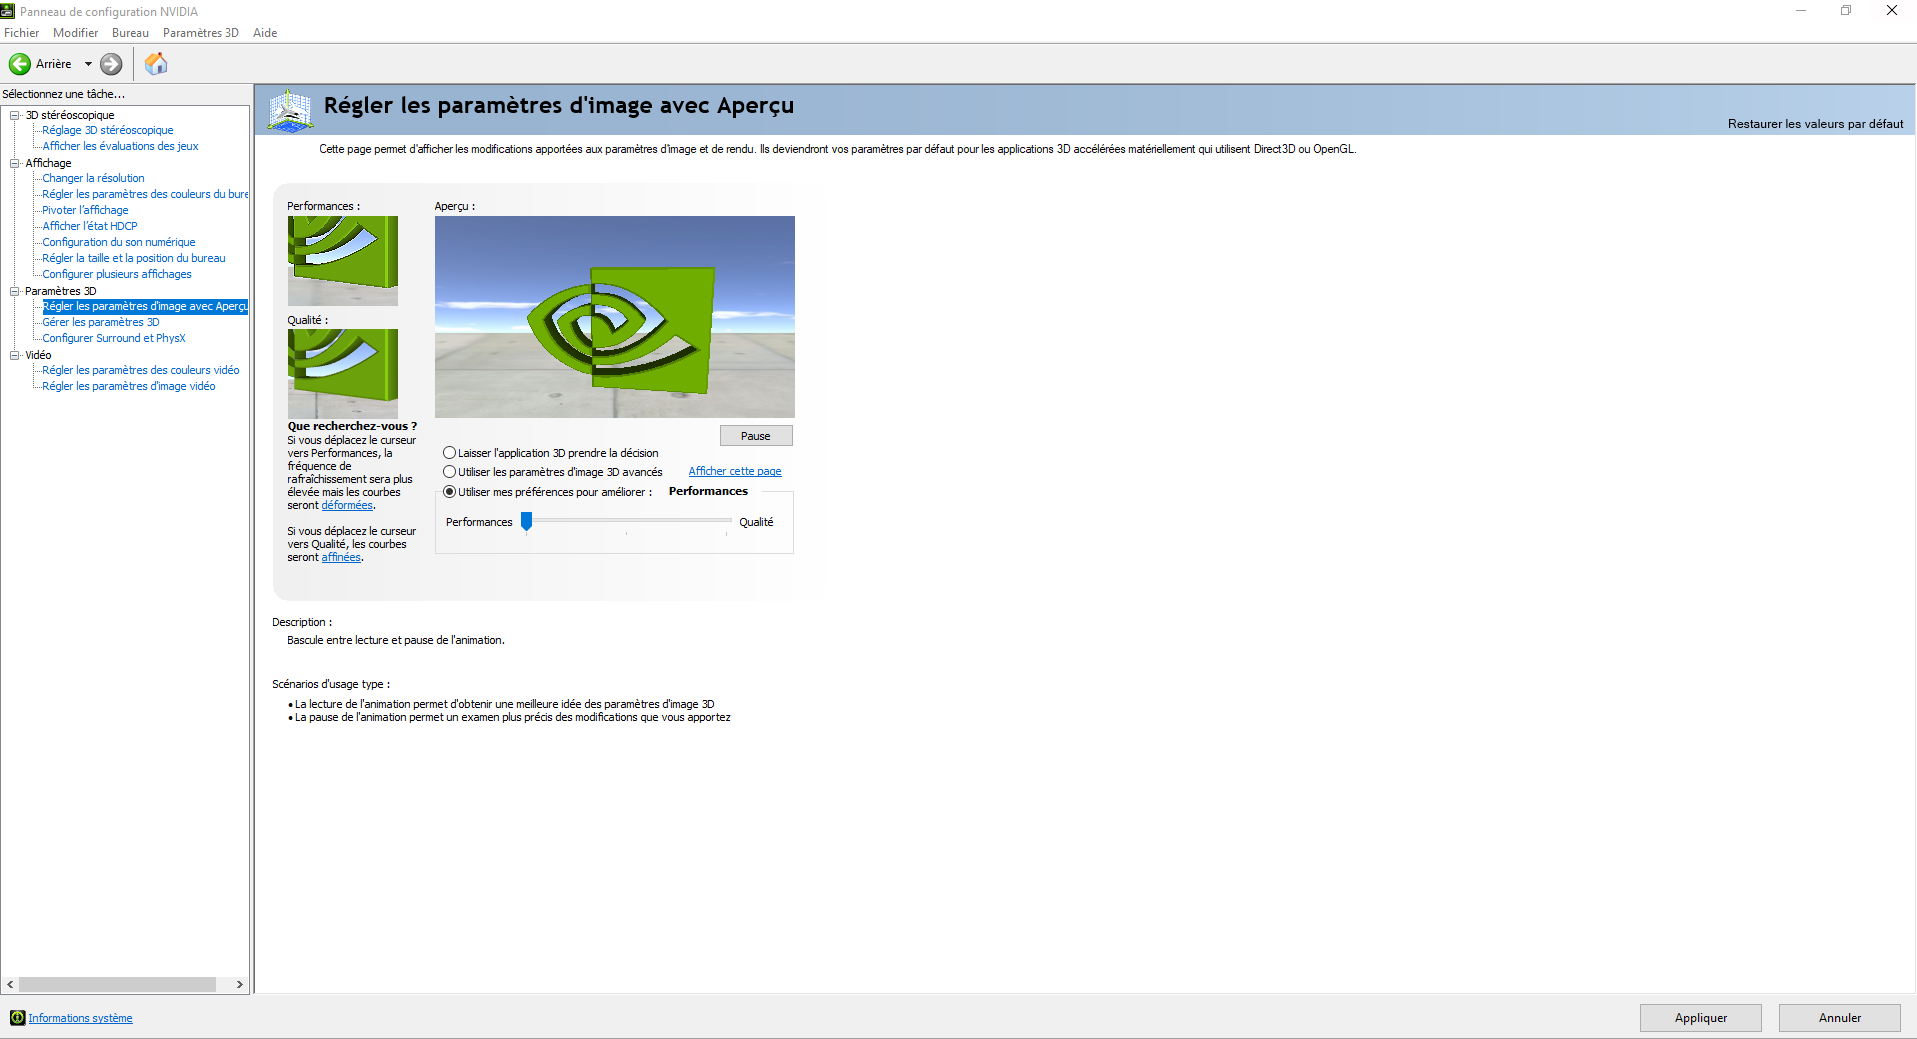
Then, after arriving at said panel, navigate to the “3D Settings” category, then “Adjust Image Settings with Preview“, then you will need to do the same as in the screenshot below.
(I ASSURE YOU, THE GAME WILL NOT BE PIXELIZED AT ALL, THE PREVIEW IS TOTALLY FALSE)
After this is all over, go to:
View > Adjust the size and position of the desktop
Changing the scaling settings to “GPU” instead of “Display” will allow you to play a little more beautiful and smoother. After that check “Replaces the scaling mode defined by games and programs” and make sure to set the refresh rate of your screen to the highest possible value, also click on “Fullscreen”.
Then go here:
3D Settings > Manage 3D Settings » Program Settings
You will then have to select the desired game, in our case it will be CS:GO. Then reproduce as in the table:
| PARAMETER | FUNCTIONALITIES |
|---|---|
| Image smoothing | Sharpening Off, Scaling disabled |
| Anti-aliasing – gamma correction | Disabled |
| Anti-aliasing – mode | Off |
| Anti-aliasing – transparency | Disabled |
| CUDA – Graphics Processors | All |
| Shadow Cache | Enabled |
| Anisotropic Filtering | Disabled |
| Texture filtering – negative LOD distortion | Allow |
| Texture filtering – sample optimization | Enabled |
| Texture filtering – quality | high performance |
| Texture filtering – trilinear optimization | Enabled |
| Preferred refresh rate | Highest |
| Max Frame Rate | Off |
| Low latency mode | Enabled |
| Power management mode | Focus on maximum performance |
| Multi-Frame Sampled AA (MFAA) | Disabled |
| Ambient Occlusion | Disabled |
| Threaded optimization | Enabled |
| OpenGL rendering graphics processor | YOUR GRAPHICS CARD |
| Vertical synchronization | Disabled |
| Monitor technology | Fixed refresh rate |
| Virtual reality pre-rendered frames | 1 |
| Triple buffering | Disabled |
CHAPTER 4b – (bonus) NVIDIA / LOW LATENCY
CHAPTER 4b – (bonus) NVIDIA / LOW LATENCY
What is input lag?
The input lag is the reactivation of the game, in short the response time. The lower the response time, the faster and smoother the game will be. In this new chapter, we will take care of reducing this input lag, to do so please download this software called NVIDIA Profile Inspector – [github.com] .
After installing and launching it, go to “Profiles” and choose “Counter-Strike: Global Offensive“. Then go to:
Sync and Refresh > Frame Rate Limiter Mode
And choose “FLIP_BY_FLIPMETERING” and finally click on “Apply changes” and quit the application.
CHAPTER 4c – AMD
CHAPTER 4c – AMD
Open the configuration panel named “AMD Radeon Settings” then go to the “Updates” section and click on “Check for Updates“, if you find one, download it.
When all of that is done go to the “Gaming” category then “Global Settings“. Then press “Reset” and “Graphics Settings“, “Shader Cache” and confirm everything. Then do this:
| PARAMETER | FUNCTIONALITIES |
|---|---|
| Anti-Aliasing Mode | Use Application Settings |
| Anti-Aliasing Method | Multisampling |
| Morphological Filtering | Off |
| Anisotropic Filtering Mode | Use Application Settings |
| Texture Filtering Quality | Performance |
| Surface Format Optimization | On |
| Wait for Vertical Refresh | Always Off |
| OpenGL Triple Buffering | Off |
| Shader Cache | On |
| Tessellation Mode | Override Application Settings |
| Maximum Tesselation Level | Off |
| GPU Workload | Graphics |
| Chill | Off |
| Frame Rate Target Control | Disabled |
You will then have to go to the “Video” section and activate the “Default” mode, after that click on “Relive” and deactivate it. Then go to the “Display” part and deactivate GPU Scalling (unless you are playing in 4/3 without black band).
After all this is done you can finally restart your computer. After reboot download this software – [amd.com] and run it.
CHAPTER 4d – INTEL
CHAPTER 4d – INTEL
Go to the Intel menu and choose these options:
| PARAMETER | FUNCTIONALITIES |
|---|---|
| General Settings | Performance |
| Multi-Sample Anti-Aliasing | Turn Off |
| Conservative Morphological Anti-Aliasing | Override Application Settings |
| Graphics Power Plans | Maximum Performance |
| Extended Battery Life for Gaming | Disable |
CHAPTER 5 – WINDOWS
CHAPTER 5 – WINDOWS
Visual effects
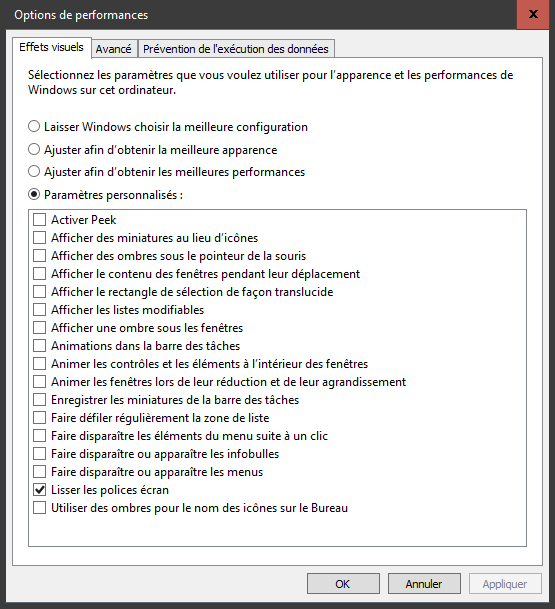
Disabling some Windows visual effects allows for a gain in FPS (such as animated windows, shadow under cursor, …) and that’s exactly what we’re going to do.
To start this chapter, you will need to go here:
Control Panel > System and Security > System
Then click on “Advanced System Settings” and uncheck absolutely everything except “Smooth screen fonts” (just so that Windows isn’t too visually gruesome, but can still be disabled if you wish).
Disable some unnecessary / cumbersome services
Some services on Windows are completely unnecessary and therefore cumbersome. In addition to solving your fluidity concerns, this chapter will allow you to optimize some space on your hard drive. In order to proceed to the rest of this chapter you must download this software named SHUTUP10 and after it is downloaded you must launch it. When it’s done, go to the “Actions” category and click on “Apply all recommended settings” (the software will ask you if you want to make a restore point, as a precaution accept), when the settings have been applied you can quit the application by refusing to have Windows restart immediately.
Disable Cortana
Cortana is one of the main additions to Windows but uses a lot of resources nonetheless, so we’ll be turning it off (don’t if you’re using Cortana). To do this, use the Windows + R keyboard shortcut and write “regedit” then click on OK. In the search bar at the top of the window, copy and paste this:
HKEY_LOCAL_MACHINE\SOFTWARE\Policies\Microsoft\Windows
Then look for the “Windows Search” folder, if it does not exist right click, choose “New“, “Key” and type “Windows Search“. In this new folder, right-click again, choose “New” again then “32-bit DWORD value” and write “AllowCortana” and change the value to “0“.
Delete temporary files
Windows keeps a lot of temporary files that won’t get erased after you shut down your computer, so we’ll do that. In addition, it will save space on your hard drive slightly and give your machine a little boost. This manipulation is to be carried out approximately every two weeks.
Use the Windows keyboard shortcut + R and type “temp” (if some files do not want to be deleted, just click “Ignore”). Repeat the same operation but this time write “%temp%”.
Sort the icons on your desktop
I honestly think the title is pretty self-explanatory. The fewer icons on your desktop, the better off your system will be.
Disable services / applications on startup
When Windows starts up, some services and applications start automatically. However, this is unnecessary and delayed since you don’t need certain apps right away, so they don’t have to be launched automatically, right? To start the procedure, you will need to open the task manager (by right-clicking on the taskbar), go to the “Startup” section and then deactivate the applications that you do not use (such as Spotify, Origin, Steam, etc.). After that do the Windows keyboard shortcut + R (el famoso keyboard shortcut!) Then write “msconfig” and navigate to the “Services” category and check “Hide all Microsoft services“. And like above, turn off unused services (If you don’t know what a particular service is for, leave it on just in case).
Change power settings
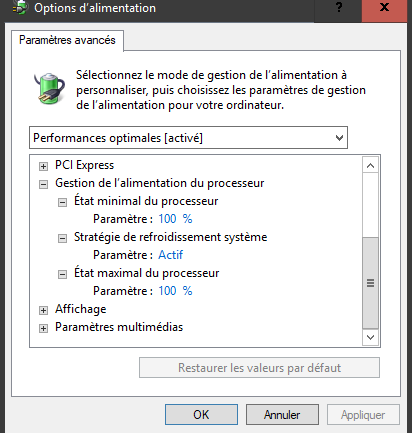
Changing the power settings of your computer will make sure that it uses the processor to the maximum of its capacities, moreover we will deactivate the automatic suspension of the peripherals connected in USB (for example the mouse, so that it stops turning disconnect by itself after X time). First of all, launch the console in Administrator mode (by searching for “CMD” in the Windows search bar) then copy and paste this command:
(IF YOU ARE GOING TO DO CHAPTER 17, DON’T DO THIS CHAPTER!)
powercfg -duplicatescheme e9a42b02-d5df-448d-aa00-03f14749eb61
When this is finished, go to:
Control Panel > System and Security > Power Options
Then check “Optimal Performance” then click on “Change mode settings” and “Change advanced power settings“.
Then follow the screenshot and this device:
- Stop the hard disk after “0“
- USB Settings > USB Selective Suspend Settings > “Disabled“
- Processor power management > Minimum processor state & Maximum processor state > “100%“
Change your wallpaper
Having a very minimalistic and simplistic wallpaper keeps your system running smoothly, therefore I highly recommend a very basic black wallpaper (avoid HD ones and animated ones)
Optimize Windows startup
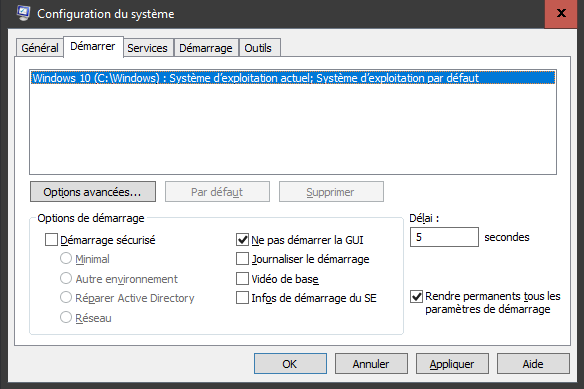
We will therefore optimize the start of Windows, as the title indicates, in order to make your computer turn on much faster than before, to do this use the famous keyboard shortcut Windows + R then write “msconfig” in the window that appears.
Navigate to the “Start” section to check “Do not start GUI” and change the timeout from 30 seconds to 10, 5 or 3 seconds. Taking care to check “Make permanent all startup parameters“, quit the application but do not restart your computer.
Disable Windows Defender Antivirus
Windows Defender is a performance problem machine, so we’re going to disable it. To do this, use the keyboard shortcut Windows + I. And click on “Update and security” then “Windows security” and open the security center. When you reach the home page, you will go to “Protection against viruses and threats“, click on the shield logo then “Settings for protection against viruses and threats” and uncheck absolutely everything!
Nevertheless, I offer you a small list of antivirus deemed to be reliable and not causing little performance concern:
- AVAST (free / paid)
- ESET NODE 32 (paid)
- KASPERSKY ANTIVIRUS (free / paid)
- BITDEFENDER (paid)
- MALWAREBYTES + ADWCLEANER (free)
- ZPH CLEANER (free)
CHAPTER 5b – WINDOWS (continued)
CHAPTER 5b – WINDOWS (continued)
Disable the hibernation option
This option, which is very often unused and especially unusable on Windows 10 is still present and takes up some space on your hard drive / SSD. In order to deactivate it press the Windows key on your keyboard and write “CMD” there, right-click on it and choose “Run as administrator” as shown in the screenshot below.
Then paste this command:
powercfg -h off
And bravo!
Change the resources allocated in the background
By modifying the resources allocated in the background this will allow you to increase your FPS in game, use the keyboard shortcut Windows + R and write “regedit“. Get in the new window copy and paste this in the search bar at the top of the latter:
HKEY_LOCAL_MACHINE\SOFTWARE\Microsoft\Windows NT\CurrentVersion\Multimedia\SystemProfile
Then right-click on “SystemResponsiveness” and change the value to “0” instead of “14“.
Disable NDU to free up RAM
Still in the regedit window, copy and paste this:
HKEY_LOCAL_MACHINE\SYSTEM\CurrentControlSet\Services\Ndu
Then right-click on “Start“, “Modify” then change the value to “4” instead of “2“.
Disable PREFECHT & SUPERFETCH (ONLY IF YOU HAVE AN SSD)
Again and again in regedit, go to:
HKEY_LOCAL_MACHINE\SYSTEM\CurrentControlSet\Control\Session Manager\Memory Management\PrefetchParameters
Then right-click on “EnablePrefetcher” and change the value to “0” instead of “3“. Then do the Windows keyboard shortcut + R and write “services.msc” and look for the Superfetch service, when you have found it right click on it then “Properties“, “Startup type” and “Disabled“.
Hide icons on your desktop
As the name suggests, we are going to hide the icons on the desktop (of course the reverse manipulation will be possible). Therefore right-click on your desktop and go to “View”, then uncheck “Show Desktop Items”, that’s it!
Empty your trash
Honestly, that says it all. Do it regularly that’s all.
CHAPTER 5 – WINDOWS (3/3)
CHAPTER 5 – WINDOWS (3/3)
In this third and last part dedicated to optimizing Windows, we are going to change some parameters and to do this you must simultaneously press the WINDOWS + I keys. From that moment on this third part will consist of several categories: System, Applications, Games, Ease of Access and Privacy.
SYSTEM
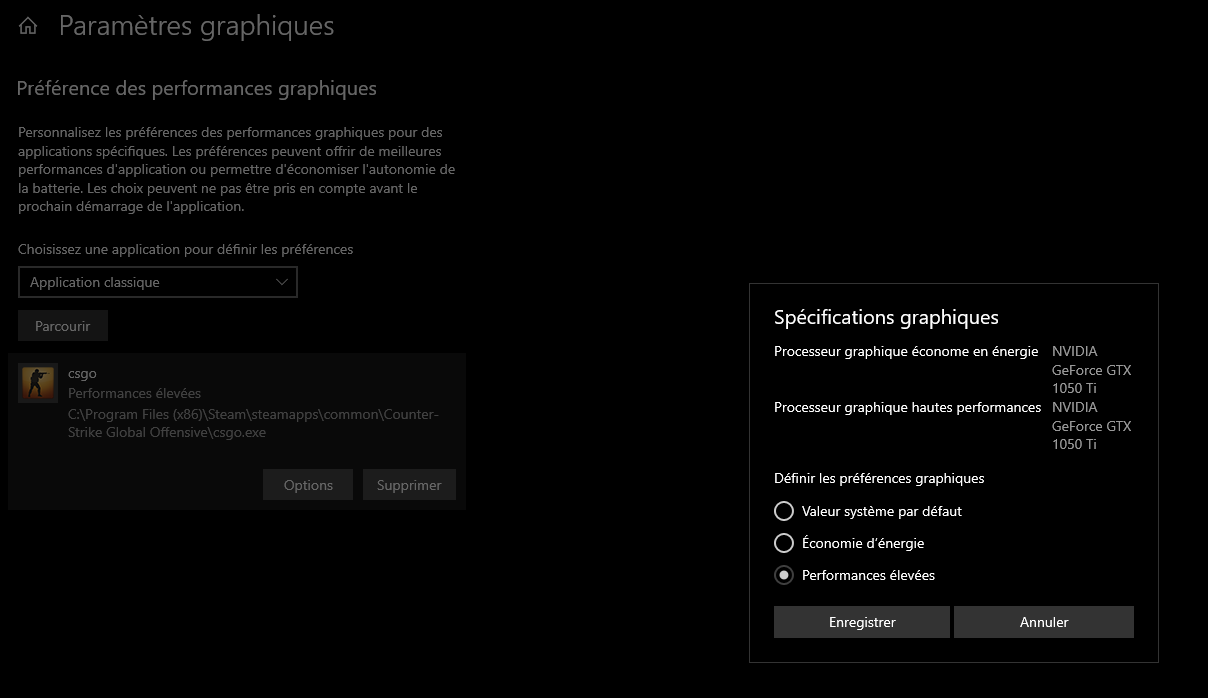
We are therefore going to tackle this first category where we will click on “System”, “Display” then go down to the bottom of the page to click on “Graphics settings”, then on “Browse” where you will choose the game you want to optimize (in our case it will be CS:GO). When it is done, click on it and go to “Options” then finally check the “High performance” box.
Back on the main menu of “System” but this time go to “Notifications and actions” where you will disable absolutely everything that is possible to disable, then in the menu “Concentration assistant” uncheck the automatic rules and check the “Disabled” box.
In the “Power and standby” section, apply “Never” to the two drop-down menus on the page.
In the “Storage” category you will uncheck all that is checked then in the “Tablet mode” you will activate the “Use office mode” mode then “Do not ask me and do not change mode” by unchecking everything.
Finally, in the “Shared experiences” menu you will uncheck everything and in “Remote desktop” also.
APPLICATIONS
To attack this second category we go to “Applications” then in “Applications and features” you will activate “Disable application recommendations“.
Then in “Offline maps” you will uncheck everything and click on “Delete all maps” and finally in “Startup” you will uncheck everything that opens when you start your PC and that is of no use to you (example: Spotify)
GAMES
In this third category you will go to “Games“, then “Game bar” and uncheck everything, also in “Capture” and “Game mode” too.
ERGONOMIC OPTIONS
For this fourth category, you will first go to “Display” then uncheck “Show animations in Windows” and “Show transparency in Windows“, in “Magnifier” you will also deactivate everything, “Color filter” too, “Narrator” also .
Then you will finally go to “Mouse” where you will click on “Modify other mouse options” and then at the top right on “Additional mouse options” where you will go to the “Pointer options” section by placing the cursor on the 6th bar then uncheck “Improve pointer precision” just below.
CONFIDENTIALITY
For this fifth and last category, you will uncheck everything in “General”, “Handwritten entry and customization of input”, “Diagnostics and comments” (by checking “Basic”), “Activity history” (by clicking on “Delete” at the bottom of the page), “Voice“, “Location” (by clicking on “Delete” at the bottom of the page), “Notifications“, “Account information“, “Contacts“, “Calendar“, “Call history” , “Email“, “Tasks“, “Messaging“, “Radios“, “Other devices“, “Background applications“, “Application diagnostics” and finally “Automatic file downloads“.
There you have it!
CHAPTER 6 – AUTOEXEC
CHAPTER 6 – AUTOEXEC
First of all, what is an Autoexec?
This is a file that will automatically run each time CS: GO is launched.
Is this allowed?
Absolutely.
First of all, it is imperative to create an autoexec.cfg file in the CS: GO folder, therefore navigate to here:
C:\Program Files (x86)\Steam\steamapps\common\Counter-Strike Global Offensive\csgo\cfg
To be able to create it you will have to right-click to create a text document in which you will copy all the commands a little lower. When you have finished you will have to “Save as“, “All files” and add “.cfg” at the end of the name of your autoexec file.
Now you have two proposals, either you take my personal autoexec (which was developed for) which is highly comprehensive or you make your own via the commands below. In order to download my autoexec, go to this site:
DOWNLOAD MY AUTOEXEC – [settings.gg]
In addition to that, you will also have access to my launch options, my viewmodel, my crosshair, my weapon movements but also my video options and my mouse settings.
The commands entered in autoexec:
- fps_max “350” //Delimits your FPS up to this number
- fps_max_menu “450” //Delimits your FPS in the menus up to this number
- mat_queue_mode “2“ //Activate multicore mode
- r_dynamic “0” //Disable the lighting effect when firing
- host_writeconfig //Automatically starts autoexec each time the game is launched
I highly recommend that you download my autoexec which will be much more complete and thorough than this one.
CHAPTER 7 – QUICK CPU
CHAPTER 7 – QUICK CPU
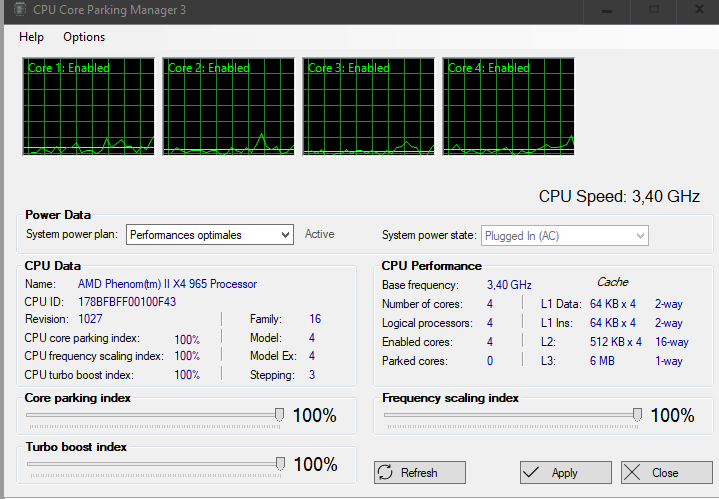
Quick CPU is a free software that allows you to unlock the processor cores blocked by Windows, as well as to boost the performance of your CPU. The latter can be downloaded right here – [coderbag.com] . After installation you will need to launch it and choose the system plan you are currently using (on the small drop-down menu) and choose “Best Performance” (or “Bitsum Highest Performance” if you are using Bitsum Park). Then activate absolutely everything that is possible to activate, as in the screenshot below:
Hope you enjoy the post for Counter-Strike: Global Offensive FPS Increase & Performance Configuration, If you think we should update the post or something is wrong please let us know via comment and we will fix it how fast as possible! Thank you and have a great day!
- Check All Counter-Strike: Global Offensive Posts List


Leave a Reply