ACT 1
Main Game
You will wanna start on dismal difficulty to do the minimum amount of playthroughs
Just follow the path to the end
Go right for a wave of enemies
The Portal achievement unlocked
You will be teleported to a new place with a health shrine and 2 items to pick up. Potion Holy Tear – Defenders Orb
Go down a screen and to the left for a battle, pick up the Aptitude Mix
Both exits work but I’m going for the east
By the stairs are enemies and Bandits Orb
Go to the left exit and up the stairs
Fight the enemies for an Athletes Orb
Go back to previous screen which contains a health shrine and 2 Uplifting Tears in the wall
Finally go to the left for a final battle
You will gain your 4th member and learn about skill points. I suggest getting Elleria’s telekinesis power which lets you avoid battles and gradually give you the Tactical Approach achievement You will also wanna get Habach’s shortcuts power which will destroy weak doors and walls for the Fists of Ruin achievement
Go down and enter the cave. Make sure to pick up the Priests Orb on the bottom left and maybe use the health shrine
At the top are enemies with a Potion and 10 Aurics
If you got the telekinesis skill you will see a flashing circle on the left
Go above them to find 2 items a Curative Tear and enemies blocking Fighters Orb, Keepers Orb, Athletes Orb
Go back down, then down the stairs
Feel free to avoid the enemies and just go right
You will be in your 1st safe area. Talk to everyone you want, gear up and finally go to Meya
You can now use teleport shrines, either go to the main game or go for the side quests
Side Quests
Keldyn Village
Go to the right and enter the building. Inside is an Aptitude Mix
Back out and at the bottom of the screen is Holy Tear
Go to the left exit for your 2nd telekinesis circle, then up
Or go to the top exit to ignore the telekinesis area.
Either way go to door and break it down – if you got shortcuts
Inside the building is 12 Aurics and a chest with a Cyan Cloak
Either way go to top exit for an Uplifiting Tear and mission complete
The Lost achievement unlocked
Zhierdan Forest
Go up for your 3rd telekinesis circle
Go for the left exit, to the left for enemies and Runners Orb, Tear of Grace, Potion
Go right then up, picking up 10 Aurics on the way and the Aptitude Mix guarded by enemies
You will reach a health shrine, a fight and mission complete
Power of The Orbs achievement unlocked
Sorak Shrine
Go up for your 4th telekinesis circle. You cant open the door so ignore it
Before going down stairs open the chest for Potion, Defenders Orb
Keep going down for enemies and a chest Aptitude Mix
Go back up and you will find a 5th telekinesis circle.
Pick up the Rogue Orb then go right
You will come across a spike maze, use the lever next to it to find the pattern
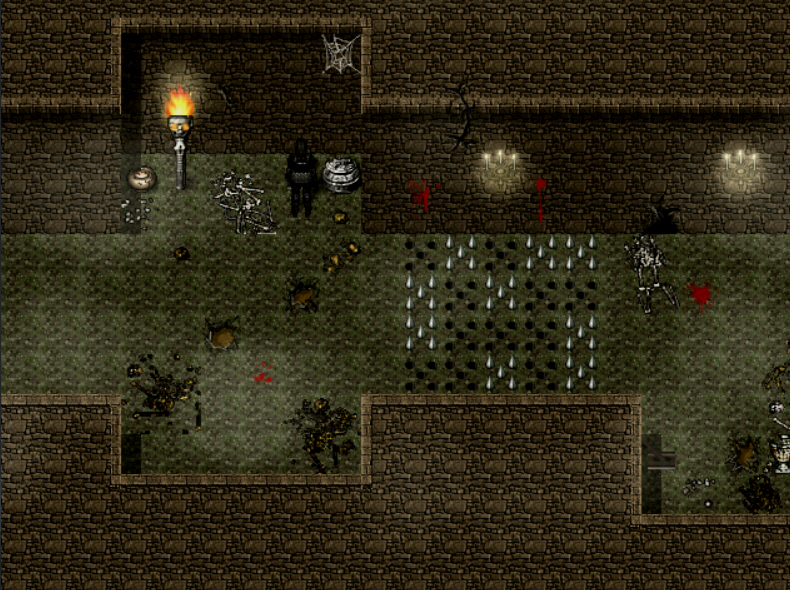
Just like all the rest, go past the maze to reach the end of the mission, health shrine and enemies
Sorak’s Ring achievement unlocked
This is your last mission so teleport to Ne.bos Valley
Main Game
1st memory
You need to go to the right until you see some guards. Go up to pick up another person
With them go back and fight the guard
Go to the right for more guards but also Potion and 12 Aurics
On the next screen you will come across a bridge. Make sure to save for easier backtracking
Cross the bridge and pick whatever choice
Main story
You will be back to our main team. If you have gotten the telekinesis power I suggest getting the heavy one if possible. I believe these next ones are classed as heavy objects
Go to the left for your 6th telekinesis circle and feel free to ignore the above enemies.
Take the above exit for a Rogues Orb, a 7th telekinesis circle and Aptitude Mix, Tear of Grace
Go back to the previous screen and left twice, get the Holy Tear
You will encounter the bridge from the memory. Depending on your choice you get
There’s No bridge or The Bridge Still Stands
If you kept the bridge just cross but I’m gonna talk about if you destroyed it
You will need to go down from the bridge to reach the 8th telekinesis circle, then down again
Just progress through the cave picking up Fighters Orb
To the right are enemies guarding 20 Aurics
Otherwise go to the left a bit and go to the up exit
Its the other side of the bridge, fight the enemies for Acrobats Orb, Curative Tear, Uplifting Tear
Go back to the previous screen and continue following the path on the left, getting gear if needed and health
In this new area go to the left for your usual fight and Amber Cloak
Go back out, down and up the stairs. There’s a chest to the left of stairs containing Healers Orb, Keepers Orb
You need to go to both sides so lets start on the left.
Go past the maze, picking up 14 Aurics on the way.
If you got the shortcut power you can open up the wall and avoid the enemies.
In the next room is a chest with Acrobats Orb, Aptitude Mix
Finally go to the right to use the sphere and be teleported back to the door
So onto the right is our 9th telekinesis circle and some stairs you want to go up
Here you will have your 10th and last telekinesis circle (that I’ll point out) and a chest which rewards you with Tactical Approach and Energy Channeler
With those gotten go back downstairs and use the other exit
You will end up with a puzzle where you need to press yellow buttons to shut off the fire.
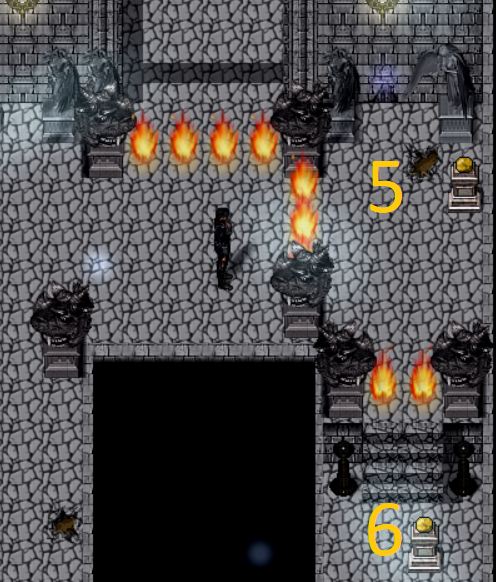
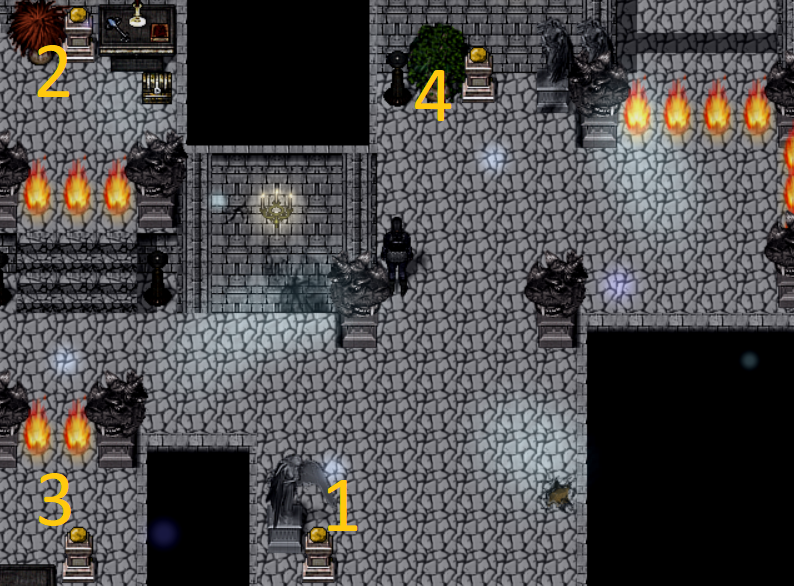
Order: 4 1 2 3 4 6
Go through the new area for a health shrine, enemies and your 2nd sphere.
You wont be teleported so go back to the door
You might wanna save for a boss battle
Solid Defence achievement unlocked if you beat the boss with a KO
Opening the Way achievement unlocked
Achievements
The Portal – Story Achievement
The Lost – Side mission
Power of The Orbs – Side mission
Sorak’s Ring – Side mission
There’s No bridge – Pick to destroy the bridge
The Bridge Still Stands – Pick to fight the soldiers
Tactical Approach – Use telekinesis 10 times (can be done whenever)
Energy Channeler – Pick up Erdan’s Headband relic in the temple of easara
Solid Defence – Beat Nodan without KO
Opening the Way. – Story Achievement
ACT 2
Side Quests
Sanaya Shrine
Go down and to the right stairs
Press the lever then go back down to the left
On the left corner is an Aptitude Mix
If you carry on down there are enemies guarding Holy Tear, Druids Orb
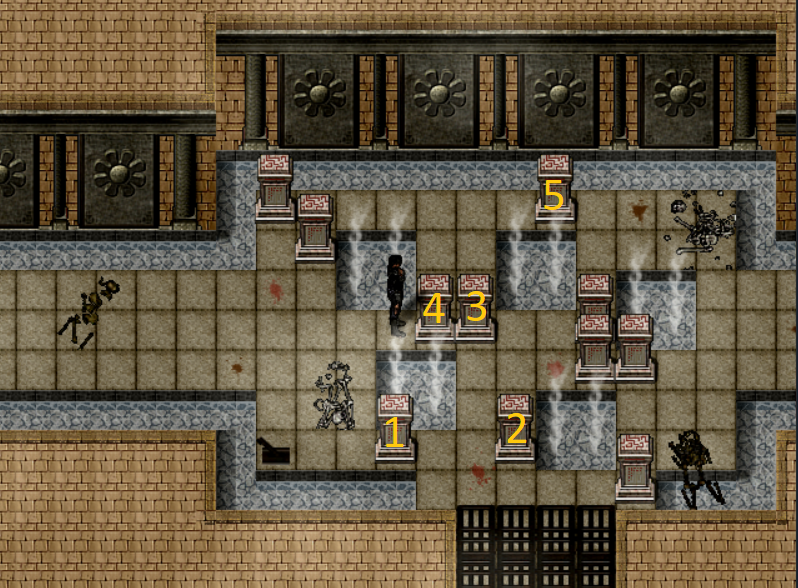
Push 1 twice. Push 2. Push 1 to the left. Push 3 up. Push 4. Push 5 twice.
Leave the area and pick up the dagger
Shadows of Sanaya achievement unlocked
Sorcerers Stronghold
Enter the building and use the circle to go down
You just need to step on the 4 pentagrams and collect the Aptitude Mix
Next room is the same but don’t step on the blue ones, collect Hollowed Orb
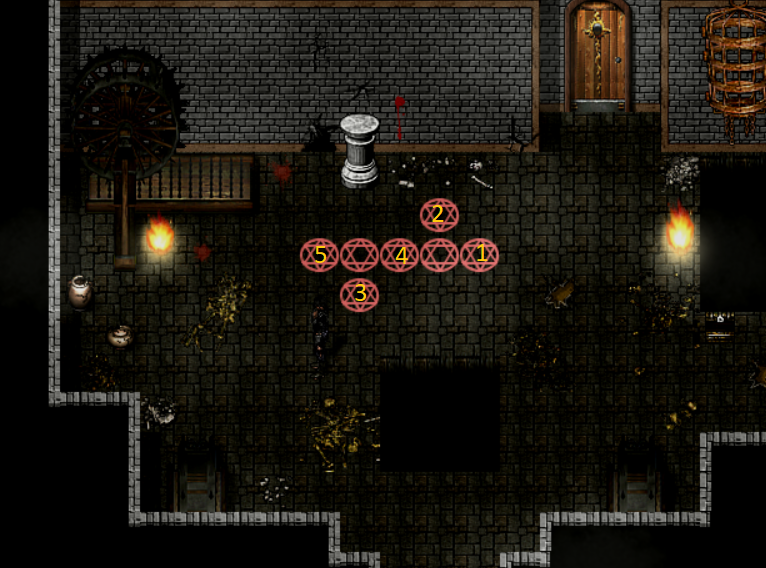
Step the buttons in order to open the door, theres a chest on the bottom right
Next room will end the mission
Blood Brothers achievement unlocked
Capital Streets
The exits all link together so lets go up 1st
You will meet your 1st rat to kill and a door to be opened
Inside is an Aptitude Mix and a health shrine
The right will lead to the 2nd rats and another door
Inside is Tear of Grace, Warriors Orb, Acrobat Orb
Go down for a Holy Tear, then down again.
To the right is a building you can enter, plus your 3rd rats
Inside the building is a Potion and 15 Aurics
Only exit is the left so go there and find 2 Potions
Go down for your 4th rat
Go left for your final enemy
If you go down you can pick up 3 Curative Tears
Where you picked up the 2 potions is a building and health shrine.
Inside is a Verdant Cloak and thats all we can do here.
The Cleansing
Main Game
Before we can continue, feel free to talk to everyone, stock up then talk to Gorleif (top right)
Memory 2
Very short memory. Talk to everyone if you want and head to the shop on the right.
Talk to the shopkeeper and gear up if you would like, its not needed to continue
Go back to Salra and make sure to save before you talk to her
Choose what you like, either way you will have a fight
Main Story
Choose between 25+ hp or 2+ defence
Enter the building and go to the open exit.
Go down from the enemies to get Tear of Grace, Holy Tear
Go back up and right
You need to press the lever and ignore the door – it wont open.
Go back a screen and a new path above is open
Enemies are guarding 2 Aptitude Mix
Go back to start and up the stairs
Straight in front is an Uplifting Tear
Take the top exit to get Sorcerors Orb, which is guarded.
You can take the right exit or go back to previous screen and right.
If you go back you can find a shortcut to break and 10 Aurics
Either way end up surrounded by blocks and go right
Go to the top for a battle and
Meat Shield achievement unlocked
Continue right and down the ladder
With telekinesis you can unlock the door I said won’t open
Otherwise continue down the stairs where a health shrine is
Depending on your choice to fight or escape you will unlock. If you escape a battle will happen
Sin Eater Is Dead or Sin Eater Lives
Going right will take you to the same place so go down and fight for Druids Orb
Go up and break down the door. Inside is Potent Potion and Celestial Orb
Go back out and to the right, collecting Aptitude Mix
The next room has traps which will teleport you out of the room
The bottom of the room contains enemies and Warrior Orb
On the top right is a lever which opens a door in the same room
In the next room is a boss battle, to get an achievement you need to darken them for 6 rounds. I suggest killing the dude as he will heal that status
Darkness is my Ally achievement unlocked
Depths of Calamity achievement unlocked
Achievements
Shadows of Sanaya – Side mission
Blood Brothers – Side mission
The Cleansing – Side mission
Sin Eater Is Dead – Choose to fight
Sin Eater Lives – Choose to escape
Meat Shield – Pick up the Talhar’s Shield relic from Floor 5 Castle
Darkness is my Ally – Darken the boss for 6 rounds
Depths of Calamity – Story mission
ACT 3
Sidequests
Memory 3
In the starting area is a health shrine and Fighters Orb, Defenders Orb, Acrobats Orb
Enter the building and go Right.
Enemies are guarding 2 Uplifting Tears, 2 Aptitude Mix
Go back and choose right then go down.
Enemies are guarding 14 Aurics and Tears of Grace
Go back and continue left.
Pick up Aptitude Mix and go up
Open the chest for Rogues Orb and Avengers Orb.
Pick up the key and use it on the entrance door we ignored
Open the chest for Aptitude Mix, Holy Tearand make sure to save as a choice is about to happen
If you shoot you will need to fight later, if you don’t you fight now
No matter what go through the door for the boss and ending the 3rd memory
You get another choice between +5% critical hit or magic evasion
Elpar Outpost
Go inside and to the left. There will be new stairs there so go up
Inside if your 1st chest
May as well go back to the door and depending on your choices unlock
Spirits of Fire or Cautious
Your 2nd chest in the room above
Now back to the left where you will need to fight
Going down gives you your 3rd chest and above your 4th chest containing
Vision and Reality achievement unlocked
Thamrak Village
You will need to talk to Igara to make this work
Go down for a building you can break.
Inside is Guardians Orb, Holy Tear
Going to the left you will find a new building with Aptitude Mix and Curative Tear inside
Continue left for a boss battle
Make sure you go up to open 3 chests for
Bane of Man achievement unlocked
Temple of Horenth
You can only go up and right for now so do that
Pull the lever and go to the left for a fight
Continue left for a cutscene and Potion, Holy Tear
In the above room go left so you can pick up 10 Aurics and Golems Orb
Go to the right for more cutscenes, a health shrine and a boss
Pain of the Past achievement unlocked
Main Game
Memory 3 was already talked about in sidequests if you skipped over it
Do what you want in the safe house then talk to Gorleif to continue
You won’t be with this team for long so just follow the path, picking up Potent Potion in the starting area
Memory 4
Health shrine is in the starting area
Take the left door 1st for a battle and 15 Aurics, Keepers Orb
Go for the right door and you can make a choice. For the least amount of battles go up for 1 battle and Potion, Uplifting Tear. Then go down for the 2nd battle and Rogue Orb, Aptitude Mix
Carry on up picking up Aptitude Mix and save for another major choice.
Depending on your choice you will receive
Salra’s Advice or Brogan’s Advice
Either way a battle will happen and the memory ends
Main Story
We get 3 choices this time +5% health/Energy regen or +5 max energy
Go through the door and find a health shrine
Go up for a Tear of Grace, then left for a boss battle.
Just follow the path left until you encounter a fight. There will be a puzzle along the way
With the items from the fight go back to the defeated bosses for
Benevolent achievement unlocked
Go up and you will need to find 6 orbs.
You can choose whichever order but lets go right 1st.
You will encounter a fight but then you can go through the door.
Inside is our 1st orb and Tear of Grace, Aptitude Mix
Continue right for another door with our 2nd orb and Celestial Potion
Upstairs go left for Angelic Orb
The right side has 2 doors. The 1st has our 3rd orb, a puzzle and Aptitude Mix
The 2nd door has a fight, Ravengers Orb and
Emergency Healing achievement unlocked
Now we will tackle the left side.
Upstairs has our 4th orb, puzzle and a chest
Continue left and down for the 5th orb and a Holy Orb
Before going to the top get the Sorcerors Orb
Finally we got our last orb, you can use the bottoms on the right side of the room to kill the enemies or just fight them
With all the orbs collected put them into the lift
From there just take whatever side you want and you will finish the act
Sombre Stronghold achievement unlocked
Achievements
Spirits of Fire – Choose to shoot
Cautious – Choose to not shoot
Vision and Reality – Side mission
Bane of Man – Side mission
Pain of the Past – Side mission
Salra’s Advice – Kill the higher ups
Brogan’s Advice – Kill the guards
Benevolent – Story mission
Emergency Healing – Get Inelda’s Medallion relic in
Sombre Stronghold – Story mission
ACT 4
Main Game
Just follow the path until you get in a cutscene. On the way is a health shrine and Black Mist
You can talk to everyone if you want but they don’t make sense.
On the right is Mak’sar but our main path is up twice
We are in a room with a health shrine and I suggest going right
You will find some blocks to move and Algo Rilt
You may as well just go up twice picking up Guardians Orb on the way and 2 Talgops
In the next room I suggest going down which is the room we ignored by going right. Now if you got telekenis we can take them out without battle. They are guarding Aoma
Continue back up for a puzzle, enemies and Channelers Orb The order is 2nd lever and 4th
Continue up again for another Aoma and a new area
So we need to press to some buttons to continue. This area also contains a health shrine
You can take either path but lets go right
Theres a path down and Rilt, Yh’kar
You cant go past the orange circles so continue the path until you teleport. You will want to step on the 2nd button
This path will be blocked by the blue circles but in this room we can get rid of the orange
Go back to the orange block path where you can get rid of the blue circles.
Now we can go back to the blocked blue path for Shielders Orb
You can skip over a battle and use the path we just went or use the 1st teleport pad for a battle but also Avengers Orb
Now we can go finish up and continue the path, ignoring the bottom path its blocked for now
If you now go to the right you will see a white version of the buttons we’ve been pressing. There’s also a Ravagers Orb
If you went for it go back to the bottom path we skipped over. In that room is Aoma and Talgop
Now there isn’t much so just keep going until the end, you might want to save at the health shrine as a boss is about to happen
Time is a Healer, not a Killer achievement unlocked if you don’t get KO
You will get the usual one path with the big baddie at the end of it
Memory 5
There isn’t much to do so just follow the path
On the way is 3 chests with a Fighters Orb, Aptitude Mix. Tear of Grace, Potion and another Aptitude Mix
On that last chest I suggest saving as you will end up with 3 choices for 3 achievements.
With that boss and choices we get
Secrets of Time achievement unlocked
Achievements
Time is a Healer, not a Killer – Beat Time Guardian without getting KO
Secrets of Time – Story mission
ACT 5
Side Quests
We get another choice to make. +25% health received or +5 agility
These next parts are all pretty short
Just follow the path and we got another door to break down, inside is Celestial Potion
Next to it is a building with Aptitude Mix, Potion
Depending on your choice you will fight the boss and unlock
Burning or Decapitation or Hanging
Lemar Cliff
There’s only the starting area with Potent Potion and Uplifting Tears
Plus the ending area, so go press on the pedestal. A boss battle will occur
The Fallen Hero achievement unlocked
Ettais Village
The path down you can get a guarded Celestial Potion and Aptitude Mix
The main one on the left gets you a boss battle and Holy Orb
Helping Hands achievement unlocked
Capital Outskirts
This is actually a bigger area
Right exit has Champions Orb
Now follow the main path and if you’ve been using shortcut you should finally have
Fists of Ruin achievement unlocked
The building contains a Potent Potion and Aptitude Mix
Outside is a health shrine and we will get a boss fight in the next screen.
Don’t forget your goal and go inside the building for the rations.
Back at the hideout deliver the rations to Gorleif
Fed and Watered achievement unlocked
While we are talking to people go ahead and talk to Andrid and Kanden, the bosses we saved in act 3
Shrine of Lelani
There’s no where you can go so just go to the end until you can pull a lever. Under it is an Aptitude Mix
As you go back the path you should find another lever. Go back one screen and we can finally go up.
This area has Black Mist
The next has a puzzle but just go for the one straight ahead and then press the others in order. Don’t forget the Channelers Orb
All thats left is to go to the relic and pick it up
Gusts and Gales achievement unlocked
Shrine of Maror
You cant do anything with the door so just go down and to the right. Enemies are guarding Divine Tear
Next we wanna go down and to the left. Enemies are guarding Paladins Orb
As you continue the path you will get to a health shrine and a boss. Depending on your difficulty you can get these achievements – only on dismal
Abomination Hunter + Abomination Killer + Abomination Slayer
Before you pick up the relic get the Angelic Orb above
Main Game
Go to vemos cliff, I suggest using the healing if you haven’t already
You can talk to everyone and gear up if you want
Make sure to save for your final choice and enter the portal
Memory 6 is just choosing a choice. It just changes what power you get and you probably won’t use them with the constant healing
We also get our final power up with 4 choices. +2 magic attack. +3 Physical/Magical defence. +4 agility
Go down and you will encounter the puzzle we are dealing with. Just turn off the buttons and get Aptitude Mix
On the next screen with be a boss battle
Again choose the down exit, for a fight and Potent Potion, Tear of Grace, Silver Cloak
Hopefully you got the shortcut achievement or at least 9 of them as this will be your last.
It will avoid a battle while giving you an Uplifting Tear
You should have no trouble avoiding the battle and making it the right.
You will find a guarded Divine Tear, Aptitude Mix and Radiant Orb
The next 2 rooms are puzzles and then we got our final 2 boss fights.
For the one on one battle its a good idea to just use Revitalise and Life drain
The boss is the last thing we will do and you can get up to 5 achievements
Fighter + Leader + Vindicator difficulty
Acaldia the Merciful or Acaldia the Just memory choice
A Good Beating – 1 v 1 don’t go under 50% health
Achievements
Hanging – Choose to hang
Burning – Choose to burn
Decapitation – Choose to decapitate
The Fallen Hero – Side mission
Helping Hands – Side mission
Fed and Watered – Side mission
Gusts and Gales – Side mission
Abomination Hunter – Side mission any difficulty
Abomination Killer – Side mission normal difficulty
Abomination Slayer – Side mission dismal difficulty
Fists of Ruin – Use shortcut 10 times
A Good Beating – Final boss don’t go under 50% health
Acaldia the Just – Kill the people
Acaldia the Merciful – Spare the people
Fighter – Story mission just beat the game
Leader – Story mission beat on normal +
Vindicator – Story mission beat on dismal
Hope you enjoy the post for Atonement 2: Ruptured by Despair 100% Walkthrough, If you think we should update the post or something is wrong please let us know via comment and we will fix it how fast as possible! Thank you and have a great day!
- Check All Atonement 2: Ruptured by Despair Posts List


Leave a Reply