This is the official manual for the game. Most information should now be up-to-date for the 1.0 version of the game, although there’s still more detail to be added on different aspects of the game.
1. General Information
In Armoured Commander II, you play the role of a tank commander in World War II, leading your crew through a campaign in one of the major conflicts of the war. It is a “roguelike” style of game, which in general means that it:
- emphasizes gameplay over graphics, using an extended Petscii character set rather than bitmap graphics;
- is turn-based and allows the player to stop and resume at virtually any point; and
- rewards mastery of the game mechanics and encourages multiple playthroughs.
The original Armoured Commander – [armouredcommander.com] was very closely modeled upon and inspired by the 1987 board game Patton’s Best – [boardgamegeek.com] , but ArmCom2 is an attempt to go beyond that model while maintaining the basic format of the player being in control of a single tank.
ArmCom2 is a strategic simulation of armoured combat that is often as brutal and unforgiving as the historical battles themselves. Your focus should be on survival rather than wanton destruction. No tank is invulnerable, so make full use of your terrain, concealment, smoke, movement, and your knowledge of the enemy to tip the odds in your favour and survive the combat day.
1.01 Most Important Piece of Advice
Pick your battles and focus on survival! You are commanding a single tank in a very large war, you cannot expect to roll into every encounter with guns blazing and survive. If you’re up against something that’s just too tough for you, then command your Driver to withdraw from the battle, and pick another path. Better to live to fight again than lose your tank and perhaps end your campaign.
1.02 Unit Classes
In this game, a unit is any entity that can act independently in a battle, whether that be a single vehicle, a gun and its crew, a small specialist team of 2-3 men, or a squad of infantry. Normally you will be commanding an armoured fighting vehicle, but you will encounter many different types of units as opposing forces:
- Infantry Squad: A group of armed men on foot, usually armed with rifles and grenades. Infantry are difficult to dislodge from well-defended positions, but are very vulnerable in the open. May also have close combat weapons such as Molotov Cocktails or Demolition Charges, but these are too small to be visible at a distance.
- Support Weapons Team: A team of 2-3 soldiers operating a specialized weapon such as a mortar or an anti-tank weapon. They operate similar to Infantry Squads but are harder to hit, and their weapon is usually capable of taking out a tank.
- Armoured Car: A wheeled armoured vehicle with a machine gun or light gun as its main weapon. Usually used for scouting, they are fast and can pose a danger to lightly-armoured tanks.
- Tankette: A very small early tank, usually with a crew of two.
- Light Tank: A lighter armoured fighting vehicle with full tracked locomotion. Although light tanks are usually lightly armed and armoured, they are also often fast and small, making them difficult to hit.
- Medium Tank: The medium tank developed first as a support vehicle, but by about 1940 had become the main tank type on the battlefield. They have a good balance of firepower, armour, and speed.
- Heavy Tank: First deployed by France and the USSR, heavy tanks combine large-calibre guns with thick armour. Although powerful and difficult to destroy, they are often slow and prone to mechanical failure.
- Tank Destroyer: A vehicle, often either unarmoured or very lightly-armoured, designed to engaged armoured targets. Usually has a powerful main gun, but cannot survive long in a head-to-head battle with tanks.
- Assault Gun: A vehicle with a powerful main gun designed for supporting infantry and attacking fortifications. Normally intended to deliver high-explosive firepower to its target. Its large gun is normally not mounted on a turret but rather embedded into the hull.
- Anti-Tank Gun: A gun and crew intended for destroying armoured targets. Although they lack the armoured protection of a tank, they can be more difficult to spot, and can be dug-in or entrenched in a good position.
- Artillery Gun: A larger gun intended for firing over long distances. In a pinch, however, these guns can also be fired over open sights against armoured targets.
- Anti-Aircraft Gun: Initially a fast-firing, smaller-calibre gun, the heavier examples of this class fire large-calibre high-explosive shells. These larger guns can be deadly when trained on an armoured target on the ground.
- Self-Propelled AA Gun: An anti-aircraft gun mounted on a vehicle.
- Truck: A larger vehicle designed for transporting people or freight. The earliest examples used during the Second World War were civilian models, while military designs were introduced later on.
- Armoured Train Car: Early in the war some armoured trains were deployed, carrying specialized cars carrying troops, artillery guns, and machine guns. Their lack of mobility, and dependence on undamaged and unblocked railway lines to move about, however, limited their utility.
1.03 Acknowledgements
- Playtesting and suggestions kindly provided by flori2412, Turtler, and more on the Discord server
- Most current unit portraits were adapted or created by cjprince
- Mockups and unit portraits created with REXPaint – [gridsagegames.com] Josh Ge, GridSageGames – [twitter.com] , and loaded with xp_loader – [github.com] , which is covered under a MIT License (MIT) and is Copyright (c) 2015 Sean Hagar;
- Some sound samples from the C64 sample pack by Odo – [howtomakeelectronicmusic.com]
- Steam integration thanks to SteamworksPy – [github.com] , covered under a MIT License (MIT) Copyright (c) 2016 GP Garcia, CoaguCo Industries
2. Main Menu
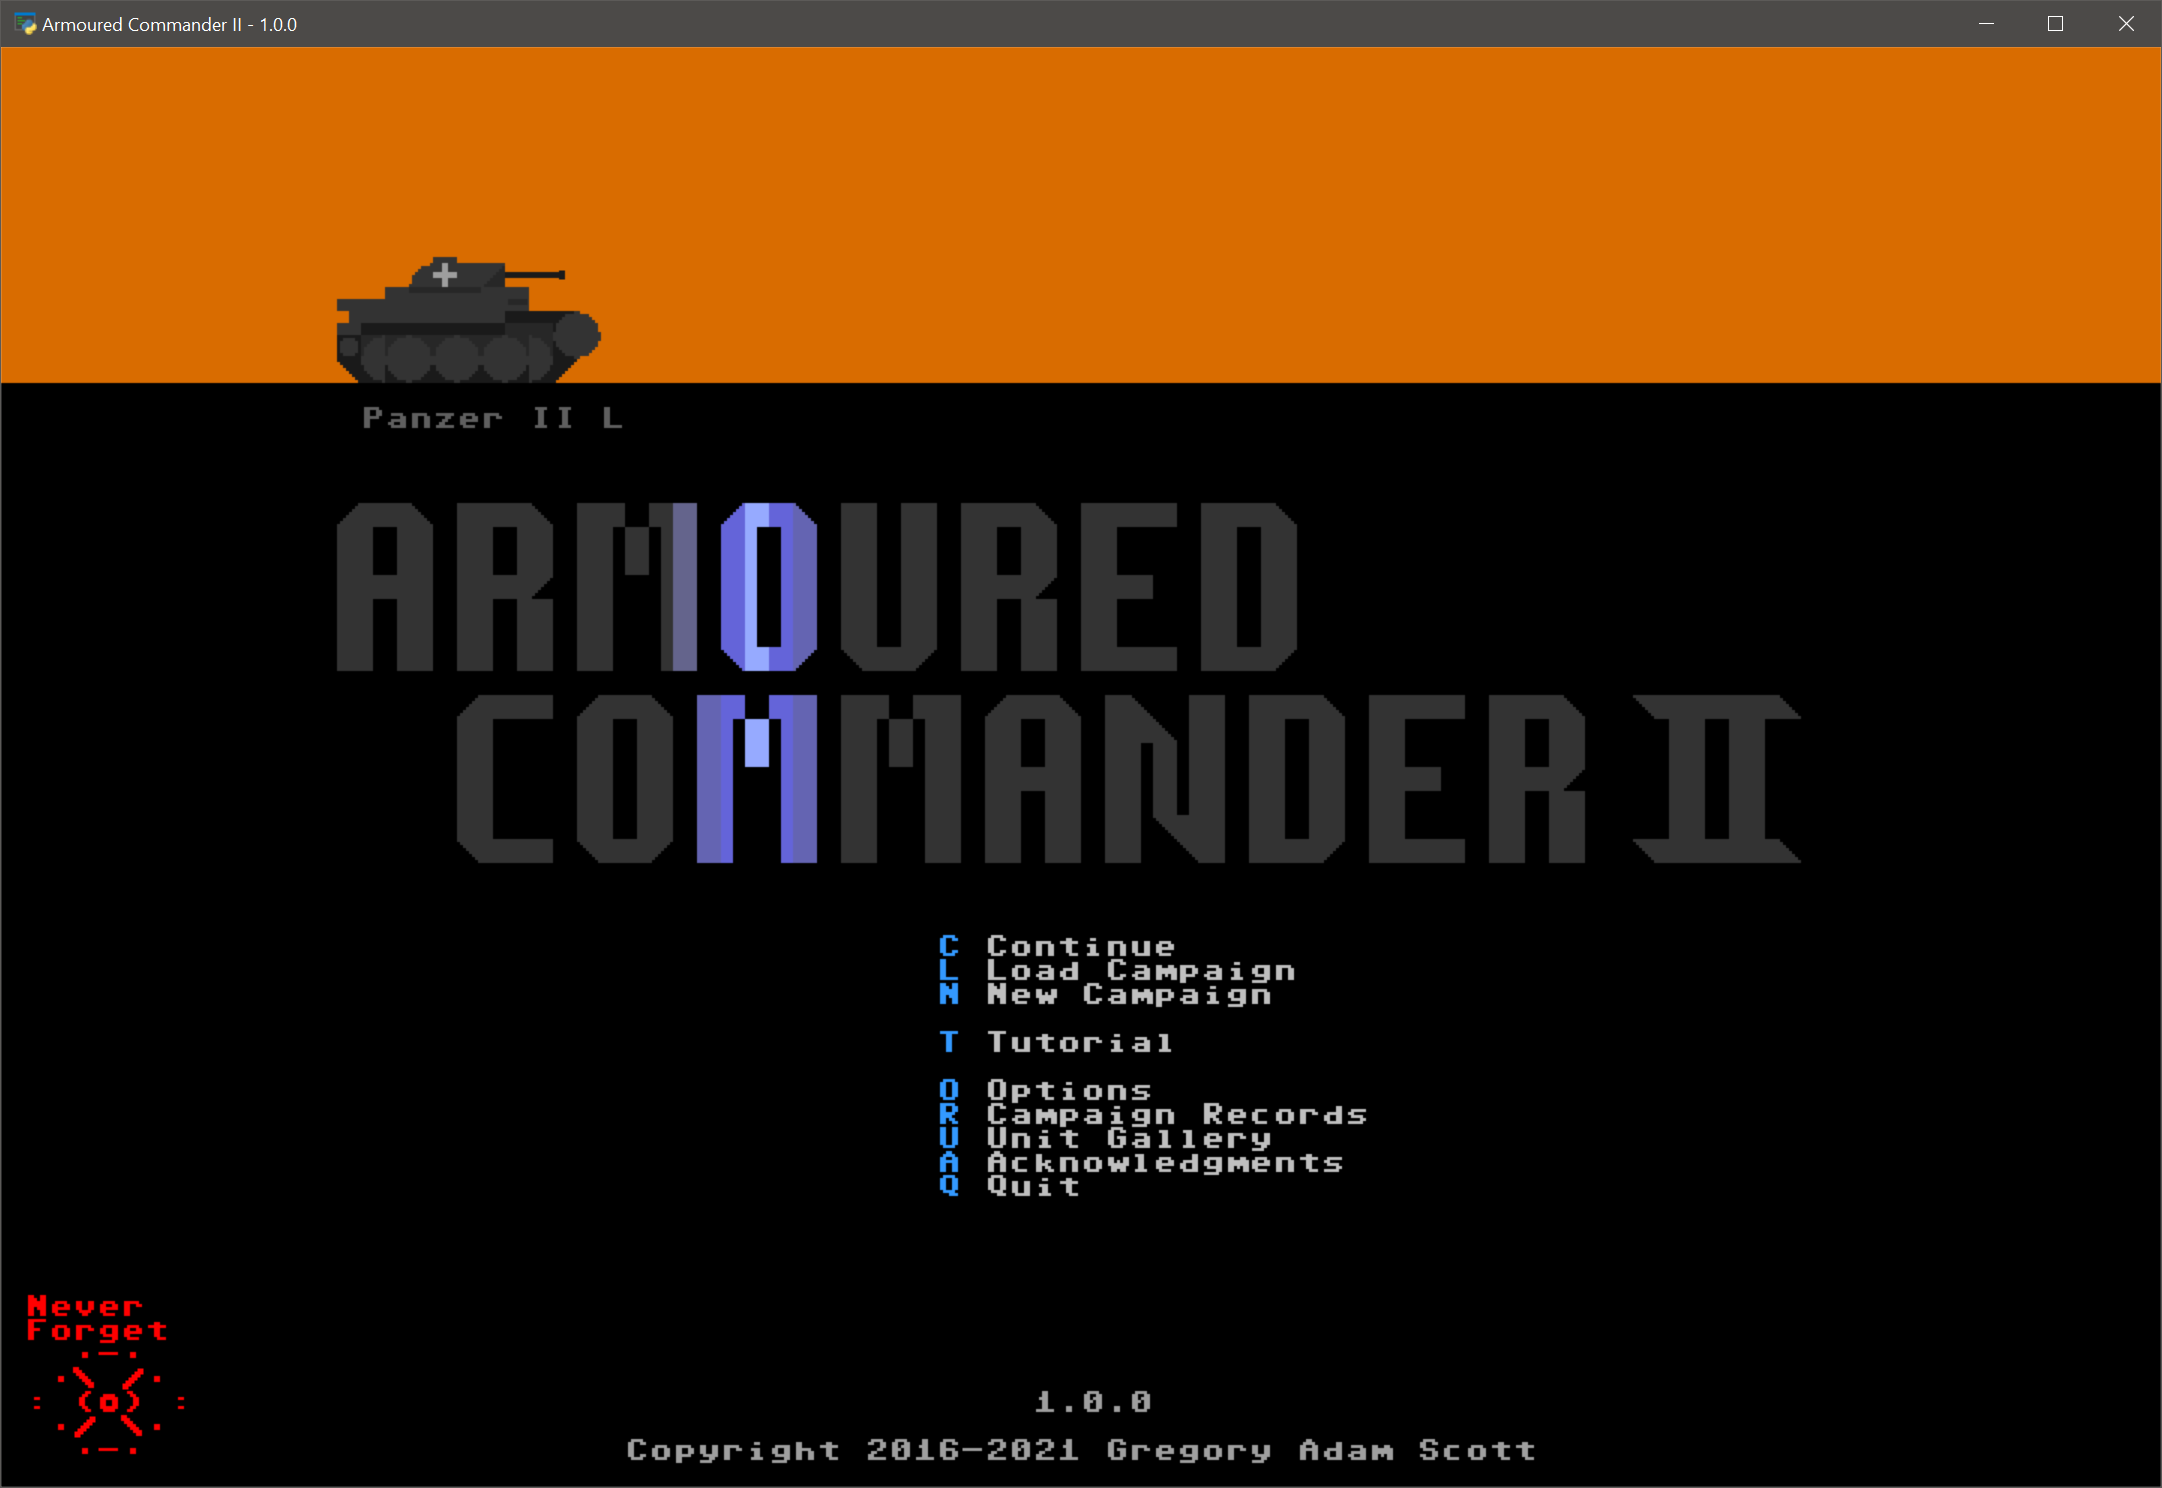
In the Main Menu, you can continue your most recently saved campaign, load and continue a saved campaign, start a new campaign, change game options, view campaign records, or quit the game.
To Continue or Load a campaign, it must have been saved with a compatible version of the game. The currently installed version of the game is always displayed at the bottom of the main menu. If the first version number (separated by single dots) matches, it will be compatible. Otherwise, you won’t be able to resume your campaign unless you load it with a compatible version of the game. If this is your first time playing, these options will be greyed out.
If you start a New Campaign, any current saved campaign of the same type will be erased. You can only have one in-progress campaign of each type going at any one time. The game will prompt you before overwriting an existing saved campaign file.
The Tutorial is a special, three-day campaign that will introduce you to the basics of the game. Many features are turned off so that you can learn the basics before progressing to a real campaign later on.
Game Options can be accessed here and from the in-game menu as well.
- Changing the Font Size will change the window size and the size of individual character cells.
- You can toggle Fullscreen mode here. Note that Fullscreen mode is not supported on all machines, you need a video card that supports either SDL2 or OpenGL for this to be available.
- Sound Effects, including the music in the main menu, can be toggled on or off here.
- Main Menu Music can be turned off here, without turning off sound effects.
- Changing the Master Volume will change the volume of the theme music and all sound effects. This option is not available if Sound Effects are currently disabled.
- Message Pause changes the length of time that in-game pop-up messages are displayed before disappearing.
- Must Dismiss Messages means that every pop-up message will remain on the screen until dismissed by the player with the Tab key.
- Animation Speed determines how quickly on-screen animations (such as attack animations, precipitation, etc.) are updated.
- Unit Stack Display will spread out units on the Scenario map rather than stacking them on top of each other. This makes it easier to see multiple units in the same hex, but may be confusing for some players.
- Several Keyboard layouts are supported, and you can set your own keyboard mapping by editing the “custom” dictionary in the keyboard_mapping.json file in the data folder (…/Steam/steamapps/common/Armoured Commander II/data), and selecting it here.
Your Campaign Records can be viewed from the main menu, but if this is your first time playing the game, you won’t yet have any records to view.
The Unit Gallery displays information about all the different unit types in the game. As of version 1.0.0, there are 620 unique unit types, although some of these will be national or captured variants of essentially the same unit.
Acknowledgements displays info on many of the people who helped make this game a reality.
3. Campaign Selection and Options
Armoured Commander II currently (as of version 1.0.0) has 47 unique campaigns. Your choice of campaign determines the types of tanks that will be available to you, the enemies you will face, and the terrain and time period you will fight over. Different campaigns can provide very different types of experiences.
3.1 Campaign Selection
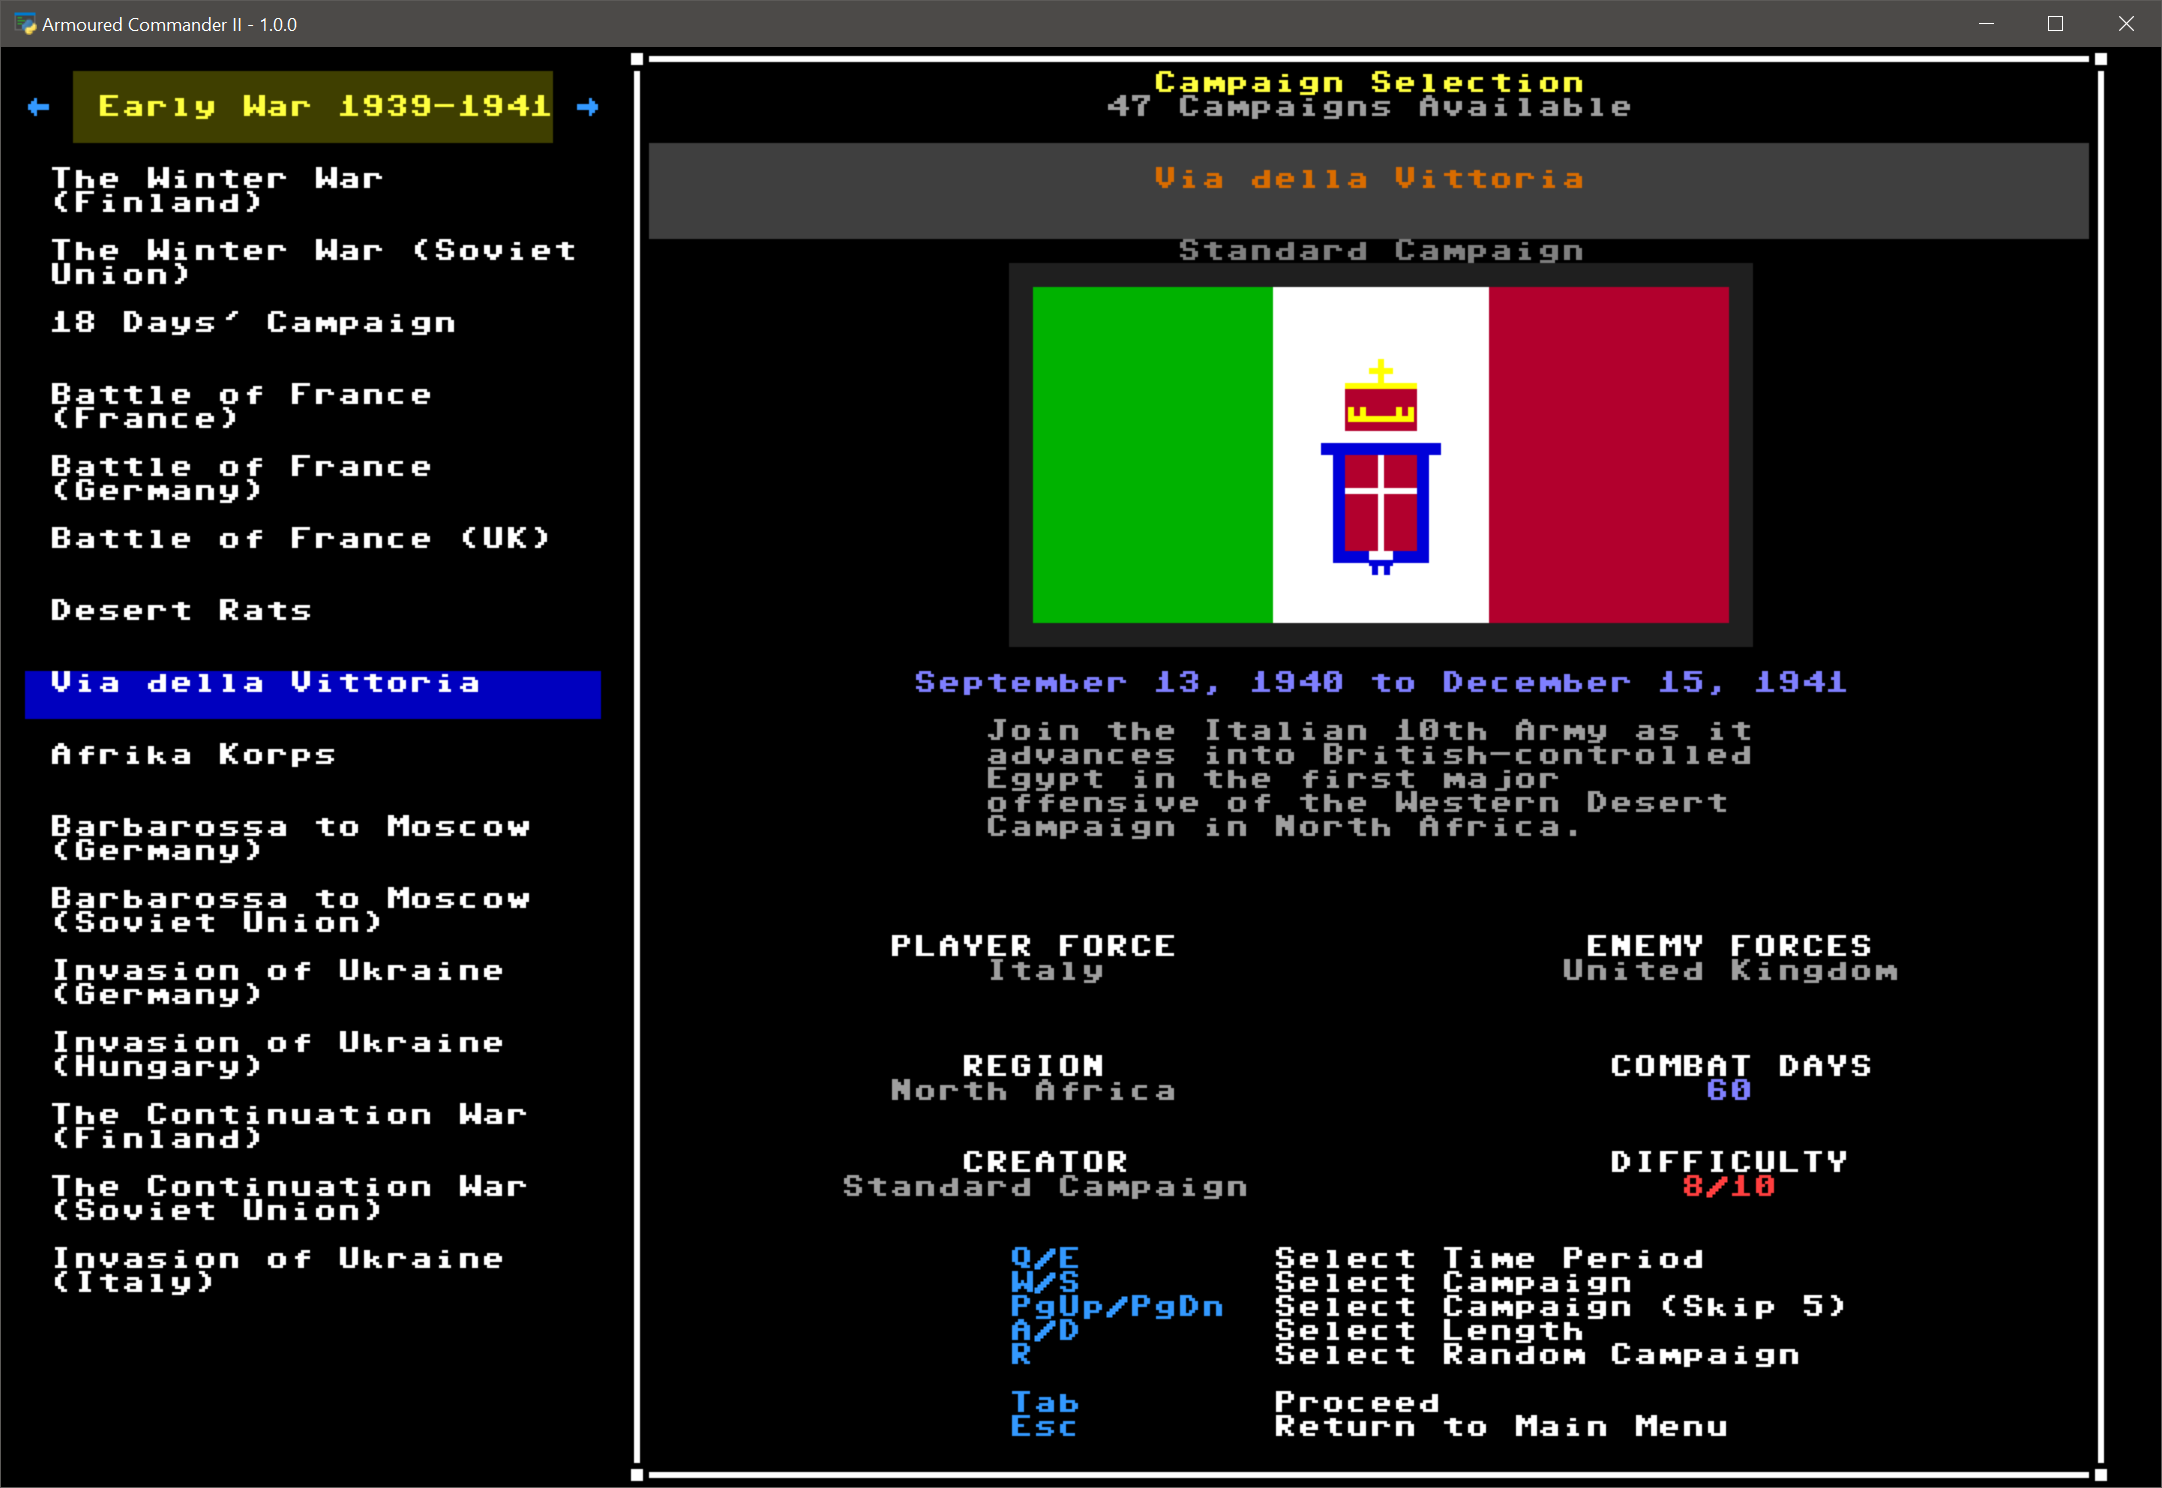
Each campaign takes place over a fixed period of time, placing you in the role of a tank commander in the war. Please note that campaigns are organized by time period, and different time periods can be viewed by scrolling through them (default keys: Q and E). Information about the currently selected campaign is displayed in the main part of the menu:
- Player Force means the national military force that you will be a part of.
- Enemy Forces lists the possible national forces that will be your opponents in this campaign.
- Region means the region of the world where the campaign takes place, which will determine the types of weather and terrain that you will encounter.
- Combat Days means the number of days during the campaign that you will be called up for combat. You can change this setting for your campaign (default keys: A and D)
- Creator: if a player or modder had a hand in creating this campaign, they will be credited here
- Difficulty: this is a subjective description of the campaign’s relative difficulty, from 1 to 10
From this screen you can select a campaign to start, or have the game select one for you randomly. Note that you can only have one campaign in progress of any given type at one time; if you already have a saved campaign in progress of this type, the game will prompt you to delete it before starting a new one.
3.2 Campaign Options
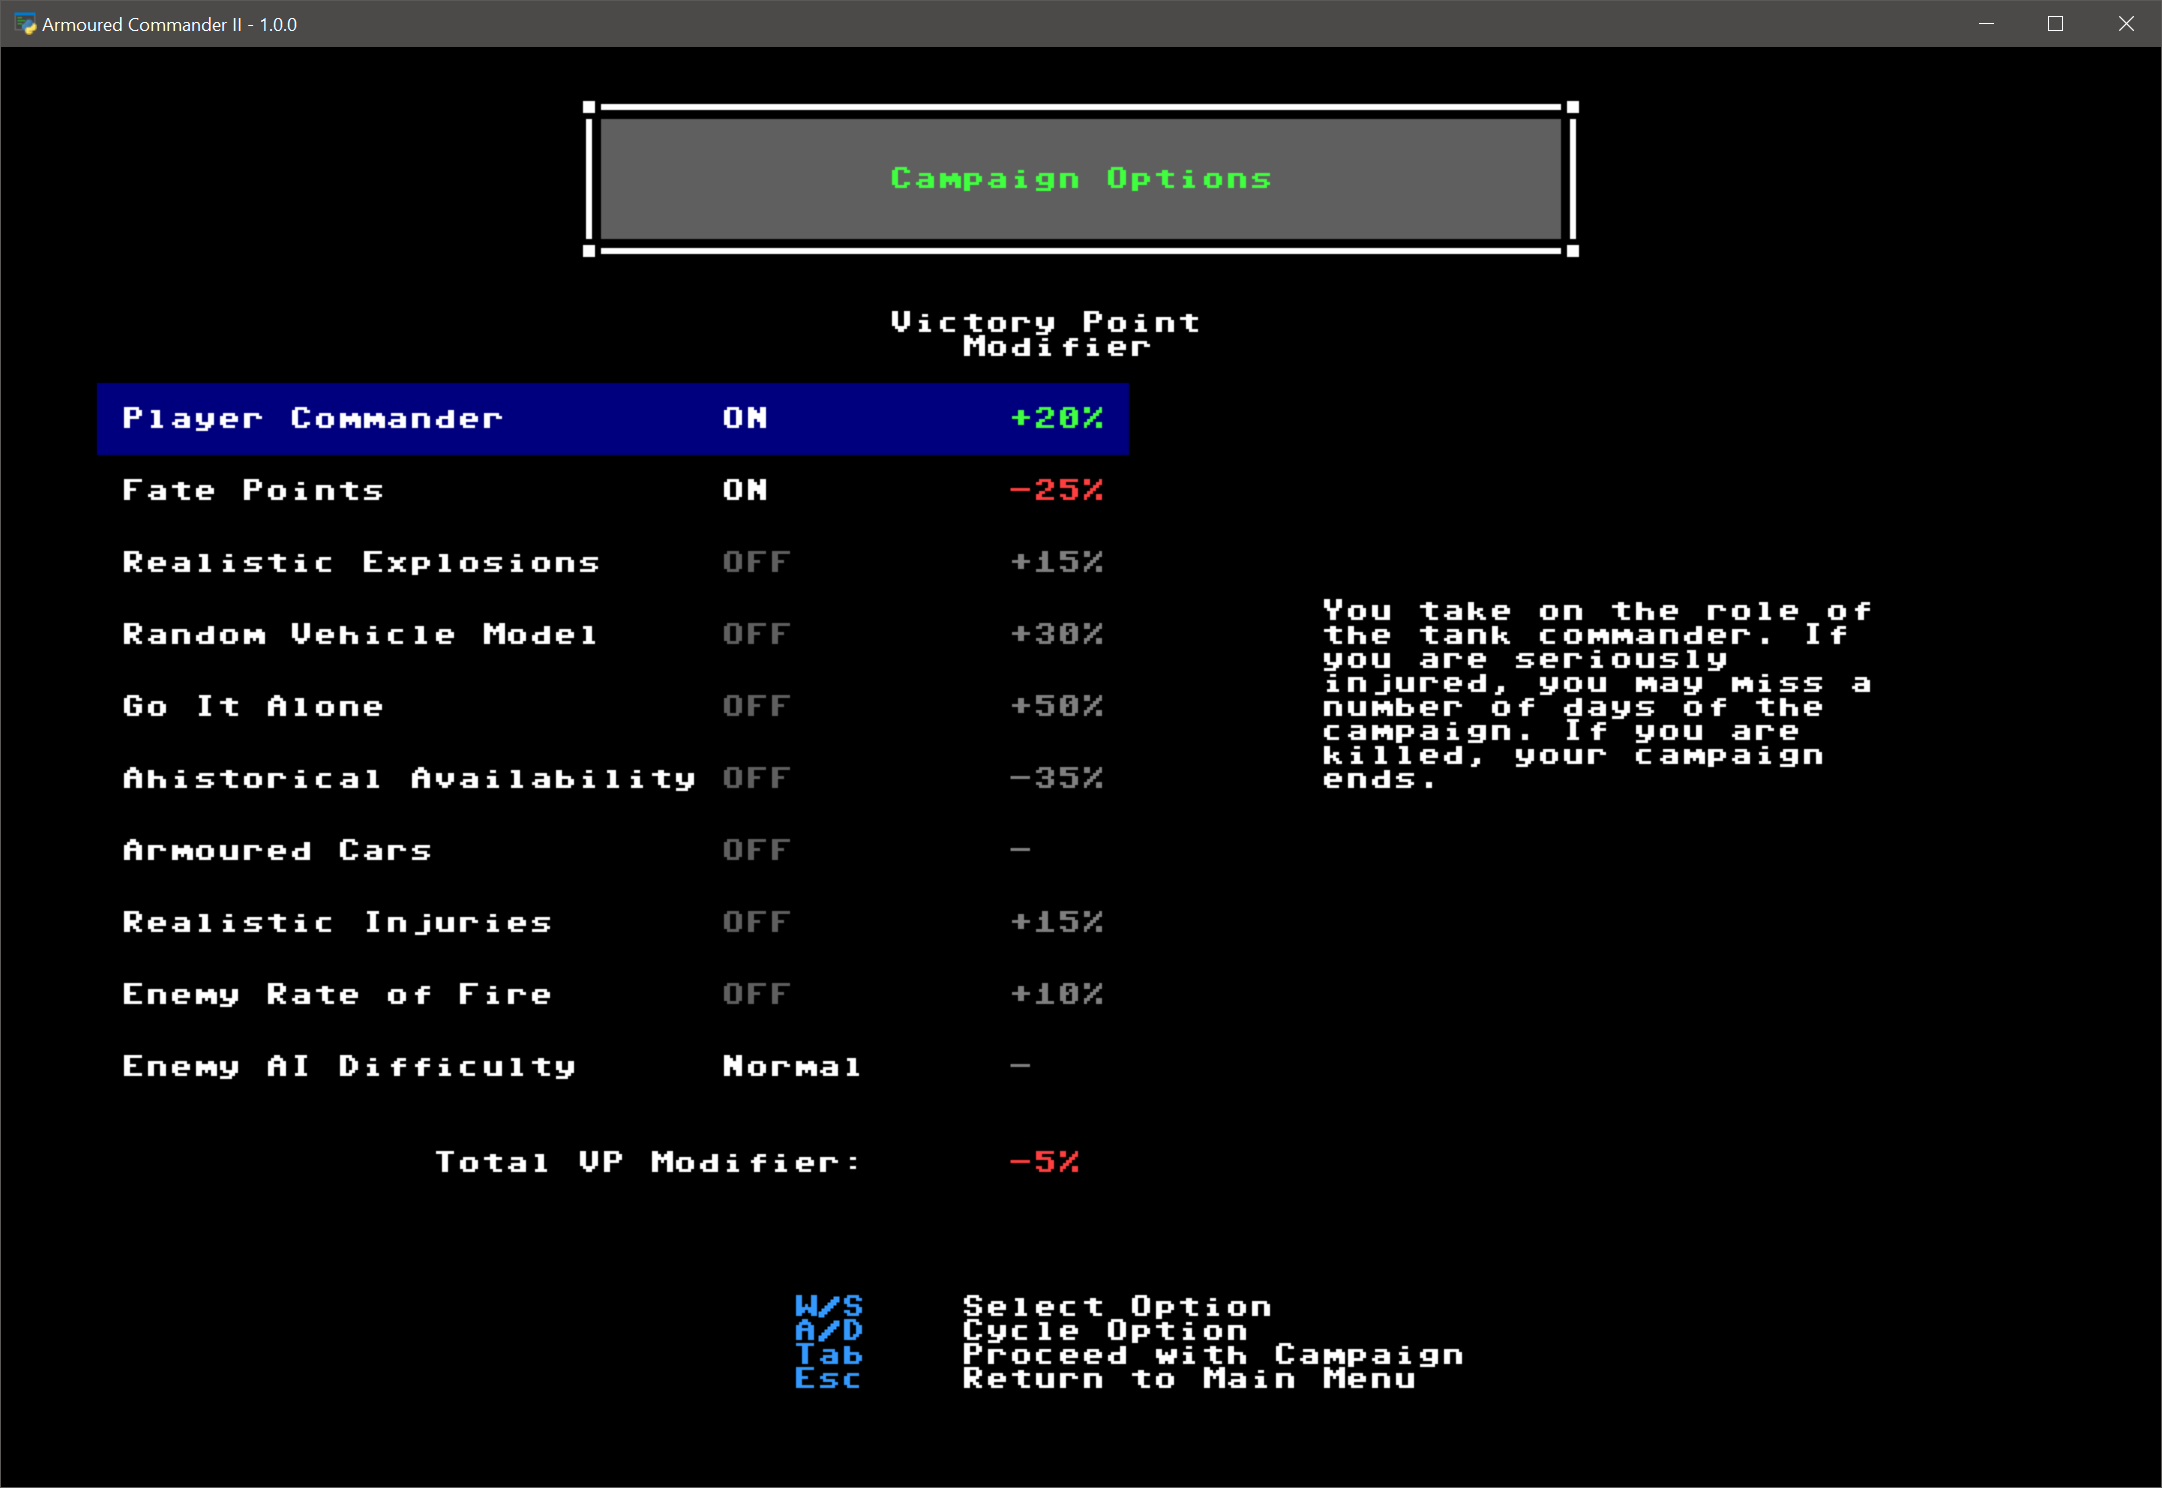
Once you have selected a campaign, you will be taken to the Campaign Options menu.
Several options can be toggled on or off in this menu, but once you select your set of campaign options, they cannot be changed again for this campaign. Each option will apply a modifier to your daily Victory Point score; if the option makes the game easier, you will receive a penalty, if it makes the game more difficult, you will receive a bonus. You can mix and match the campaign options to set the level of challenge that you want to play.
Player Commander
“Player Commander” means that your Commander represents you, and if he is killed or seriously injured, your campaign ends immediately. If your Commander is sent to the Field Hospital, you will miss a number of days of the campaign, and when you return, your old tank may have been destroyed, or you may rejoin some or all of your old crew.
Fate Points
Enabling this option means that at the start of each Campaign Day, you will be granted three “Fate Points.” Your current number of points is displayed as a number in the top right of your tank portrait. Any time there’s an incoming attack on your tank you will have the option of spending a Fate Point to ensure that the attack misses. Note that Fate Points cannot be used for Armour Penetration rolls.
If you also have Player Commander enabled, each fate point may also automatically be used to prevent a fatal injury on your Commander. Once you have exhausted your fate points for the day, no more can be used until the next combat day.
Realistic Explosions
If your tank is knocked out, there’s a chance that your on-board ammo will be ignited, causing an explosion within the tank. If this option is enabled, your crew will very likely all be killed by this explosion, as in real life.
Random Vehicle Model
You will be assigned a random unit those available at the start of the campaign and whenever you require a replacement vehicle. During refit periods you will be offered the option of switching to one randomly-selected model.
Go It Alone
If you select this option, you will not be assigned any squadmates during the campaign.
Ahistorical Availability
The historical availability and rarity of unit types will be ignored, meaning that types of tank, etc. may appear in the game before or after they were historically deployed.
Armoured Cars
If this option is active, you may have access to armoured cars and other types of vehicles, if the campaign has included them. Otherwise you can only command tanks and similar armoured fighting vehicles.
Realistic Injuries
Crewmen will be injured more often when exposed in firepower attacks and by spalling from incoming fire.
Enemy Rate of Fire
If this option is active, enemy units may possible maintain Rate of Fire, giving them multiple attacks per turn.
Enemy AI Difficulty
This can be set to one of four options. Harder settings mean that AI units will be more active and aggressive in Scenarios.
3.3 Other Campaign Information
3.31 Campaign Regions
Campaigns take place in a Region, such as Northwestern Europe, that defines the parameters for the types of weather and terrain you will encounter. Depending on the region, you may encounter more severe winter weather, for example, or the terrain generated for the Campaign Day map may be more hilly, forested, and so on.
3.32 Weather Conditions
The weather conditions for each combat day will be randomly generated, and may change during the course of the combat day. The initial odds of each type of weather will be based on the current campaign region as well as the date in the calendar. Weather conditions fall into one of three categories:
Cloud Cover:
Clear, Scattered, Heavy, Overcast
Precipitation cannot fall if cloud cover is clear; no air support possible if Overcast
Precipitation:
None, Mist, Rain, Heavy Rain, Light Snow, Snow, Blizzard
Affects spotting checks and to-hit chances; if continues, can change Ground Conditions to Wet, Muddy, Snow, or Deep Snow
Ground Conditions:
Dry, Wet, Muddy, Snow, Deep Snow
Snow dampens effect of HE; increases chance of Bogging Down; increases travel time required on Campaign Day map
Wind Conditions:
None, Light, Gusty, Strong
Wind will dry out the ground quicker, and will cause fog, smoke, and dust to dissipate faster
Fog:
Makes spotting more difficult; applies a penalty to attacks; air support not possible in fog
4.1 Tank Selection
A selection of tank models, perhaps joined by armoured cars or other vehicles, are available to you at the start of the campaign. Some types of tank will only become available later in the campaign, either because they represent tanks captured from the enemy, or because historically they were not delivered to the front lines until a later date.
During Refit Weeks, or if you have to abandon your tank, you will have an opportunity to select a new model. Pay close attention to the stats of your chosen tank, since you may be riding in it for some time.
One important tank stat to take note of in the Tank Selection menu – some campaigns will define a Victory Point Multiplier for certain underpowered or overpowered tank models. If you select one of these tanks, your total VP earned per combat day will be modified slightly to reward you for playing in a more vulnerable tank, or possibly apply a slight penalty for an overpowered one.
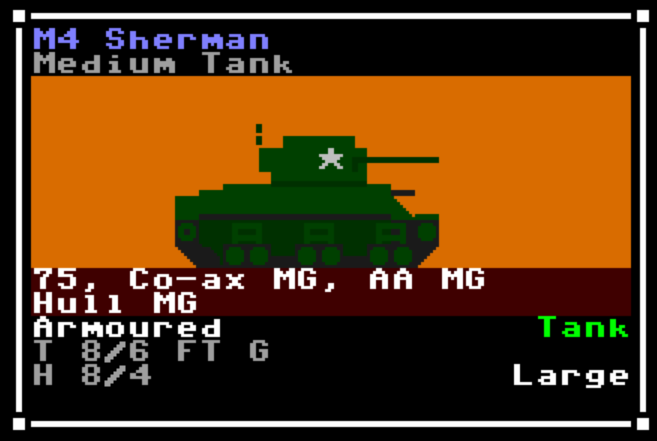
Virtually everything you need to know about a unit is included in its unit information display. Your tank’s stats are especially important, so here is an example of how to read them:
Basic information about the unit appears at the top, above the unit portrait:
- M4 Sherman: This is the unit identifier, unique to each model of tank
- Medium Tank: This is the unit’s class, indicating generally what type of unit it is
Weapons are listed on a dark red background:
- Guns may be short (S), long (L), or very long (LL) barreled
- Co-axial weapons are mounted on the turret alongside (or as) the main gun
- Anti-Aircraft (AA) machine guns (MG) can fire in any direction, but must often be fired from outside of the tank
- Hull MGs are fixed to the front of the hull
If a weapon is displayed in a light grey colour, it means that it is unreliable and has a greater chance of breaking down
Armoured or Unarmoured vehicles have their armour values listed here:
- The T line refers to turret armour, but if there is no rotatable turret it will appear as U (Upper Structure) instead. If the turret has a fast traverse, this will be noted by (FT). If it has a very slow traverse speed, this will be noted by (VST). If the turret has restricted space inside, (RST) will appear here. If the vehicle’s gun has a gyrostabilier, this will be displayed with a G
- H refers to hull armour
- The two armour values x/y refer to front and side armour respectively for that area, higher values mean better protection from incoming attacks
- Rear armour values for any location are one level lower than its side level
The movement class of the unit is shown in green in the lower right:
- Fast and Slow movement classes have correspondingly better or worse odds of making a successful move on the Scenario map
- If a vehicle has light ground pressure this will be displayed in a light shade of green, if heavy ground pressure, a darker shade. Ground pressure affects the chance of bogging down.
- If a vehicle has an especially powerful engine, a plus sign will appear next to the movement class
- If a vehicle has an unreliable drivetrain, it will be shown by (u)
Any special vehicle features will appear below the movement class:
- HVSS stands for Horizontal Volute Spring Suspension; vehicles with this upgrade are slightly faster and less likely to bog
- Recce is short for reconnaissance, and means that the vehicle is less likely to be ambushed at the start of a scenario
- ATV means that this is an All-terrain Vehicle, and they are not affected by terrain modifiers when trying to move on the Scenario map
The size class of the unit appears below that. Larger targets are easier to spot and hit
The crew positions for your tank will be listed in the right column of the tank selection menu. A full crew will be automatically generated for your chosen tank.
From this menu you can select any tank model that is available to you. You can also name your tank, or you can give it a name later on. Finally, you can have the game select a random tank model from this list for you.
4.2 Crew
This soldier, I realized, must have had friends at home and in his regiment; yet he lay there deserted by all except his dog. I looked on, unmoved, at battles which decided the future of nations. Tearless, I had given orders which brought death to thousands. Yet here I was stirred, profoundly stirred, stirred to tears. And by what? By the grief of one dog.

Napoleon Bonaparte
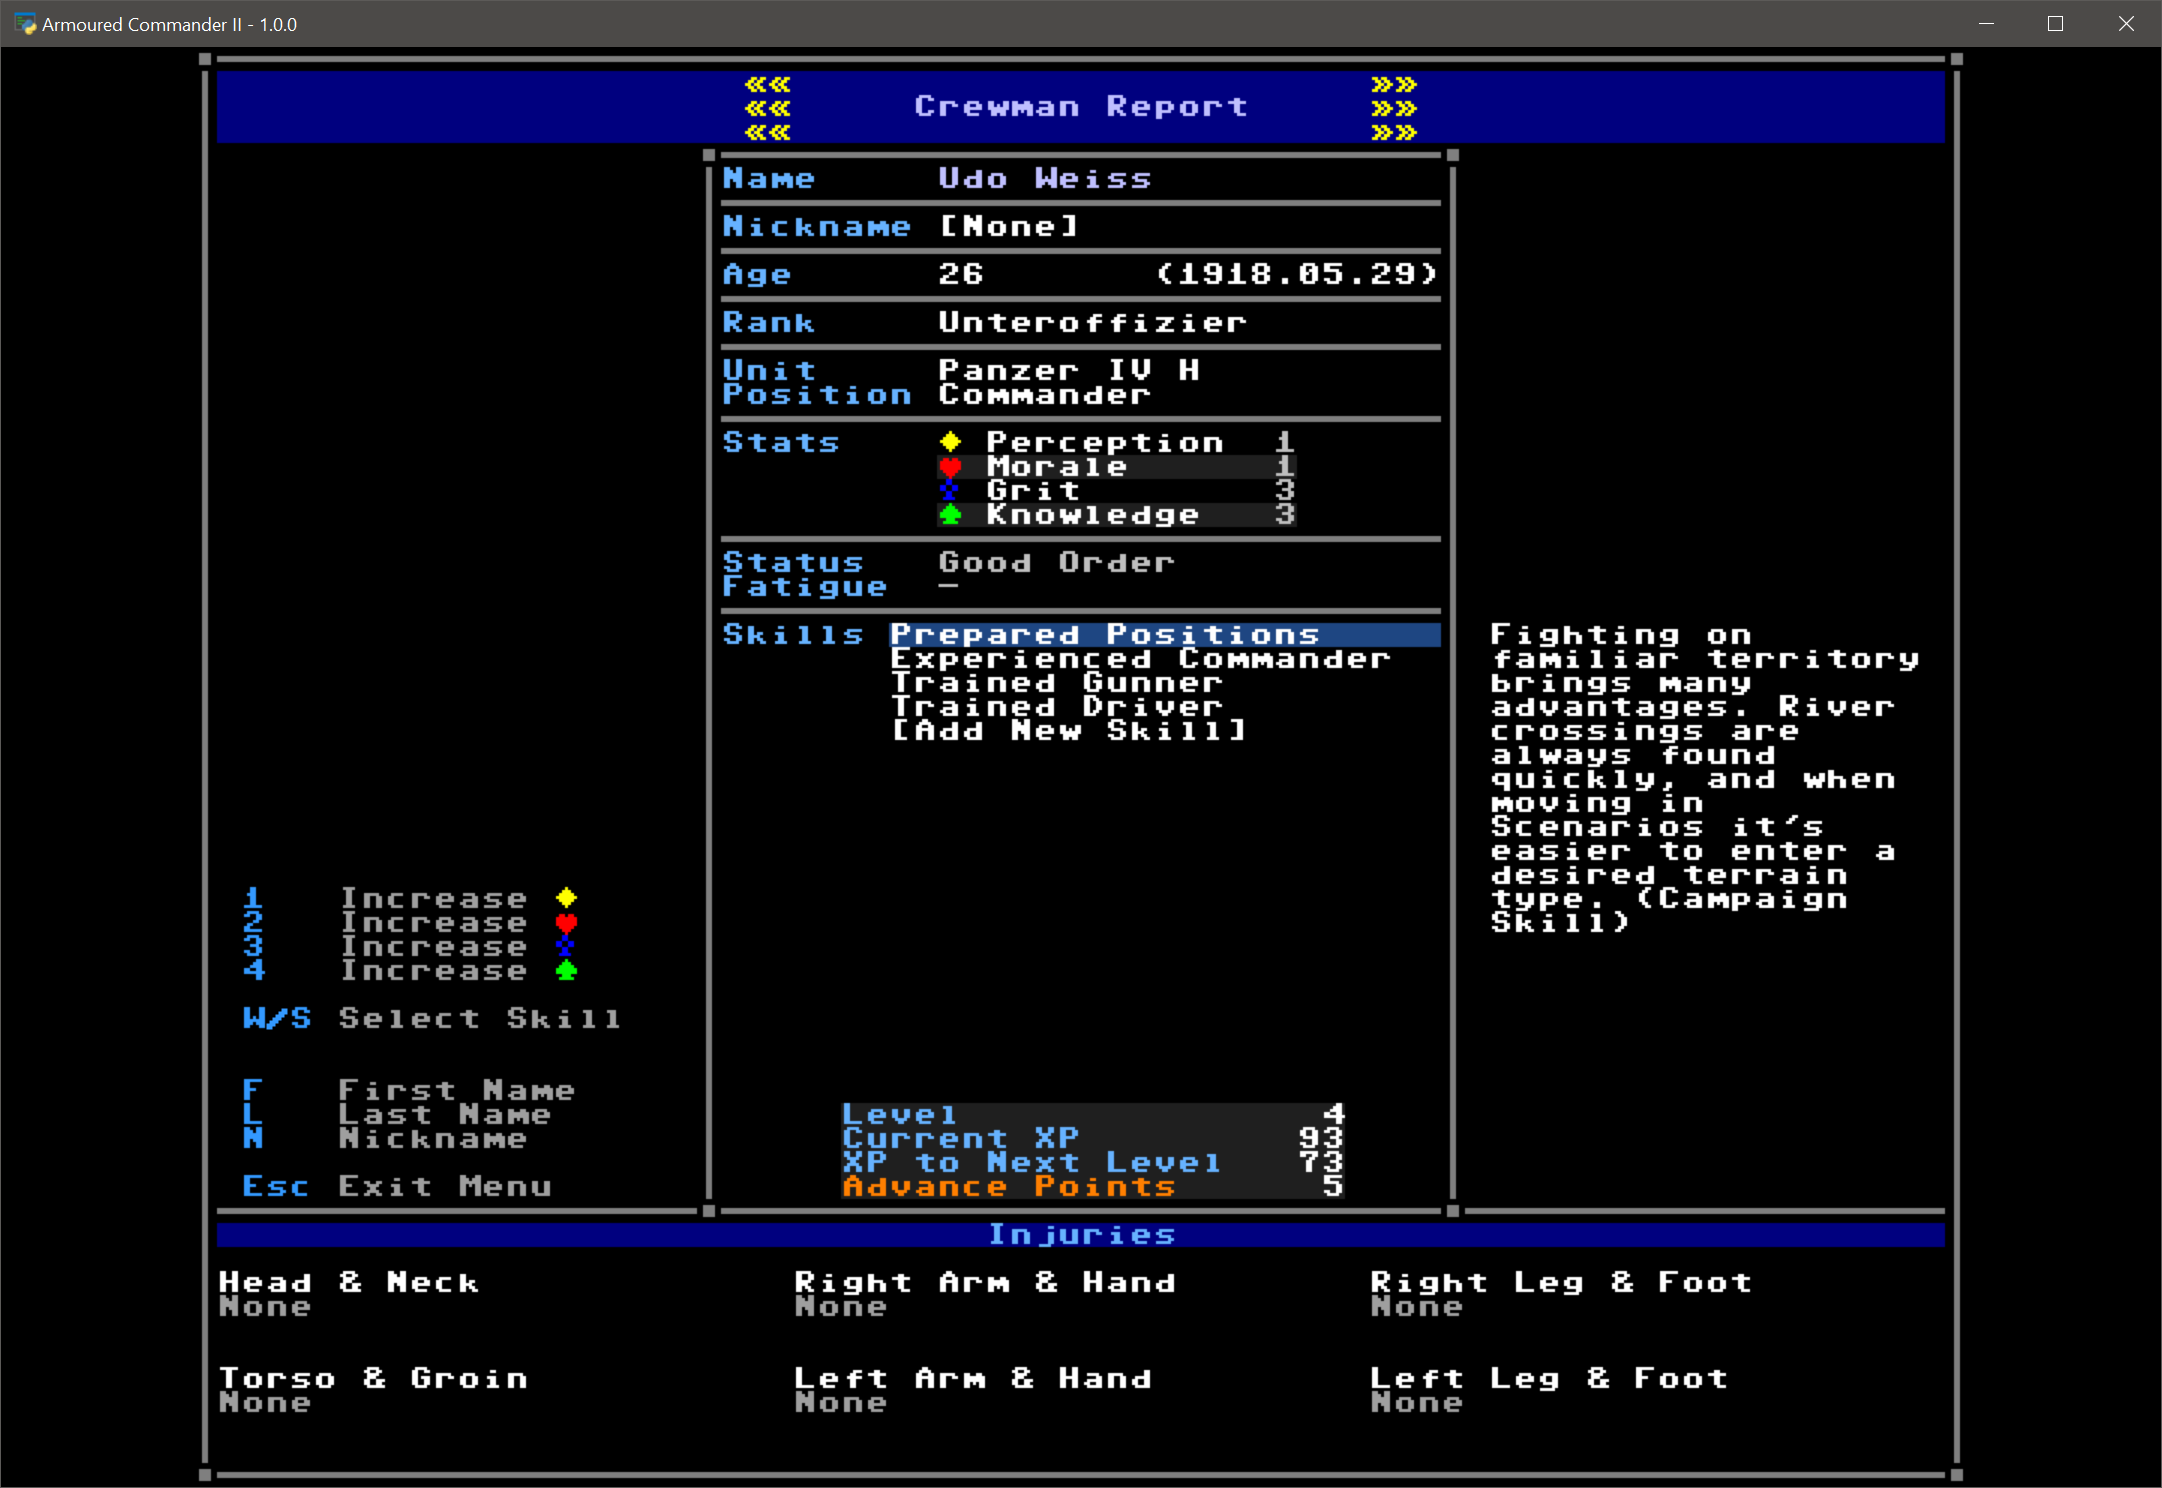
Each crewman in your tank has their own set of stats, skills, and experience points. Names are randomly generated, but you can change these at any time, and can assign a nickname to each crewman. Crewmen have a position in the tank for which they are trained, but any crewman can work any position if needed in an emergency. If it’s a more complex position than they are used to, however, then they won’t be as effective as a trained crewman would be in that position.
Crewmen start at a rank appropriate to their initial position, and as they gain levels they may be promoted to a higher rank. Each promotion grants the crewman two free advance points.
4.21 Crew Stats
Each crewman has four stat values, which are randomly generated at the start of the game but can be improved by spending Advance Points later on:
- Perception is used during attempts to spot enemy units on the scenario layer
- Morale represents the crewman’s ability to resist and recover from being Shaken or Stunned, and to recover from Fatigue
- Grit is used to resist being Stunned, recover from Critical injuries, and resist being Injured
- Knowledge applies a small bonus to crewmen actions
Most skills have a minimum stat requirements, so plan out your stat increases based on the skills that you plan to add to your crewman in the future.
4.22 Crew Experience
At the end of each combat day, each surviving crewman is awarded experience points based on your total Victory Point score for the day. Depending on how many points they gained, they may go up one or more levels. Each time they go up a level, they are awarded with an Advance Point which can be spent increasing the crewman’s stats or adding a skill.
4.23 Crew Skills
Many crewman skills are available, but not all are available to crewmen in all tank positions. Some of them have another skill as a prerequisite. All apply some kind of bonus or give your tank an advantage as described in the skill description. Campaign Skills cannot be purchased with Advance Points, and are only granted at the start of a Campaign.
4.24 Crew Conditions
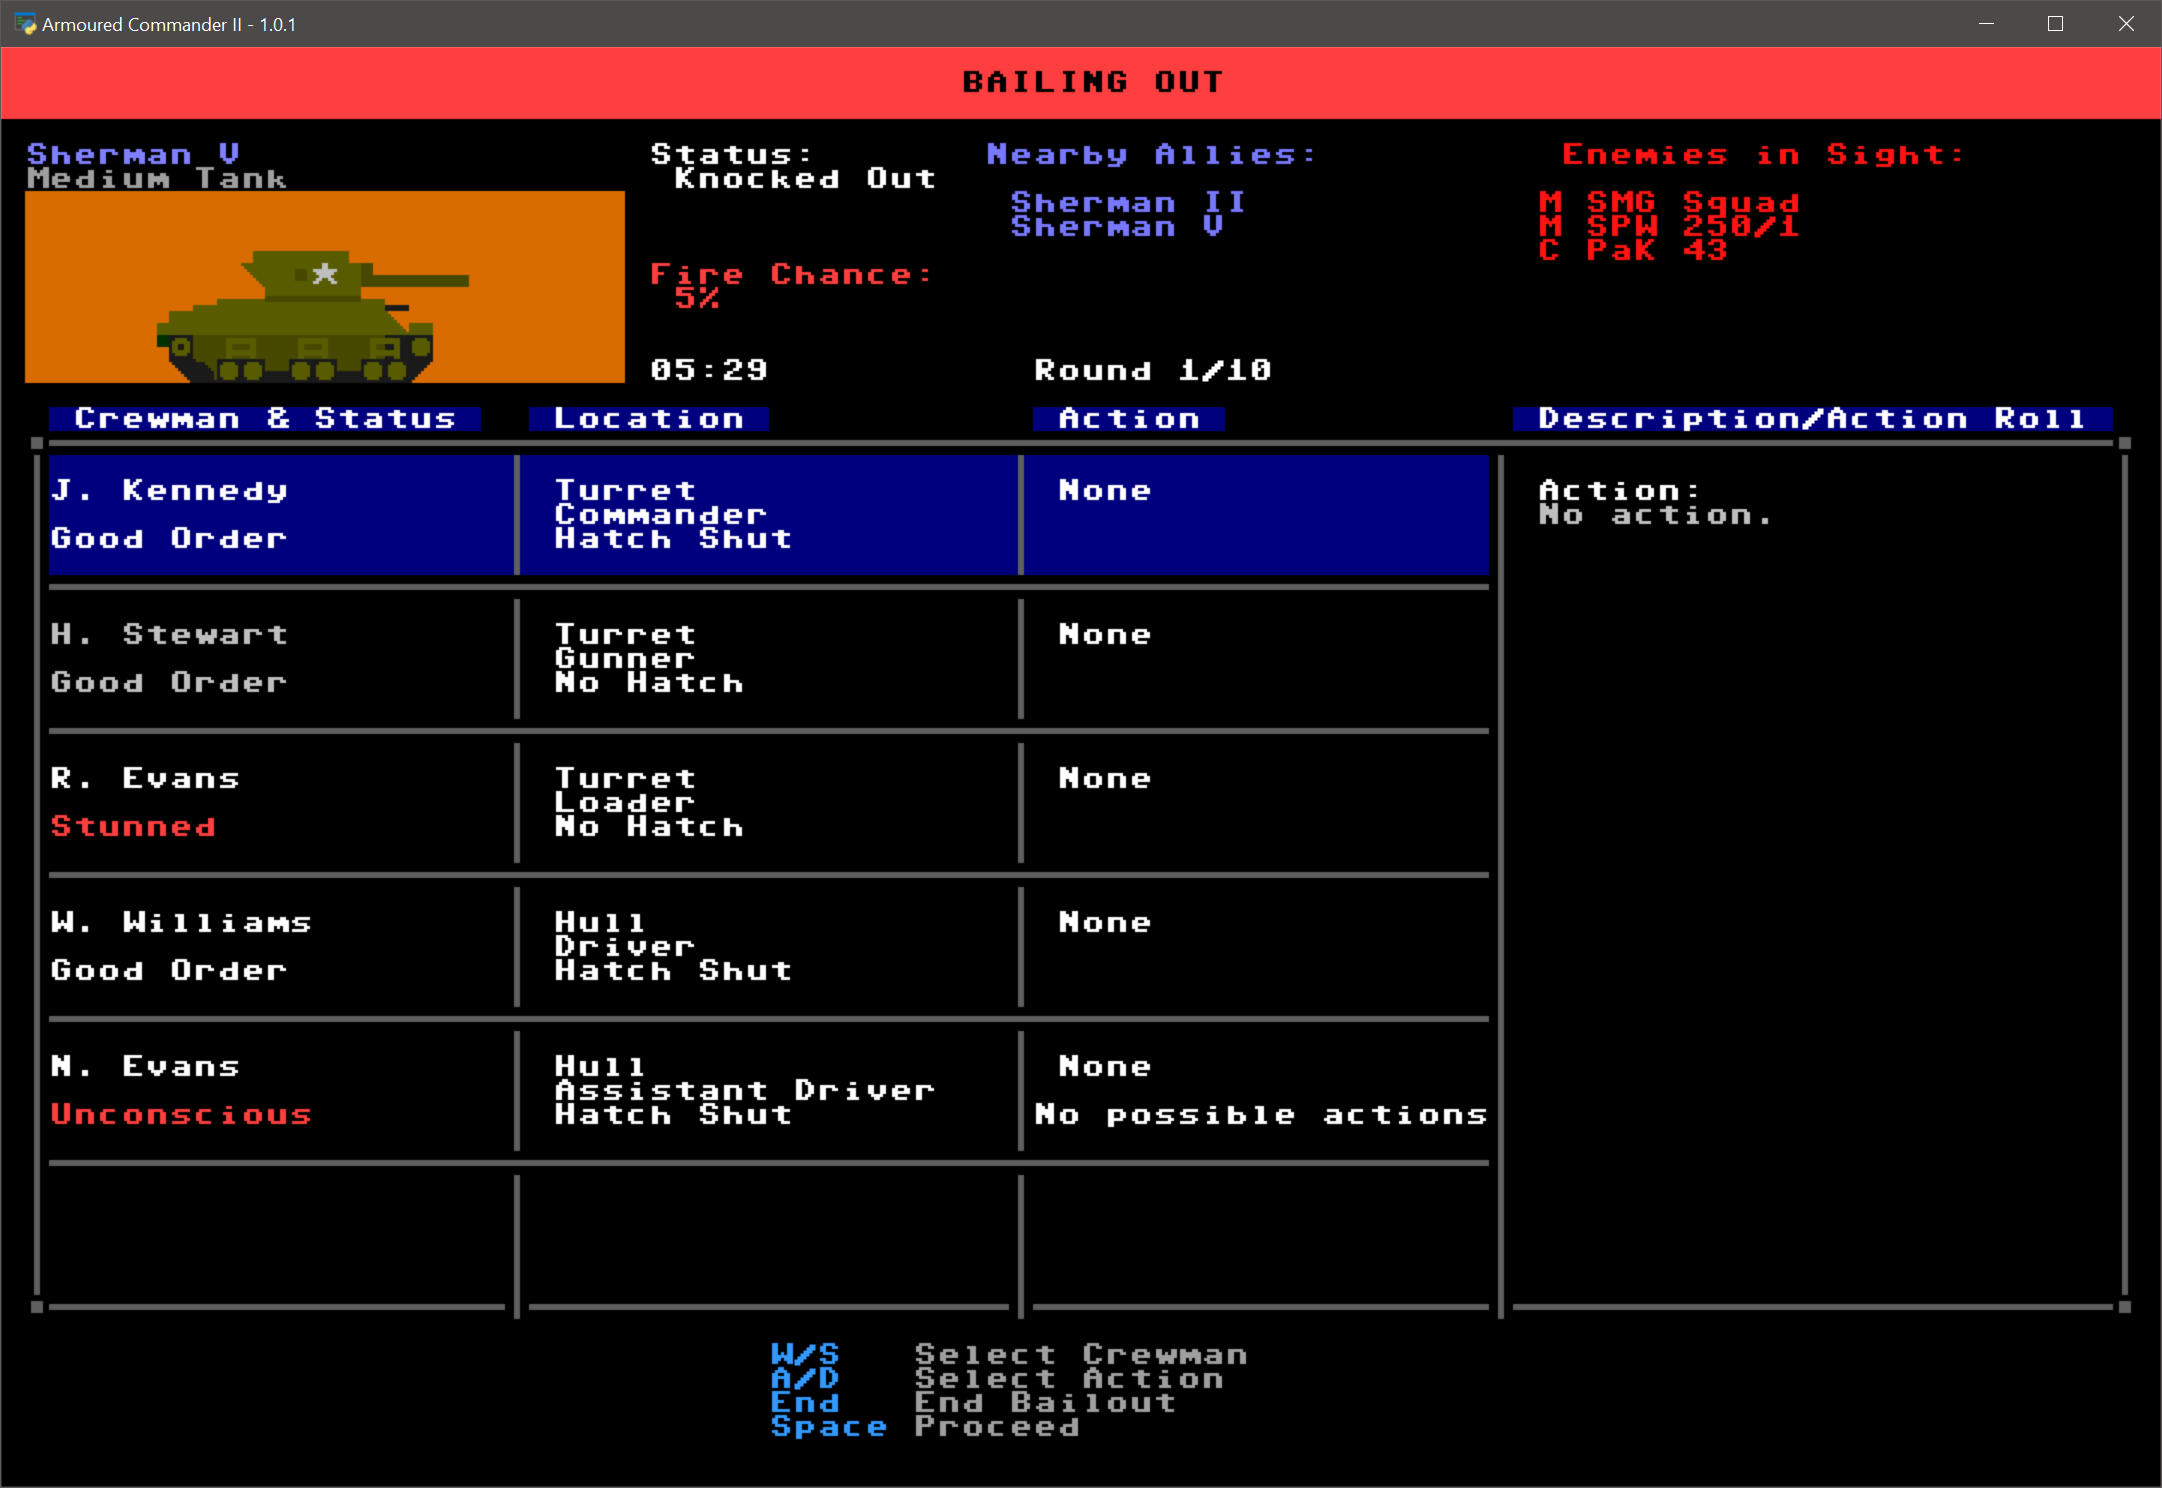
During the course of a combat day, your crew are subject to a number of Conditions that may negatively affect their ability to operate. The default condition is “Good Order” which indicates no penalties. If injured or subject to incoming firepower, crewmen may become “Shaken” which means that they more likely to be injured in a subsequent attack until they recover. “Stunned” means that they have been more seriously affected, and until they recover all their effective skill bonuses are reduced by half. “Unconscious” means that the crewman has been knocked out, and cannot perform any actions until they recover.
4.25 Crew Hatches, BU, and CE
Most armoured fighting vehicles include hatches so that crewmen can exit the vehicle quickly in case of being knocked out. Not all positions have their own hatch, however, and some vehicles that lack a fully-enclosed roof (such as many tank destroyers) don’t need them. Crewmen are always in one of two states:
- BU: Buttoned Up. This means either that the crewman’s hatch is closed or they don’t have a hatch. In either case, they are protected.
- CE: Crew Exposed. This means either that the crewman’s hatch is open, or they are in a position that’s not protected by armour in at least one direction. In either case, they are vulnerable.
Crew hatches can be opened or closed at any time on the Campaign Day map, or during the Command Phase on the Scenario map. You can also set the default hatch status for a given crewman in the Scenario layer, which will automatically be set at the start of every subsequent scenario.
Effects of being BU:
- Crewmen are protected from the effects of small arms, MG, HE, etc. attacks on your tank; they only risk injury if the armour of your tank is penetrated
- Less chance of gaining fatigue during Cold and Extreme Cold conditions
- Harder to spot enemy units
- Usually the crewman’s spotting distance is reduced, and the number of directions in which they can spot is limited, since they have to use a periscope or small porthole to spot
- Most AA MG weapons can only be operated if the crewman is CE
- Cannot throw Smoke Grenades when BU
- If the crewman is in a Restricted Turret (RST), then main actions will not be available to them, such as operating a gun, since these turrets are too small to be able to look out a hatch and also do something inside the tank
- BU crewmen in a RST also have an increased base chance of fatigue gain
Effects of being CE:
- Crewmen are vulnerable to the effects of small arms, MG, HE, etc. attacks on your tank
- If your tank was knocked out by a Close Combat attack, CE crewmen have a higher chance of being injured by the KO attack
- Increased chance of fatigue gain in Extreme Cold conditions, but reduced chance in Extreme Hot conditions
- The effect of commands such as Direct Fire and Direct Movement is increased
- If at least one crewman is CE at the start of a Scenario, the chance of being Ambush is reduced
- CE Drivers have a bonus to move actions and to HD attempts
Unconscious crewmen with an open hatch or in an open-topped position still count as being CE, but they won’t be as vulnerable to incoming attacks, since they will be slumped down in their position.
4.26 Crew Injuries
Crewmen may be injured by incoming small-arms or machine-gun fire if they are not Buttoned Up or otherwise protected by armour. They may also be injured as the result of an incoming attack that penetrates the tank’s armour. Six separate injury locations are tracked for each crewman, and injuries in different locations have different effects during the day:
- Head & Neck: greater chance of becoming Stunned or Unconscious when injured; penalty to spot concealed enemy units if Heavy or worse
- Torso & Groin: Slightly greater chance of becoming Stunned when injured
- Arm & Hand: Penalty to actions that require the use of arms and hands
- Leg & Foot: Penalty to bail out of your tank if Heavy or worse
Any location that is already injured and become subject to another attack is more likely to increase the severity of its injury. Certain locations are normally protected; for example, a Leg & Foot injury is very unlikely for a crewman exposed due to an open hatch. Sniper attacks, in contrast, are much more likely to hit the Head & Neck than other locations.
Injuries start as Fresh and can be Patched-Up during a battle or automatically after a battle ends. Injuries get treated after the combat day is over, after which they will be healing for a period of a few days. Healed injuries may leave scarring in that location, which reduces a random stat by one.
At the end of each combat day, each Heavy or Serious injury that a crewman has taken increases the chance that he will have to be transferred to a Field Hospital for a period of time to recover, before he can rejoin your crew. Otherwise, all injuries are treated and considered to be healed at the end of a combat day.
Crewmen may die during the combat day. They remain at their position but they can also be moved to another position within the tank if required. If you are granted Resupply, then any dead bodies are taken away by the supply vehicle. Dead bodies are also removed at the end of the combat day.
4.3 Crew Skills
- Trained Commander: Allows crewmen to operate Commander positions without penalty.
- Experienced Commander: Allows crewmen to operate Commander positions without penalty and to gain Commander-specific skills.
- Trained Gunner: Allows crewmen to operate Gunner positions without penalty.
- Experienced Gunner: Allows crewmen to operate Gunner positions without penalty and to gain Gunner-specific skills.
- Trained Driver: Allows crewmen to operate Driver positions without penalty.
- Experienced Driver: Allows crewmen to operate Driver positions without penalty and to gain Driver-specific skills.
- Fire Spotter: Slightly increases effect of Direct Fire action.
- MG Spotter: Greatly increases effect of Direct Fire action when attacking with a Machine Gun.
- Gun Spotter: Greatly increases effect of Direct Fire action when attacking with a Gun.
- Driver Direction: Slightly increases effect of Direct Movement action.
- Lay of the Land: Greatly increases effect of Direct Movement action when attempting Hull Down.
- Forward!: Greatly increases effect of Direct Movement action when moving forward.
- Enemy Spotted!: Less chance of being ambushed at the start of a battle encounter.
- Explorer: Greater chance of quickly finding a crossing point when attempting to ford a river.
- Natural Leader: All other crewmen in the tank have a bonus to Morale checks.
- Coordination: All crewmen accumulate less fatigue due to good coordination and rotation of tasks.
- Tactical Retreat: Bonus chance to withdraw from a battle when Directing Movement.
- Improved Recon: Recon reports on enemy resistance will be more accurate.
- Keen Senses: Your observational senses have become sharpened and you keep a constant watch for enemy contact. Enemy units are more likely to start the Scenario further away from you.
- Primo Victoria!: You are a ruthless expert in close-combat fighting. Overrun attacks are more effective.
- Quick Trigger: Slightly increases chance of maintaining Rate of Fire when firing a Gun.
- Time on Target: Greatly increases chance of maintaining Rate of Fire when firing a Gun at a stationary target.
- Crack Shot: Slightly increases chance to hit when firing a Gun.
- Target Tracker: Greatly increases chance to hit firing a Gun at a moving target.
- Sniper: Greatly increases chance to hit firing a Gun at a long-range target.
- Target Focus: Reduces the effect of precipitation when firing a Gun.
- Knows Weak Spots: Slightly increases chance of scoring a Critical Hit when firing a Gun at an armoured target.
- Basic Gyro Use: Allows the crewman to use the gyrostabilizer on a Gun.
- Advanced Gyro Use: Allows the crewman to fully make use of the gyrostabilizer on a Gun.
- Gun Maintenance: Decreases chance of a jam or breakdown for the gun that the crewman is reloading. Also helps when attempting to unjam a weapon.
- Fast Hands: Slightly increases chance of maintaining Rate of Fire when reloading a Gun.
- Ammo Scrounger: Increased number of rare ammo available at start of day.
- Quick Shifter: Slightly increases chance of a successful Move Forward or Backward action.
- Eye for Cover: Slightly increases chance to achieve Hull Down status after moving.
- Eye for Terrain: Slightly increases chance to enter desired terrain type when moving or repositioning.
- Cautious Driver: Decreases chance of bogging down and triggering land mines.
- Mechanic: Decreases chance of breakdown when moving on the Scenario map. Also helps when attempting to unjam a weapon.
- Shell Tosser: Increases chance of RoF when crewman is on Pass Ammo command.
- Good Comms: Decreases chance of a friendly fire artillery or air attack on your squad.
- Burst Fire: Slightly increases chance of maintaining Rate of Fire when firing a Machine Gun.
- Eagle Eyed: When hatch is open, slightly increases chance to spot and identify enemy units.
- Fire Fighter: Less chance of a fire starting when tank is knocked out. Effect does stack if multiple crewmen have this skill.
- Infantry Specialist: Small bonus to all attacks against Infantry and Cavalry targets. Not possible to add any other Target Specialist skill after this one.
- Gun Specialist: Small bonus to all attacks against Gun targets. Not possible to add any other Target Specialist skill after this one.
- Vehicle Specialist: Small bonus to all attacks against Vehicle targets. Not possible to add any other Target Specialist skill after this one.
- Quick Reflexes: When hatch is open, slightly decreases chance of injury or death from incoming firepower attacks.
- Lightning Reflexes: When hatch is open, greatly decreases chance of injury or death from incoming firepower attacks.
- Gymnast: Slightly increases chance to successfully bail out.
- Acclimatized: Reduced chance of gaining fatigue from Hot and Cold conditions.
- Acclimatized (Desert): Reduced chance of gaining fatigue from Extreme Hot conditions.
- Acclimatized (Nordic): Reduced chance of gaining fatigue from Extreme Cold conditions.
5. The Campaign Calendar
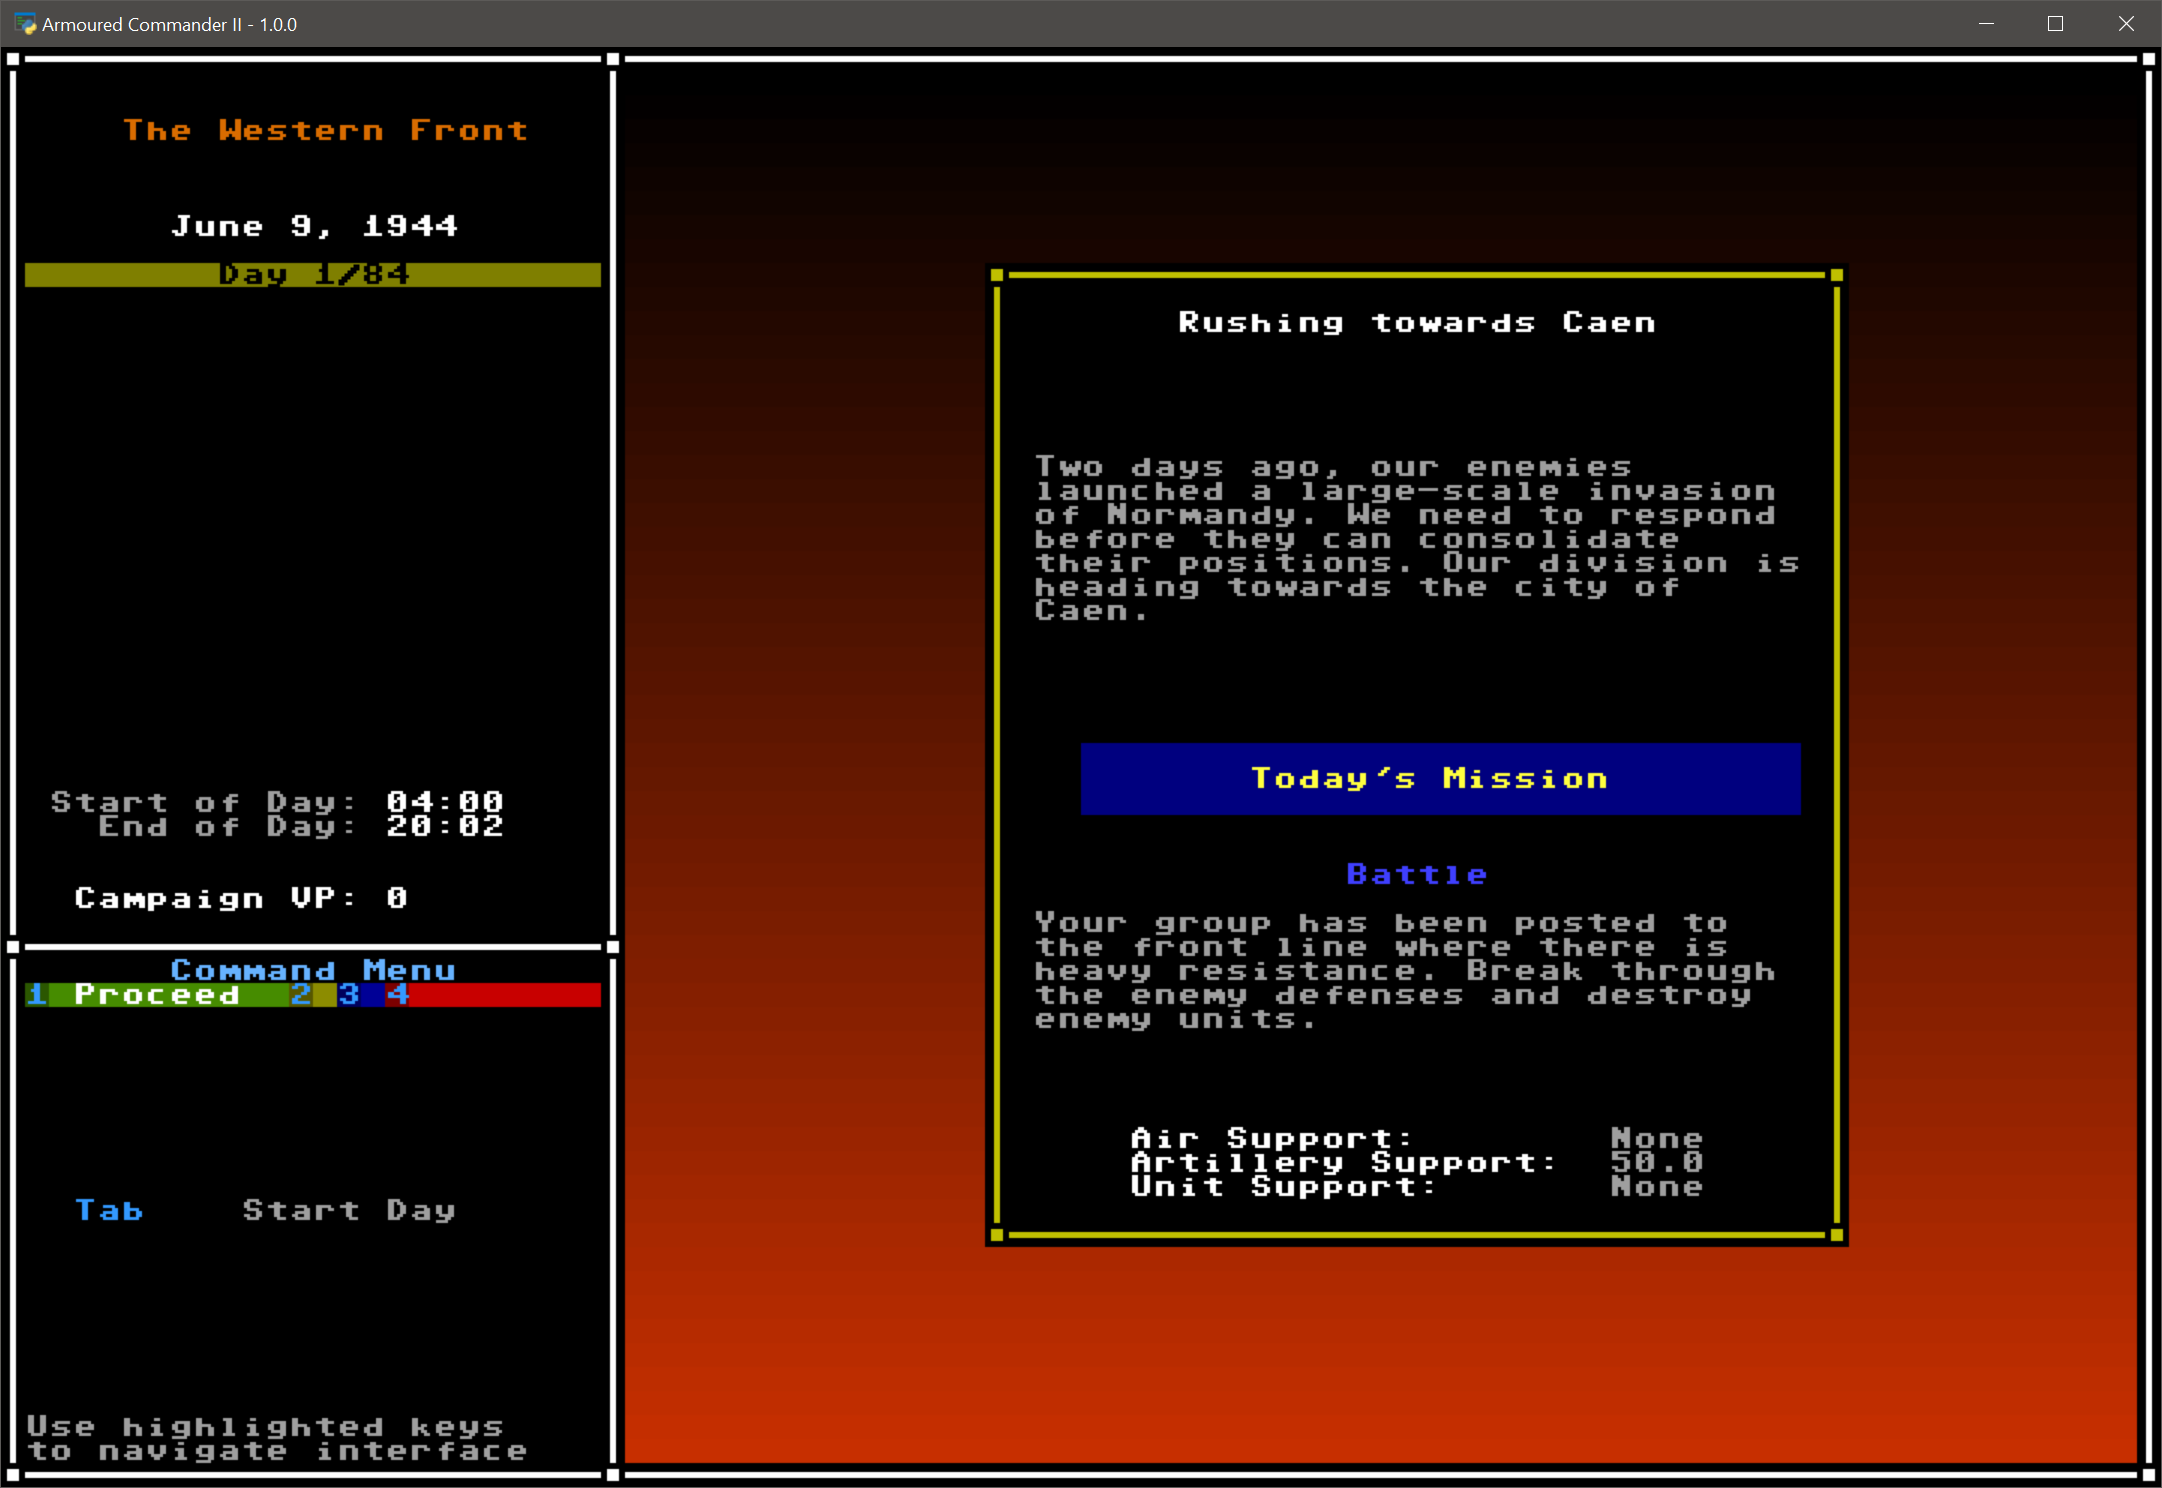
In the Campaign Calendar layer you can prepare for the upcoming combat day; you also return to this view at the end of a combat day. The Command Menu in the lower left has four tabs, and pressing a number key from 1 to 4 will activate that tab, and will also change the display in the main panel to the right.
- Tab 1 is the Proceed menu, which will allow you to start a combat day, or to proceed to the next day in the combat calendar if the day is complete
- Tab 2 is the “Crew and Tank” command menu. Here you can review each of your crew, see your tank’s stats, and assign crew and tank nicknames if you have not done so already
- Tab 3 displays a journal, which you can review at the end of the combat day
- Tab 4 displays the Field Hospital, which is where badly injured crewmen may be sent to recover at the end of a combat day
To start your game, press 1 to activate the Proceed menu tab, and press Enter to start your combat day. If you survive your combat day, you will return to this layer from which you can proceed to the next combat day.
5.01 Campaign Day Missions
On each combat day you will be assigned one of five possible missions for the day. The mission determines the initial set-up of the Campaign Day map, the average enemy resistance level, the odds of friendly and enemy zone capture, and Victory Point rewards for capturing zones:
- Advance: Low enemy resistance, very high chance of friendly forces capturing zones, high VP value of captured zones, higher chance of Ambush
- Battle: Stronger enemy resistance, equal chance of friendly and enemy forces capturing zones
- Counterattack: Moderate enemy resistance, very high chance of enemy forces capturing zones
- Fighting Withdrawal: Stronger enemy resistance, exceptionally high chance of enemy forces capturing zones
- Spearhead: Normal enemy resistance, very low chance of any friendly or enemy zone capture, VP value of captured zones increases as you move up the map, higher chance of Ambush
- Hold the Line: You must hold a line of objectives until the end of the combat day
- Patrol: Very light enemy resistance, very low chance of any friendly or enemy zone capture
- Urban Assault or Urban Defense: These only occur in urban areas, but will involve unique terrain conditions and a higher level of danger
In Counterattack and Fighting Withdrawal missions, you cannot progress forward into a new map area (past the top row of the map), you can only withdraw backward (past the bottom row of the map). In Hold the Line and in both Urban missions, you cannot move into a new map area at all.
5.02 Ammo Load Menu
At the start of every combat day you must load (or reload) all the guns on your tank with ammo. Depending on your tank, you may have one or more guns, and each gun may be able to fire one or more types of ammo. You can load more than the safe amount of ammo into your tank, but beware that if your tank is knocked out when carrying extra ammo, it will be more dangerous for your crew, as the rounds are not safely stowed away and can ignite with potentially deadly consequences.
- HE (High Explosive) produces an explosion upon impact, and is more effective against infantry, guns, and unarmoured vehicles
- AP (Armour Piercing) is only effective against vehicles, and is best used against armoured targets
- APCR (Armour Piercing Composite Rigid) is much more effective against armoured targets
- APDS (Armour Piercing Discarding Sabot) is much more effective against armoured targets
- C (Canister or Shrapnel) is very effective against soft targets
- HEAT (High-Explosive Anti-Tank) is much more effective against armoured targets, but can also damage other targets as well with its explosive blast
- WP (White Phosphorous) produces smoke and as harmful to soft targets
- Smoke will produce concealing smoke upon impact, making it more difficult for enemy units to fire at you and your allies
Most guns have a Ready Rack to hold ammo that is very close to the gun itself. In combat, if you are reloading from the ready rack rather than the general stores, you will have a higher chance of firing multiple times per turn. You can load ammo into the Ready Rack now, but your Gunner or Loader can also move shells between your General Stores and the Ready Rack during the day. Further information on the ready rack is in the Scenario section below.
Some ammo types will have limited availability and only a few will be made available to you each day. Some ammo types were only issued to fighting units after a certain calendar date, and so will only be available to you from that date in your campaign.
If you’re not certain what ammo to load, you can always use ‘X’ to add a recommended loadout. Don’t forget to load each gun on your tank.
Machine Guns (MGs) do not need to be loaded; it’s assumed that you are carrying ample ammo for them for the day. If your tank is only armed with Machine Guns, then you will skip this menu altogether.
6. The Campaign Day
Once you start your combat day, the first game interface layer that you will encounter will be the Campaign Day layer, with the Campaign Day map prominently displayed.
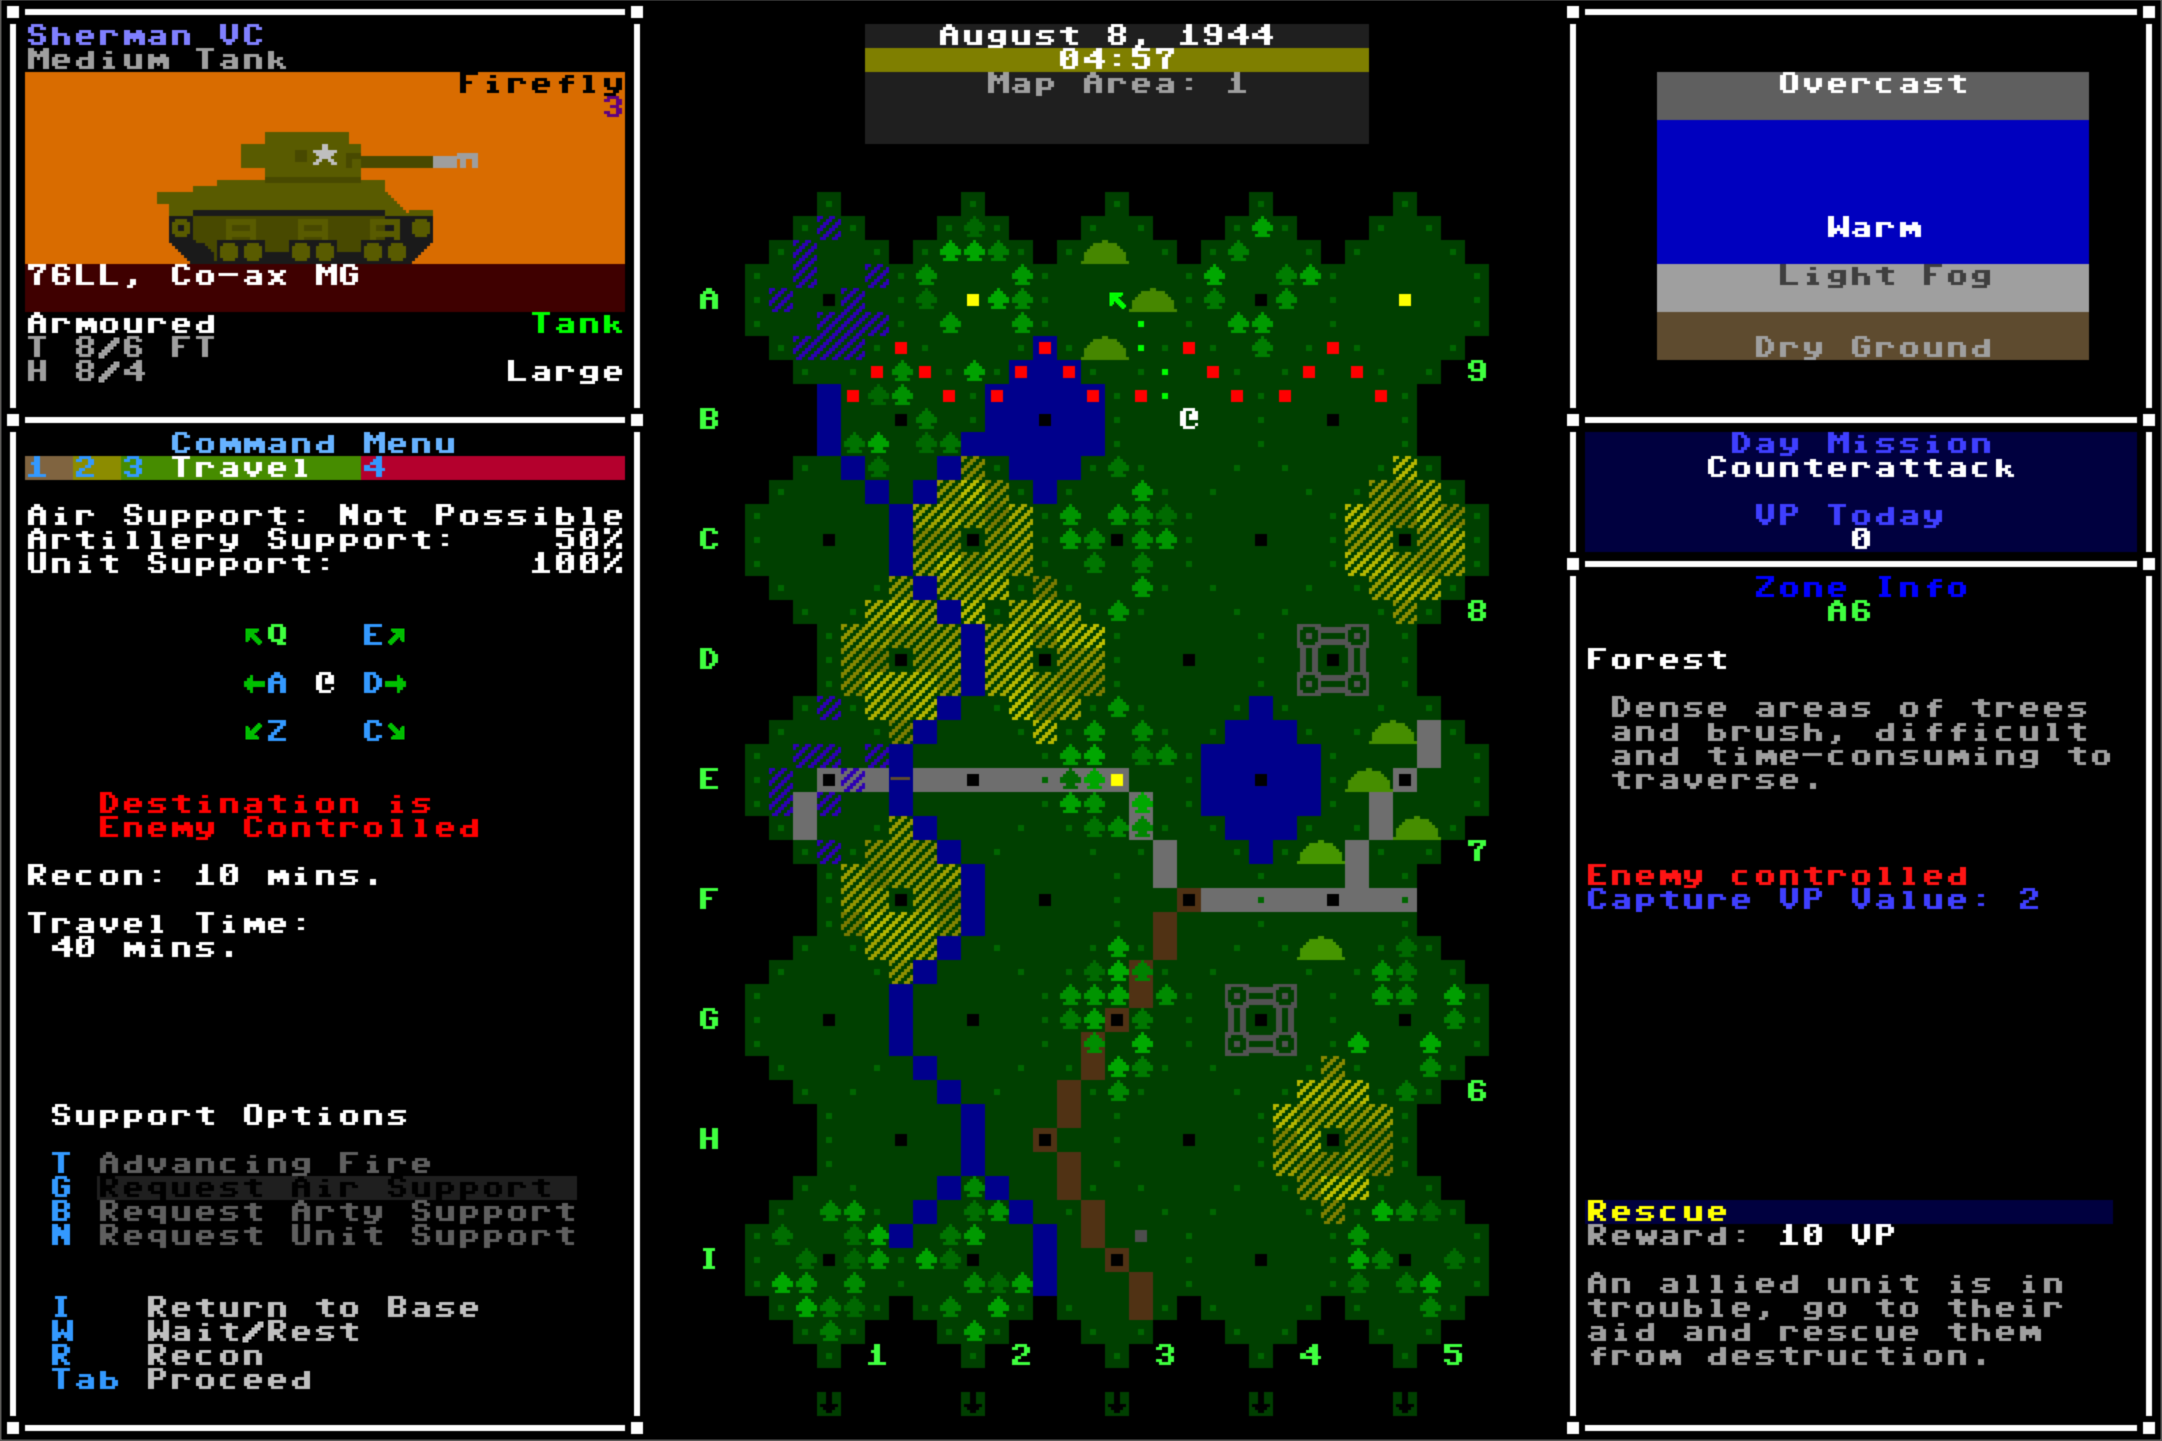
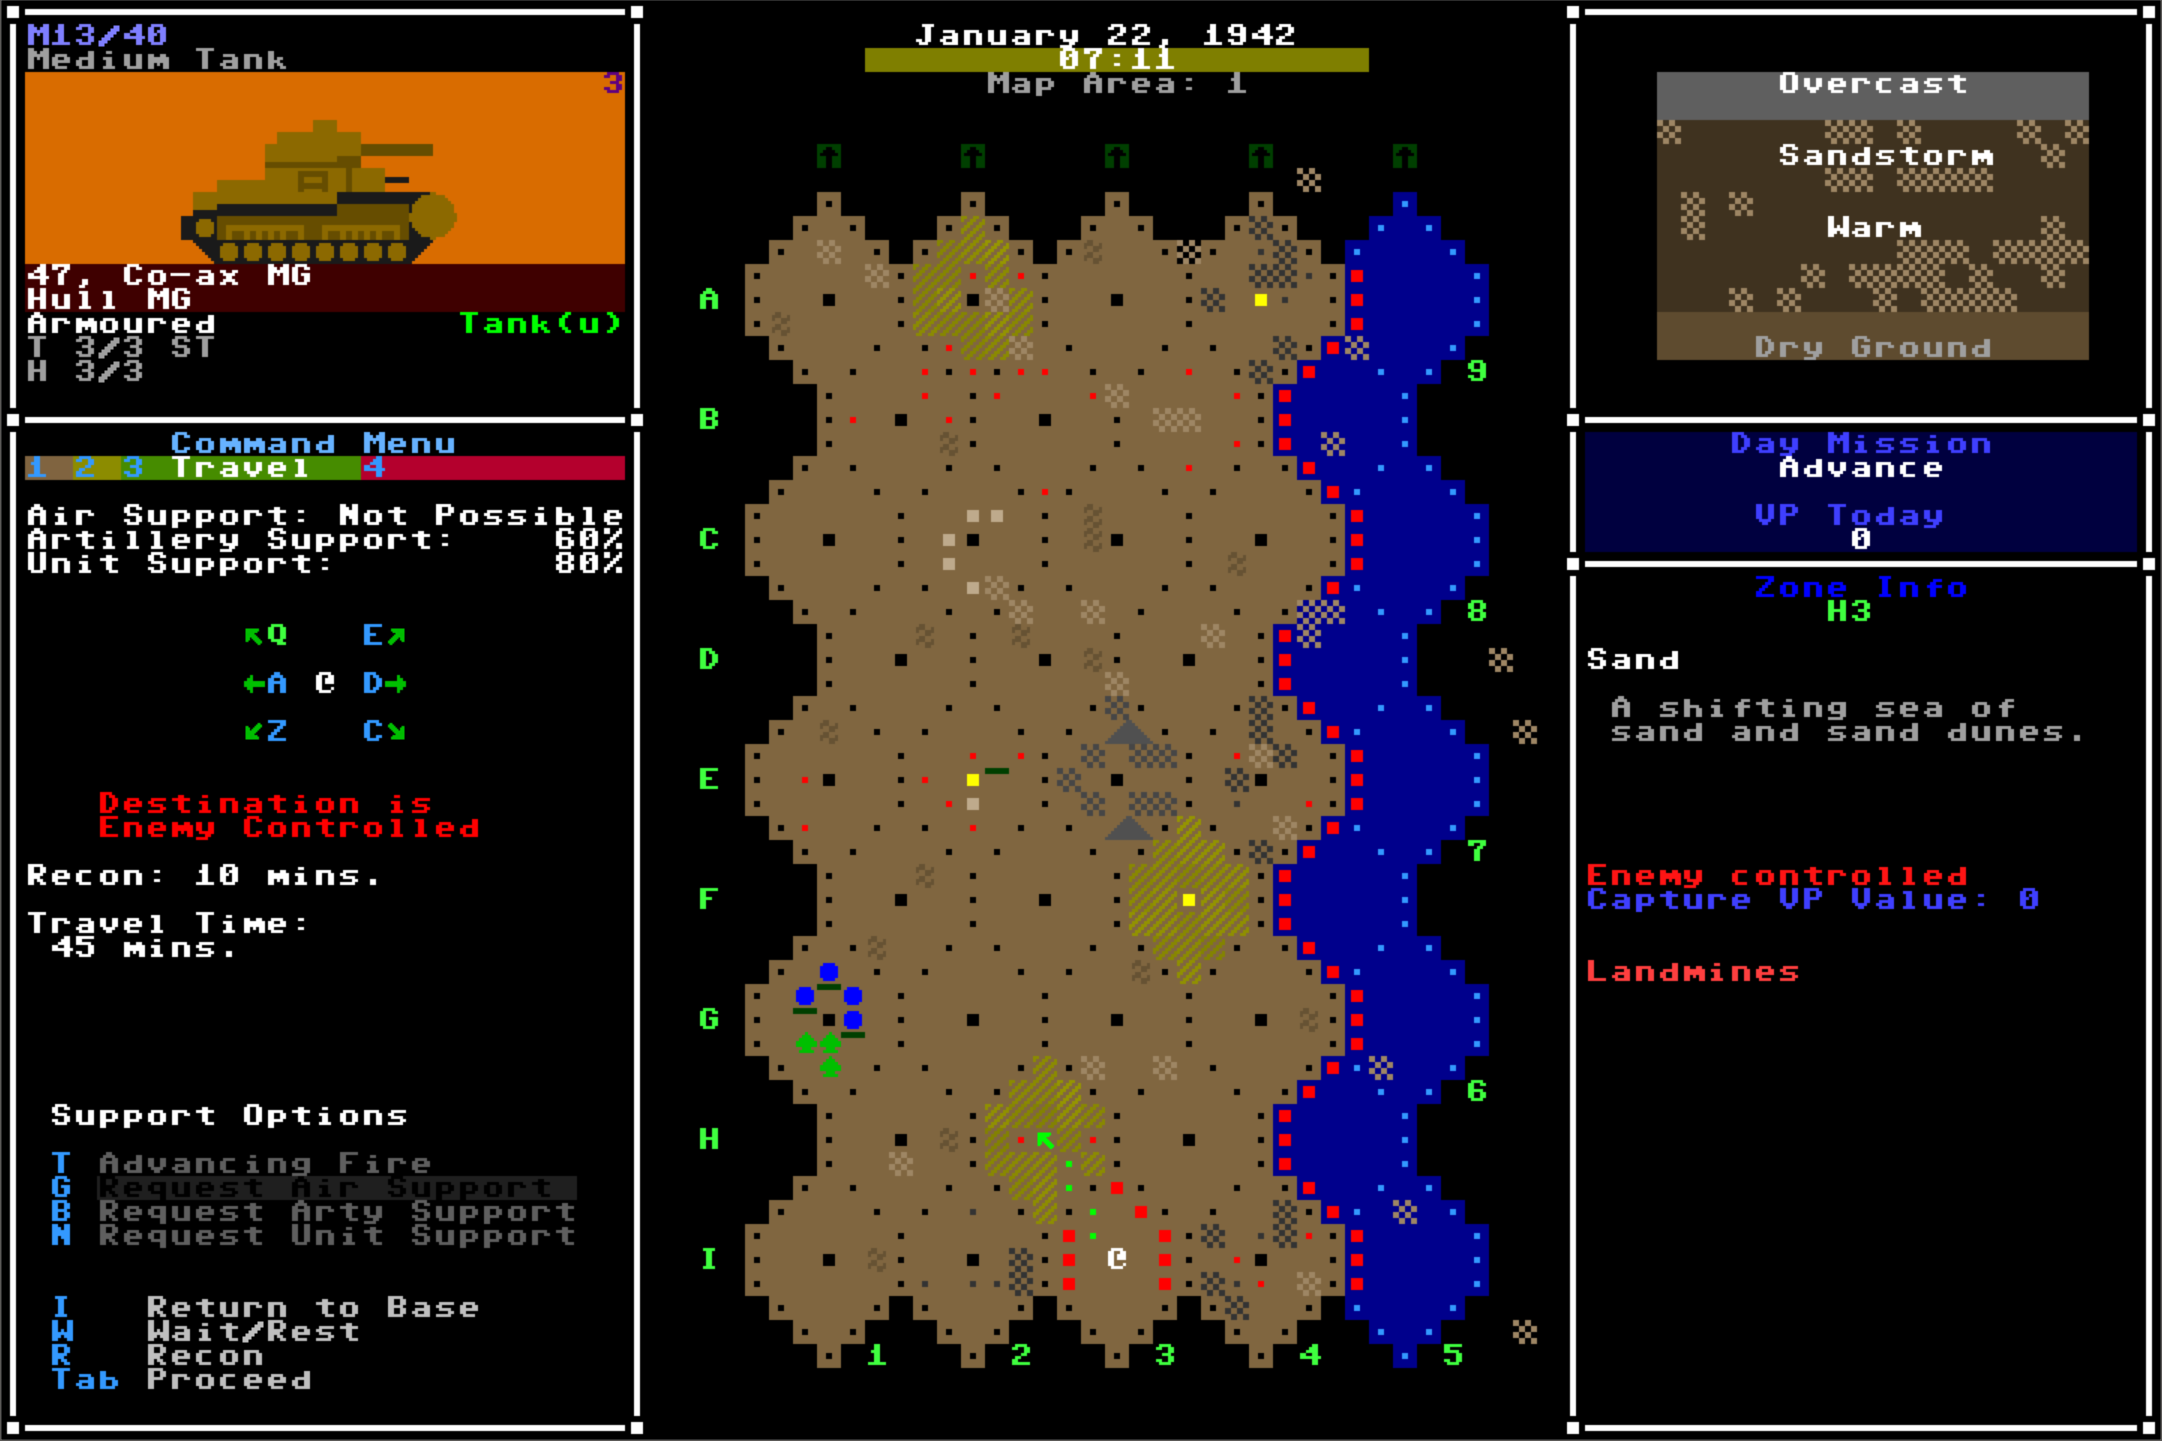
In this layer you lead your tank and squad across a terrain map of hex zones. Information on your own tank is displayed in the upper left of the screen, and several tabs of commands appear in the lower left. Current environmental and ground conditions are displayed in the upper right, campaign and day mission information on the middle right, and hovering the mouse cursor over any map zone will display information about it in the lower right of the screen. The current date and time appear at the top of the screen. The remaining daylight and time of the current combat day is indicated by the bar behind the time display, which fills up as the day progresses.
Each area of the campaign day map is made up of 41 hex zones, each of which are randomly generated as one of random terrain type, based on the Region in which your campaign is set. Campaigns taking place in North Africa, for example, will look very different to those taking place in the Nordic region. Urban missions will also look quite different. The terrain type of a hex zone determines the time required to travel into it, as well as the possible terrain for units on the scenario layer if a battle occurs there.
Dark brown and light grey lines joining hex zones are roads; travel along roads is usually faster than cross-country. Dark-brown lines are dirt roads and grey lines are improved/stone roads; improved roads are slightly faster to travel along than dirt roads. Dark blue lines along the edges of hex zones are rivers; these will take additional time to cross unless there is a bridge or ford that can be crossed, indicated by a dark brown cell with three horizontal lines. Some types of hex zone terrain are impassible to you, such as ocean and mountain zones.
In most missions, if you reach the top or bottom hex row (indicated by a row of arrows), a new map area will be generated and the map view will shift to it. For some missions you won’t be able to move off the current map area.
Each hex zone is either friendly-controlled, enemy-controlled, or neutral territory. The front line between friendly and enemy-held or neutral territory is indicated by a red dotted line. Any time you move into a zone that has an enemy presence, there’s the potential for a battle. Odds of a battle are higher if enemy strength is higher in that zone. In the desert and in urban maps, enemy forces may be present even in friendly-held zones, since the front lines are less clearly defined in these situations.
Throughout the day, zones may be captured by either side; if you advance into an enemy-held zone and either encounter no resistance or you encounter resistance and win the ensuing battle, you will capture the zone and gain Victory Points. If you wait in place and your zone is attacked by the enemy, a battle will be triggered. Neutral zones cannot be captured by either side.
Control of the map zones has an important impact on your ability to resupply. If you cannot draw an unbroken path to the bottom edge of the map through neutral or friendly-controlled zones, you will not be able to be resupplied.
Four menu tabs are available in the command menu:
- Supply: Here you can view the stats of your tank’s main gun, and manage the contents of the Ready Rack. From here you can also Request Resupply which, if granted, allows you to replenish main gun ammo, will remove any dead crewmen, and will allow your crewmen to rest and perhaps lose some Fatigue.
- Crew: Displays a list of current crewmen in your tank. From here you can open the crew menu for any of them, switch positions if needed, and open/close their hatch if they have one.
- Travel: In this menu you can select a direction from your current location, and either request reconnaissance information about an adjacent enemy-held hex, or travel to an adjacent hex. Recon will tell you what types of enemies to expect in a given zone, but this report may not be accurate. Before moving, you can toggle advancing fire and air/artillery/unit support requests on and off. Advancing fire uses up HE ammo but if a battle encounter is triggered, it has the chance of pinning enemy units before combat begins. You can also Wait in place, but there’s a possibility that enemy forces may attack your hex.
- Squad: Lists any current members of your tank squadron. These tanks will fight alongside you on the scenario layer. You can set their default combat orders from this tab as well.
The combat day ends when you abandon your tank, or you reach the end of the combat day as indicated by the background of the time display in the top centre of the screen.
6.01 Air, Artillery, and Unit Support
Depending on the campaign and the campaign week definitions, you may have a certain level of air, artillery, and/or unit support for the day. This represents ground-attack aircraft, artillery batteries, and friendly combat units that you can contact via radio and request their support. In the Travel menu tab you can toggle air, artillery, and/or unit support. This support is indicated as a percentage from 0-100%.
If you’ve requested support and move into a neutral or enemy-held zone, a silent roll will be made against the current support level. If it’s successful, that support will be made available to you, and your support level will be reduced by a small amount. If you don’t end up finding and enemy resistance, that support is lost.
Note that air support cannot be requested if the cloud cover is Overcast, if there is any fog, or if there is currently a Sandstorm. Unit support can be requested before waiting in place; if you are attacked in your own zone, the support request will be resolved.
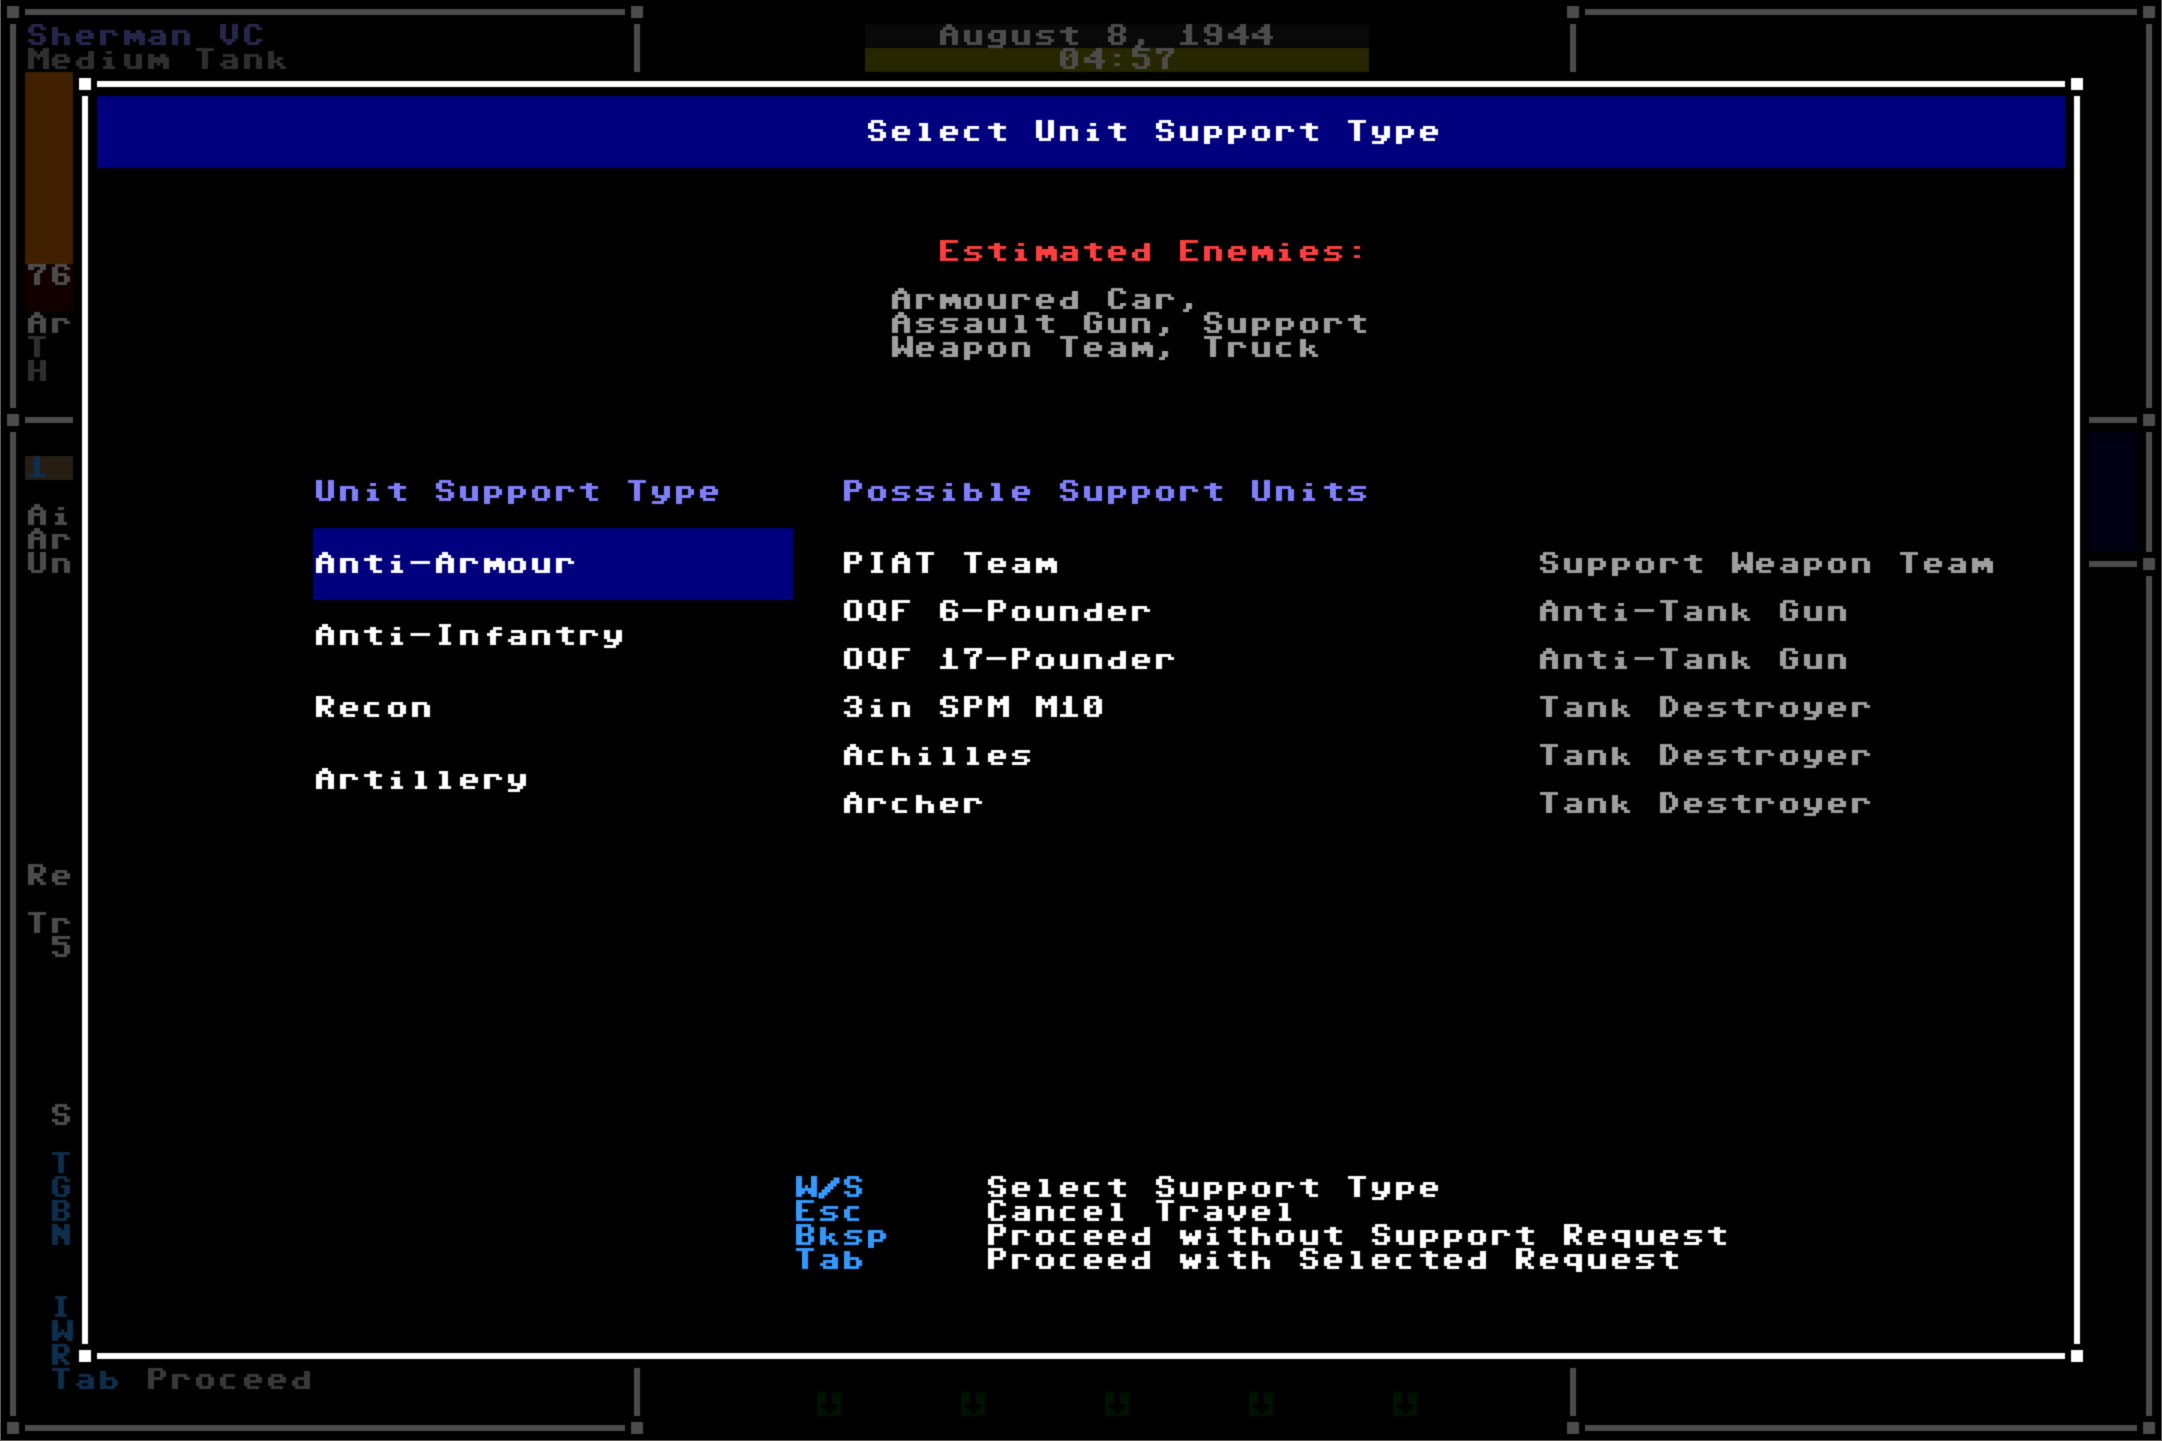
If you request unit support, before you wait in place or move into a new zone, you will be shown a menu of possible unit support categories. The actual units that may arrive will be randomly selected from the list of the category that you choose.
If an air and/or artillery support request is granted and you encounter enemy resistance in a zone, at the start of the ensuing battle, your supporting forces will automatically attempt to attack. Air and artillery attacks can be very effective, sometimes destroying enemy units even before you can spot them. They can also often spot enemy units and communicate their identity to you. If unit support is granted, a random number and type of friendly units from the category selected will be spawned at the start of the battle.
7. The Scenario Layer
Once you encounter enemy resistance on the Campaign Day map, or if you wait in place and are attacked, gameplay shifts to the Scenario layer where battles take place.
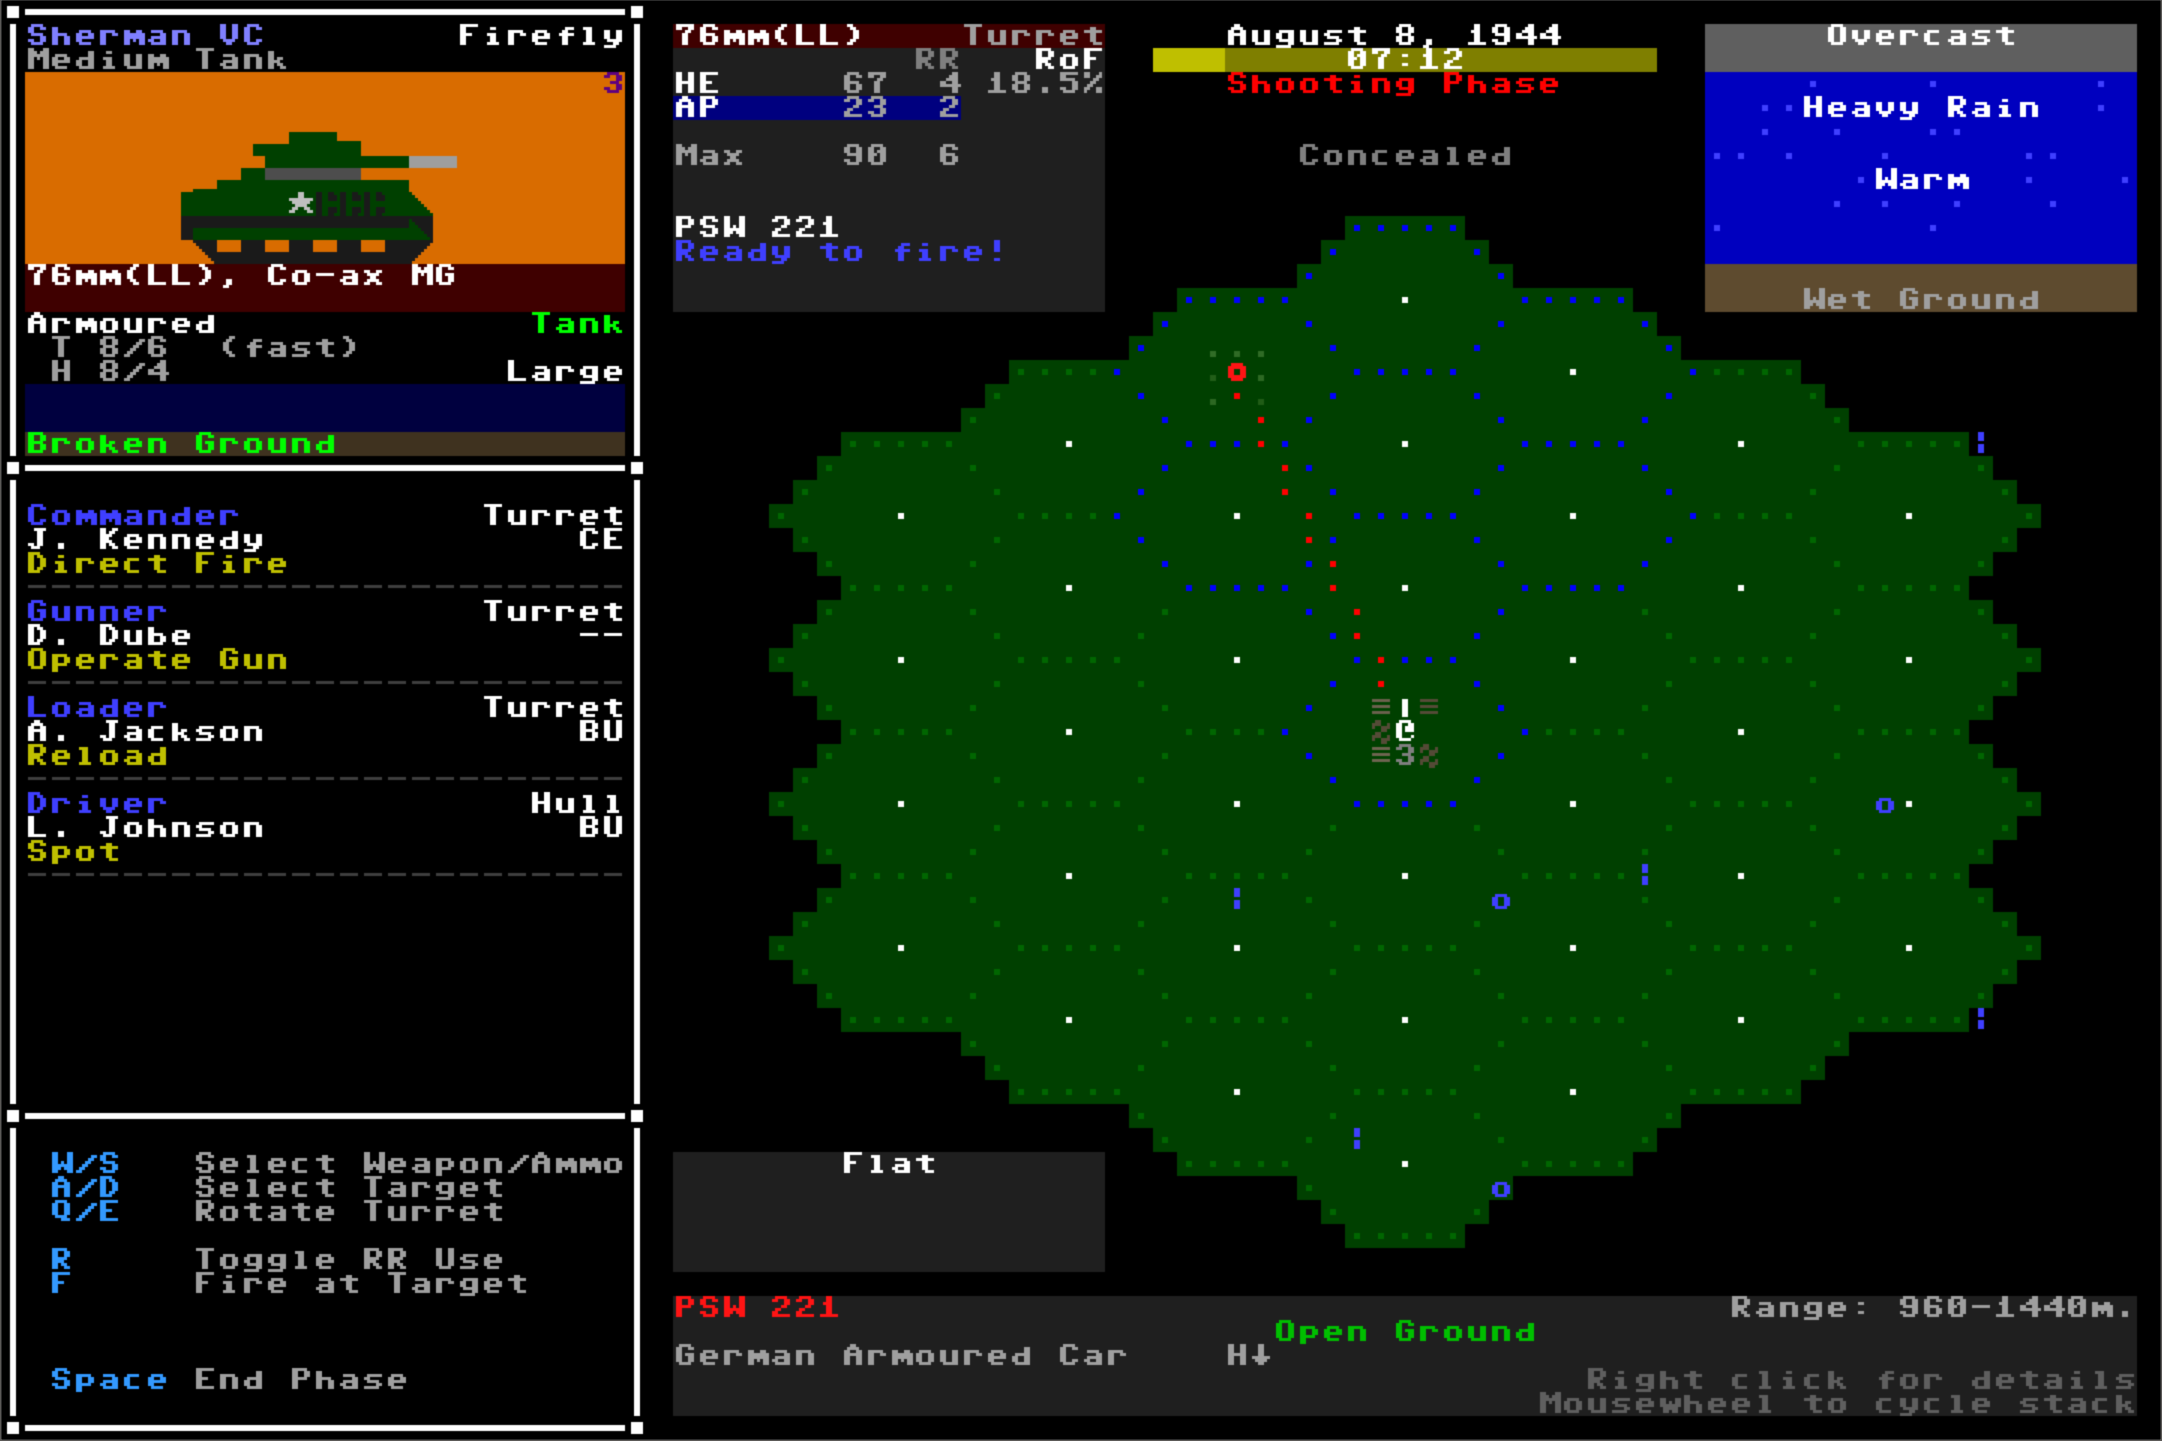
On the right of the scenario interface is the Scenario Map, made up of 36 hexes arranged in 3 rings surrounding a central hex. The map represents, in an abstract way, all terrain in a 1,440 meter radius around you. Your tank, represented in traditional roguelike fashion by the @ character, is located in the centre of the map with the front of your hull facing upward. Your turret facing is indicated by the line extended outward from the @ character. All other infantry, gun, vehicle, etc. units on the map are displayed from your point of view, so if you pivot your tank counter-clockwise, units will appear to rotate clockwise around the map. Likewise, if you move into a new map hex, all other units will shift around you.
Note that if there is a number displayed in a map hex, that means that there are 2 or more units stacked within the same hex. You can cycle the order of this stack by hovering the mouse cursor over the hex and scrolling with the mouse wheel. In the Game Options there is an option to display unit stacks spread out, so that the top three units are all displayed separately. Hovering your mouse cursor over any map hex will display its info, and that of the top unit in the stack if any, just below the map.
Remember that the map is an abstract representation of a real battlefield. Thus, the actual position of any infantry squad or tank on the map can be imagined to be somewhere within the hex depicted on the map. Similarly, although it appears to be a flat plain, the map can be imagined to be filled with hills, rivers, buildings, and others types of terrain. Thus, each pair of units on the map may or may not have a clear Line of Sight between them, dictated by the distance between them and the terrain they are currently in. If you do not have LoS to an enemy unit, neither can attack the other. Every time a unit moves or repositions, a new LoS is generated between it and every other unit on the map. You always have a clear LoS to units within your own squad, but each of them has a separate perspective on the battlefield. That means that a tank in your squad may have LoS to an enemy unit, whereas your own tank does not. Information about spotted enemy units is shared within your squad, so you might find that an enemy that is out of LoS for you is still spotted by a squadmate. You will have to still move or reposition, however, and get into a position where you have LoS on it, if you want to attack it.
Above and to the left of the scenario map is the Contextual Console, which displays different information depending on the current phase. Above and to the right is the Environmental Conditions console, which displays information about current weather conditions.
7.1 Scenario Phases Part 1
Play on the Scenario Layer proceeds though a series of Phases, each one of which either allows the player to perform certain actions, or allows allied and enemy AI units to act. Each set of phases makes up a game turn, which takes 2 minutes of in-game time to resolve.
Command Phase
In this phase you can open and close the hatch for each crewman that has one, and you can assign one command to each of your tank crew that is neither unconscious nor dead. Each command will allow the crewman to do different types of tasks in the remainder of the turn. The current field of view for your crewman is highlighted on the scenario map in blue; different hatch statuses and commands will result in different areas of the map where your crewman can spot in the following phase. Descriptions for each command are displayed in the Contextual Console.
Note that some commands will only become available when certain conditions are met; for example, you can only abandon your tank if it is immobilized or if you have 1+ crewmen who have been seriously injured. Some commands are only available to crewmen who have open or closed hatches; the list of available commands will dynamically be updated if you change your crewman’s hatch status. You can also access the Crewman menu for each crewman during this phase.
Spotting Phase
During this phase no input is required from the player; any crewman who can do so will automatically try to spot any hidden enemy unit in his line of sight. If an enemy unit is spotted, its identity will be displayed in a pop-up message. Early in a battle it can be helpful to open crew hatches and have crewmen on spotting orders, so that you can quickly assess what the possible enemy threat is like, before then “buttoning up” for combat.
Crew Action Phase
Certain crew commands require additional input or will result in automatic actions during this phase. For example, a Gunner can manage his Ready Rack, moving shells into or out of it, or the Commander might throw a smoke grenade, providing some concealment for your tank. You will need to select a crewman in order to see possible actions associated with his current command.
Movement Phase
If your Driver is on the “Drive” command, then in this phase you can attempt to move your tank. The Driver can attempt to drive the tank forward or backward, pivot the hull, reposition, or attempt to move into a Hull Down position.
Pivot Hull
The driver is free to pivot the tank hull to face any direction, without ending the Movement Phase. As you pivot, your relative facing on the map remains the same; instead, all other units on the map are rotated relative to your direction of pivot.
Forward and Backward Movement
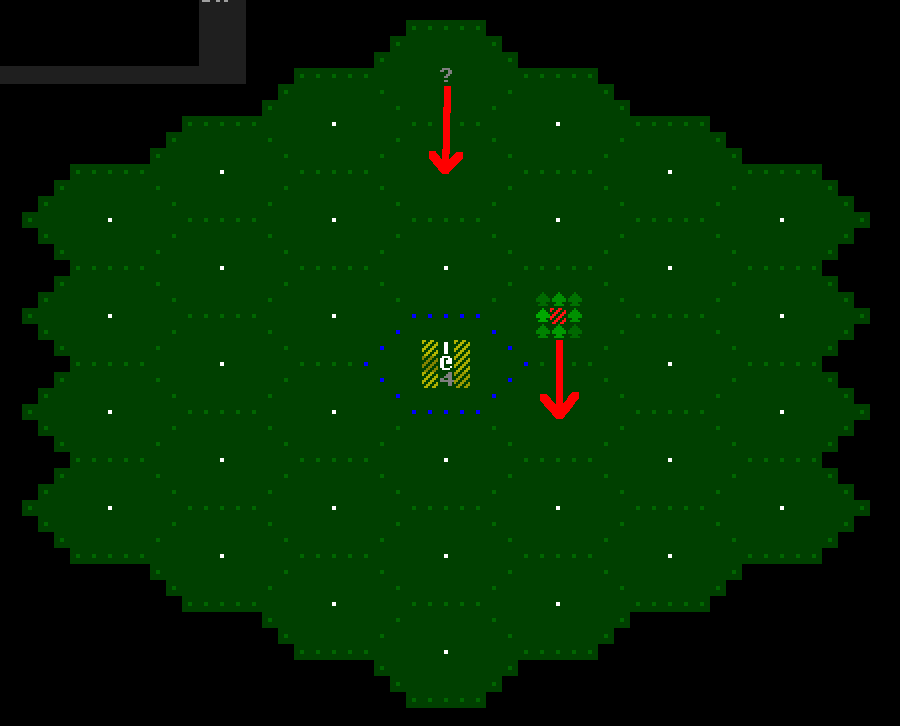
Since the battlefield is represented in a very abstract way, doing a move action will sometimes be successful, other times not. The odds of your tank moving far enough to shift the relative position of enemy units is displayed in the upper left console. Each failed attempt will increase the chance of a successful move in subsequent Movement Phases. If a move action is successful, your tank will remain in the same location on the map, but every other unit on the map (other than your squadmates, who always stay by your side) will shift position.
For example, in the image above, if the player completes a successful Move Forward action, then the unknown unit and enemy infantry unit will all shift downward one hex. The exception is if there is a unit directly in front of the player, in which case they leapfrog over the player and end up behind (the player moves past them and keeps going.) Reverse move actions would have the opposite effect. If an enemy unit would normally be pushed off the scenario map by a player move, they will stay in relative place instead. Enemy units can only move off the scenario map of their own accord.
Movement Chances
The chances of a successful forward or backward move action are determined by the following:
- Movement class of your tank
- Powerful Engine and/or HVSS
- Current terrain and ground conditions
- Light/Heavy ground pressure of your tank
- Bonus from a previous failed attempt in the same direction
- Commander on Direct Movement command
- Driver skills
Hull Down
When starting a scenario and after a move action, the player may find themselves in a Hull Down position in one direction. This means that a hill or other large solid object is covering their hull from that direction. Any incoming attacks that would have affected the Hull coming from that direction will instead have no effect. The Driver can try to get the tank into a HD position in the forward direction with the Attempt HD action.
Reposition
If you want to move your tank into a different types of terrain, or want to try to change your Line of Sight to enemy units, you can have your Driver reposition you tank. You won’t cause a shift in enemy unit positions, but a new terrain type, HD status, and LoS will be generated for your tank.
Overrun
If your driver is on an Overrun command, your squad will move close to the hex immediately ahead of you, allowing you to attack them at very close range with MG weapons. Note that this command only becomes available if there are one or more gun or infantry units directly ahead of your location. While on an Overrun command, your squad counts as moving, but there are no movement penalties to MG attacks. Note that this command will only appear if there are 1 or more enemy infantry or gun units directly ahead of you at the start of the turn.
Bogging Down
If the player’s tank becomes bogged down, then the Driver must successfully unbog the tank in a subsequent Movement Phase before the tank can move again. Surviving player tanks are automatically unbogged at the end of a scenario.
7.2 Scenario Phases Part 2
Shooting Phase
During the Command Phase, one or more crewmen can be commanded to operate one of the tank’s weapons, which they can then do during the Shooting Phase. Most player tanks will have a gun as its main weapon, which can usually fire High Explosive (HE) rounds, Armour-Piercing (AP) rounds, and later in the war, Smoke rounds.
Gun Stats
Guns are defined by their calibre, with larger-calibre guns producing more of an effect on both soft and armoured targets, and usually being better at long range as well. Guns can be short, long, or very long-barrelled, indicated by an ‘S’, ‘L’, or ‘LL’ following their calibre in millimetres. The loader for each gun normally has access to a Ready Rack of ammo nearby, use of which makes it faster to reload the gun. Guns will also normally have an innate Rate of Fire chance, which indicates the odds of reloading the gun fast enough to allow two or even more shots per shooting phase. Use of the Ready Rack, as well as crew skills, can greatly increase these odds.
Machine Guns (MGs)
Most player tanks and many other vehicles have one or more machine gun (MG) weapons. Note that coaxial MGs, mounted next to a gun barrel, cannot fire in the same phase as the gun fires, and vice-versa. MGs are only effective against soft targets and unarmoured vehicles; at present (Verion 5.2) they have no effect on armoured enemy targets. MGs have chance to maintain RoF for additional attacks in the same phase.
Rate of Fire (RoF)
You and your allies can maintain RoF, and if you have enabled the campaign option, so can enemy units. RoF means that a weapon will be able to fire two or more times during a single phase. The game will do a hidden check after every attack, hit or miss, and if it passes you will have the option of firing again at the same target. You won’t know the outcome of your attacks until the phase is over, however.
Several factors influence the final chance of maintaining RoF. The chance can be modified several times to reach the final odds:
- if the weapon is a Gun and the unit moved that turn, no RoF is possible
- if the weapon is a Gun and no more ammo of the given type is available, no RoF is possible
- many weapons will have a set base RoF chance, otherwise 5% is the default
- if the weapon is a Gun and calibre is between 15mm and 40mm, RoF chance is doubled
- if the weapon is turret-mounted and the turret was rotated this turn, RoF chance is halved (or multiplied by 0.75 if it’s a fast traverse turret)
- if the weapon is hull-mounted and the hull was pivoted this turn, RoF chance is halved (or multiplied by 0.75 if it’s a gun on a turntable)
- if there is a dedicated Loader position and the position is empty or the Loader is not Reloading, RoF is chance is halved
- if the weapon is a Gun and the Ready Rack is not in use, RoF chance is halved
Finally, crew skills and campaign skills can apply a modifier to the RoF chance. If the weapon is a gun, the minimum RoF while using the Ready Rack is 5%, otherwise it’s 2.5%. The RoF chance cannot be reduced to below 0%, nor improved beyond 85%.
Effect on Enemy Targets
Enemy targets hit with HE or machine guns will have Firepower applied to them; an abstract measure of incoming fire. Firepower stacks from different attacks and is resolved at the end of each phase, so a unit hit by a bomb from an HE shell as well as MG fire will have a large amount of firepower to resolve at the end of the opposing side’s phase. Higher total firepower values increase the chance that the unit will be destroyed, its soldiers killed, wounded, or routed from the battlefield.
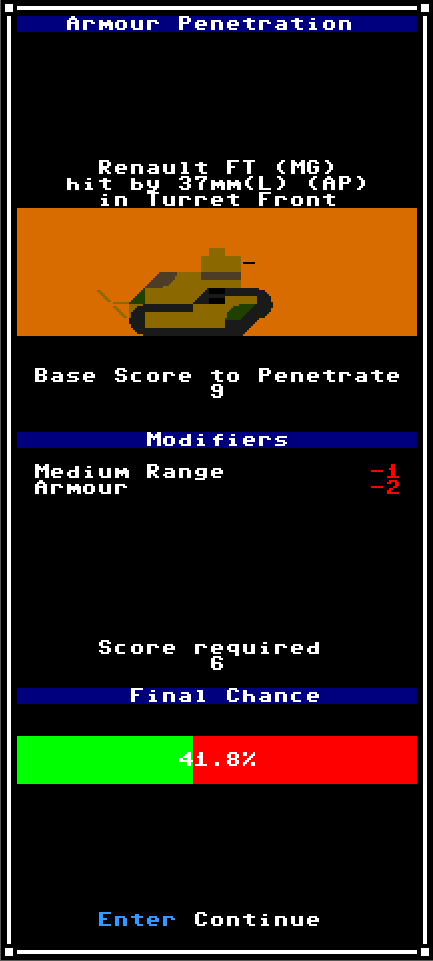
Armoured targets hit with AP will undergo an Armour Penetration check immediately after each hit.
The chance of the hit penetrating the target armour depends on the gun calibre, barrel length, distance from target, and thickness of target armour on the location hit. Especially powerful guns will automatically penetrate all but the thickest armour, as shown here. Enemy armoured targets that are penetrated are destroyed.
Allied Action Phase
During this phase any other tanks in your squad will attack enemy targets automatically.
Enemy Action Phase
During this phase enemy units will move around the map, and may attack you or your squadmates.
8. Bailing Out
Sooner or later, your vehicle will be knocked out, and your surviving crew will have to bail out of the destroyed vehicle. The bail-out sequence is a separate part of the game from the usual layers. You cannot save your campaign during bail-out, you will need to complete the sequence first before being returned to the Campaign Calendar layer. The goal in bailing out is to get all your surviving crewmen to safety, but smoke, fire, hatches, and enemy units all complicate things.
8.1 The Bailout Procedure
Bailing out lasts for up to 10 rounds. In each round, the status of your vehicle and crew is updated, enemy units have a chance to fire harassing fire at you, and each crewman who is alive and not unconscious has a chance to act.
Right away the effects of the hit that knocked out your tank are resolved. If you are unlucky, then it’s possible that the hit ignites fuel or ammo held on board, resulting in a massive explosion that may further injure or even kill your crew. The interior of your vehicle may catch on fire, risking further injury to any crewmen still inside. Finally there can be smoke inside or around your vehicle. Interior smoke makes actions inside the vehicle more difficult, which smoke outside the vehicle reduces the effect of incoming firepower.
If at any time all surviving crew have moved to a safe location, or all your crew are dead, the bailout sequence will end. Otherwise you have 10 rounds to save your crew.
8.2 Bailout Actions
Live, conscious crewmen will have a number of actions available to them in each round. The list of possible actions will depend on whether they are inside the vehicle, on its exterior, or in a safe location.
- None : Do no action this round
- Return to Vehicle: Move from a safe location back to the vehicle exterior.
- Move to Safe Location : Move from the vehicle exterior to a safe location, away from enemy units.
- Covering Fire: Use small arms to fire at nearby enemy units, decreasing the chance of them firing at your vehicle and exposed crew.
- Aid Crewmen Bailing Out: Help any crewmen attempting to bail out from the vehicle, increasing the chance of their success.
- Rescue Unconscious Crewman: ‘Pull an unconscious crewman out of the vehicle, either through an open hatch or an open top.
- Carry Unconscious Crewman to Safety: Move with an unconscious crewman to a safe location, away from enemy units.
- Open Hatch: Attempt to open the hatch in this position.
- Throw Smoke Grenade: Throw a smoke grenade, giving your vehicle some cover from incoming attacks.
- Push Unconscious Crewman Out: Move an unconscious crewman in the same location out of the vehicle, through an open hatch or open top.
- Swap Positions: Swap positions with a dead or unconscious crewman.
- Move Unconscious Crewman: Move an unconscious crewman to another, empty position within the vehicle.
- Bail Out: Leave the vehicle. Depending on the crew position, there may options to do so through an open top, through a hatch or large hatch, or through a hatch in a nearby position.
- Go to Position: Move to another position within the vehicle.
- Aid Fellow Crewmen: Give first aid to other crewmen in the same location, increasing their chances of recovering from a negative condition.
A. Modding Guide
Armoured Commander II allows certain elements of the game to be freely modded. Unit definitions, portraits, campaigns, and sound effects can all be modded. This is a brief guide to how mods have to be organized so that the game can recognize and load them correctly.
A1 – General Guidelines
All mods need to be located in their own folder within the /mods folder:
{steam folder}/steamapps/common/Armoured Commander II/mods
There will already be a folder there called example_mod, which is never loaded by the game; instead it provides an example of how mod files should be organized. To create a new mod, create a new folder in /mods.
Mod files will either be JSON, XP, or OGG files.
- JSON is a standard format, and many text editors have built-in syntax checkers.
- XP files store ASCII art; to edit these, you will need to download the free editor REXPaint – [gridsagegames.com]
- OGG files store sound; Audacity – [audacityteam.org] is a popular free program to record and edit sound, and can export OGG files.
Different elements of the mod need to be stored in different subfolders within your mod’s folder:
- Custom campaigns should be stored as JSON files in /mods/{your_mod}/campaigns
- Custom sounds should be stored as OGG files in /mods/{your_mod}/sounds
- Custom unit portraits should be stored as XP files in /mods/{your_mod}/unit_portraits, which itself can contain subfolders for different categories of variant portraits
- Custom unit definitions should be stored as one or more JSON files in /mods/{your_mod}/units
Hope you enjoy the post for Armoured Commander II User Manual Guide and Basic Game Information, If you think we should update the post or something is wrong please let us know via comment and we will fix it how fast as possible! Thank you and have a great day!
- Check All Armoured Commander II Posts List


Leave a Reply